When the Blender viewport is slow: check face count, turn off modifiers, then use Simplify
When Blender feels slow and laggy, check these settings inside Blender before you blame your hardware. Read the face count with Statistics, lower the Subdivision Levels Viewport and modifier display, then use Simplify, the shading mode, Display As and the Outliner toggles to make the 3D Viewport lighter.
한국어English
ON THIS PAGE
- 011. See the face count: Statistics overlay and status bar
- 022. Lower Levels Viewport on Subdivision Surface
- 033. Turn off a modifier in the viewport: the monitor icon
- 044. Lower the whole scene at once with Simplify
- 055. Shading mode: work in Solid
- 066. Draw heavy objects simply: Display As
- 077. Hiding versus switching off: eye icon, monitor icon, checkbox
- 088. The checks at a glance
- 099. Practice
- 1010. Common mistakes and fixes
- 11Summary
- 12References
Based on: Blender 5.2 LTS (English interface, default shortcuts). Checked in November 2026. The pictures are real Blender 5.2.1 screenshots already used in other Blender guides on this site, plus a diagram drawn for this guide. The steps follow the official Blender 5.2 manual and the default keymap. The red numbers and boxes were added to explain them.
When a Blender scene grows, the view can start to stutter as you orbit, and objects lag behind the mouse when you move them. It is easy to blame the graphics card or the memory first. But when you are new to Blender, the slowdown often comes from a few settings inside Blender.
This guide covers only what to check inside Blender before you change any hardware. The order is see the face count → lower the smoothing modifier → lower everything at once (Simplify) → shading mode → draw heavy objects simply, or switch them off. It is like pulling a heavy cart: weigh what is heavy, take off the heaviest load, then set the rest aside for a while.
After this guide you can:
- Read the face count with the Statistics overlay and the status bar.
- Lower Levels Viewport on Subdivision Surface so only the view gets lighter.
- Turn off a modifier's viewport display (the monitor icon).
- Lower the subdivision level of the whole scene at once with Simplify.
- Use the shading mode, Display As and Outliner toggles to draw heavy objects simply or leave them out.
Before you start: This guide covers settings inside Blender only. How to see which part of your computer is busy with Task Manager, power modes, and what to upgrade first are in Finding your computer's bottleneck. For graphics card memory see What VRAM means, and for slowdowns after long use see Heat and thermal throttling.
1. See the face count: Statistics overlay and status bar
To find why a scene is slow, first find out how many faces it has. A face is one of the small flat pieces that make up an object's surface. The more faces, the more the graphics card has to draw at once. Think of the tiles in a mosaic: more tiles make a finer picture, but take longer to lay.
Starting point: Open the scene that is slow. If you do not have one, start from the default cube in a new file (File > New > General).
Steps:
- In the right part of the 3D Viewport header, click the small down arrow next to the overlay button (the arrow on the right of ② in Figure 1).
- In the Viewport Overlays popover, turn on Statistics.
- Numbers such as Objects, Vertices, Edges, Faces and Triangles appear under the text in the top left of the 3D Viewport.
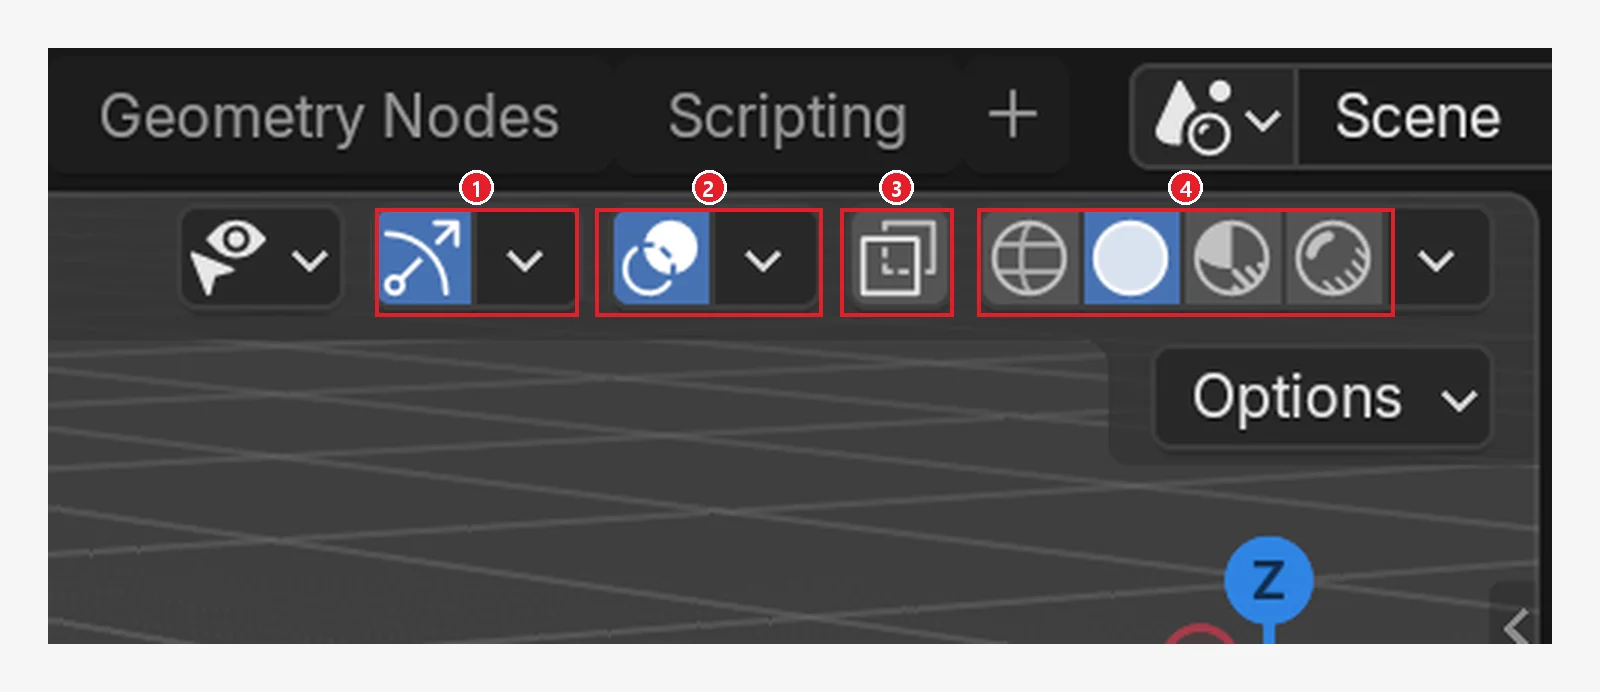 Figure 1. Right side of the 3D Viewport header. ① Gizmos ② Overlays (the arrow next to it opens Viewport Overlays) ③ X-ray ④ the four shading modes (Blender screenshot)
The Statistics numbers depend on the selection. When you select one object, its own numbers are shown too. Use them to tell whether the whole scene is heavy or just one object.
You can also keep the same numbers in the status bar at the bottom of the window. Open Edit > Preferences, go to Interface > Editors > Status Bar and turn on Scene Statistics. In the same place, System Memory and Video Memory show how much computer memory and graphics card memory Blender is using. In section 2, ③ at the bottom of Figure 4 is a status bar with scene statistics turned on.
Where the weight comes from: If one object has hundreds of thousands of faces, look at that object first. Most of the time the cause is a modifier that adds faces, such as Subdivision Surface in section 2. A modifier is a filter that changes the shape and keeps the original. If modifiers are new to you, read Beginner chapter 7 first.
2. Lower Levels Viewport on Subdivision Surface
The Subdivision Surface modifier makes a blocky model smooth. Its panel is labeled Subdivision. Each time you raise the level by one, every four-sided face is split into four. So the face count goes up four times per level.
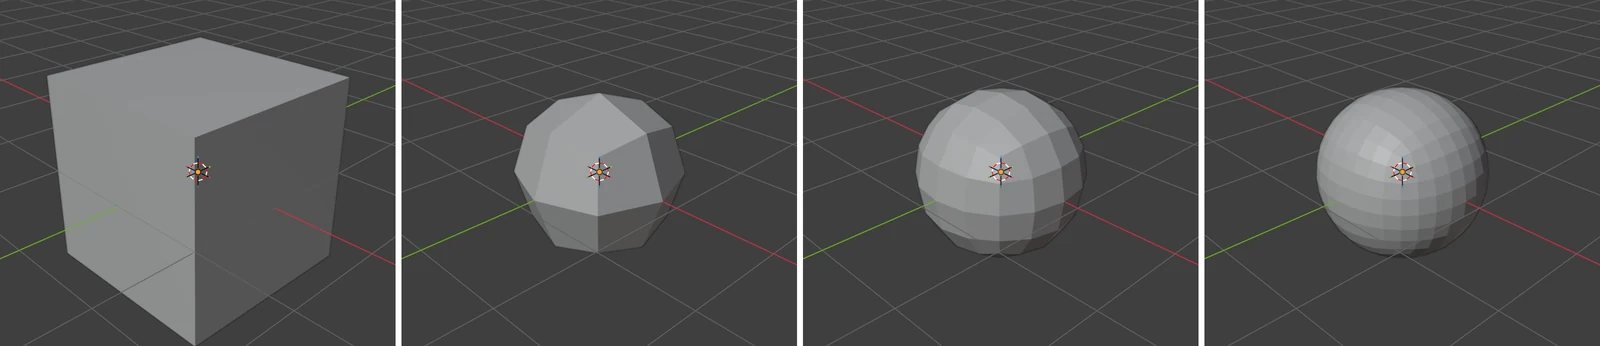 Figure 2. The default cube with Subdivision Surface at levels 0, 1, 2 and 3 (Blender screenshot)
A cube has only 6 faces, so even level 3 gives just 384. A model with 10,000 faces is a different story. Figure 3 is a diagram of the face count per level for a model made of 10,000 four-sided faces. Level 3 gives 640,000 faces and level 4 gives 2,560,000.
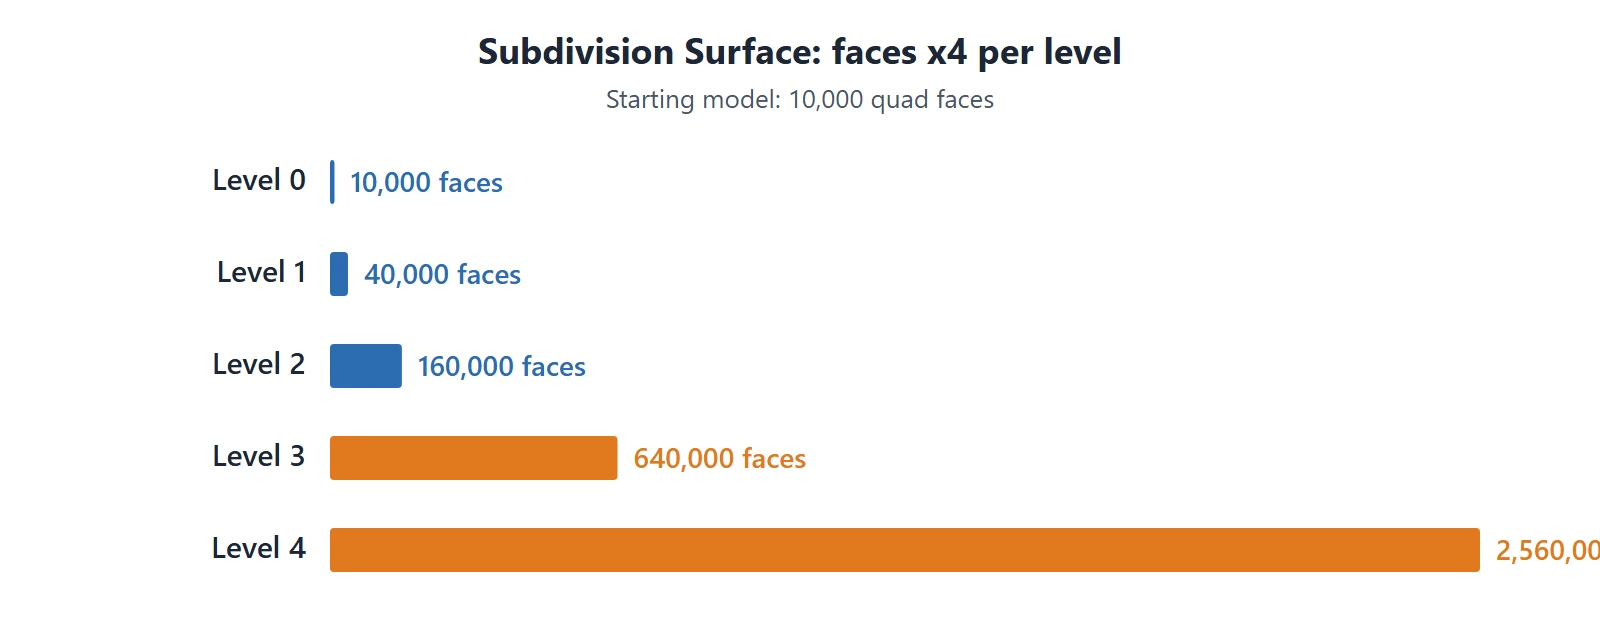 Figure 3. Face count per level when Subdivision Surface is added to a model of 10,000 four-sided faces. Four times per level (diagram)
This modifier has two level fields. Levels Viewport is the level you see in the 3D Viewport. Render is the level used when you render with F12. Keep Viewport low while you work and Render high, and you get a light view and a smooth result.
Starting point: Continue from the scene where you turned on Statistics in section 1. Select an object that has Subdivision Surface.
Steps:
- Open the Modifier tab (wrench icon) in the Properties editor.
- In the Subdivision panel, lower Levels Viewport to
1or0(① in Figure 4). - Leave Render as it is (② in Figure 4). The render result does not change.
- Check that the Faces number in Statistics went down.
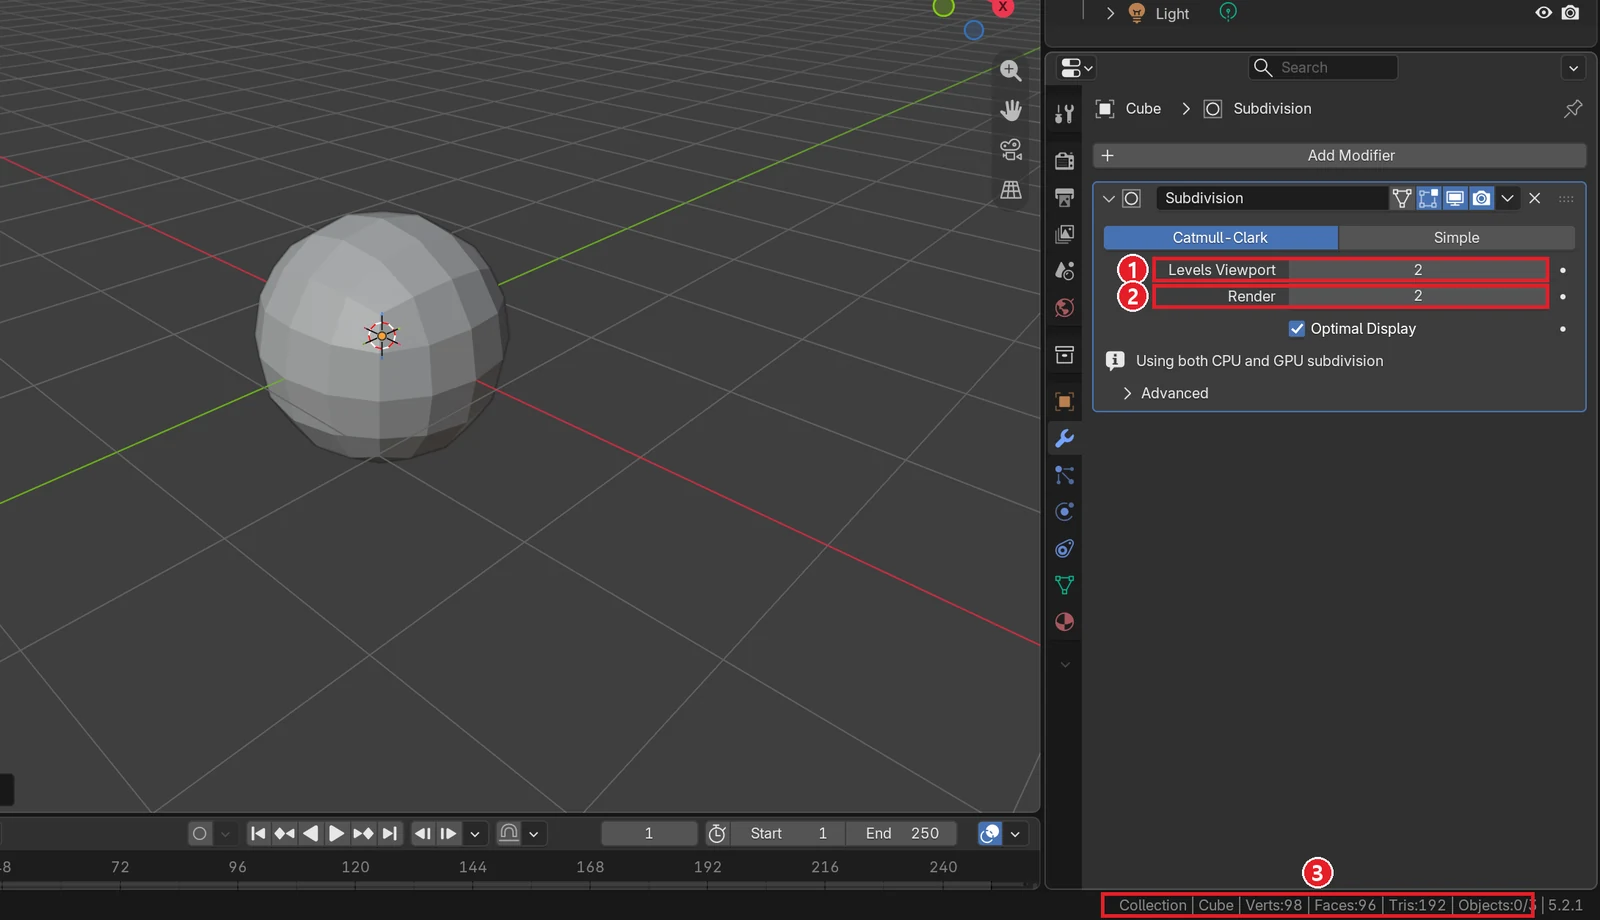 Figure 4. ① Levels Viewport ② Render ③ scene statistics in the status bar (Faces 96). The picture shows both fields at 2 (Blender screenshot)
In Object Mode, select the object and press Ctrl plus a number, such as Ctrl+1, to set Levels Viewport to that number. This key does not change the Render level. More settings are in Subdivision Surface modifier.
3. Turn off a modifier in the viewport: the monitor icon
If lowering the level is not enough, or other heavy modifiers (Boolean, Array and so on) are stacked, turn their viewport display off for a while. The monitor icon in the modifier panel header is the switch. When it is off, the modifier is left out of the 3D Viewport only. It is still used in the render as long as the camera icon is on.
Starting point: Continue with the object from section 2.
Steps:
- Click the monitor icon in the modifier panel header (② in Figure 5).
- The object now looks as it did before the modifier was added (① in Figure 5).
- When you are done, click the icon again to turn it back on.
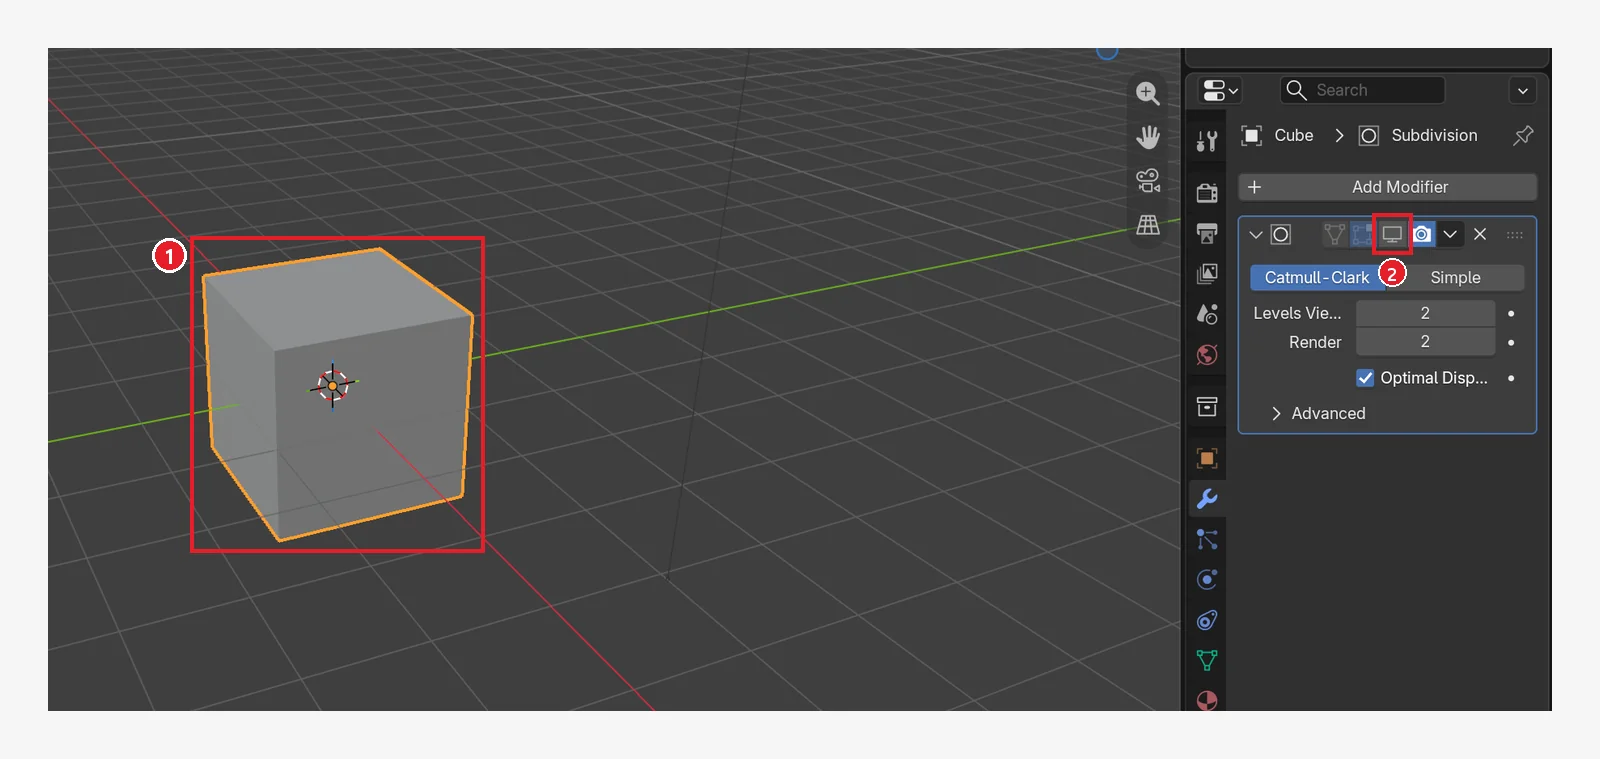 Figure 5. ① With the modifier left out of the view, the cube looks blocky ② the monitor icon is off (Blender screenshot)
If an object has a stack of modifiers, turn them off one at a time from the top and watch the Statistics numbers and the view speed. The modifier that makes the number drop the most is the heavy one.
4. Lower the whole scene at once with Simplify
If there are dozens of objects and changing each level is tedious, use Simplify. It puts a ceiling on smoothness for the whole scene, like switching off the main breaker for a whole building.
Starting point: Turn the monitor icon from section 3 back on.
Steps:
- Open the Render tab in the Properties editor.
- Turn on the checkbox in the header of the Simplify panel near the bottom. The panel starts closed.
- Open the panel and under Viewport set Max Subdivision to
1or0. - Check that every Subdivision Surface object in the 3D Viewport is now only that smooth.
Under Viewport there are also Max Child Particles (the number of particles such as hair or grass), Volume Resolution (the resolution of volumes such as smoke and clouds) and Normals (skip computing custom normals when drawing meshes in the viewport). Lower them too when your scene has those things. The fields under Render in the same panel apply only when rendering.
Remember: If you lower the render fields while Simplify is on, the render gets rougher too. When you are done, turn off the header checkbox to go back. When the render engine is Cycles, the Simplify panel has extra Cycles-only fields.
5. Shading mode: work in Solid
The shading mode of the 3D Viewport also affects speed a lot. The four buttons on the right of the header (④ in Figure 1) are, from the left, Wireframe, Solid, Material Preview and Rendered.
- Solid draws materials and lights only simply. It is the lightest mode for modeling.
- Material Preview draws material colors and a photo light (HDRI). Large image textures use a lot of graphics card memory.
- Rendered keeps redrawing the view with the render engine. Turn it on only briefly when you set up lights.
Starting point: Continue with the scene from section 4.
Steps:
- With the mouse over the 3D Viewport, press
Zand pick Solid. - Orbit the view and compare the speed with the state up to section 4.
- Switch to Material Preview or Rendered only when you check materials or lights, then come back to Solid.
If only selecting objects is unusually slow, the cause may be different. Try installing a fresh graphics driver first. If it is still slow, turn off GPU Depth Picking in Preferences under Viewport > Selection. Selection may become faster, but picking becomes a little less accurate. If playback will not go above 60 frames per second, that is often the vertical sync (VSync) setting of your graphics driver, which is a different issue from slowness.
6. Draw heavy objects simply: Display As
Some objects are needed in the scene but do not need detail while you work (background buildings, a cluster of trees and so on). You can draw them as a box or as lines only. It is like marking where the set pieces go with tape during a rehearsal instead of building the full set. This setting applies to the 3D Viewport only. The render does not change.
Starting point: In the scene from section 5, select one heavy object.
Steps:
- Open the Object tab (orange square icon) in the Properties editor.
- Open the Viewport Display panel.
- Change Display As to Bounds (box outline only) or Wire (lines only) (① in Figure 6).
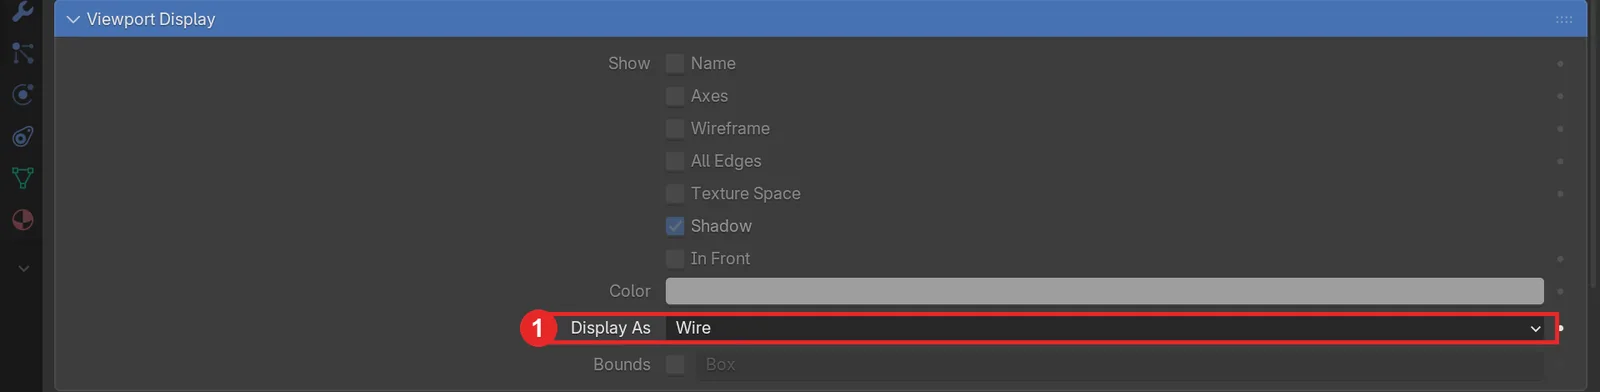 Figure 6. Viewport Display panel. ① Display As (the picture shows Wire selected) (Blender screenshot)
Display As offers Bounds, Wire, Solid and Textured. Each one further down the list draws more detail. Bounds is the lightest.
7. Hiding versus switching off: eye icon, monitor icon, checkbox
There are three ways to make a heavy object disappear from view. They differ in whether Blender keeps evaluating it.
| Method | Where | 3D Viewport | Evaluation | When to use |
|---|---|---|---|---|
Eye icon (Hide in Viewports), or H in the 3D Viewport | Object row in the Outliner | Hidden | Continues (affects playback speed) | Hiding for a moment |
| Monitor icon (Disable in Viewports) | Outliner, hidden at first | Hidden | Left out | Leaving out for a long time |
| Checkbox (Exclude from View Layer) | Collection row in the Outliner | Hidden, also left out of the render | Left out | Leaving out a whole collection |
Starting point: Continue with the scene from section 6. It helps to gather the heavy objects into one collection (a collection is like a folder in the Outliner).
Steps:
- In the Outliner, find the collection row that holds the heavy objects.
- In the group of icons on the right of that row, turn off the leftmost one, the checkbox (the Collection row in Figure 7). The objects in the collection leave both the 3D Viewport and the render.
- Turn the checkbox back on when you need them.
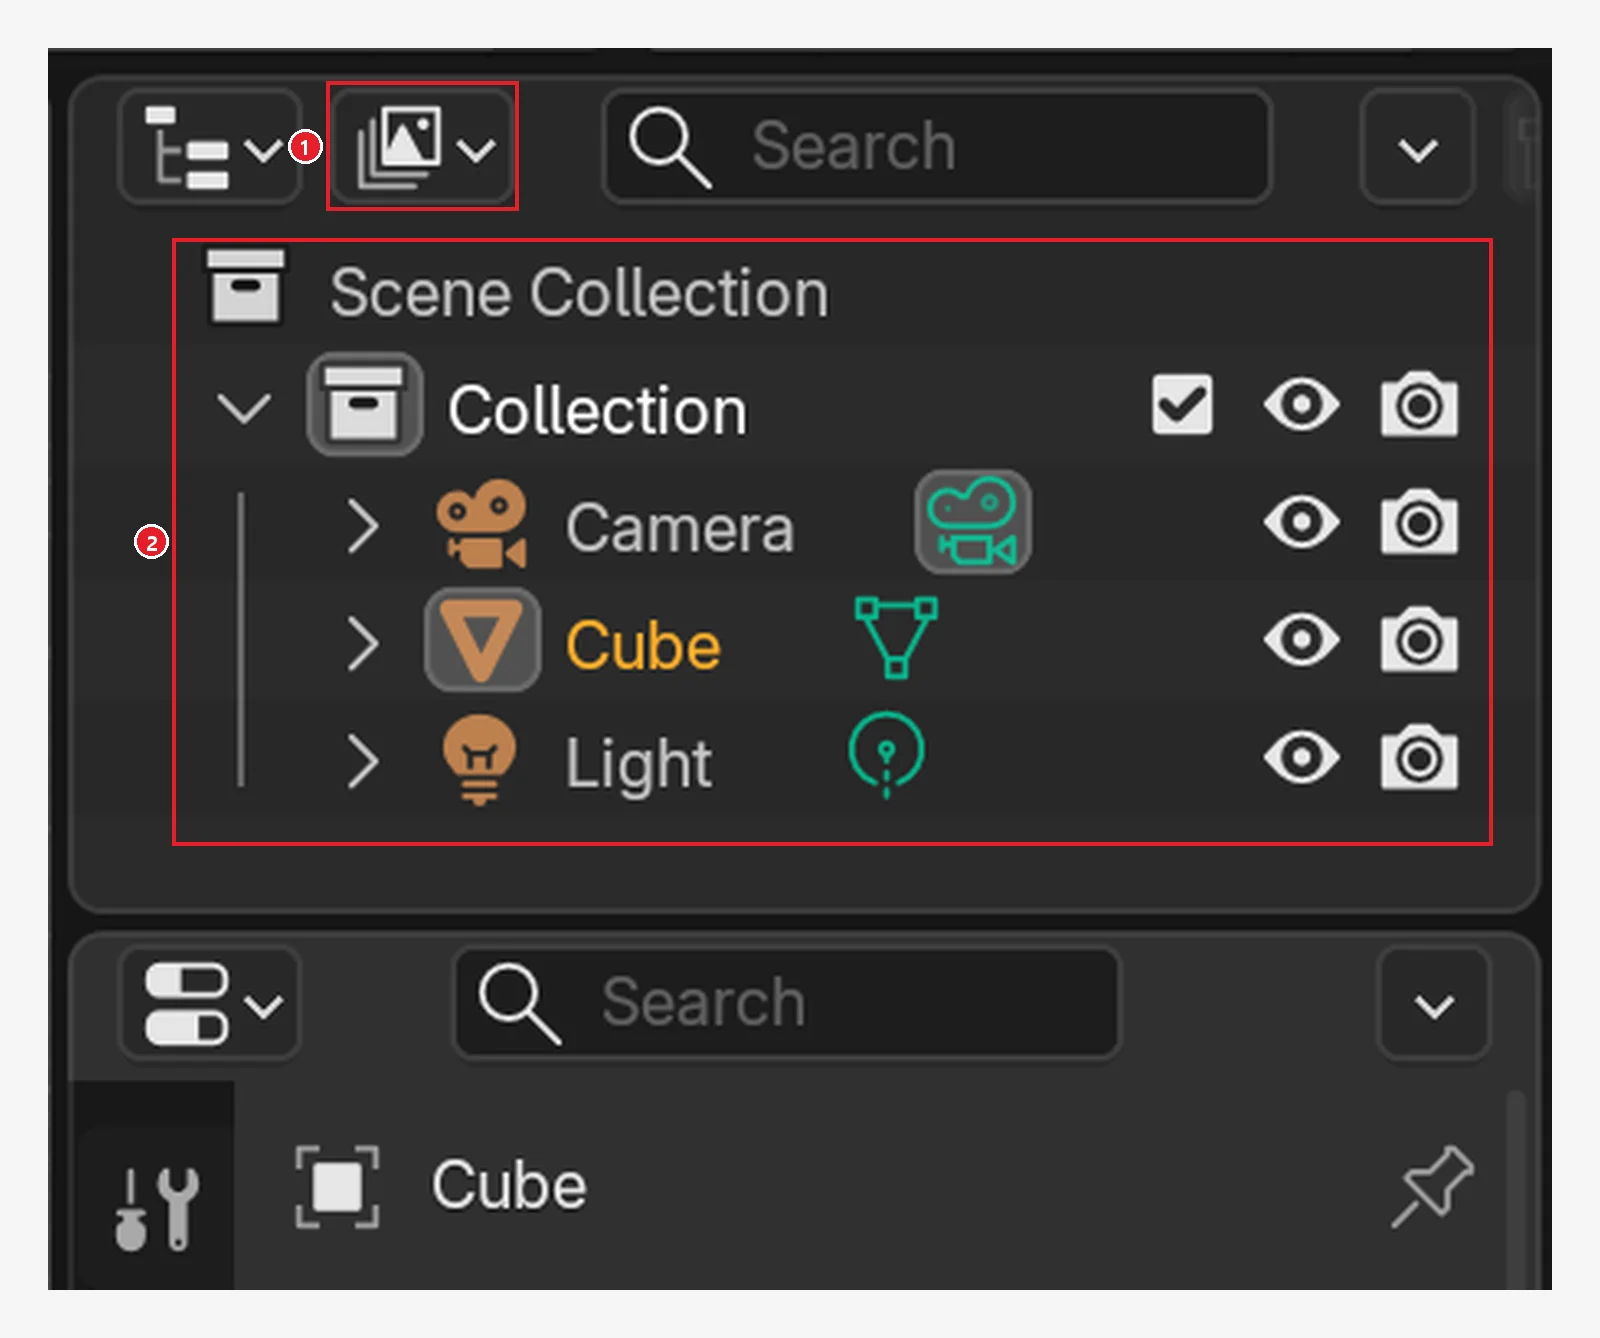 Figure 7. The Outliner. Only the Collection row has a checkbox; object rows have eye and camera icons. ① Outliner display mode ② scene list (Blender screenshot)
Objects hidden with the eye icon stay in the scene and are still evaluated, so they still affect playback speed. To reduce slowness, the checkbox or the monitor icon works better than the eye icon. The monitor icon is not shown at first. Click Filter (the funnel icon) at the top right of the Outliner and turn on the monitor button in the Restriction Toggles row. It then appears on each object row.
How to find hidden or excluded objects again continues in When an object disappears or looks cut off.
8. The checks at a glance
| Order | Where to look | What you see | Fix |
|---|---|---|---|
| 1 | Statistics (section 1) | Hundreds of thousands to millions of faces | Find the object with many faces |
| 2 | Subdivision Levels Viewport (section 2) | 2 or higher | Lower to 0–1, keep Render |
| 3 | Modifier monitor icon (section 3) | Several heavy modifiers | Turn off while working |
| 4 | Render tab Simplify (section 4) | Too many objects to change one by one | Turn on Simplify, lower Max Subdivision |
| 5 | Shading mode (section 5) | Working in Material Preview or Rendered | Switch to Solid |
| 6 | Display As (section 6) | Background objects drawn in detail | Bounds or Wire |
| 7 | Outliner (section 7) | Unused objects only hidden with the eye icon | Leave them out with the collection checkbox or monitor icon |
If it is still slow after all seven, look at the computer. Follow Finding your computer's bottleneck and measure which part is busy first.
9. Practice
- Add Subdivision Surface to the default cube and change Levels Viewport from 0 to 4. Write down the Faces number in Statistics each time. Check that it grows four times per level like Figure 3.
- On the same cube, set Levels Viewport to 4 and Render to 2. Then turn on Simplify in the Render tab and set Max Subdivision to 1. Write down which level the shape in the 3D Viewport looks like.
- Change the cube's Display As to Bounds, Wire and Solid in turn. See what remains on screen each time.
10. Common mistakes and fixes
| Symptom | Cause | Fix |
|---|---|---|
| The view got lighter but the render got rough too | Render level or Simplify's Render fields were lowered too | Lower only Levels Viewport and keep Render. Turn off Simplify when done |
| Playback is still slow after hiding objects | Hidden only with the eye icon (H); still evaluated | Leave them out with the collection checkbox or monitor icon (section 7) |
| Turning on Simplify changed nothing | Max Subdivision is higher than the objects' levels | Lower Max Subdivision further |
| The Statistics numbers suddenly got small | Only one object is selected, so its own numbers are shown | Click empty space to deselect and read the scene numbers |
| Cannot find a hidden object | The checkbox, monitor icon or eye icon is off | Find the off switch in the Outliner and turn it on |
Summary
Face count → Levels Viewport → monitor icon → Simplify → Solid → Display As → leave out with the checkbox. The next guide covers joining several objects into one and splitting them again.
Previous: When a material turns pink · Next: Join and Separate
References
- Blender 5.2 Manual: Viewport Overlays (Statistics)
- Blender 5.2 Manual: Subdivision Surface Modifier
- Blender 5.2 Manual: Simplify (fields shared with EEVEE and Workbench)
- Blender 5.2 Manual: Object Viewport Display (Display As)
- Blender 5.2 Manual: Outliner Interface (Restriction Toggles)
- Blender 5.2 Manual: Troubleshooting 3D Viewport (Performance)
- Shortcuts: default (Blender) keymap of Blender 5.2.
- Pictures: screenshots made in Blender 5.2.1 for Blender guides on this site, and a diagram drawn in code for this guide.