When an object disappears or looks cut off in Blender: check the view, hiding, Local View and Clip Start
What to check, in order, when an object in Blender vanishes or looks half cut off. The view has wandered away, the object was hidden with H, the eye, monitor and camera icons and the collection checkbox in the Outliner, Local View (numpad /), the 3D Viewport's Clip Start and End, the Alt+B clipping region, and the camera's Clip.
한국어English
ON THIS PAGE
- 011. When the view has wandered off: `Home` and numpad `.`
- 022. When it was hidden with `H`: `Alt`+`H`
- 033. Outliner icons: eye, monitor, camera and checkbox
- 044. Local View: numpad `/`
- 055. When an object looks cut off: Clip Start and End
- 066. When only part shows and the rest vanished: `Alt`+`B` clipping region
- 077. Missing only in the camera view: the camera's Clip
- 088. The checks at a glance
- 099. Practice
- 1010. Common mistakes and fixes
- 11Summary
- 12References
Based on: Blender 5.2 LTS (English interface, default shortcuts). Checked in November 2026. The pictures are real Blender 5.2.1 screenshots already used in other Blender guides on this site, plus a diagram drawn for this guide. The steps follow the official Blender 5.2 manual and the default keymap. The red numbers and boxes were added to explain them.
Sometimes an object that was there a moment ago is gone from the 3D Viewport, or as you zoom in, the front of the object looks sliced off. Most of the time the object was not deleted. A viewing setting changed.
This guide goes through the causes from the most common. The order is the view wandered off → hidden → Outliner icons → Local View → cut off (Clip) → missing only in the camera view. It is like looking for something you lost at home: is it in another room, under a cover, or put away in storage?
After this guide you can:
- Get a lost view back with
Homeand numpad.. - Bring back objects hidden with
HusingAlt+H. - Tell the eye, monitor and camera icons and the collection checkbox apart in the Outliner.
- Turn Local View on and off.
- Fix objects that look cut off because of Clip Start and End or a clipping region (
Alt+B).
Before you start: Orbiting, zooming and panning are in Beginner chapter 2, hiding with
His in Beginner chapter 4, and camera settings are in Beginner chapter 10. This guide gathers those topics from the "I can't see it" side.
1. When the view has wandered off: Home and numpad .
This is the most common case. The object is still there, but after orbiting or panning the view is looking somewhere else. As in Figure 1, only the grid shows and no objects.
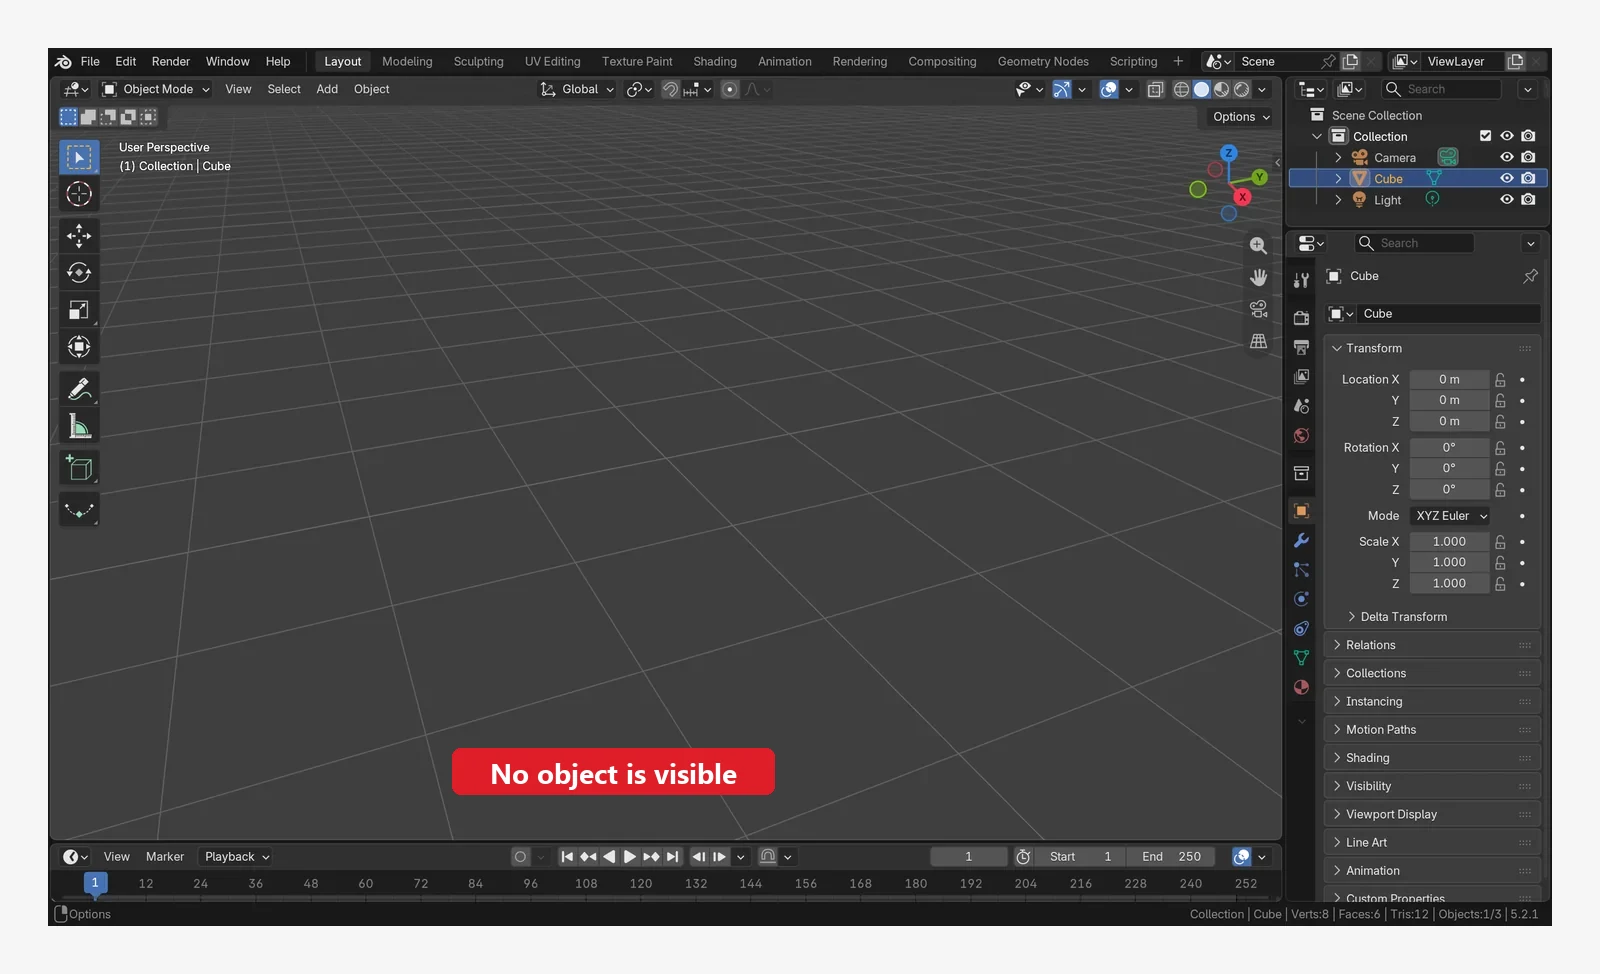 Figure 1. The view has moved away from the objects. The Outliner still lists Cube (Blender screenshot)
Starting point: Start from the scene where the object is missing. To practice, orbit the view anywhere with a middle-button drag in a new file (File > New > General).
Steps:
- Check the Outliner first. If the object's name is in the list, it was not deleted.
- With the mouse over the 3D Viewport, press
Home. All objects in the scene fit in the view (Figure 2). - To look at just one object up close, click its name in the Outliner, move the mouse to the 3D Viewport and press numpad
.(period).
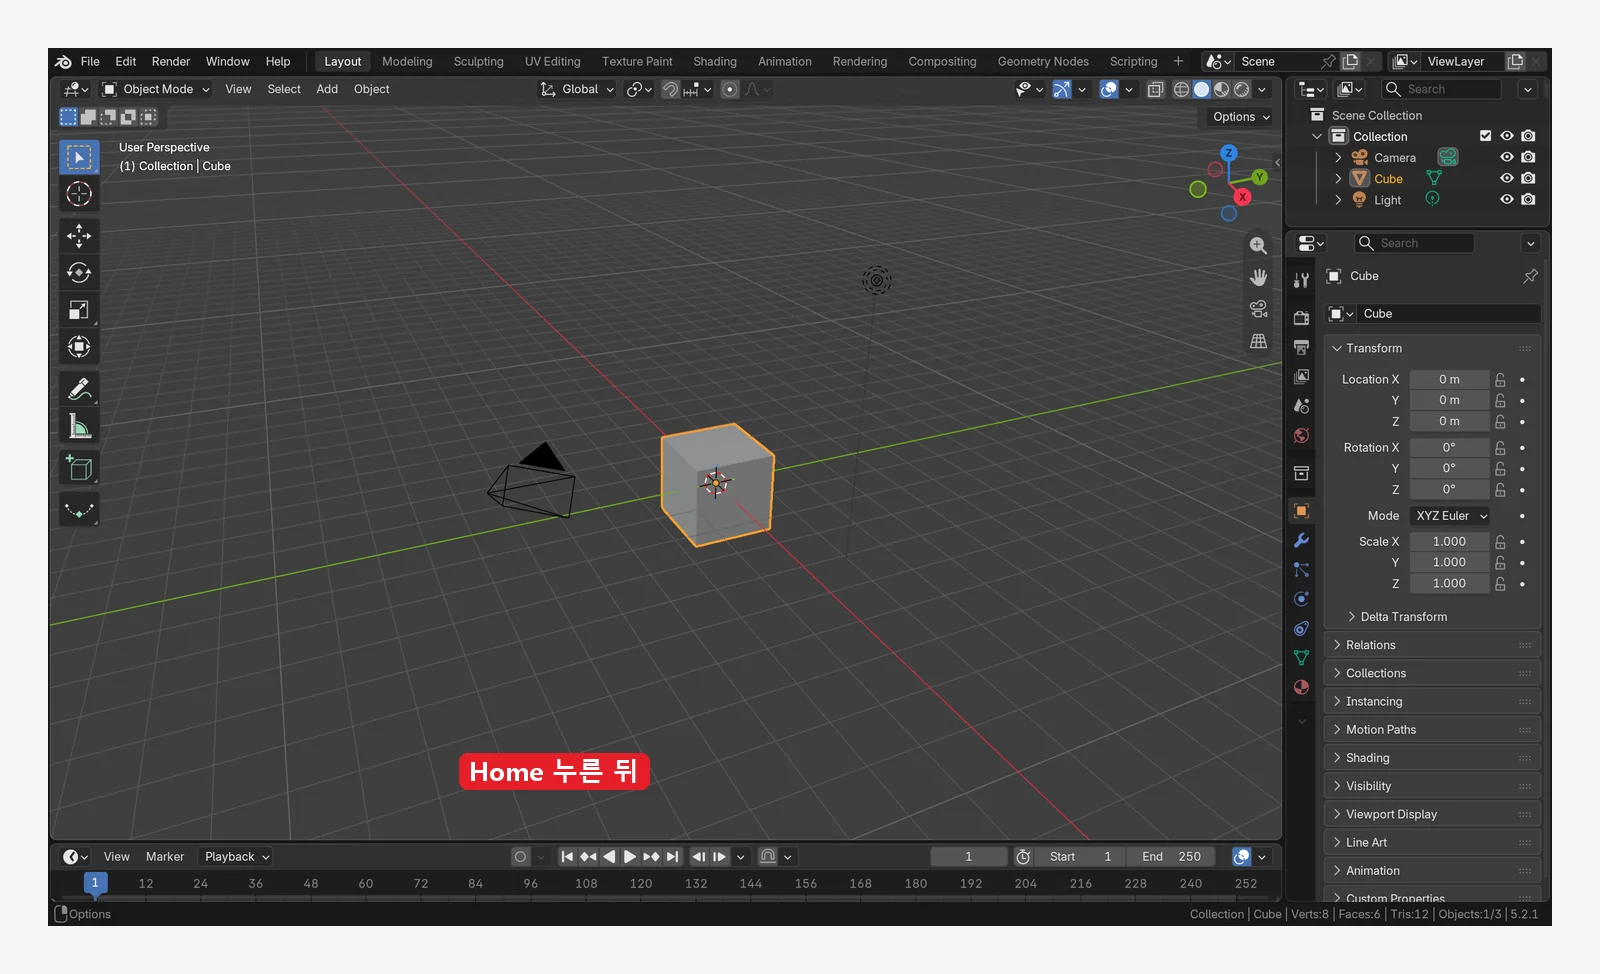 Figure 2. After pressing
Home (View > Frame All). All objects in the scene fit in the view (Blender screenshot)
When you cannot zoom in any further: If scrolling stops getting you closer at some point, you are too close to the point the view orbits around. Select the object you want to see and press numpad .. That object becomes the new center and you can get closer again. If your keyboard has no numpad, see section 10 of Beginner chapter 2.
If Home does not show it, the object has been switched off from drawing. Go to section 2.
2. When it was hidden with H: Alt+H
H hides the selected objects in the 3D Viewport. It is easy to press by mistake when reaching for another key. A hidden object shows a closed eye icon in the Outliner (② in Figure 3).
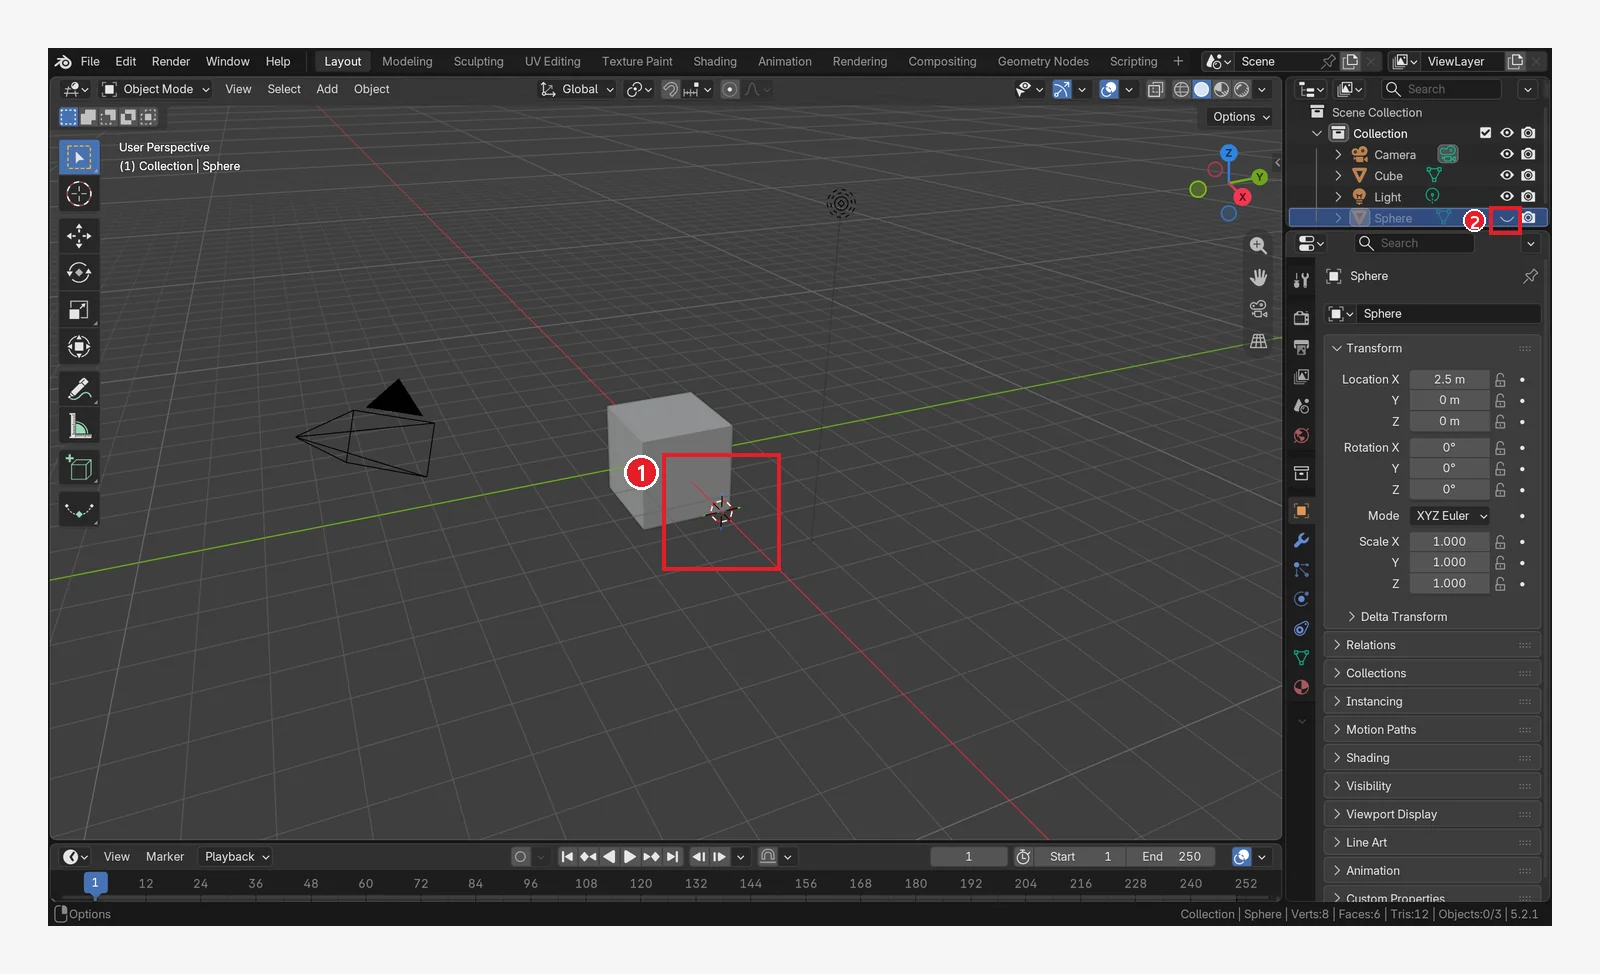 Figure 3. After hiding the sphere with
H. ① The place where the sphere was is empty ② the eye icon on the Sphere row is closed (Blender screenshot)
Starting point: Continue with the scene from section 1. To practice, select the cube and press H to hide it.
Steps:
- Find the row with a closed eye icon in the Outliner.
- With the mouse over the 3D Viewport, press
Alt+H. All hidden objects come back. - To bring back just one, click the eye icon on its row in the Outliner.
Shift+H does the opposite: it hides everything that is not selected. If all but one object vanished, you may have pressed it. Alt+H brings them back in this case too.
3. Outliner icons: eye, monitor, camera and checkbox
If Alt+H does not bring it back, another switch in the Outliner is off. On the right of each Outliner row there are small icons, and each one has a different job.
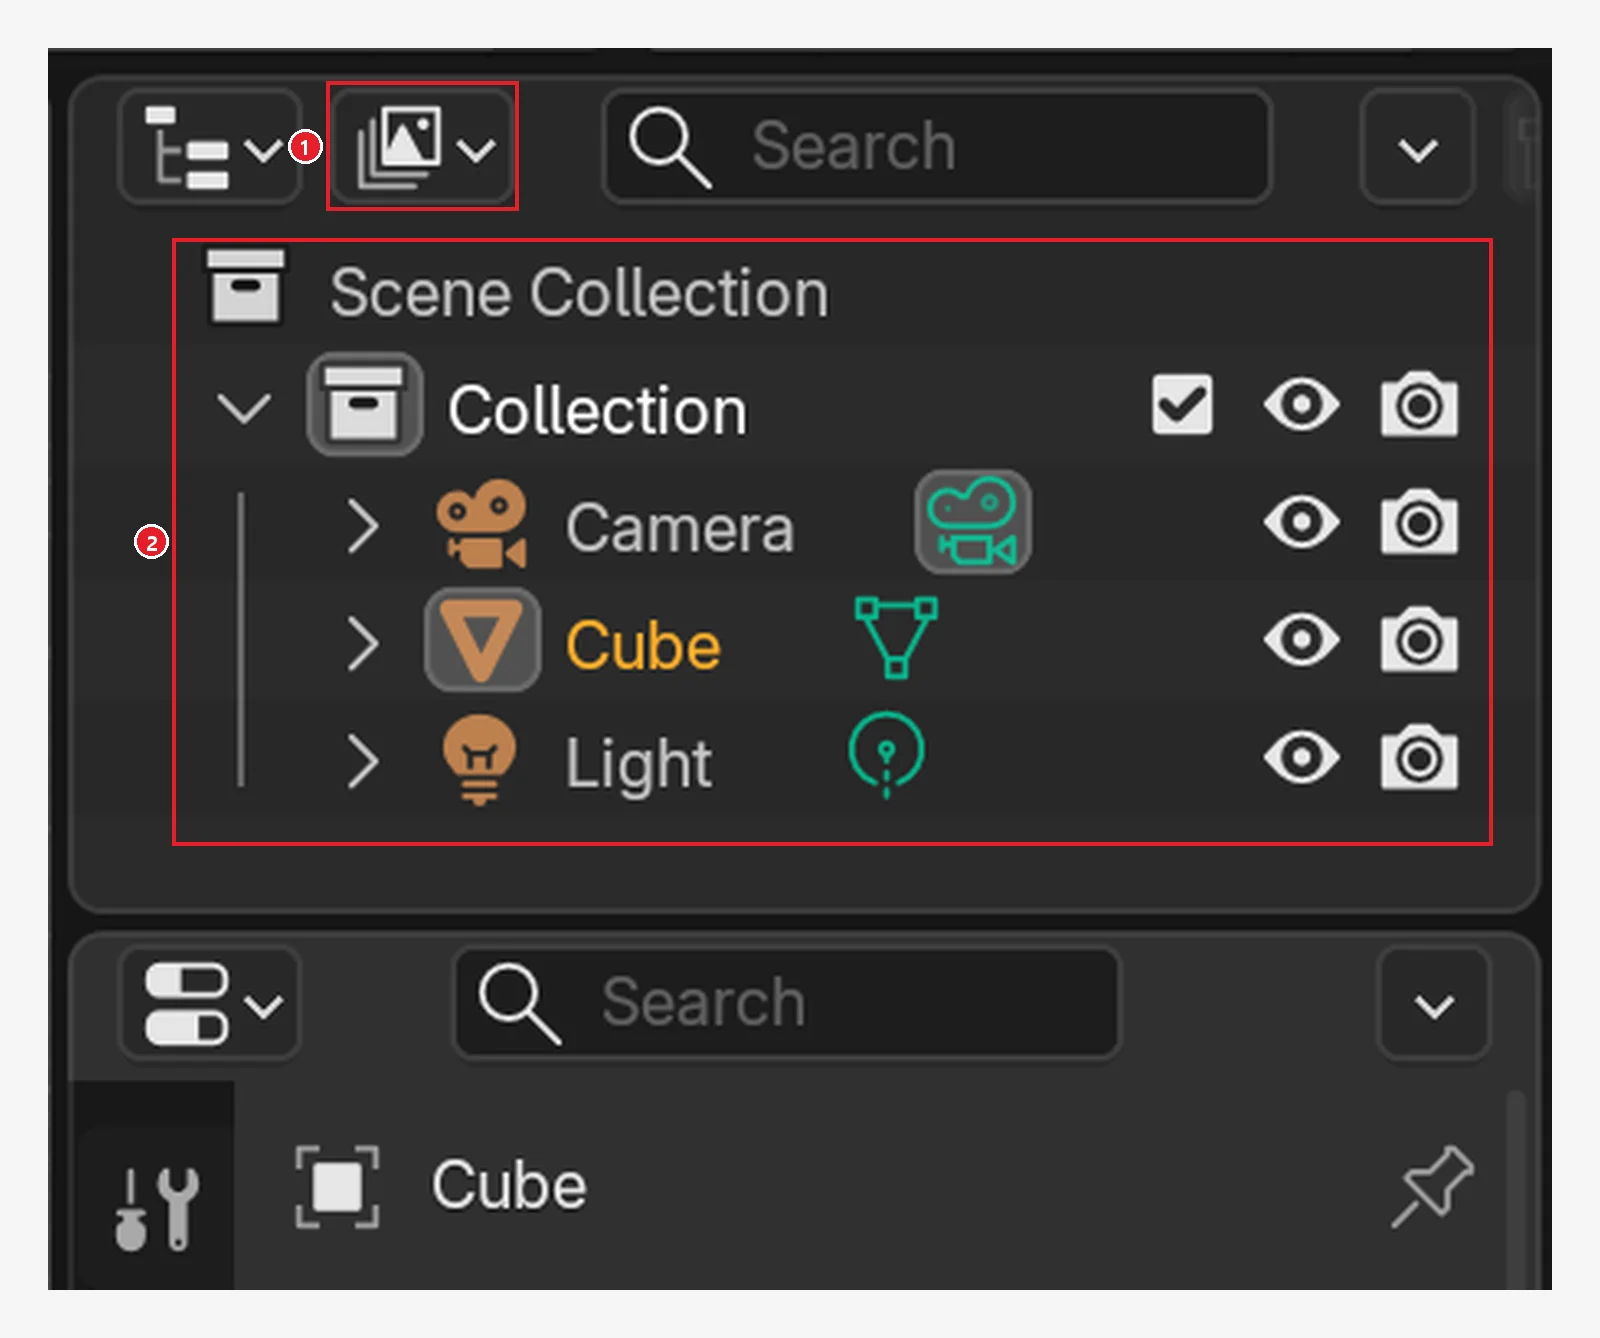 Figure 4. The Outliner. The Collection row has a checkbox; object rows have eye and camera icons. ① Outliner display mode ② scene list (Blender screenshot)
| Switch | Shown at first? | When off | How to bring back |
|---|---|---|---|
| Eye icon (Hide in Viewports) | Yes | Gone from the 3D Viewport only. Same as H | Click the eye icon or press Alt+H |
| Monitor icon (Disable in Viewports) | Hidden | Gone from the 3D Viewport. Alt+H does not bring it back | Turn the monitor icon back on |
| Camera icon (Disable in Renders) | Yes | Left out of the render only. Still shown in the 3D Viewport | Turn the camera icon back on |
| Checkbox (Exclude from View Layer) | Collection rows only | Objects in the collection leave both the 3D Viewport and the render | Turn the checkbox back on |
Starting point: Assume that in the scene from section 2 an object does not come back with Alt+H.
Steps:
- In the Outliner, check that the checkbox on the collection row that holds the object is on (the Collection row in Figure 4). If it is off, turn it on.
- Click Filter (the funnel icon) at the top right of the Outliner.
- In the Restriction Toggles row, turn on the monitor button. A monitor icon appears on each object row.
- If a monitor icon is off, click it to turn it on.
If an object is missing only from the render (shown in the 3D Viewport but not in the F12 result), look at the camera icon. An example of a light turned off for rendering is in section 2 of When a render is too dark or blown out. Using these icons to lighten a heavy scene is covered in section 7 of When the Blender viewport is slow.
4. Local View: numpad /
Local View keeps only the selected objects in view and moves the rest out of the way for a while. It is like putting a spotlight on one actor on stage. The other objects are not deleted; they are just off stage for now.
Numpad / (slash) sits right next to numpad ., so it is easy to press by mistake. If several objects suddenly vanished but every icon in the Outliner is on, suspect Local View first.
Starting point: Continue with the scene from section 3. To practice, select only the cube and press numpad / to enter Local View.
Steps:
- With the mouse over the 3D Viewport, press numpad
/once more. Without a numpad, the/key on the main keyboard does the same. The menu entry is View > Local View > Toggle Local View. - Check that the missing objects are back.
Local View is set per 3D Viewport. If your screen is split in two, only one side may be in Local View. To take one object out of Local View, select it and press Alt+numpad / (View > Local View > Remove from Local View).
5. When an object looks cut off: Clip Start and End
When you get very close to an object, its front can be cut away so you see inside, or in a very large scene a distant mountain can vanish. The 3D Viewport draws only what lies between Clip Start and End. It is like the reach of a flashlight beam: things too close or too far are outside the range and not shown.
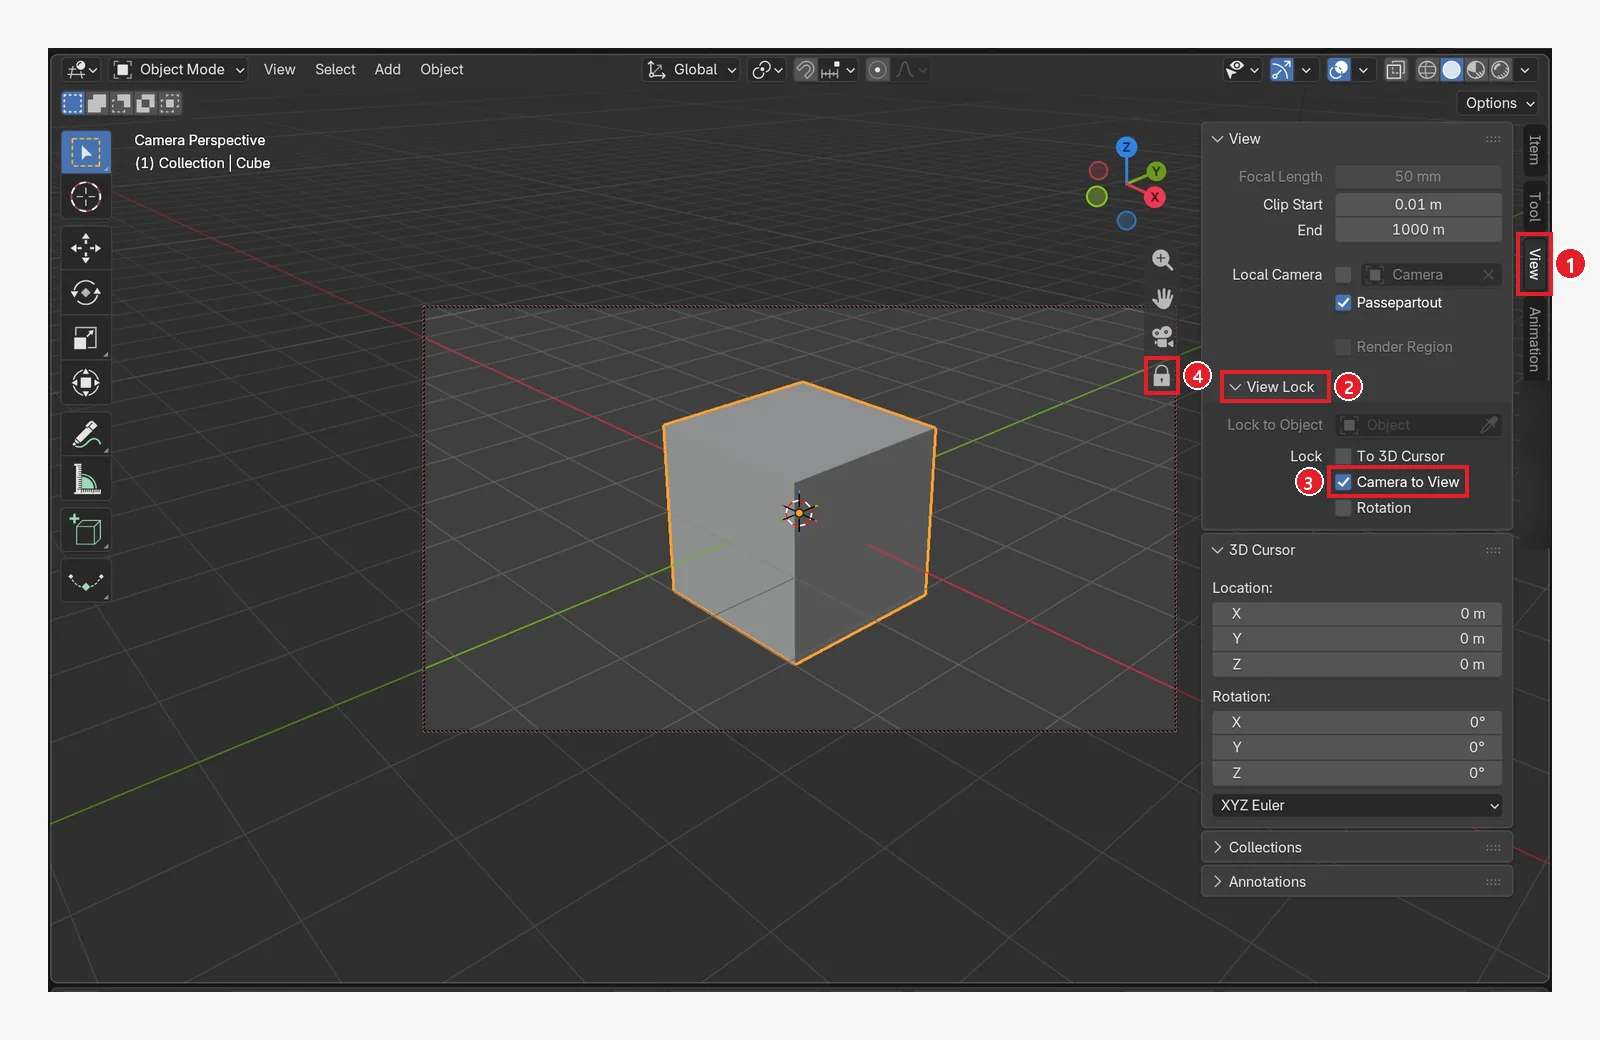 Figure 5. The View panel on the sidebar's View tab. Clip Start 0.01 m and End 1000 m are the drawing range of the 3D Viewport. The numbers were made for the View Lock explanation in Beginner chapter 10 (Blender screenshot)
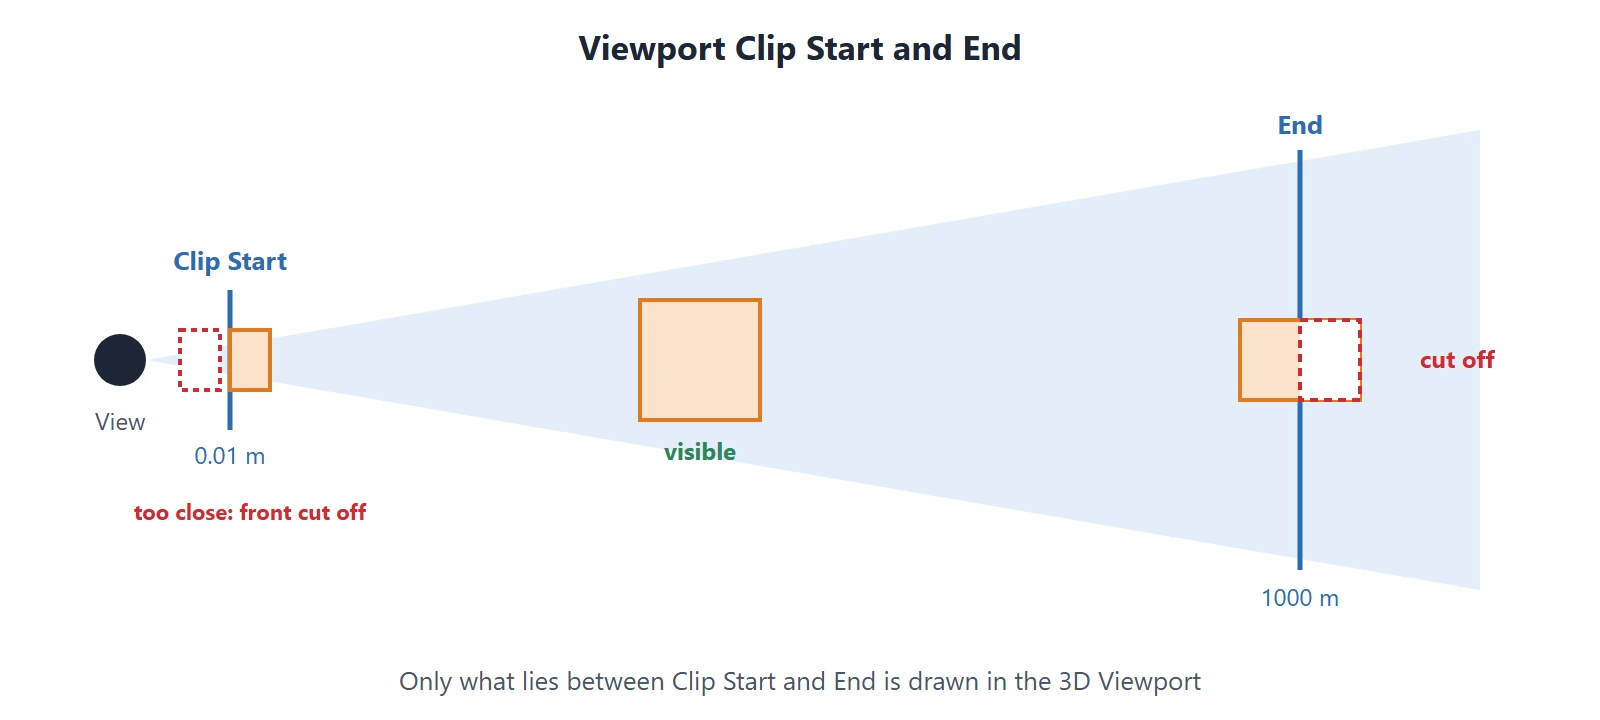 Figure 6. Only what lies between Clip Start and End is drawn. Parts outside are cut off (diagram)
Starting point: Continue with the scene from section 4 with Local View turned off.
Steps:
- With the mouse over the 3D Viewport, press
Nto open the sidebar. - Click View in the vertical tabs on the right (① in Figure 5).
- Look at Clip Start and End in the View panel.
- If things are cut off up close, make Clip Start smaller. If distant things vanish, make End larger.
Do not make the range too wide. If Start is tiny and End is huge, the calculation that decides what is in front gets rough, and faces can flicker or show through each other. In a large scene, raise Start a little, and lower End if you do not need to see far. In orthographic view (numpad 5), Start is not used and the End value is used as the front limit too. If things are cut off in orthographic view, look at End.
The same problem appears when you work with very large or very small objects. If your sizes are far outside the default range (0.01 m to 1000 m), such as terrain several kilometers across or a 1 mm part, set the Clip values to match.
6. When only part shows and the rest vanished: Alt+B clipping region
A clipping region shows only the space inside a box you draw on screen. It is meant for looking at one part of a complex model. But if you press Alt+B without knowing it and then drag, only part of the scene remains and the rest looks cut away.
Starting point: Continue with the scene from section 5.
Steps:
- If objects are cut off in a box shape and only part is visible, put the mouse over the 3D Viewport and press
Alt+B. The clipping region is cleared and everything shows. - To use it on purpose, press
Alt+Band drag a box around the part you want to see. The menu entry is View > View Regions > Clipping Region…. - When done, press
Alt+Bonce more to clear it.
Things outside the clipping region are not only hidden but also ignored by selection and snapping. If an object will not respond to clicks, suspect this too.
7. Missing only in the camera view: the camera's Clip
If an object shows in the 3D Viewport but is cut off or missing in the camera view (numpad 0) or the F12 render, the camera's own Clip values may be the cause. The camera's defaults are 0.1 m to 100 m, a narrower range than the 3D Viewport (0.01 m to 1000 m).
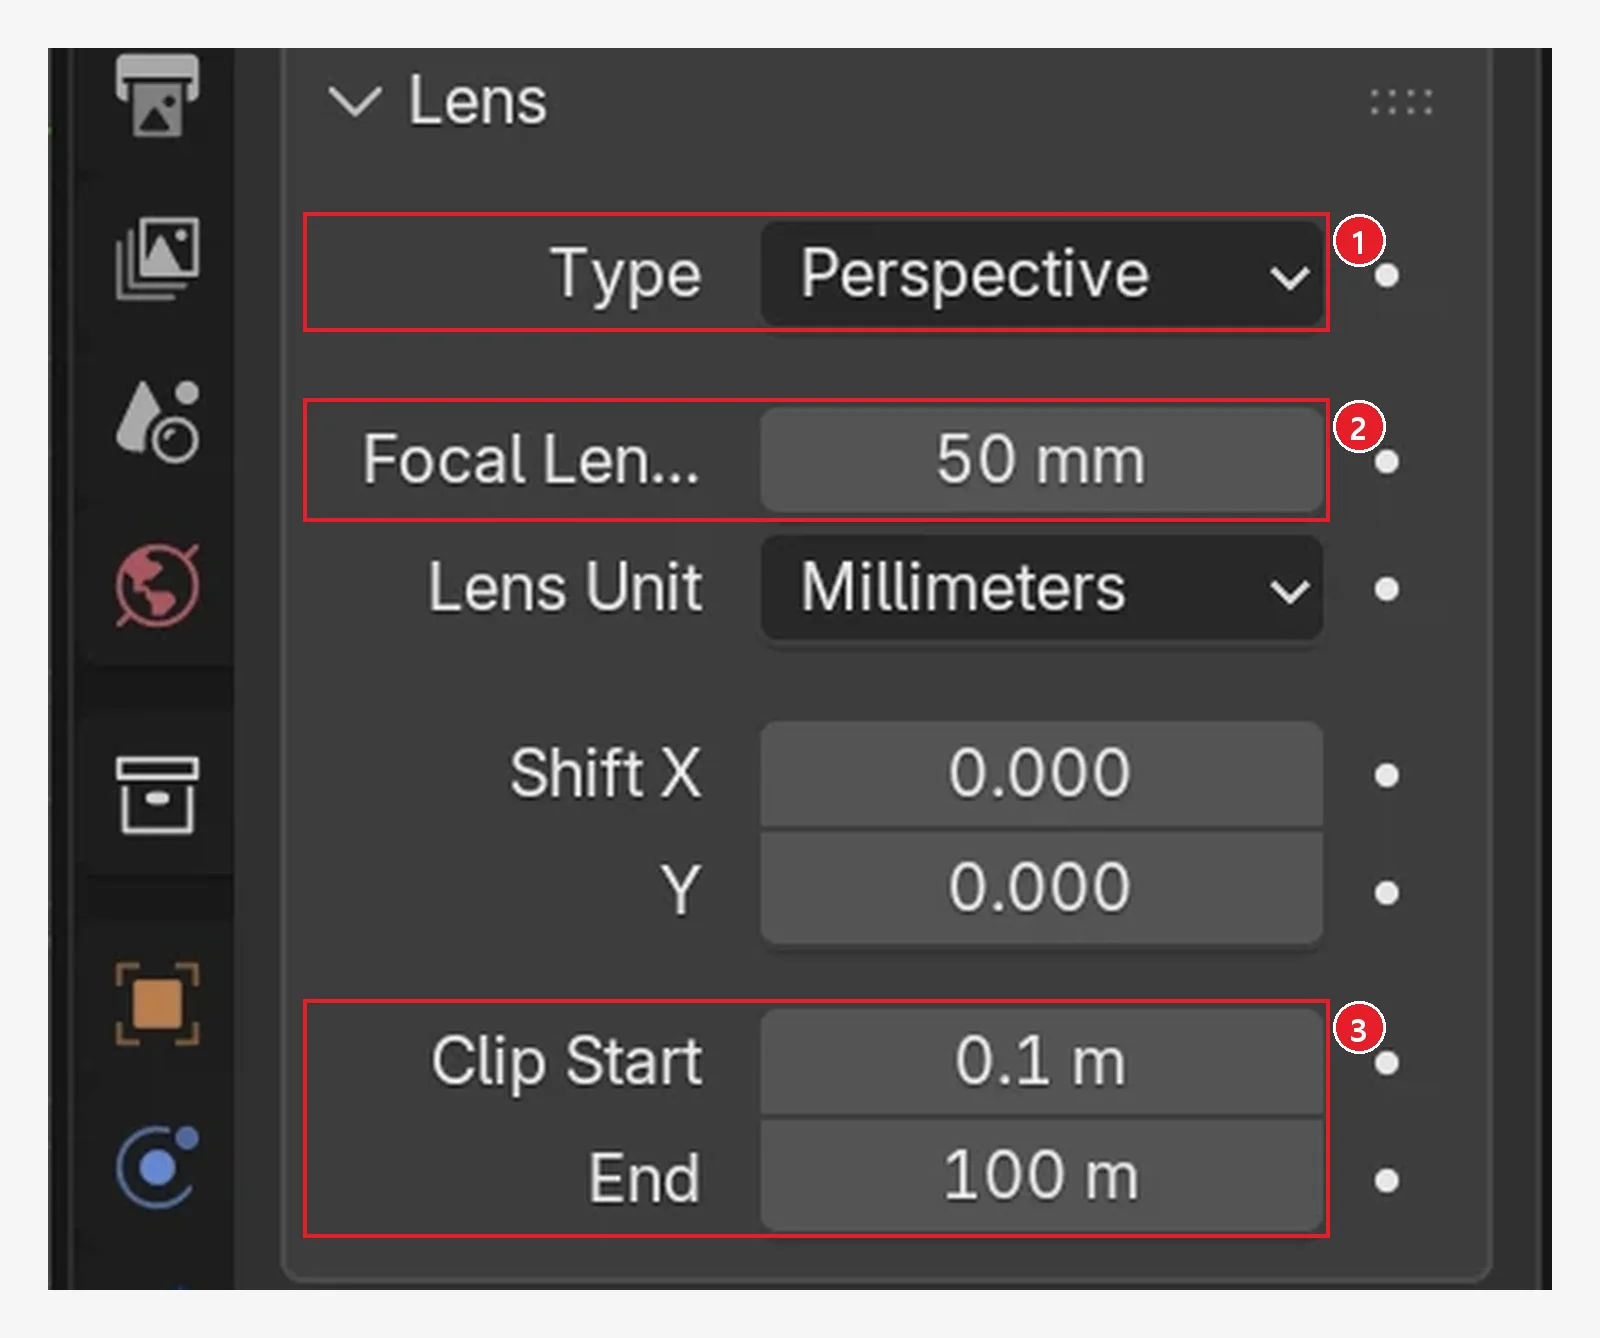 Figure 7. Lens panel in the Camera tab. ③ The camera's Clip Start 0.1 m and End 100 m (Blender screenshot)
Starting point: In the scene from section 6, select the camera.
Steps:
- Open the Camera tab (green camera icon) in the Properties editor.
- Look at Clip Start and End in the Lens panel (③ in Figure 7).
- If objects farther than 100 m from the camera are missing, raise End.
- Open the camera view with numpad
0and check again.
Camera framing and lenses are covered in detail in Beginner chapter 10.
8. The checks at a glance
| Order | Where to look | What you see | Fix |
|---|---|---|---|
| 1 | Outliner list | The name is not there | It really was deleted. Undo with Ctrl+Z |
| 2 | 3D Viewport | Only the grid | Home, numpad . (section 1) |
| 3 | Outliner eye icon | A closed eye | Alt+H (section 2) |
| 4 | Collection checkbox, monitor icon | Off | Turn back on (section 3) |
| 5 | Local View | All icons on, but several objects gone | Numpad / (section 4) |
| 6 | Sidebar View tab Clip | Cut off up close, distant things gone | Adjust Clip Start and End (section 5) |
| 7 | Clipping region | Only a box-shaped part shows | Alt+B (section 6) |
| 8 | Camera Clip | Cut off only in the camera view or render | Adjust the camera's Clip Start and End (section 7) |
9. Practice
- In a new file, hide the cube with
H, see how the eye icon in the Outliner changes, then bring it back withAlt+H. - Show the monitor icons with the Outliner's Filter, then turn off the cube's monitor icon. Check whether
Alt+Hbrings it back this time. - Select the cube and enter Local View with numpad
/. Write down how the camera and light look. Leave with numpad/again. - On the sidebar's View tab, change Clip Start to
5and move toward the cube. See at what distance it starts to get cut off, then set it back to0.01.
10. Common mistakes and fixes
| Symptom | Cause | Fix |
|---|---|---|
Alt+H does not bring it back | Switched off with the monitor icon or the collection checkbox | Turn that switch on in the Outliner (section 3) |
| Only one object is left and the rest vanished | Shift+H was pressed, or you entered Local View | Alt+H; if that fails, numpad / |
| Zooming in cuts off the front so you see inside | You are closer than Clip Start | Back off a little or lower Clip Start |
| The far side of a large terrain is missing | It is farther than End | Raise End, but not too far |
| Faces flicker or show through each other | The Clip range is far too wide | Raise Start or lower End |
| Shown in the 3D Viewport but missing in the render | Camera icon off, or outside the camera's Clip | Turn on the camera icon, adjust the camera Clip (section 7) |
| Only part shows and clicks do nothing | A clipping region is active | Alt+B |
Summary
If the name is in the Outliner, it was not deleted. Check in order: Home → Alt+H → icons → numpad / → Clip → Alt+B → camera Clip.
Previous: Snapping in Blender
References
- Blender 5.2 Manual: Troubleshooting 3D Viewport (Lost in Space, Objects Invisible in Camera View, Depth Buffer Glitches)
- Blender 5.2 Manual: Show/Hide
- Blender 5.2 Manual: Outliner Interface (Restriction Toggles)
- Blender 5.2 Manual: Local View
- Blender 5.2 Manual: View Regions (Clipping Region)
- Blender 5.2 Manual: Sidebar (Clip Start/End)
- Shortcuts: default (Blender) keymap of Blender 5.2.
- Pictures: screenshots made in Blender 5.2.1 for Blender guides on this site, and a diagram drawn in code for this guide.