EEVEE light beams and fog: making light visible with a volume box and Principled Volume
In EEVEE, put a Principled Volume into a box that surrounds the scene to make fog, then create a spotlight cone and light beams coming through a window. Density, Anisotropy, the Volumes and Volume Shadows settings on the Render tab, and each light's Volume Scatter are checked with side-by-side renders.
한국어English
ON THIS PAGE
- 011. Prepare the practice scene
- 022. Make a fog box: no Surface, only Volume
- 033. A spotlight cone
- 044. Fog thickness: Density
- 055. Render settings: the Volumes panel
- 066. Light beams through a window
- 077. Fog blocking its own light: Volume Shadows
- 088. Choosing which lights light the fog: Volume Scatter
- 099. Practice
- 1010. Common mistakes and fixes
- 11Summary
- 12References
Based on: Blender 5.2 LTS (screenshots from 5.2.1, English interface, default shortcuts), EEVEE render engine. Checked in November 2026. All pictures are real Blender screenshots and renders. The red numbers, boxes and red labels on the renders were added to explain them.
The cone of a stage spotlight, sunbeams slanting through a window, fog in a forest at dawn. In scenes like these you can see the light itself because dust and water droplets in the air bounce light in all directions. In clean air you cannot see the path of light. Turn on a flashlight and you see only the circle on the wall, not the beam.
Blender works the same way. Turn on a light with no extra settings and only the floor it hits gets brighter. To see a beam, you have to fill the space with a volume, a "fog" that bounces light. This guide shows how to make a fog box in EEVEE and create a spotlight beam and window light beams inside it.
After this guide you can:
- Fill a box with fog by giving its material only a Principled Volume and no Surface.
- Set how thick the fog is with Density.
- Put a spotlight behind a wall with a window to make light beams striped by the window bars.
- Make beams look brighter when you face the light, with Anisotropy.
- Tell apart Volumes and Volume Shadows on the Render tab and each light's Volume Scatter.
Before you start: Spotlights and light values such as Power are covered in Blender beginner chapter 9: lights and the first guide of this series, Three-point lighting in Blender. Volume calculation makes renders slower, so for how fast EEVEE runs on your PC, see EEVEE render benchmark.
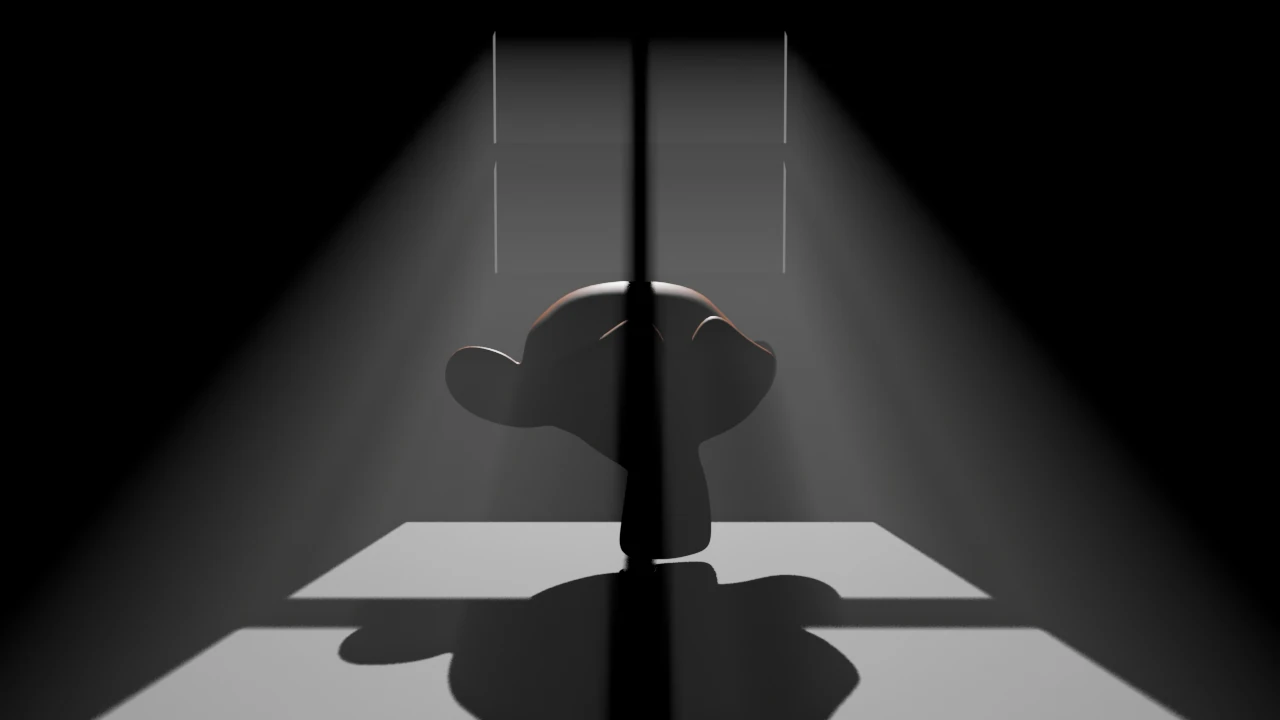 Figure 1. The window light beams you build in section 6 of this guide (Blender render)
1. Prepare the practice scene
Start: Begin with the default cube of a new file (File > New > General).
Steps:
- Select the cube and the point light (Light) and delete them with
X> Delete. - Add a monkey head with
Shift+A> Mesh > Monkey, then pressCtrl+2and right-click > Shade Smooth. On the sidebar (N) Item tab, set Rotation Z to20, and give it an orange material. - Add
Shift+A> Mesh > Plane and set Size30and Location Z-1in the Add Plane panel. Give it a gray material (the picture uses R, G, B 0.3). - On the World tab, drag the brightness (V) of Color down to
0to remove the background and the World light. Light beams show best in the dark. - Select the camera and set Location X
0, Y-9, Z1, Rotation X86, Y0, Z0, and Focal Length35on the Camera tab.
2. Make a fog box: no Surface, only Volume
Fog is made with a large box that surrounds the scene. Leave the box's outer surface empty so it does not show, and fill the space inside with fog. It is like dropping a little milk into a clear fish tank. You do not see the glass, only the cloudy water inside.
Start: Continue from the scene in section 1.
Steps:
- Add
Shift+A> Mesh > Cube and rename it toFog. On the sidebar Item tab, set Location to X0, Y0, Z2and Dimensions to X16, Y16, Z6. This size surrounds the monkey and the space above the floor. - On the Material tab, click New. A new material with Principled BSDF in the Surface field is created.
- Click the Surface field (the one that says Principled BSDF). Scroll the list that opens all the way to the top and the Link group appears on the right. Choose Remove there (Figure 2). The Surface field becomes None.
- Expand the Volume panel just below, click the Volume field (None) and choose Principled Volume from the list (Figure 3).
- Change the Density of Principled Volume to
0.08(Figure 4). The starting value of1is far too thick.
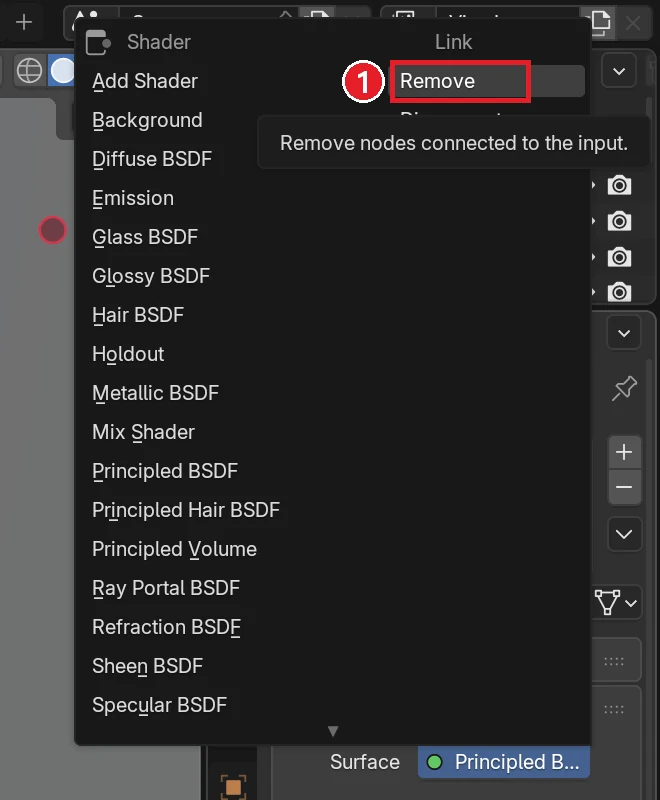 Figure 2. ① Remove in the Link group at the top of the Surface field list (Blender screenshot)
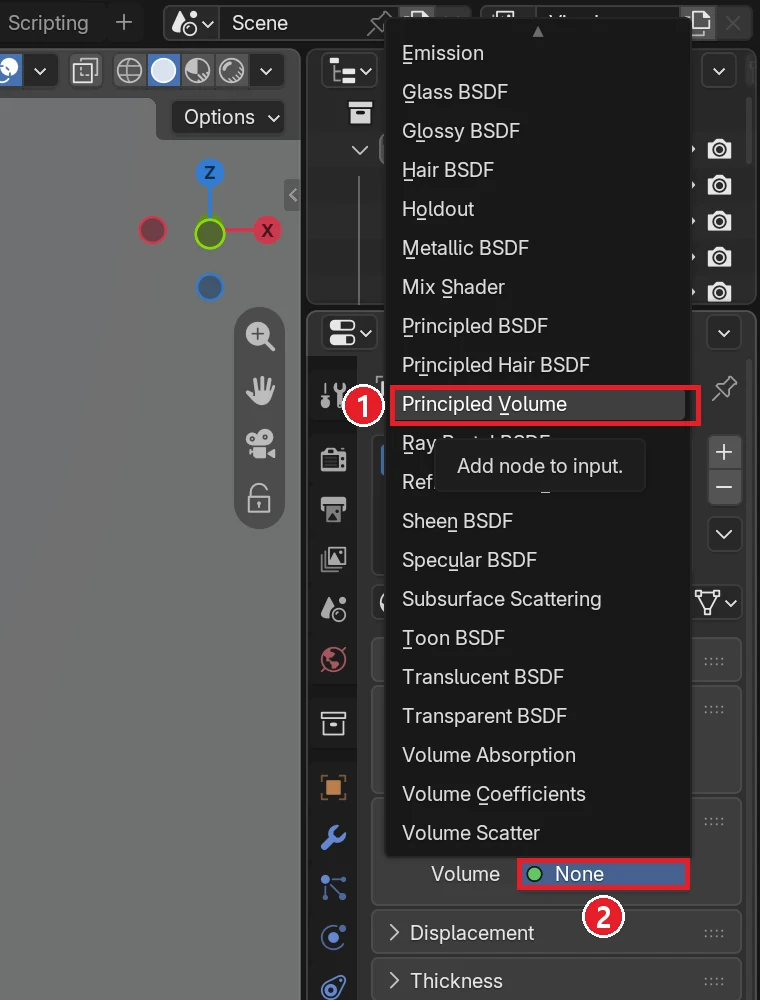 Figure 3. ① Principled Volume in the list ② The Volume field (Blender screenshot)
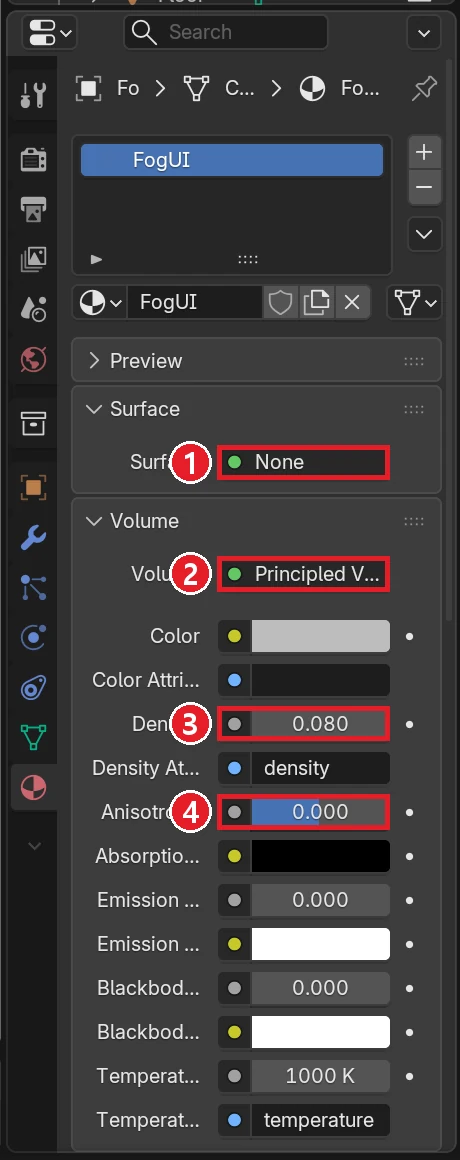 Figure 4. The finished fog material. ① Surface: None ② Volume: Principled Volume ③ Density 0.08 ④ Anisotropy (Blender screenshot)
You empty Surface so the box's outer faces do not show in the render. If Principled BSDF stays, the box blocks the camera like a white wall. In Solid view of the 3D Viewport, the Fog box still looks like a gray box, so do not be surprised. Check the result in Rendered view or with F12. If the box gets in the way while you work, hide it in the 3D Viewport only with the eye icon in the Outliner.
Why not put the fog in the World: The World tab also has a Volume field. But a volume in the World makes the World's Surface (background light) and Sun lights lose their effect. A volume object surrounding the scene suits effects such as fog, so this guide uses a box.
3. A spotlight cone
Start: Continue from the scene with the fog box from section 2.
Steps:
- First turn off the camera icon on the Fog row in the Outliner (to compare with the result without fog).
- Add
Shift+A> Light > Spot. Set Location X-2.5, Y-3, Z4.5and Rotation X38, Y0, Z-40. - On the Light tab, set Power
3000, Radius0.1, and under Beam Shape, Angle35and Blend0.3. - Render with
F12. You see only a round patch of light on the floor (left of Figure 5). - Turn the camera icon on the Fog row back on and render. A cone of light shining down on the monkey appears (right of Figure 5).
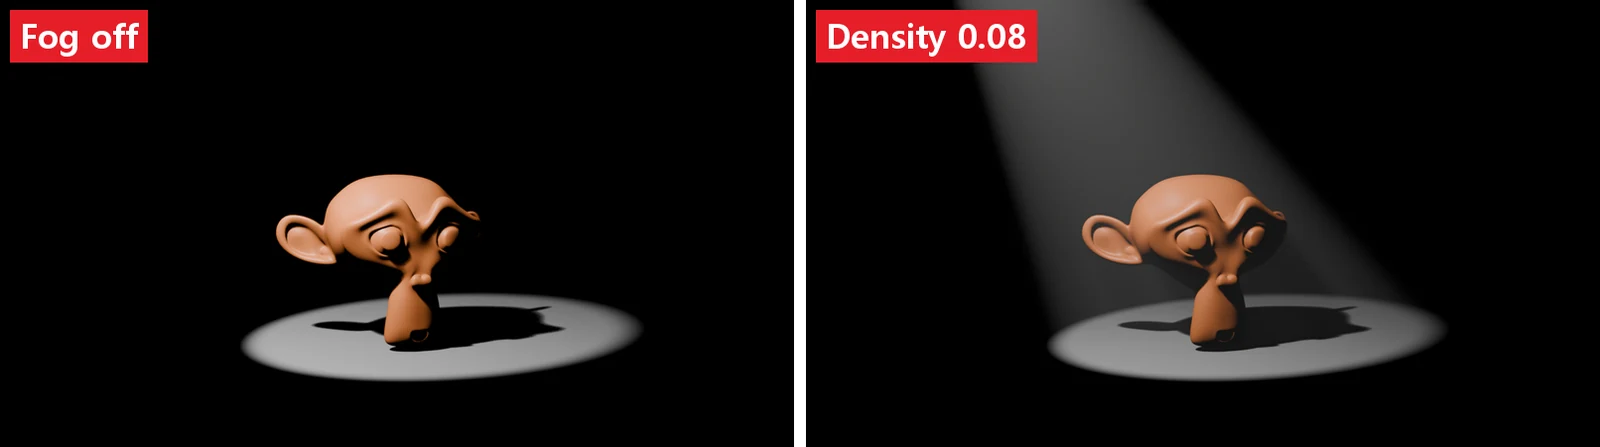 Figure 5. Left: no fog. Right: fog with Density 0.08 (Blender render)
With the same light, you see the path of light only when there is fog. The fog particles bounce light toward the camera.
4. Fog thickness: Density
Density is how tightly packed the fog particles are. Thicker fog makes beams clearer, but too much swallows the light and objects get darker.
Start: Continue from the scene in section 3 (fog on).
Steps:
- Select Fog and change Density on the Material tab to
0.02, then render. - Change it to
0.3and render again. - Set it back to
0.08.
 Figure 6. Density 0.02, 0.08 and 0.3 (Blender render)
On the right of Figure 6 (0.3), the beam is strongest, but the monkey and the round patch on the floor are clearly darker. Much of the light scattered in the fog before reaching the monkey. Start between 0.05 and 0.1 and adjust a little at a time while watching the render. The bigger the fog box, the longer the path the light travels through it, so the same Density looks thicker.
5. Render settings: the Volumes panel
EEVEE splits the space the camera sees into small cells (a 3D grid) to calculate volumes. How fine this grid is gets set in the Volumes panel on the Render tab.
Steps:
- On the Render tab of the Properties editor, expand the Volumes panel (where ② and ③ are in Figure 9).
- Check that Resolution is the default 1:8 and Steps is 64.
| Field | What it does | When you change it |
|---|---|---|
| Resolution | How many pixels of the screen make one cell (1:8 means one cell every 8 pixels) | The smaller the second number, as in 1:4 or 1:2, the finer the cells and the better the result, and the more video memory it uses |
| Steps | How many cells to calculate going away from the camera | More is better and uses more video memory |
| Distribution | Whether to pack the cells near the camera or spread them evenly | Higher values put more cells near the camera |
This calculation uses several 3D textures and uses a lot of video memory. In this guide's scene the fog is spread evenly, so there was no visible difference between 1:8 and 1:2. Only when beam edges break up like stairs, or the fog around small objects smears, try changing Resolution one step at a time to 1:4 and 1:2.
6. Light beams through a window
Now build the scene in Figure 1. Put up a wall with a window behind the monkey, and light the window from outside with a spotlight. Only light that passes through the window lights the fog, and the window bars leave stripes of shadow in the beams.
Start: In the scene from section 4, turn off the camera icon of the Spot from section 3 in the Outliner.
Steps:
- Wall: add a box with
Shift+A> Mesh > Cube and type the Location and Dimensions from the table below on the sidebar Item tab. Make six boxes the same way. Give them all one shared dark gray material.
| Name | Location (X, Y, Z) | Dimensions (X, Y, Z) | What |
|---|---|---|---|
| WallL | -5.25, 4, 3 | 7.5, 0.2, 8 | Wall left of the window |
| WallR | 5.25, 4, 3 | 7.5, 0.2, 8 | Wall right of the window |
| WallB | 0, 4, 0 | 3, 0.2, 2 | Wall below the window |
| WallT | 0, 4, 5.25 | 3, 0.2, 3.5 | Wall above the window |
| BarV | 0, 4, 2.25 | 0.16, 0.2, 2.5 | Vertical window bar |
| BarH | 0, 4, 2.25 | 3, 0.2, 0.16 | Horizontal window bar |
- Change the fog box so it stays only inside the room, in front of the wall. Set Fog's Location to X
0, Y-2.05, Z3and Dimensions to X18, Y11.9, Z8. - Add another
Shift+A> Light > Spot and rename it toWinSpot. Set Location X0, Y16, Z9and Rotation X58, Y0, Z180. This places it high behind the wall, looking down at the window. - On the Light tab, set Power
60000, Radius0.05, Angle20and Blend0.1(Figure 7). - Render with
F12. You get the result in Figure 1.
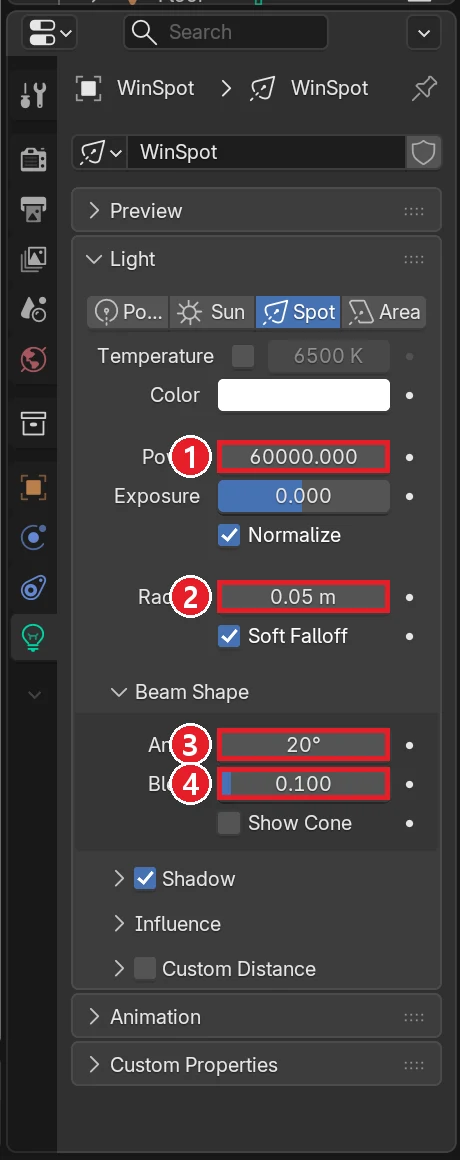 Figure 7. The WinSpot panel. ① Power 60000 ② Radius 0.05 m ③ Angle 20° ④ Blend 0.1 (Blender screenshot)
Power is as high as 60000 because the light is about 12 m from the window and has to travel a long way past the wall. If the render is too dark or too bright, halve or double Power. If light strength is confusing, follow the order in When a render is too dark or blown out.
6-1. Brighter when you face the light: Anisotropy
In Figure 1, the beams are on the window side, the direction in which the camera faces the light. Real fog and dust often do not bounce light evenly in all directions. They bounce more of it in the direction it was already going. That is why fog glows so brightly when you look into the light. This property is set with Anisotropy. At 0 the light bounces evenly in all directions. Positive values bounce more forward (the direction the light was going), and negative values bounce more backward.
Steps:
- Change the Anisotropy of the Fog material to
0.6and render. - Compare with the result at
0(Figure 1).
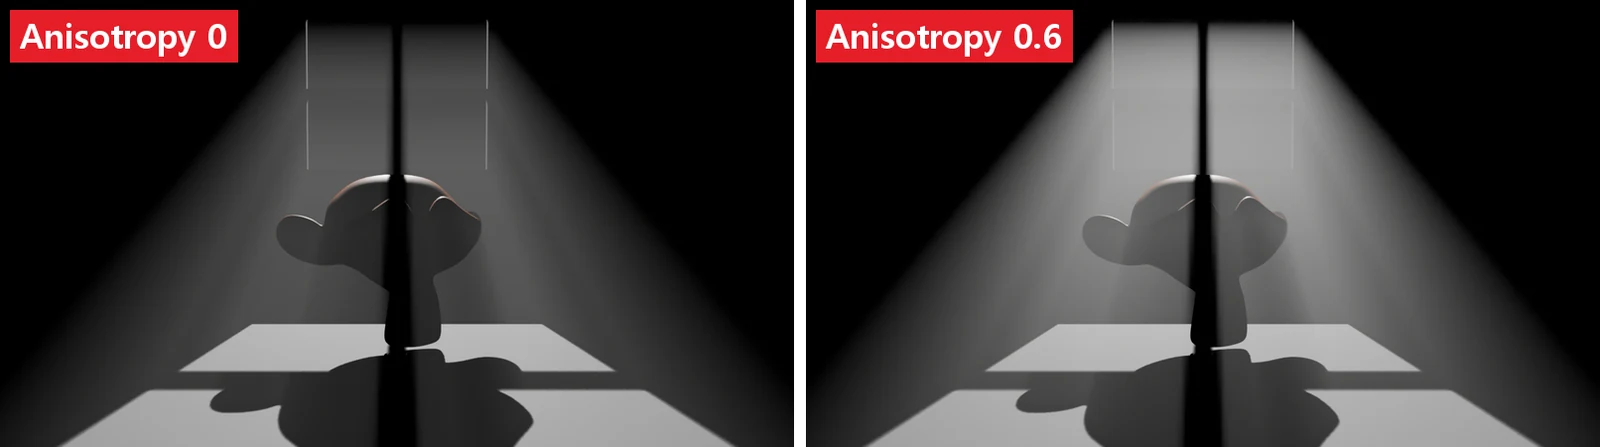 Figure 8. Left: Anisotropy 0. Right: Anisotropy 0.6 (Blender render)
In this scene the camera faces the light, so raising Anisotropy made the beams much brighter. In the opposite case, where the camera is on the same side as the light and looks away from it, a positive Anisotropy makes the beams fainter. Decide by looking at where the camera and the light face.
7. Fog blocking its own light: Volume Shadows
When fog is thick, light should weaken little by little as it passes through. EEVEE leaves this calculation off by default. The switch is Volume Shadows inside Sampling > Shadows on the Render tab. This option approximates light absorption by the surrounding volumes, which makes volumes more opaque to light, and it is very expensive to calculate.
Start: Continue from the window scene in section 6 (Anisotropy 0).
Steps:
- Raise the Density of the Fog material to
0.3, to make the difference easy to see. - On the Render tab, expand Shadows inside the Sampling panel and render with the Volume Shadows checkbox off (① in Figure 9).
- Turn on Volume Shadows and render again.
- When you are done, turn Volume Shadows off and set Density back to
0.08.
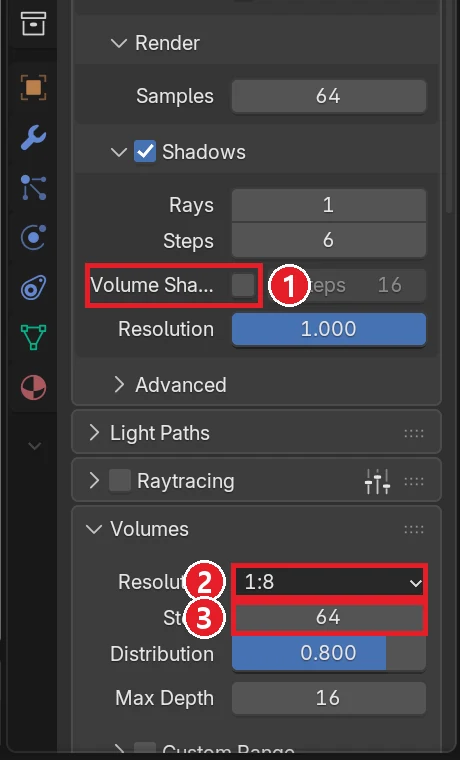 Figure 9. ① Volume Shadows in Sampling > Shadows (off by default) ② Resolution in Volumes ③ Steps in Volumes (Blender screenshot)
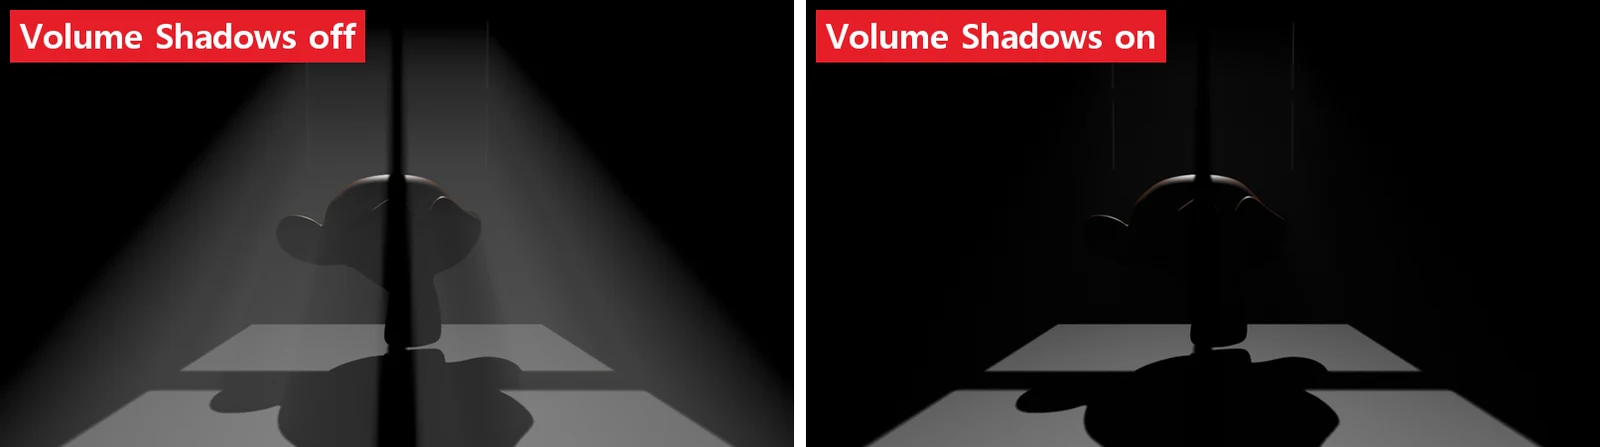 Figure 10. At Density 0.3. Left: Volume Shadows off. Right: on (Blender render)
With it on, the light weakened as it passed through the thick fog, and the beams became much darker. For thick smoke or clouds, volumes that are "solid inside", turning it on looks natural. For light fog like this guide's, leaving it off makes little difference and saves render time.
8. Choosing which lights light the fog: Volume Scatter
When a scene has several lights, you may want some lights to make beams and others to light only the objects. The Influence > Volume Scatter field on the Light tab controls this. When this value is 0, that light does not light the fog.
Start: In the scene from section 7, turn off WinSpot's camera icon in the Outliner and turn the Spot from section 3 back on.
Steps:
- Select the Spot from section 3 and expand the Influence panel on the Light tab (Figure 11).
- Change Volume Scatter to
0and render. - Compare with the result at
1.
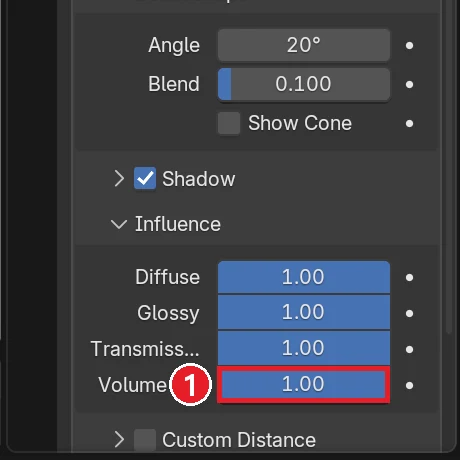 Figure 11. ① Influence > Volume Scatter. The picture shows WinSpot selected; the Spot from section 3 has the same field in the same place (Blender screenshot)
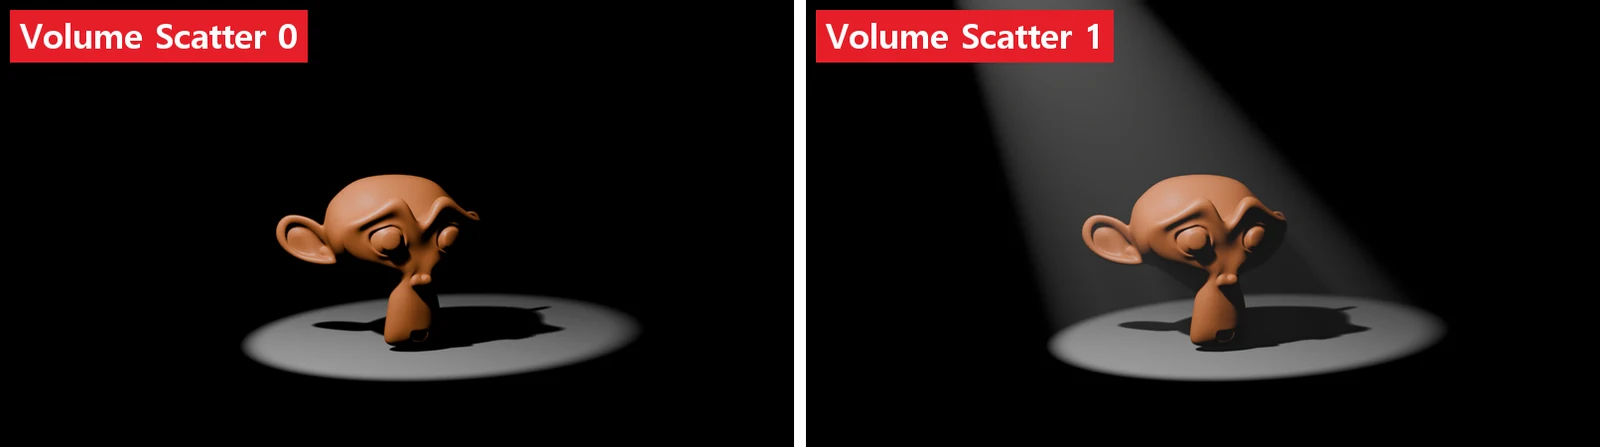 Figure 12. Left: Volume Scatter 0. Right: 1. The picture was rendered with the fog box from section 3 (16 × 16 × 6 m) (Blender render)
With Volume Scatter at 0, only this light's beam disappears, even though the fog is still there. The monkey and the floor are just as bright. If you add fog to a scene with several lights, such as three-point lighting, every light makes beams and the image easily turns hazy. Lowering only the fill light's Volume Scatter to 0 keeps just the main beam. Influence values other than 1 are artistic adjustments that break physical rules.
9. Practice
- Change the Color of the Fog material to light blue and render. See how the color of the beams changes.
- In the window scene from section 6, change WinSpot's Rotation Z to
170and render. Check which way the beams and the patch on the floor tilt. - Turn on both the Spot from section 3 and WinSpot, then lower Volume Scatter to 0 on only one of them. See how the image cleans up.
10. Common mistakes and fixes
| Symptom | Cause | Fix |
|---|---|---|
| The render is blocked by a white wall | Principled BSDF is still in the Fog material's Surface | Empty it with Surface field > Link > Remove (section 2) |
| No beam shows at all | The volume went into the Surface field, or Density is too low | Put Principled Volume in the Volume field and set Density to 0.05 or more |
| The whole image is hazy white | Density is too high, or the light is too strong | Lower Density and reduce the light's Power |
| Objects are too dark inside the fog | Density is high, so light scatters before reaching them | Lower Density or make the fog box smaller |
| I put fog in the World and the Sun and background disappeared | A World Volume makes the World Surface and Sun lose their effect | Remove the World Volume and use a volume box around the scene (section 2) |
| Beam edges break up like stairs | Volumes Resolution is coarse | Change Resolution one step at a time to 1:4 and 1:2 (section 5) |
| Rendering got very slow | Volume Shadows is on, or Resolution is set as fine as 1:2 | For light fog, turn Volume Shadows off and keep Resolution at 1:8 |
Summary
Fog is a box with Volume only and no Surface: thickness with Density, backlight with Anisotropy, and per-light control with Volume Scatter. That is the end of the lighting series. Go back to the first guide and try adding light fog to the three-point lighting scene.
Previous: When a render is too dark or blown out · Series start: Three-point lighting in Blender
References
- Blender 5.2 Manual: Volumes (EEVEE)
- Blender 5.2 Manual: Sampling (EEVEE) (Volumetric Shadows)
- Blender 5.2 Manual: World Environment (World Volume)
- Blender 5.2 Manual: Principled Volume
- Blender 5.2 Manual: Light Settings (EEVEE) (Influence)
- Shortcuts: default (Blender) keymap of Blender 5.2.1.
- Pictures: screenshots and renders made in Blender 5.2.1 for this guide.