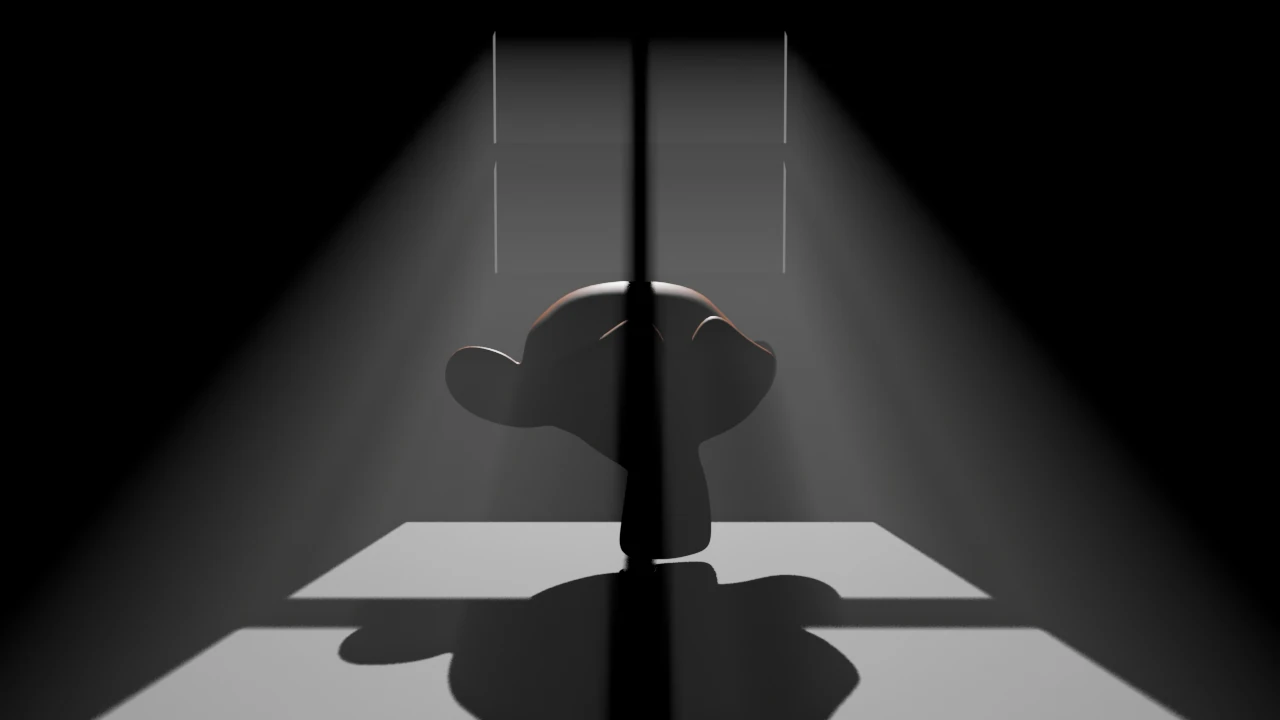
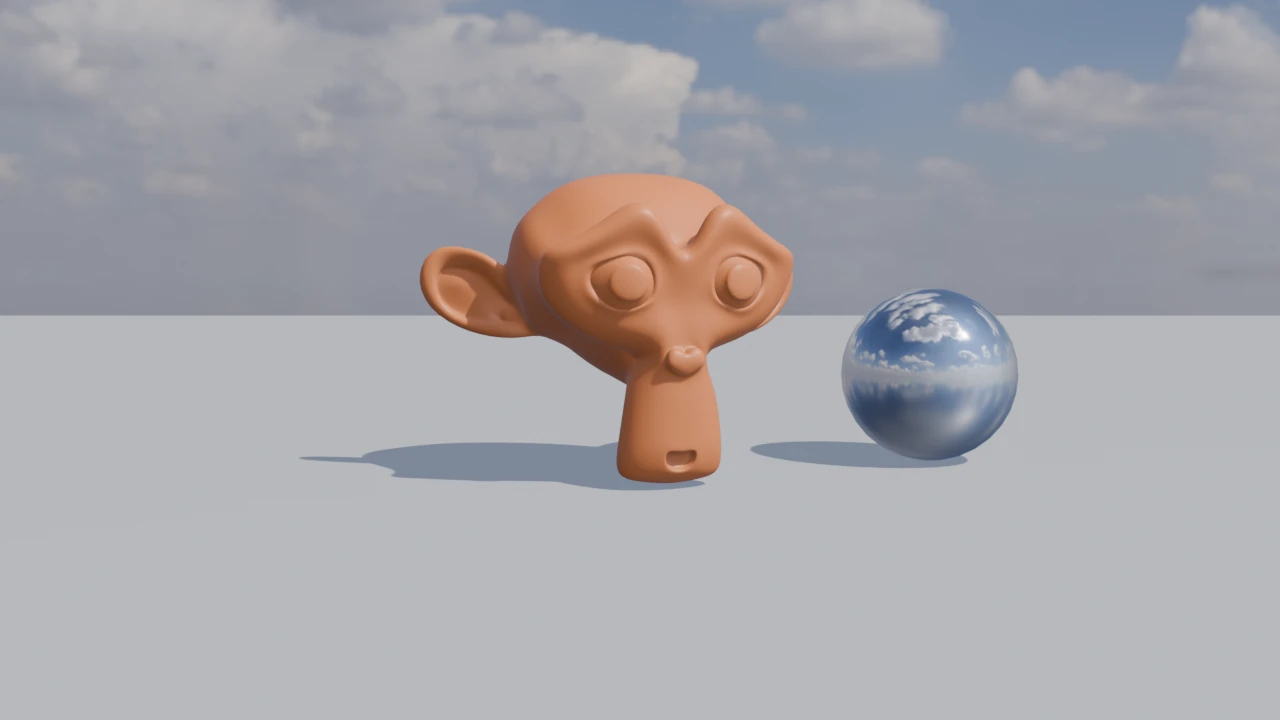
Three-point lighting in Blender: key, fill and rim lights for one clear subject
Build three-point lighting in Blender with three Area lights. The key light shapes the subject, the fill light decides how dark the shadows stay, and the rim light separates the subject from the background. Each step is checked with side-by-side renders.
한국어English
ON THIS PAGE
- 011. Prepare the practice scene
- 022. Where the three lights go
- 033. Key light: the light that makes the shape
- 044. Fill light: deciding how dark the shadows stay
- 055. Rim light: lifting the subject off the background
- 066. Checking lights one by one
- 077. Practice
- 088. Common mistakes and fixes
- 099. The whole lighting series
- 10Summary
- 11References
Based on: Blender 5.2 LTS (screenshots from 5.2.1, English interface, default shortcuts), EEVEE render engine. Checked in November 2026. All pictures are real Blender screenshots and renders. The red numbers, boxes and red labels on the renders were added to explain them.
When you render your first object, it often looks flat. The shape reads poorly, one side sinks into black, or the subject melts into the background. The first thing to try is three-point lighting. Photo studios and film sets have used this layout for a long time. It uses three lights, and each light has one job.
Think of an actor on a stage. A key light from the front on one side shows the face. A weaker fill light on the other side keeps the shadows from going pitch black. A rim light from behind makes a bright edge on the hair and shoulders, so the actor stands out from the dark stage behind. In this guide you turn on these three lights one at a time in Blender and compare the renders.
After this guide you can:
- Add an Area light and set its location, rotation, Power and Size with numbers.
- Shape the subject with a key light.
- Set how deep the shadows are with the fill light's strength.
- Light the subject's edge with a rim light to separate it from the background.
- Turn lights on and off in the Outliner to see what each one does.
Before you start: The light types (Point, Sun, Spot, Area) and basic values such as Power and Radius are covered in Blender beginner chapter 9: lights. This guide is the next step: how to split the work between several lights. The render shortcut
F12and resolution settings are in Blender render settings.
1. Prepare the practice scene
To see only the effect of our lights, start with a completely dark room. A new file has a cube and a point light, and the World (the background) also gives off a very dark gray light. Remove both, and only the lights you add are left.
Start: Begin with the default cube of a new file (File > New > General).
Steps:
- In the 3D Viewport, left-click the cube and press
X> Delete. Delete the point light (Light) the same way. Keep the camera. - Choose
Shift+A> Mesh > Monkey. A monkey head (Suzanne) appears in the middle. - Press
Ctrl+2. A Subdivision Surface modifier is added and the surface becomes smooth. Then, with the mouse over the 3D Viewport, right-click > Shade Smooth. - Press
Nto open the sidebar and type20into Rotation Z on the Item tab. The monkey turns a little to the left, toward the key light. - On the Material tab of the Properties editor, click New and set Base Color to an orange color. The picture uses R 0.8, G 0.22, B 0.06. Color makes it easier to tell lit areas from shadows.
- On the World tab (red globe icon), click the Color field in the Surface panel and drag its brightness (V) down to
0. The background turns black, and the World no longer gives off light. - Select the camera and, on the sidebar Item tab, set Location to X
0, Y-8.5, Z1and Rotation to X82, Y0, Z0. The camera now looks at the monkey from the front, slightly above.
If you render with F12 now, the image is completely black, because there is no light at all. Now add the lights one by one.
2. Where the three lights go
First, see where the three lights sit in one picture. If the direction from the camera to the subject is 6 o'clock on a clock, the key light is front left (7 to 8 o'clock) and high, the fill light is front right (4 to 5 o'clock) and low, and the rim light is behind the subject (12 to 1 o'clock) and high.
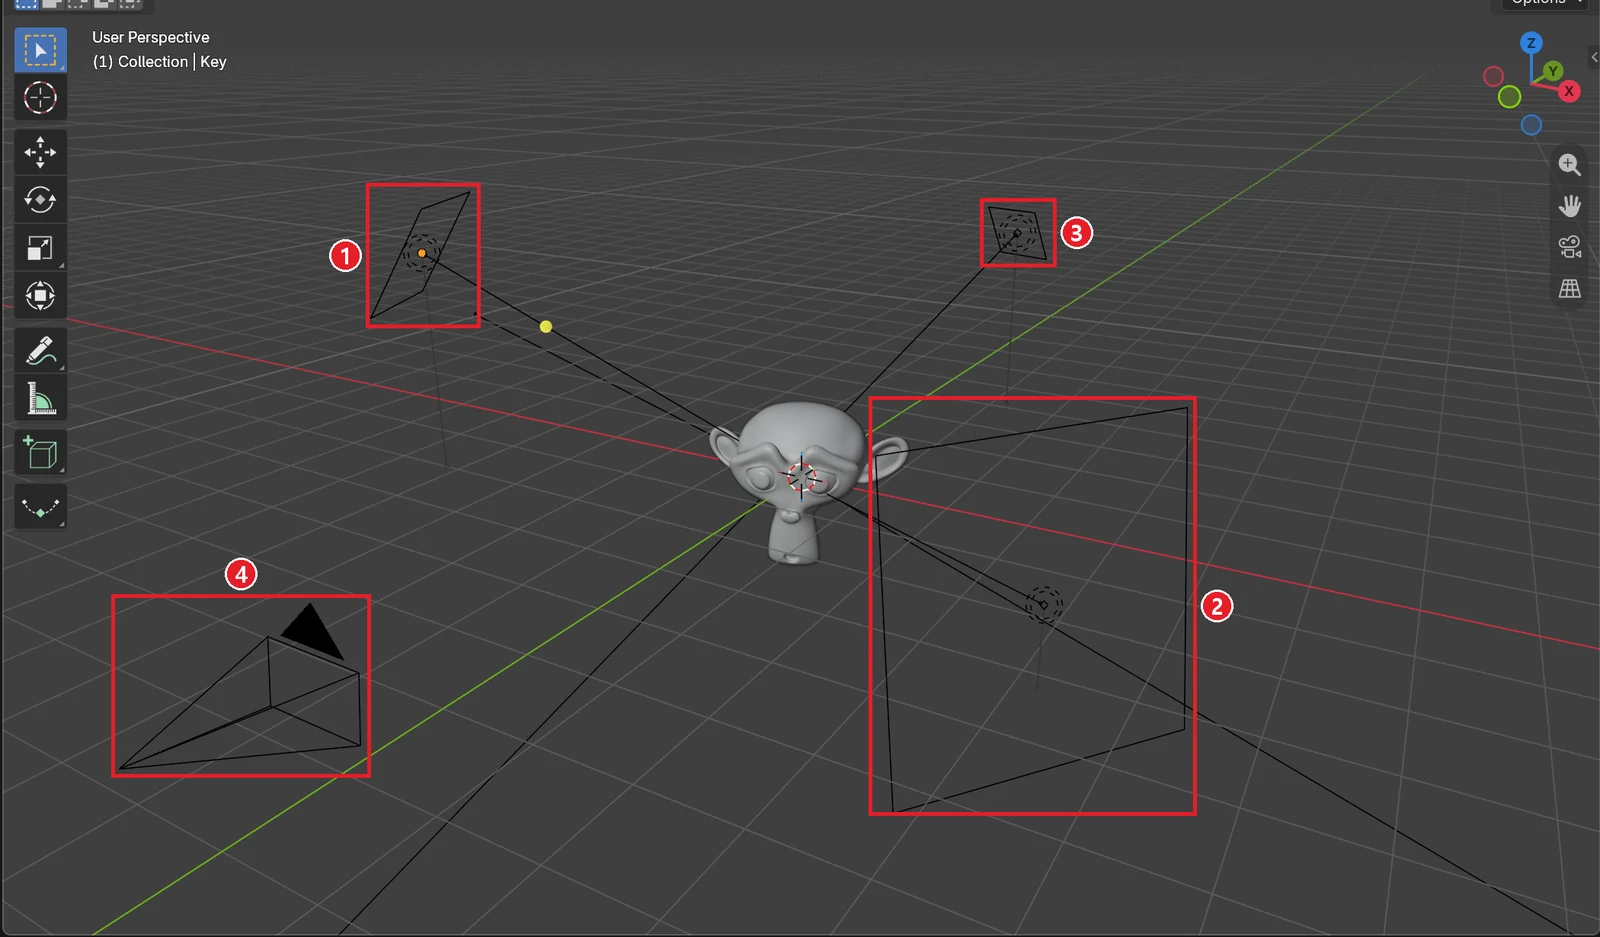 Figure 1. The three lights and the camera. ① Key light ② Fill light (the largest square) ③ Rim light (far behind the monkey) ④ Camera (Blender screenshot)
| Light | Job | Location (X, Y, Z) | Rotation (X, Y, Z) | Power | Size |
|---|---|---|---|---|---|
| Key | Makes the shape and the bright side | -4.2, -2, 2.8 | 59, 0, -65 | 900 | 1.5 m |
| Fill | Lifts the shadows a little | 4.2, -3.2, 0.8 | 81, 0, 53 | 200 | 3 m |
| Rim | Lights the edge to separate it from the background | 1.2, 4.2, 2.6 | 62, 0, 164 | 2500 | 0.8 m |
The rotation values point all three lights at the monkey. If a light points somewhere else, the subject will not get brighter however strong you make it. After typing the values, check in the 3D Viewport that each light's yellow direction line points at the monkey.
3. Key light: the light that makes the shape
All lights in this guide are Area lights. An Area light gives off light from a flat panel, not a point. Think of a window or a studio softbox (a square light covered with cloth). The bigger the panel, the softer the shadow edges.
Start: Continue from the dark scene in section 1.
Steps:
- With the mouse over the 3D Viewport, press
Shift+A. In the Add menu, hover over Light and choose Area from the list that opens on the right (Figure 2). - With the new light selected, press
F2and rename it toKey. - On the sidebar Item tab, type the Key values from the table in section 2 (Location, Rotation).
- Open the Light tab (green bulb icon) of the Properties editor. Type
900into Power and1.5into Size (Figure 3).
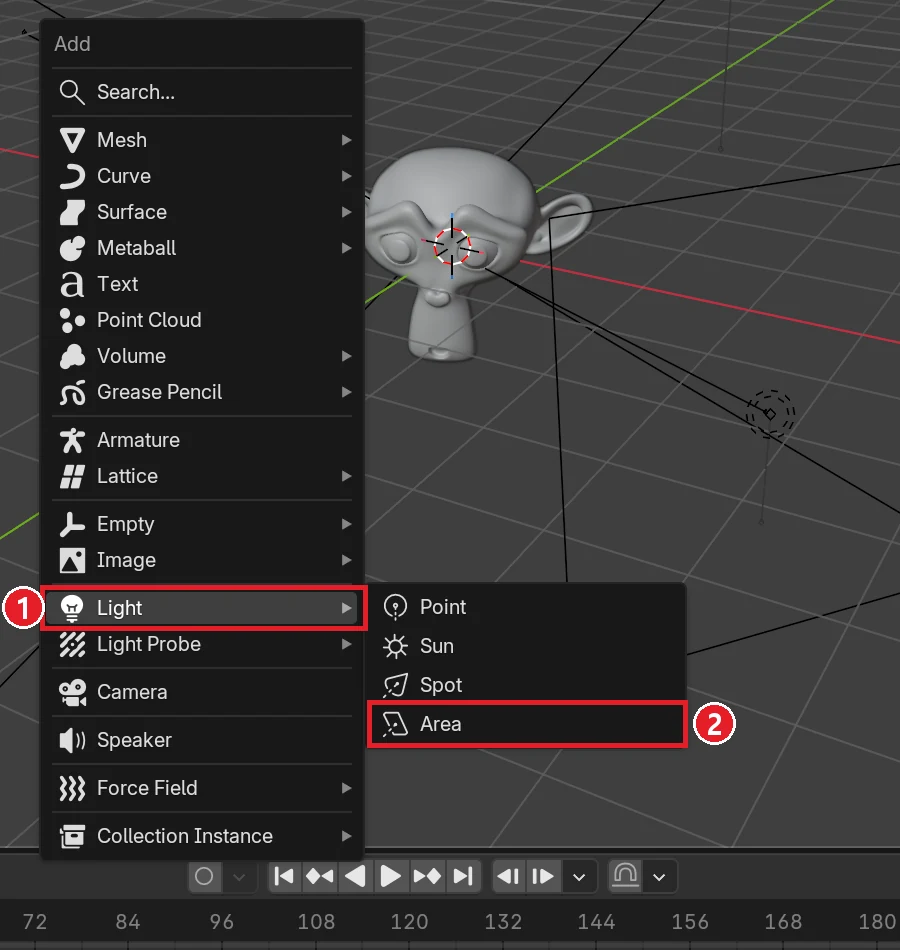 Figure 2. ① Light in the Add menu ② Area in the list on the right (Blender screenshot)
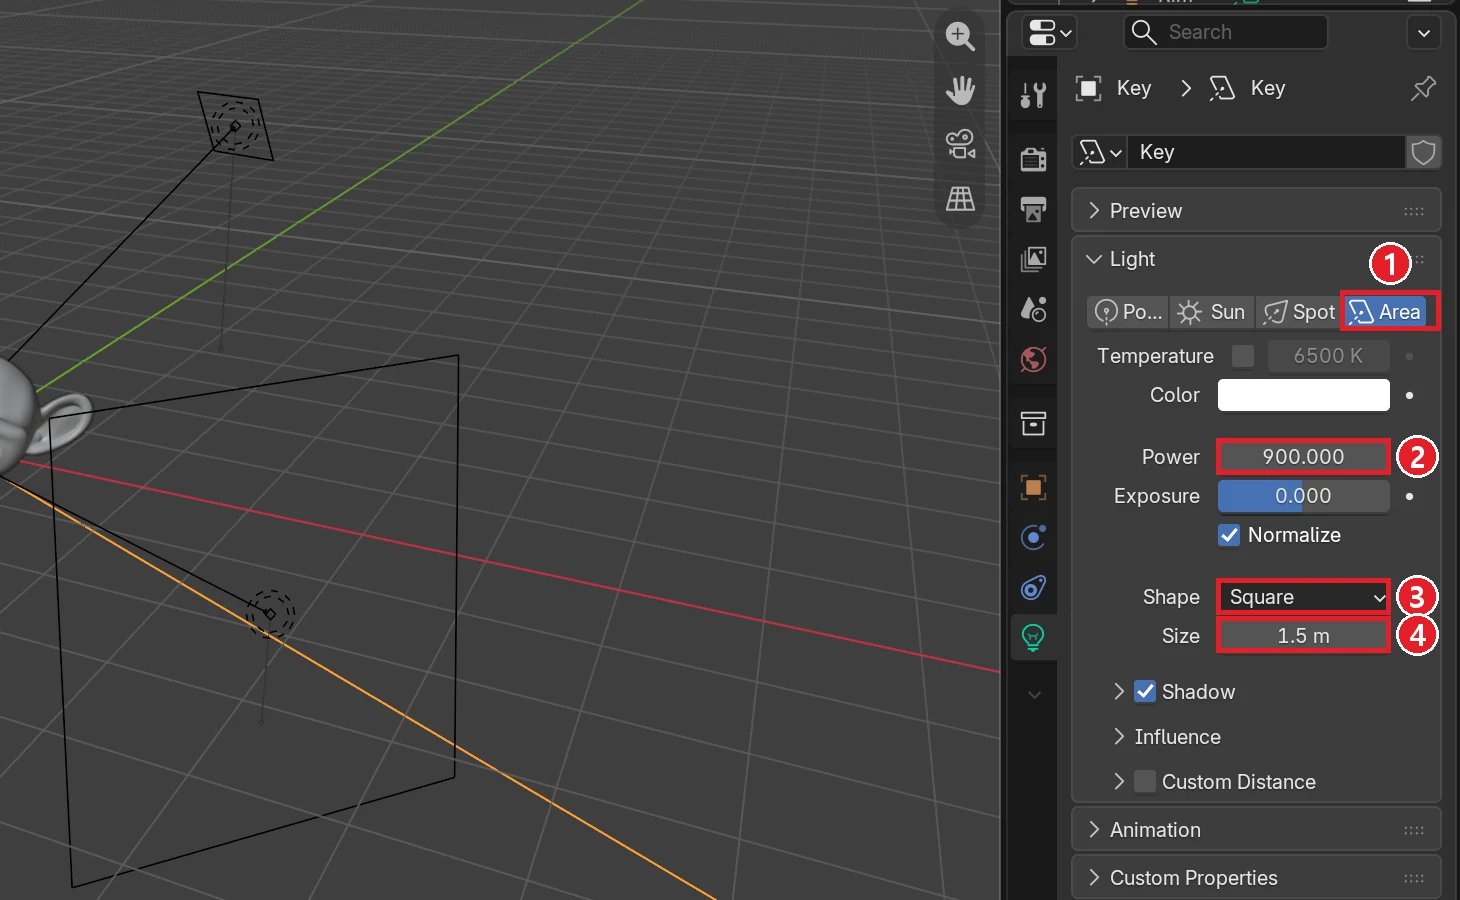 Figure 3. The Key light panel. ① Light type Area ② Power 900 ③ Shape is Square by default ④ Size 1.5 m (Blender screenshot)
Power is the amount of light a lamp gives off. The Power of point, spot and area lights is in watts (W), but this is the energy that leaves as light, not the electric power printed on a bulb, so you cannot compare it directly with household lamps. The same Power gets darker as you move the light away, so it is easier to think of the number as "a value that looks good in this scene". The value 900 on a 1.5 m panel also fits this scene, where the light is about 5 m from the monkey.
Press F12 to render. As in the left image of Figure 4, the left side of the face is bright, while the right side and the right ear almost disappear into black. Even so, the brow and nose read very clearly. The light comes in at an angle from the side and leaves a shadow behind every bump. That is the point of the key light: shadows are what make shape readable. Light straight from the front removes the shadows and the subject looks flat.
4. Fill light: deciding how dark the shadows stay
With only the key light, the shadow side vanishes into the black like the background. The fill light does not remove this shadow. It lifts it a little. You can see a face in the shade on a sunny day because of weak light bouncing back from the sky and the ground. The fill light plays that bounced light.
Start: Continue from the scene with Key from section 3.
Steps:
- Add another light with
Shift+A> Light > Area and rename it toFillwithF2. - Type the Fill values from the table in section 2. Power is
200and Size is3. - Render with
F12and compare with the key-only result.
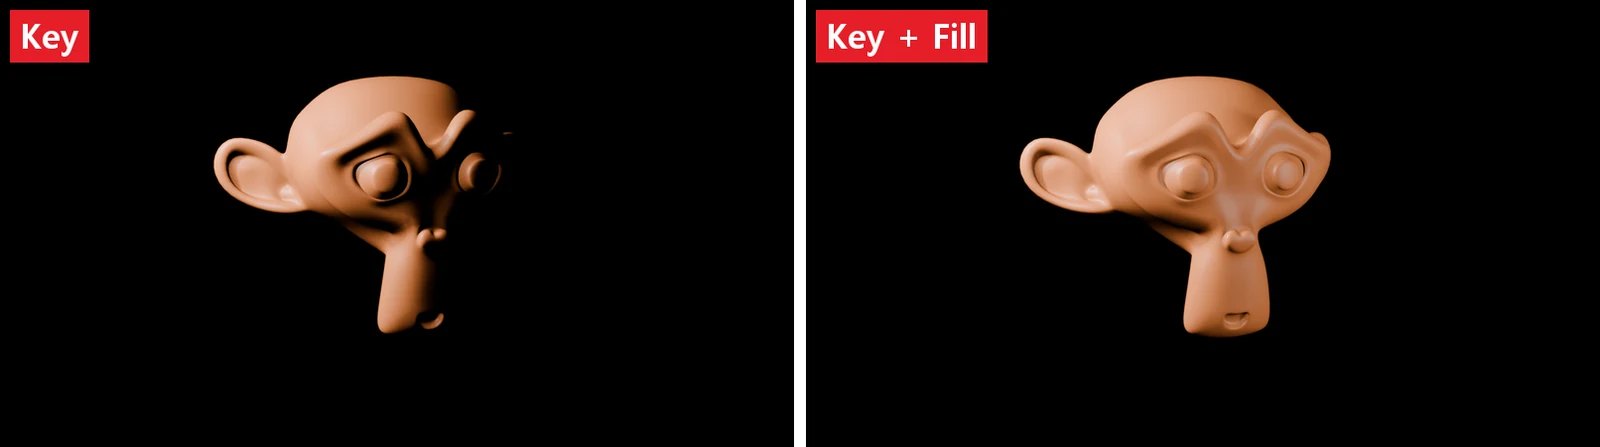 Figure 4. Left: Key only. Right: Key and Fill (Blender render)
Set the fill light differently from the key light in three ways.
- Keep it weak. This scene uses 900 for the key and 200 for the fill, roughly a quarter.
- Make the panel large. A 3 m panel casts almost no visible shadow. If the fill light casts its own sharp shadow, you get a double shadow that looks odd.
- Place it low, on the opposite side from the key. From there it looks into the shadow the key light made.
Changing the fill strength changes the mood a lot. Figure 5 keeps everything else the same and changes only the Fill Power to 40, 200 and 900.
 Figure 5. Only the Fill Power changed to 40, 200 and 900. The W on the labels is the value in the Power field (Blender render)
- Left (40): deep shadows feel heavy and dramatic. They suit a night scene or a tense mood.
- Middle (200): shadows remain, but the dark side still reads. This is a safe place to start.
- Right (900, the same as the key): the shadows almost disappear and the bumps look weak. Bright and clean, but flat.
There is no single right answer. Remember that the difference between key and fill is the knob that sets the mood.
5. Rim light: lifting the subject off the background
In front of a dark background, the edge of the dark side blends into the background and you cannot tell where the subject ends. The rim light shines from behind and above, toward the camera, and leaves a thin band of light only on the edge. It looks like the glowing outline of hair when the sun is behind a person.
Start: Continue from the scene with Key and Fill from section 4.
Steps:
- Add another light with
Shift+A> Light > Area and rename it toRim. - Type the Rim values from the table in section 2. Power is
2500and Size is0.8. - In the Outliner, click the camera icons (Disable in Renders) on the Key and Fill rows to turn them off, then press
F12. You get the rim light alone. - Turn both camera icons back on and press
F12. This is the result with all three lights.
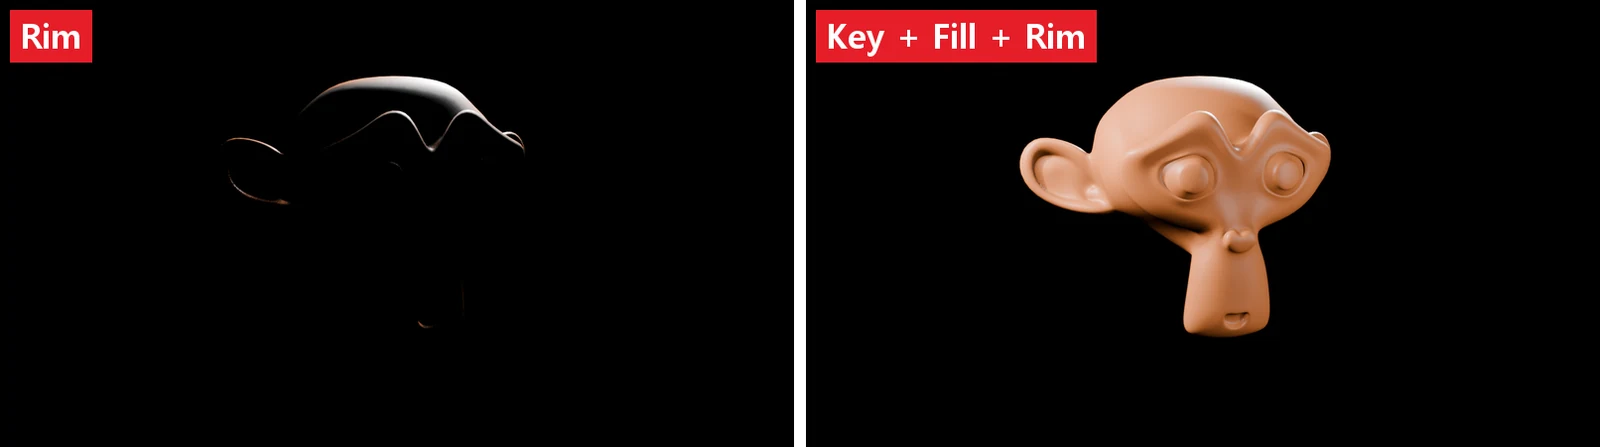 Figure 6. Left: Rim only. Right: Key, Fill and Rim (Blender render)
With the rim light alone (left of Figure 6), you cannot see the face, only the top of the head and the ear edges glowing. With all three lights (right of Figure 6), this band follows the outline of the head, so the head shape is clear even against the black background. Compare it with the right image of Figure 4 to see the difference.
The rim light has a higher Power than the other lights because its light only grazes the edges and mostly passes by. This scene uses 2500. If it is too strong, the edge blows out to white, so adjust it while looking at the render until some color stays on the edge.
6. Checking lights one by one
With several lights it is easy to forget which light does what. The surest way is to turn off all but one and add them back one at a time.
- The camera icon in the Outliner turns a light off only in renders. The light stays visible in the 3D Viewport.
- If pressing
F12every time is tedious, switch the 3D Viewport to Rendered view (Z> Rendered). You see the result as soon as you change a value. - The render window has several slots. Render into different slots to switch between before and after. How to do this is in the slot section of Blender beginner chapter 11: render and save.
7. Practice
- Move Key in front of the monkey (Location X
0, Y-5, Z0, Rotation X90, Y0, Z0) and render with Key only. Compare how the bumps look with the result in section 3. - With Key only, change Key's Size from
1.5to0.2and render. See whether the border between the bright side and the shadow gets sharper. Set it back to1.5when you are done. - Change Rim's Color to light blue and render. Check that only the edge light changes color.
- Finally, set Rim's color back to white and save the file. Part 4 of this series (when the render is too dark or blown out) uses this scene again.
8. Common mistakes and fixes
| Symptom | Cause | Fix |
|---|---|---|
| I added a light but the render is still black | The light points away from the subject | Check in the 3D Viewport that the yellow direction line points at the subject and fix Rotation |
| I see two overlapping shadows | The fill light is small and strong, so it casts its own shadow | Make Fill's Size bigger and its Power lower |
| The subject looks flat and dull | The key light shines from the same direction as the camera | Move the key light about 30 to 60 degrees to the side so shadows appear |
| The edge blows out to white | The rim light is too strong | Lower Rim's Power |
| Changing a value does not change the render | You are editing a light whose camera icon is off in the Outliner | Check that the light you are editing has its camera icon on |
When the whole render is too dark or blown out, the cause is often light strength, exposure or color management rather than light placement. That case is covered step by step in When a render is too dark or blown out.
9. The whole lighting series
This is the first guide in the lighting series. The rest follow in this order.
| Order | Guide | What it covers |
|---|---|---|
| 1 | Three-point lighting in Blender (this guide) | The jobs and strengths of key, fill and rim |
| 2 | HDRI lighting: a free HDRI in the World | Background and surrounding light from one photo |
| 3 | Rendering like a product photo | Infinite background, large softbox, camera focus |
| 4 | When a render is too dark or blown out | Fixing light strength, exposure and view transform in order |
| 5 | EEVEE light beams and fog | Volume scattering and Volumes settings |
If you want to let AI place the lights, Letting AI handle lighting and materials shows the same three-point lighting added through Blender MCP.
Summary
Key for shape, fill for shadow depth, rim for the edge, and turn them on one at a time to check. The next guide lights the whole scene with one photo (an HDRI) instead of separate lights.
References
- Blender 5.2 Manual: Light Objects (light types, Area Shape and Size, Power of Lights table)
- Blender 5.2 Manual: Light Settings (EEVEE)
- Shortcuts: default (Blender) keymap of Blender 5.2.1.
- Pictures: screenshots and renders made in Blender 5.2.1 for this guide.