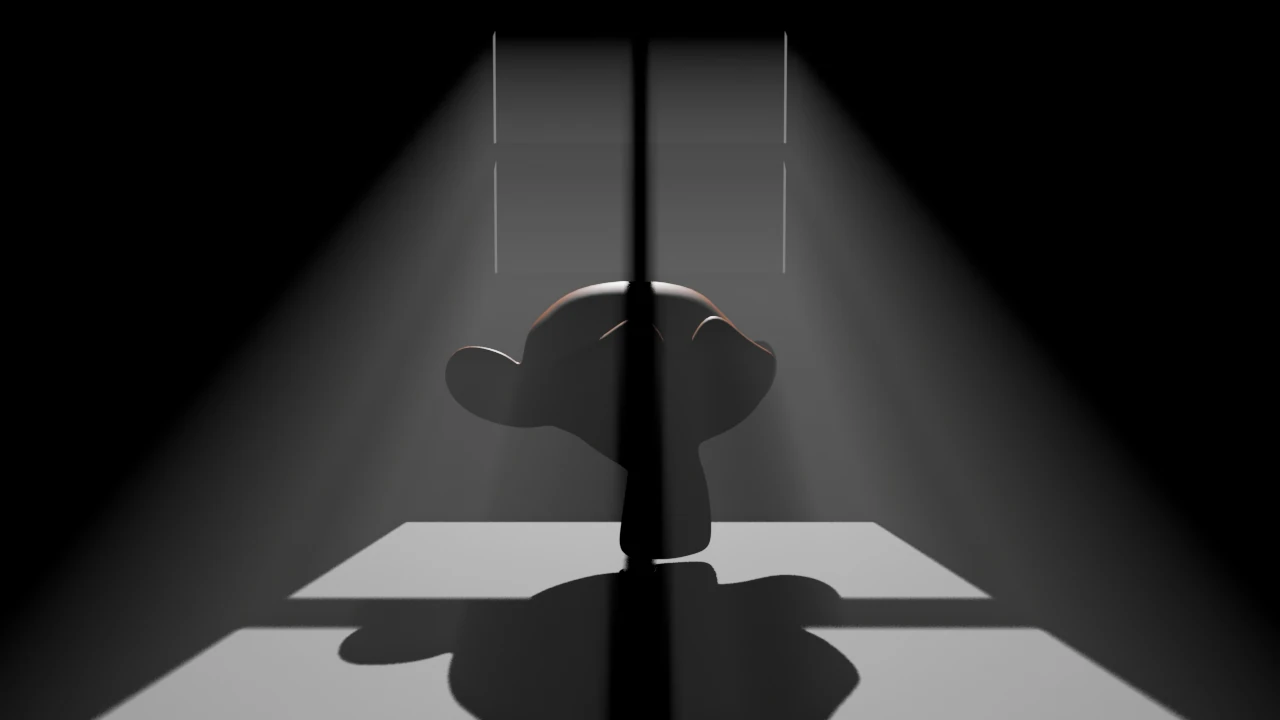
When a render is too dark or blown out: fix it in order of light on, strength, exposure and view transform
A checklist for when the viewport looked bright but the F12 render comes out black, or the subject blows out to white. Material Preview's stand-in lighting, lights turned off for rendering, a Power that is too low, Sun Strength, and the Exposure and View in Color Management are each checked with side-by-side renders.
한국어English
ON THIS PAGE
- 011. Bright in the viewport, black in the render: Material Preview's stand-in light
- 022. Lights turned off for rendering
- 033. The light is too weak: the size of Power
- 044. Blown out to white: Sun Strength and Exposure
- 055. Bright areas turn flat and yellow: set View to AgX
- 066. The order of checks at a glance
- 077. Practice
- 088. Common mistakes and fixes
- 09Summary
- 10References
Based on: Blender 5.2 LTS (screenshots from 5.2.1, English interface, default shortcuts), EEVEE render engine. Checked in November 2026. All pictures are real Blender screenshots and renders. The red numbers, boxes and red labels on the renders were added to explain them.
Sometimes the object looks clearly lit in the 3D Viewport, but pressing F12 gives a black render window. Other times you make a light a little stronger and the object turns into a white blob. Both are among the most common problems when you start with Blender.
The cause is usually one of five things. This guide checks them in order: is the light on → is it strong enough → exposure → view transform. It is like taking a photo: "is the lamp on → is the lamp bright enough → is the camera exposure right → what film are you using". The early checks are the most common and the easiest to fix, so going in order usually solves the problem in the first two or three steps.
After this guide you can:
- Tell why Material Preview and the render look different.
- Find lights that are turned off for rendering in the Outliner.
- Set a light's Power and a Sun's Strength to a size that fits the scene.
- Raise or lower overall brightness with Exposure in Color Management.
- Switch View between AgX and Standard and see how bright areas change.
Before you start: This guide uses the scene from Three-point lighting in Blender (a monkey head, three Area lights and a black World). Open the file you saved in that guide's practice section. If you do not have it, follow sections 1 to 5 of that guide to build the same scene. The order of checks is the same even if your scene is different.
1. Bright in the viewport, black in the render: Material Preview's stand-in light
Start: In the three-point scene, click the camera icons on the Key, Fill and Rim rows of the Outliner to turn them all off. This step makes a scene with no lights on purpose.
Steps:
- With the mouse over the 3D Viewport, press
Z> Material Preview. - Press numpad
0to switch to the camera view. - Press
F12to render.
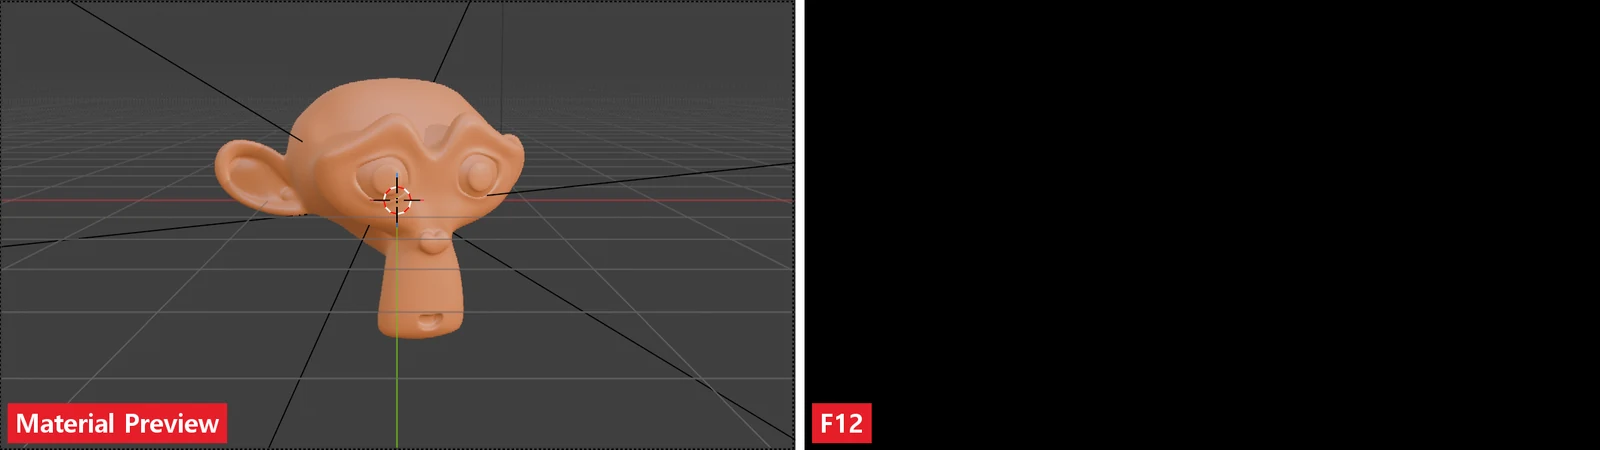 Figure 1. Same scene, same camera. Left: Material Preview in the 3D Viewport. Right: the
F12 render (Blender screenshot and render)
The monkey is bright in the 3D Viewport but the render is completely black. Material Preview does not use the scene's lights. To make it easy to check material colors, it lights objects with a photo light (HDRI) that ships with Blender. It is like the work lights on a stage during rehearsal. You can see well under them, but if the show lights are off, the audience sees nothing.
You can see this setting by clicking the small down arrow next to the view mode buttons on the right of the 3D Viewport header (Figure 2).
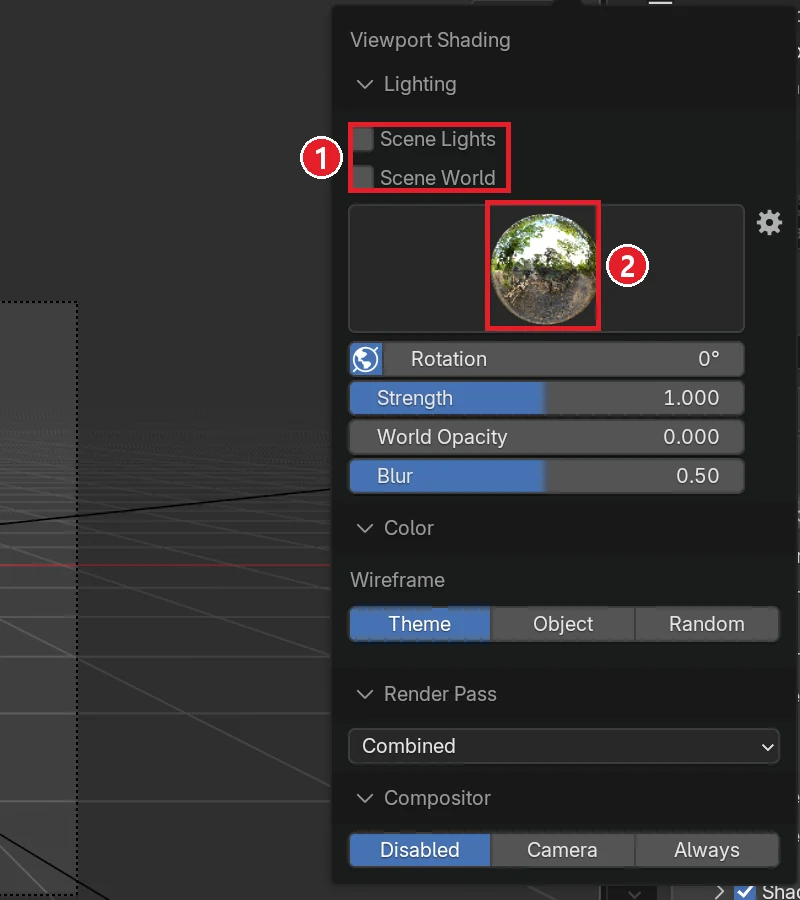 Figure 2. Material Preview's Lighting settings. ① Scene Lights and Scene World are off by default ② The built-in HDRI used instead (Blender screenshot)
- Turning on Scene Lights uses the scene's lights.
- Turning on Scene World uses the scene's World (background light).
With both on, Material Preview also turns black like the render. To preview the render result, it is simpler to use Z > Rendered view instead. Rendered view uses the scene's lights and World from the start.
What to check: If the render is black but Material Preview is bright, the scene has no light that counts for rendering. Go to section 2 and check whether the lights are on for rendering.
2. Lights turned off for rendering
A light that is in the scene but turned off for rendering is the same as no light. The camera icon (Disable in Renders) at the right end of each row in the Outliner is that switch.
Start: Continue from the state of section 1 (camera icons of the three lights off).
Steps:
- In the Outliner, look at the camera icons at the right end of the Key, Fill and Rim rows. Icons that are off look faded (Figure 3).
- Click the three icons to turn them on again.
- Render with
F12. If the monkey shows with three-point lighting, this step solved it.
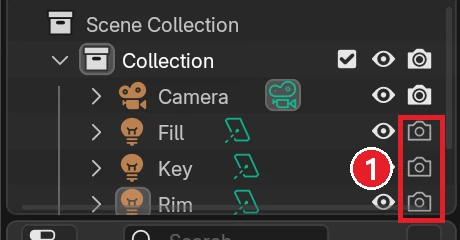 Figure 3. ① The camera icon of a light turned off for rendering is faded (Blender screenshot)
The eye icon (Hide in Viewport) and the camera icon are different switches. Turning off the eye hides the object only in the 3D Viewport, and turning off the camera removes it only from the render. If the light looks fine in the 3D Viewport but the render is black, suspect the camera icon first. The collection row that holds the lights has the same camera icon, so if the collection row is off, the lights drop out of the render even when their own rows are on.
3. The light is too weak: the size of Power
If the lights are on and it is still dark, their strength is too low. Figure 4 shows the same scene with the Power of all three lights cut to one hundredth.
Start: Continue from the scene in section 2 with all three lights on.
Steps:
- Select Key and, on the Light tab of the Properties editor, change Power to
9. Change Fill to2and Rim to25. - Render with
F12. The monkey is barely visible. - Set the values back (Key
900, Fill200, Rim2500).
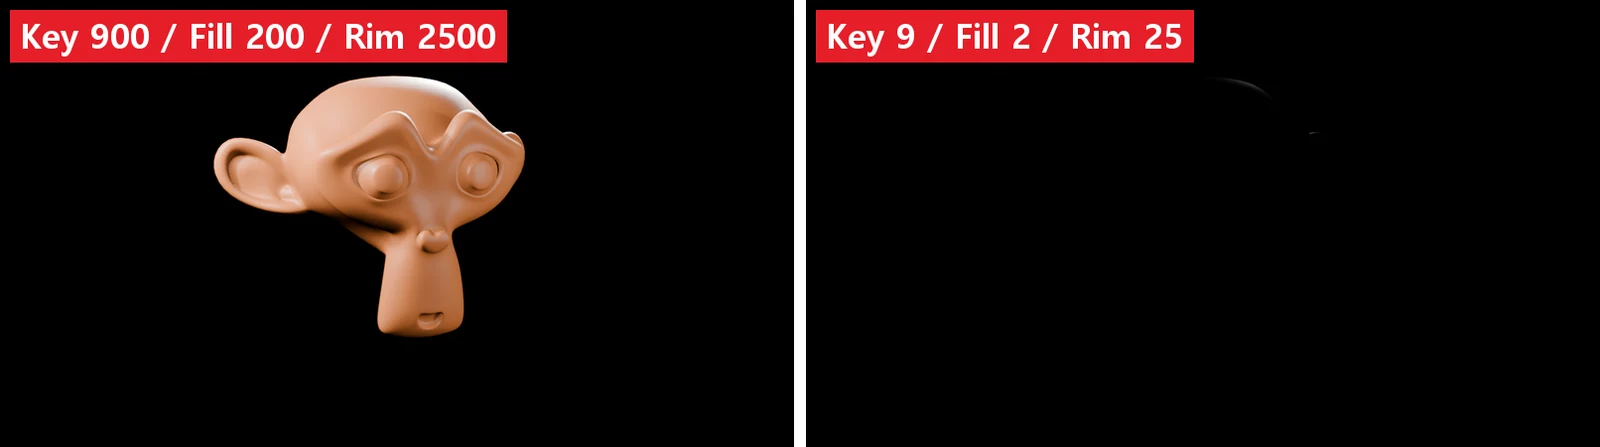 Figure 4. Left: the original Power values. Right: all cut to one hundredth (Blender render)
A common reason is typing the watt number from a household bulb. The table in the Blender manual shows that a 1000-lumen bulb is only about 2.9 W of Power, and a candle is 0.05 W. Such real-world values come out much darker or brighter than you expect. Our eyes adapt to brightness but a render engine does not, so you compensate with exposure (section 4).
The other reason is distance. Point, spot and area lights get darker quickly as they move away. If you built a large scene and the light is tens of meters from the subject, the Power has to be much larger. Move the light close to the subject and you can see right away whether distance is the problem.
4. Blown out to white: Sun Strength and Exposure
The opposite problem also happens. Sun uses a different unit from the other lights. The Power of point, spot and area lights is in watts (W), while Sun Strength is the amount of light reaching one square meter (W/m²). So if you type 1000 as you would for other lights, it is very bright.
Start: In the scene from section 3, turn off the camera icons of Key, Fill and Rim and switch to a scene lit only by a Sun.
Steps:
- Choose
Shift+A> Light > Sun. On the sidebar Item tab, set Rotation to X50, Y0, Z-40. For a Sun only the direction matters, not the location. - On the Light tab, type
1000into Strength and render withF12. The monkey blows out to white (left of Figure 5). - Change Strength to
5and render again. The orange shows properly (middle of Figure 5).
 Figure 5. Left: Sun 1000. Middle: Sun 5. Right: Sun 1000 with Exposure -7.6 (Blender render)
In the manual's table, sunlight on a clear day is 1000 W/m². It is a real-world value, and it still blows out for the same reason as in section 3. Your eyes close down automatically in sunlight, but the render engine does not. If you want to keep real-world values, lower the camera exposure.
Steps (continued):
- Set Strength back to
1000. - Open the Render tab of the Properties editor and expand the Color Management panel at the bottom (Figure 6).
- Type
-7.6into Exposure and render. As on the right of Figure 5, you get almost the same image as Sun 5.
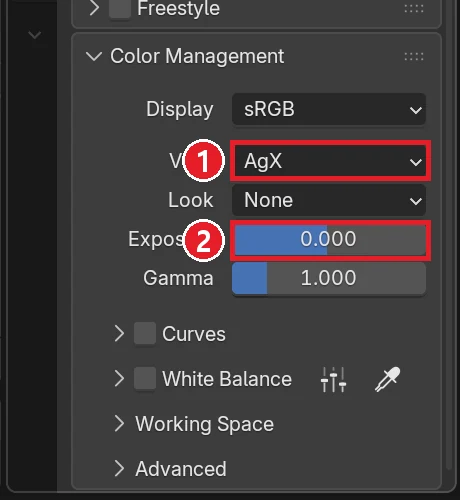 Figure 6. Color Management on the Render tab. ① View (view transform) ② Exposure (Blender screenshot)
Exposure works like camera exposure. Its unit is the stop: raising it by 1 doubles the brightness, and lowering it by 1 halves it. 1000 is 200 times 5, and 200 is 2 multiplied by itself about 7.6 times, so -7.6 gives the same brightness as Sun 5. If the math is a bother, lower it by -1 at a time while watching the render.
Which one to change: When one light is too strong, change that light's Power or Strength. When the whole scene is evenly too bright or too dark, a single Exposure change is faster, because the balance between the lights stays the same and only the overall brightness changes.
5. Bright areas turn flat and yellow: set View to AgX
The last check is View (the view transform). A render holds brightness values far beyond what a monitor can show. View is the way that wide range is fitted into the monitor's range. It is like pouring soup from a big pot into a small bowl. Pour it straight and the overflow is lost. Ladle it carefully and all the flavor stays.
Start: In section 4, turn off the Sun's camera icon and set Exposure back to 0. Turn the camera icons of Key, Fill and Rim back on.
Steps:
- Change Key's Power to
3600(four times the original). - Render with View in Color Management set to AgX (the default in a new file).
- Change View to Standard, render again and compare the two.
- When you are done, set View back to AgX and Key's Power back to
900.
 Figure 7. With Key at 3600. Left: View Standard. Right: View AgX (Blender render)
- Standard pours the brightness straight in. Anything brighter than the bowl is cut off, so on the left of Figure 7 the cheek and forehead become a flat yellow patch. The area where the shape disappears is what people call "blown out".
- AgX moves very bright colors gradually toward white. AgX handles 16.5 stops of brightness and desaturates very bright colors so they look like film. That is why the right of Figure 7 keeps its shape under the same lights.
The default in a new file is AgX. If it has been switched to Standard, for example while following someone else's file or an old tutorial, even a slightly strong light quickly looks blown out. On the other hand, in AgX it is normal for a very bright orange to look slightly faded. What View is and how it differs from Filmic is covered in Color management basics: sRGB, Filmic and AgX.
6. The order of checks at a glance
| Order | Where to look | What you see | Fix |
|---|---|---|---|
| 1 | 3D Viewport view mode | Bright only in Material Preview, black in the render | Check the render lighting with Z > Rendered view (section 1) |
| 2 | Outliner camera icons | A faded camera icon on a light or collection row | Click the icon to turn it on (section 2) |
| 3 | Power on the Light tab | A single-digit value, or a light very far away | Raise Power or move the light closer (section 3) |
| 4 | Sun Strength | A large value such as 1000 | Lower it to between 1 and 10, or lower Exposure (section 4) |
| 5 | Exposure in Color Management | A value other than 0 | Set it back to 0 and judge again (section 4) |
| 6 | View in Color Management | Set to Standard | Change it to AgX (section 5) |
7. Practice
- In the three-point scene, change only Exposure to
+1and-1and render. Check that the strength differences between the three lights stay the same and only the overall brightness changes. - Move Key twice as far from the monkey (Location X
-8.4, Y-4, Z5.6) and render with Key only. See how much darker it gets than in the original position, and write down how many times you would need to raise Power to get the same brightness back. - In Material Preview, turn on Scene Lights and Scene World from Figure 2. Check whether the view now looks similar to Rendered view.
8. Common mistakes and fixes
| Symptom | Cause | Fix |
|---|---|---|
| The render window is completely black | No lights and no World light count for rendering | Check in the order of sections 1 and 2. If the World color is black, you must have a light |
| The render shows only the background, no object | The camera is not looking at the object, or the object's camera icon is off | Check the camera view with numpad 0 and the camera icon on the object's row |
| Changing a light does not change the render | The render window still shows an old result | Press F12 again. Also check whether the render window is on a different slot |
| One light is much brighter than the others | That light is very close to the subject | Move it farther away or lower only that light's Power |
| Everything looks grayish and hazy | Exposure was raised to pull up the dark areas | Keep Exposure at 0 and set brightness with the lights |
Summary
When it is black, check light on → strength. When it is white, check Strength → Exposure → View. The next guide uses EEVEE to make light beams and fog that you can see in the air.
Previous: Rendering like a product photo · Next: EEVEE light beams and fog · Series start: Three-point lighting in Blender
References
- Blender 5.2 Manual: Light Objects (Power of Lights table)
- Blender 5.2 Manual: Viewport Shading (Scene Lights and Scene World in Material Preview)
- Blender 5.2 Manual: Displays and Views (View, Exposure)
- Shortcuts: default (Blender) keymap of Blender 5.2.1.
- Pictures: screenshots and renders made in Blender 5.2.1 for this guide.