HDRI lighting: one free HDRI in the World for background and light at once
Download a free (CC0) HDRI from Poly Haven, put it into Blender's World as an Environment Texture, turn the sun direction with a Mapping node, set brightness with Strength, and see what EEVEE's Sun Threshold and Film Transparent do, all checked with side-by-side renders.
한국어English
ON THIS PAGE
- 011. Download a free HDRI: Poly Haven
- 022. Prepare the practice scene
- 033. Put the HDRI in the World
- 044. The same thing as nodes: photo → background → world
- 055. Turning the HDRI: setting the sun direction
- 066. Setting brightness: Strength
- 077. Sun shadows in EEVEE: Sun Threshold
- 088. A transparent background only: Film Transparent
- 099. HDRIs that come with Blender
- 1010. Practice
- 1111. Common mistakes and fixes
- 12Summary
- 13References
Based on: Blender 5.2 LTS (screenshots from 5.2.1, English interface, default shortcuts), EEVEE render engine, the Poly Haven website. Checked in November 2026. The pictures are real Blender screenshots and renders, and screenshots of the Poly Haven website. The red numbers, boxes and red labels on the renders were added to explain them.
Instead of placing lights one by one, you can light a whole scene with one photo. That is HDRI lighting. An HDRI (High Dynamic Range Image) is a 360-degree photo that captures everything around one spot, up, down and all around. Unlike a normal photo, it stores the brightness of very bright areas such as the sun as numbers. Put this photo on Blender's World (the background that surrounds the scene), and the sky and sun in the photo become light that falls on your objects.
Imagine putting your scene inside a huge photo studio shaped like a ball. A photo of an outdoor view covers the inside of the ball. The bright part of the photo (the sun) gives strong light, and the sky gives soft light. The same photo also becomes the background. Shiny objects such as metal reflect the view in the photo.
After this guide you can:
- Download a free HDRI from Poly Haven at a sensible size.
- Connect an Environment Texture to the World's Color and open the HDRI file.
- Turn the HDRI with a Mapping node to set the sun direction (the shadow direction).
- Set the overall brightness with Strength.
- Tell what EEVEE's Sun Threshold and Film Transparent do.
Before you start: How to place individual lights is in the first guide of this series, Three-point lighting in Blender. What the World is first appears in the World section of Blender beginner chapter 9: lights.
1. Download a free HDRI: Poly Haven
Poly Haven is a site that gives away HDRIs, textures and 3D models for free. Its license page says all assets are CC0. CC0 means the creator has given up their rights, so you can use the files in commercial work and do not need to give credit (though it is appreciated).
Steps:
- Go to polyhaven.com in a web browser and choose HDRIs. This guide uses Kloofendal 48d Partly Cloudy (Pure Sky), an HDRI of a clear sky with clouds only.
- Click the resolution button at the top right (① in Figure 1) and choose 2K.
- Click the format button (②) and choose HDR.
- Click Download (③). The 2K HDR file is about 5.5 MB. Keep it in a folder that is easy to find (for example, the same folder as your project file).
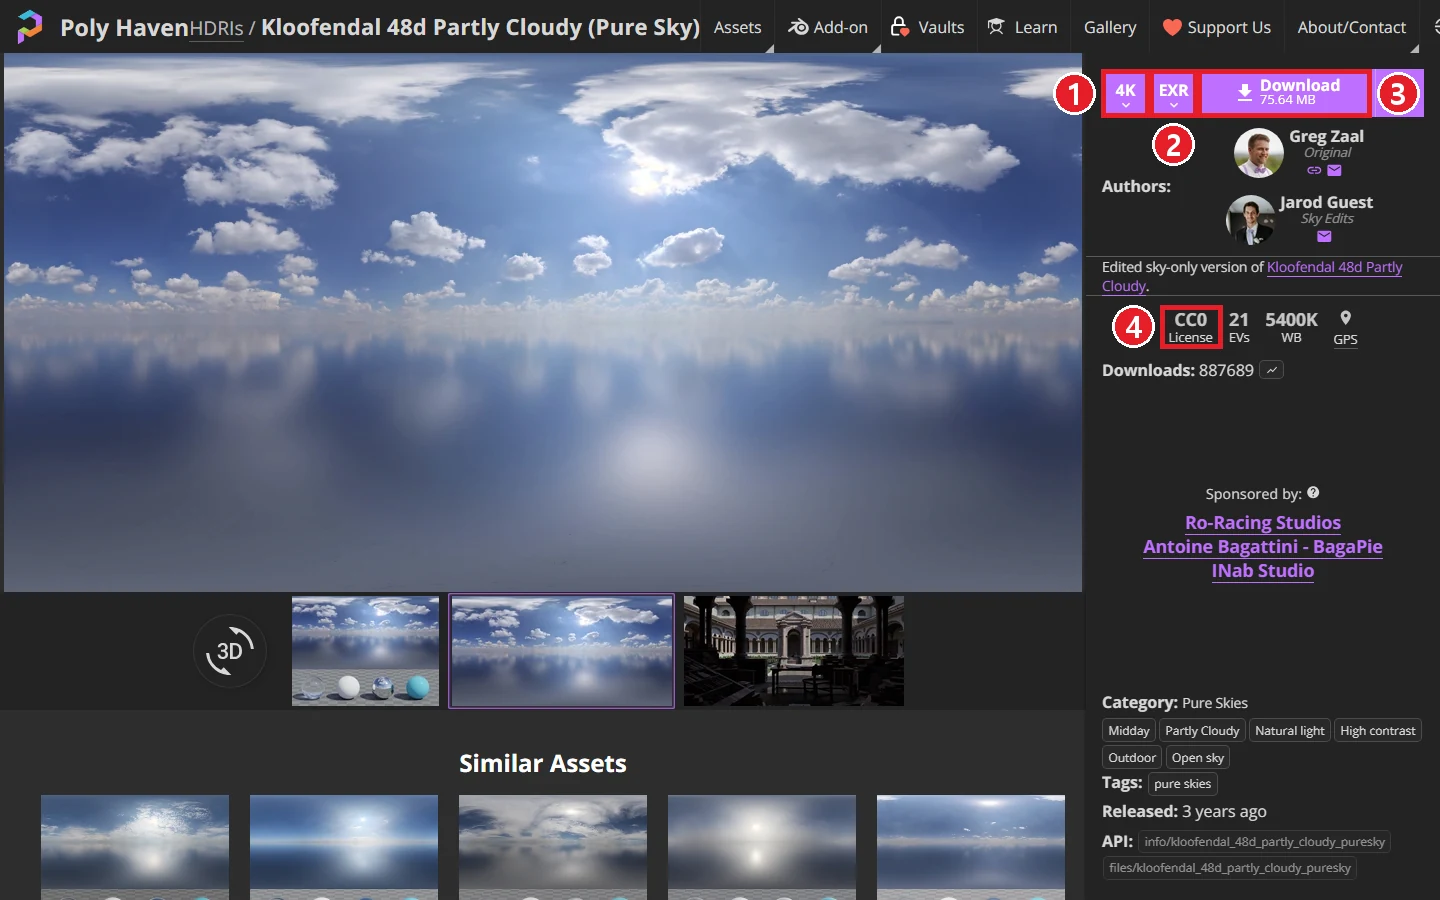 Figure 1. ① Resolution ② File format ③ Download ④ CC0 license. When you first open the page it is set to 4K and EXR (Poly Haven website screenshot)
Why start with 2K: Higher resolution means a bigger file and more memory during rendering. As Figure 1 shows, the 4K EXR is over 75 MB. 2K is enough to make light. You only need higher resolution when the background is seen large. A 2K file is 2048 pixels wide and covers all 360 degrees, so there are about 6 pixels per degree. A 35 mm lens sees about 54 degrees, which holds only about 300 pixels, so in a 1280-pixel render the sky looks a little soft (Figure 4). If you want a sharp background, download 8K or more.
HDR and EXR: Both formats store a wide range of brightness. Blender reads both. At the same resolution the HDR file is smaller, which makes it handy to start with.
2. Prepare the practice scene
Start: Begin with the default cube of a new file (File > New > General).
Steps:
- Select the cube and the point light (Light) and delete them with
X> Delete. This guide uses only the HDRI, with no light objects. - Add a monkey head with
Shift+A> Mesh > Monkey, then pressCtrl+2and right-click > Shade Smooth. On the sidebar (N) Item tab, set Rotation Z to20. On the Material tab, click New and set Base Color to an orange color. - Add a sphere with
Shift+A> Mesh > UV Sphere. In the Add UV Sphere panel at the lower left, set Radius to0.6, and on the sidebar set Location to X2, Y0.6, Z-0.4. Apply Shade Smooth and make a new material with Metallic1and Roughness0.05. This sphere reflects its surroundings like a mirror. - Add a floor with
Shift+A> Mesh > Plane, set Size to60in the Add Plane panel and Location Z to-1on the sidebar. Click New for the material and set Base Color to a middle gray (the picture uses R, G, B 0.5). - Select the camera and, on the sidebar, set Location to X
0, Y-8, Z0.3and Rotation to X86, Y0, Z0. On the Camera tab (green camera icon) of the Properties editor, change Focal Length to35.
If you render with F12 now, it is dark as on the left of Figure 5, because there are no light objects and the World only gives its default dark gray light.
3. Put the HDRI in the World
The HDRI goes into the World's Color field. Right now the Color field holds a single color (dark gray). Think of it as plugging a photo into that slot instead of a color.
Start: Continue from the scene in section 2.
Steps:
- Open the World tab (red globe icon) of the Properties editor.
- Click the small yellow dot to the left of the Color row in the Surface panel (① in Figure 2). A list of nodes you can connect opens.
- In the Texture group, choose Environment Texture (②).
- An image field appears under the Color row. Click Open and choose the HDR file you downloaded in section 1 (Figure 3).
- With the mouse over the 3D Viewport, press
Z> Rendered to see the result.
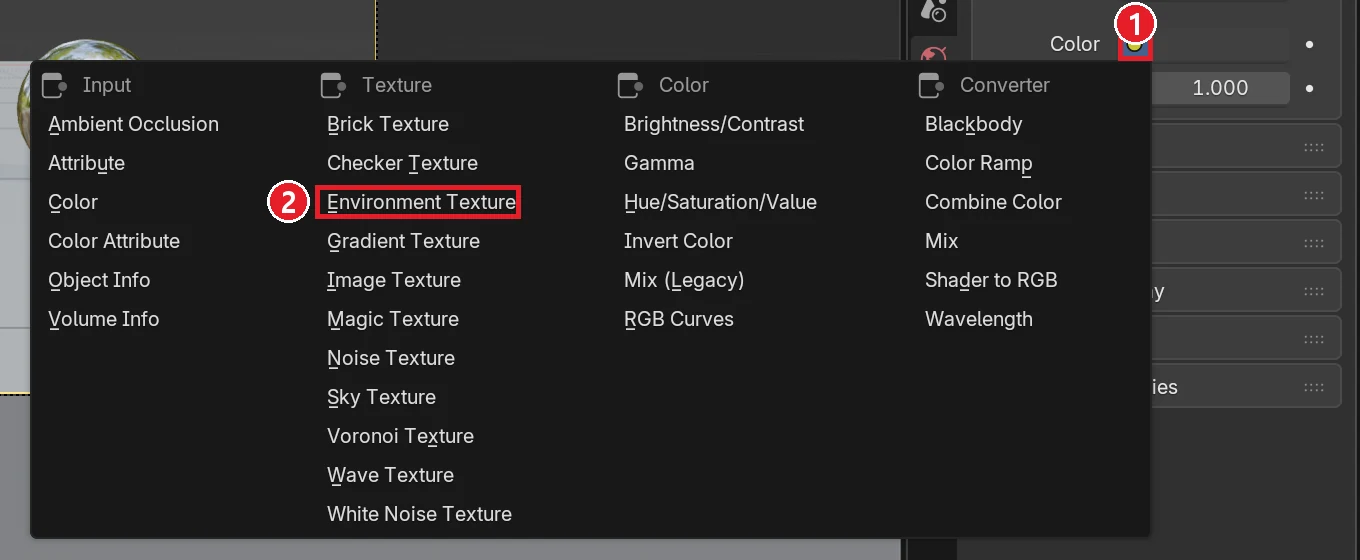 Figure 2. ① The yellow dot of the Color row ② Environment Texture (Blender screenshot)
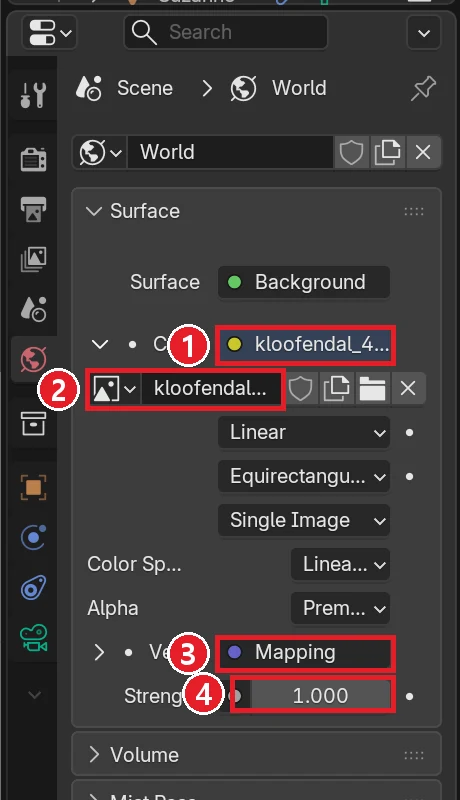 Figure 3. The World tab with the HDRI. ① Environment Texture connected to Color ② The opened HDRI file ③ Vector (after connecting Mapping in section 5) ④ Strength (Blender screenshot)
Figure 3 was taken after finishing section 5, so the Vector row shows Mapping. Right after step 4, your screen shows Default on this row. Equirectangular means the 360-degree photo is unrolled like a world map (by latitude and longitude). Poly Haven HDRIs use this layout, so leave it as is.
Render with F12. As in Figure 4, the sky becomes the background, light comes in from the side where the sun is, and shadows fall on the floor. The mirror sphere reflects the sky and clouds.
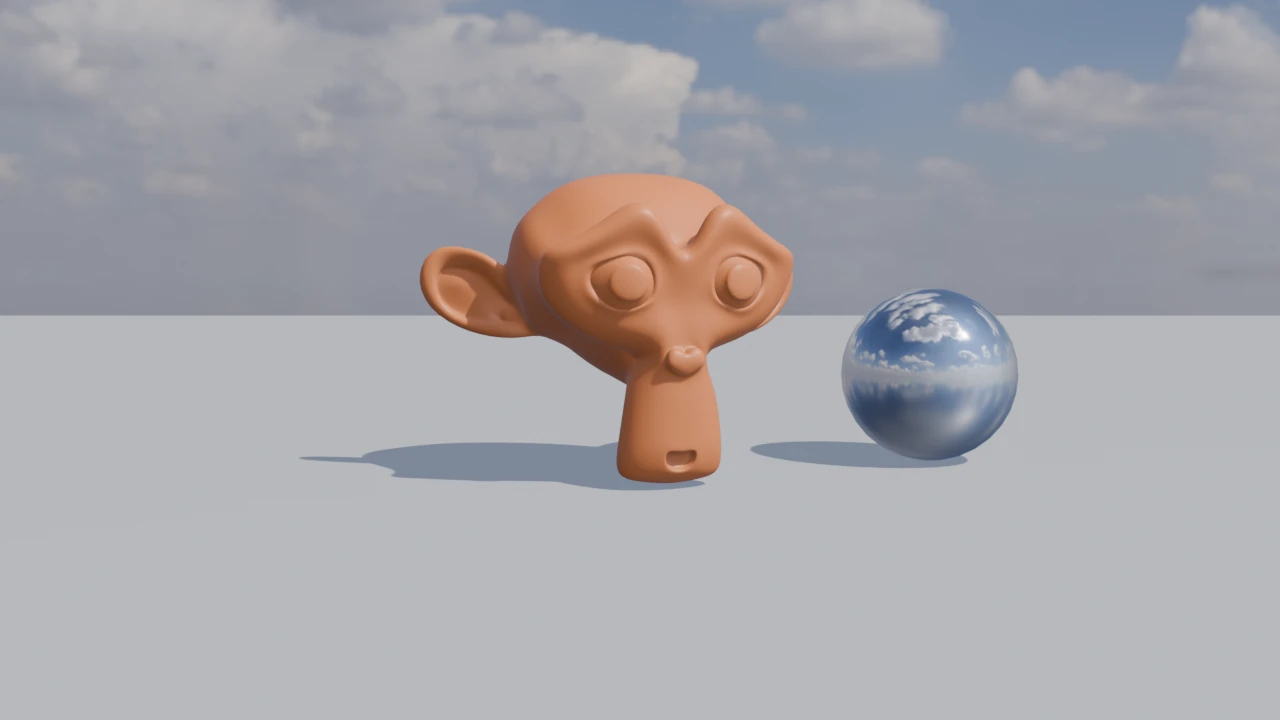 Figure 4. Lit only by the HDRI. There are no light objects (Blender render)
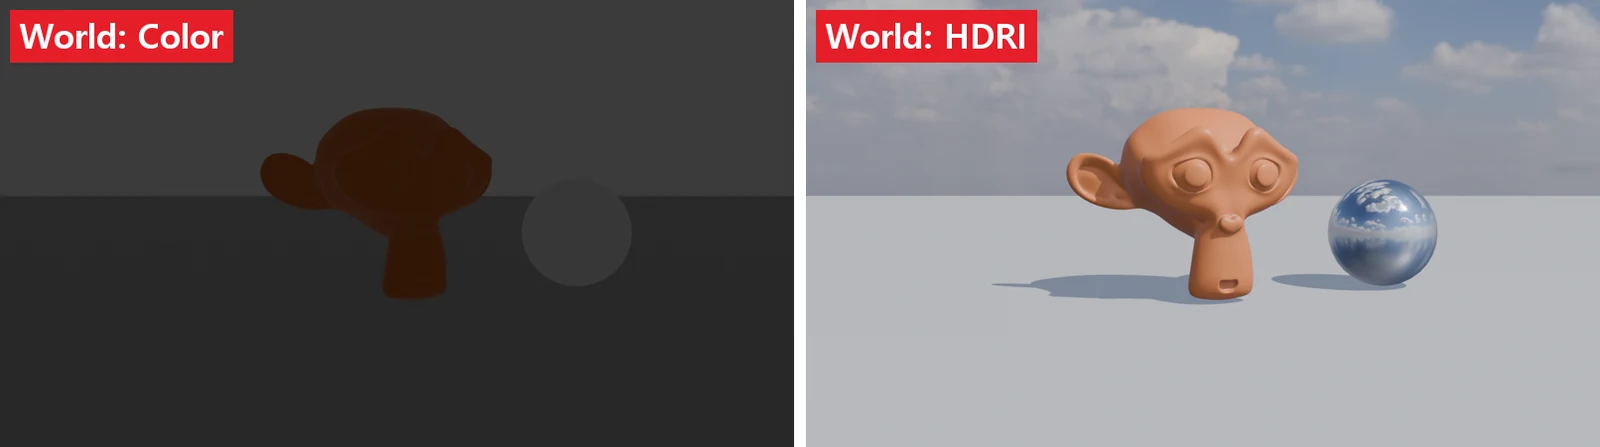 Figure 5. Left: the default World color. Right: the HDRI (Blender render)
Material Preview also shows HDRI-like photo lighting, but that is a preview HDRI built into Blender, and it is not used in renders. To use an HDRI in a render, you have to put it into the World yourself, as in this section. The difference is covered in detail in section 1 of When a render is too dark or blown out.
4. The same thing as nodes: photo → background → world
What you did on the World tab looks like a few nodes connected in a row in the Shader Editor. To turn the HDRI in section 5 you need to add two more nodes on this screen, so first learn how to open it.
Steps:
- Click the Editor Type button at the far left of the 3D Viewport header and choose Shader Editor. The 3D Viewport area turns into the Shader Editor.
- Click the Object field at the left of the Shader Editor header and change it to World.
- With the mouse over the editor, press
Hometo fit the nodes on the screen.
For now you see three nodes: Environment Texture → Background → World Output. The photo (Environment Texture) becomes background light (Background), which goes into the surface of the world (World Output). When you are done, use the same Editor Type button to switch back to 3D Viewport.
5. Turning the HDRI: setting the sun direction
The direction of the sun in the HDRI sets the direction of the shadows. If you want the shadows on the other side, turn the photo. It is like spinning the photo studio ball. Environment Texture has no rotation field, so you add a Mapping node in front of it.
Start: Continue in the Shader Editor (World) you opened in section 4.
Steps:
- With the mouse over the Shader Editor, choose
Shift+A> Input > Texture Coordinate and place the node in an empty spot on the left. - Choose
Shift+A> Vector > Mapping and place it between Texture Coordinate and Environment Texture. - Drag from the dot to the right of Generated on Texture Coordinate to the Vector input dot of Mapping.
- Drag from the Vector output dot of Mapping to the Vector input dot of Environment Texture (Figure 6).
- Type
90,180and270into Mapping's Rotation Z field in turn, rendering each time.
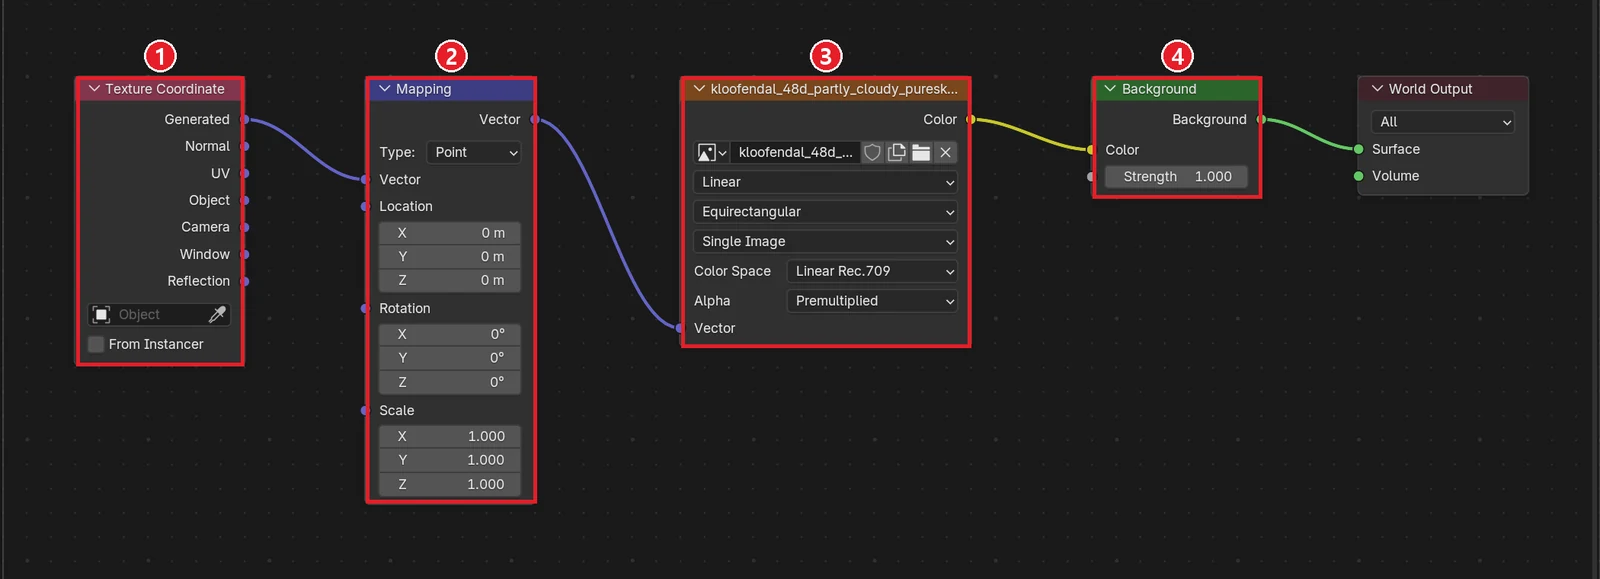 Figure 6. ① Texture Coordinate ② Mapping (Rotation Z is the field that turns it) ③ Environment Texture ④ Background (the Strength field) (Blender screenshot)
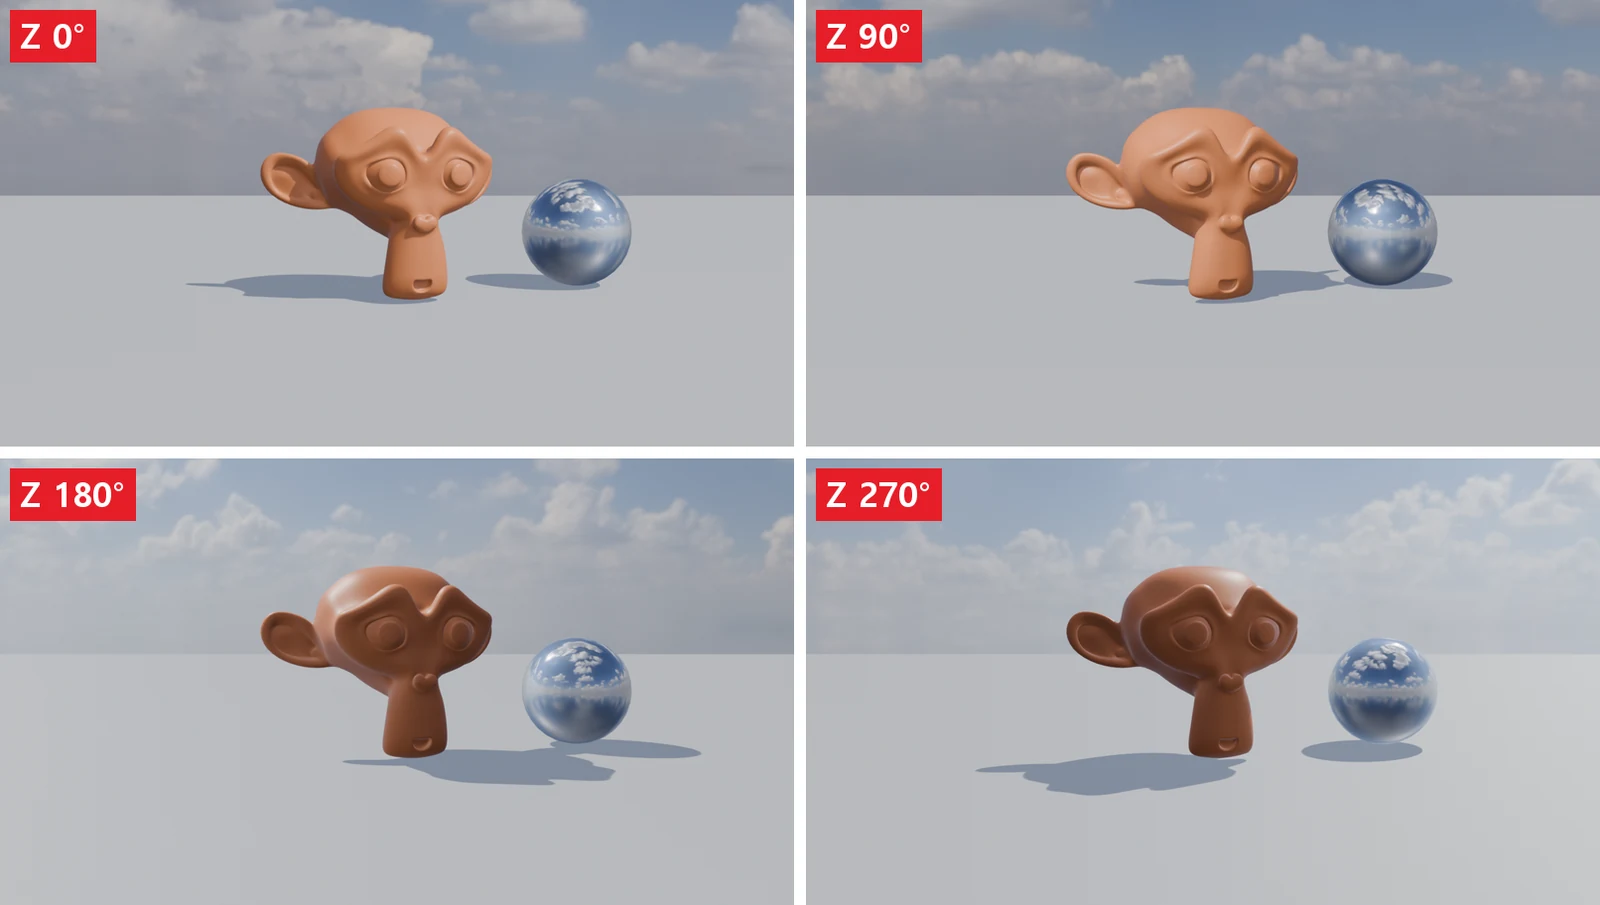 Figure 7. Rotation Z 0°, 90°, 180° and 270° (Blender render)
In Figure 7, each turn of Z rotates the clouds in the background together with the shadow direction. At 0° and 90° the sun is on the camera side, so the monkey's face is bright and the shadows stretch backward. At 180° and 270° the sun moves behind the monkey, so the face falls into shade and the shadows stretch toward the camera. Pick the angle where your subject looks best by rendering.
6. Setting brightness: Strength
The overall brightness of the HDRI is set with Strength on the Background node. It is the same value as the Strength field at the bottom of the World tab (④ in Figure 3).
Start: Continue from section 5 with Rotation Z set back to 0.
Steps:
- Change Strength on the World tab to
0.3and render. - Change it to
3and render again. - Set it back to
1.
 Figure 8. Strength 0.3, 1 and 3 (Blender render)
Strength makes the background photo and the light brighter or darker together. If you want to change only the overall brightness of the scene, use Exposure in Color Management on the Render tab. Exposure and brightness problems are covered in When a render is too dark or blown out.
7. Sun shadows in EEVEE: Sun Threshold
EEVEE stores the World's light in a small storage (a light probe) to calculate it. But a very small, intense light like the sun is hard to store accurately this way. So EEVEE can cut out the parts of the HDRI brighter than a threshold and rebuild them as a Sun light. That threshold is Sun Threshold.
Start: Continue from the scene in section 6 (Strength 1).
Steps:
- Expand the Settings panel on the World tab. Under Sun you find Threshold (default
10) and Angle (Figure 9). - Change Threshold to
0and render. - Set it back to
10, render and compare.
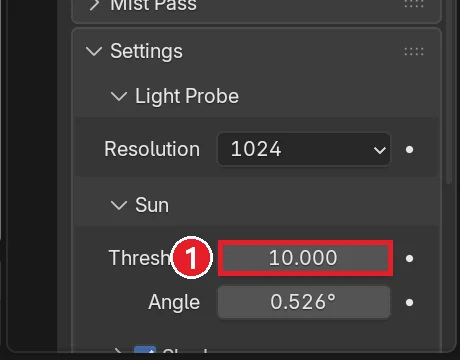 Figure 9. ① Threshold under World > Settings > Sun (Blender screenshot)
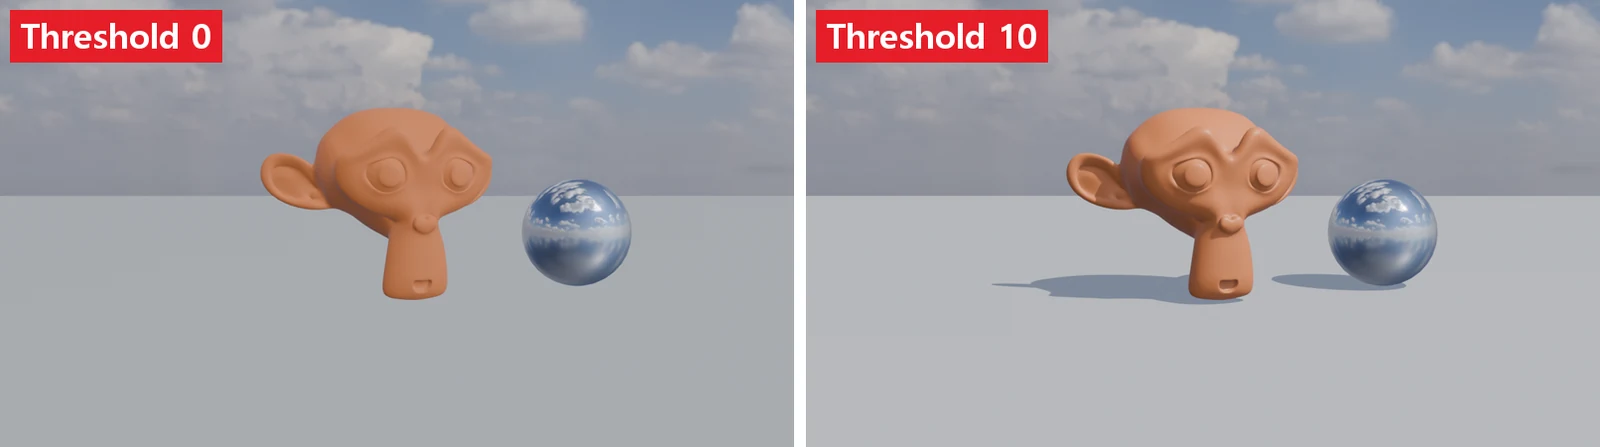 Figure 10. Left: Threshold 0. Right: Threshold 10 (Blender render)
With Threshold at 0 this feature is off. As on the left of Figure 10, the sharp sun shadow disappears and only a soft shade remains. At the default 10, the sun part becomes a Sun light and the shadow is sharp. Angle is the size of the extracted sun. The bigger it is, the softer the shadow edges.
8. A transparent background only: Film Transparent
Sometimes you want the HDRI's light but not the sky background, for example when you cut out the subject to place it on another picture. For this, turn on Film > Transparent on the Render tab.
Start: Continue from the scene in section 7 (Threshold 10).
Steps:
- On the Render tab of the Properties editor, expand the Film panel and turn on Transparent (Figure 11).
- Render with
F12. In the render window, the background becomes transparent. - When you save with Image > Save As in the render window, set the format to PNG and Color to RGBA so the transparent part is saved as transparent.
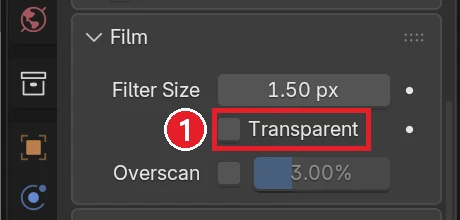 Figure 11. ① Film > Transparent (Blender screenshot)
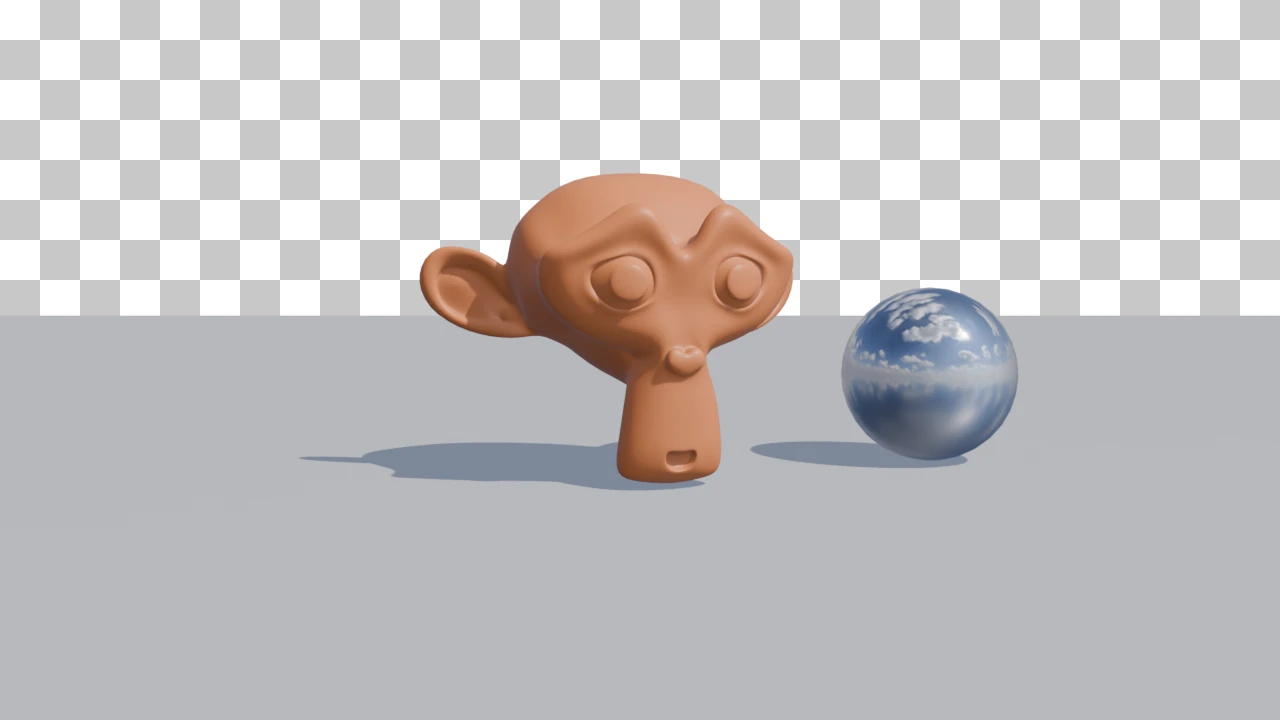 Figure 12. A PNG rendered with Film Transparent, placed on a checkerboard to show the transparent area (Blender render)
In Figure 12 the sky area is transparent, but the monkey and floor still receive the HDRI's light, and the mirror sphere still reflects the sky. Only what shows as background is removed, and the light stays. The floor is an object in the scene, so it stays too.
9. HDRIs that come with Blender
If you want to try right away before downloading anything, the Blender install folder also contains HDRIs. They are the eight you can pick in Material Preview, such as forest, city and studio. In a default Windows install they are in C:\Program Files\Blender Foundation\Blender 5.2\5.2\datafiles\studiolights\world\, and if you choose an .exr file from this folder with Open in section 3, you can use it in renders too. They are made for previews, so their resolution is low and they look soft as a large background, but they are fine for testing light. An example of letting AI do this is in Letting AI handle lighting and materials.
10. Practice
- Change Mapping Rotation Z and find the angle where the monkey's face looks brightest. Write it down.
- Change Angle from section 7 from
0.526°to5°and render. See how the shadow edges change. - Download one indoor HDRI from Poly Haven and put it in the same scene. Check how the reflection in the mirror sphere and the shadows change.
11. Common mistakes and fixes
| Symptom | Cause | Fix |
|---|---|---|
| I added an HDRI but the background is pink | The file was moved or deleted, so Blender cannot find it | Open the file again with the folder button in the image field on the World tab. Keep the file inside your project folder |
| The background is stretched or wrapped strangely | Image Texture was used instead of Environment Texture | Connect Environment Texture to the World's Color |
| The background is blurry | The HDRI resolution is low | Download a higher resolution (8K or more) only when the background is seen large |
| Shadows are soft and the sun direction does not show | Sun Threshold is 0 | Set Threshold back to the default 10. Choose an HDRI with a clearly visible sun |
| Turning Mapping changes nothing | Mapping's output is not connected to Environment Texture's Vector | Check that both links are connected as in Figure 6 |
| The render is bright but colors differ from Material Preview | Material Preview uses the built-in preview HDRI | Check the result in Rendered view |
Summary
The HDRI goes into World Color > Environment Texture, direction with Mapping Z, brightness with Strength, and Film Transparent to drop only the background. The next guide uses a large light panel and a curved background to render like a product photo.
Previous (series start): Three-point lighting in Blender · Next: Rendering like a product photo
References
- Blender 5.2 Manual: World Environment
- Blender 5.2 Manual: Environment Texture Node
- Blender 5.2 Manual: World Settings (EEVEE) (Sun Threshold, Angle)
- Blender 5.2 Manual: Film (EEVEE)
- Poly Haven: Kloofendal 48d Partly Cloudy (Pure Sky), Poly Haven License (CC0)
- Shortcuts: default (Blender) keymap of Blender 5.2.1.
- Pictures: screenshots and renders made in Blender 5.2.1 for this guide, and screenshots of the Poly Haven website. The HDRI is a CC0 asset from Poly Haven.