Blender 5.2 LTS hands-on: node physics, new geometry nodes, EEVEE, and online assets
We try the big changes in Blender 5.2 LTS, released in July 2026, on real 5.2.1 screens: node-based cloth physics, the Mesh Bevel and Sample Sound Frequencies nodes, EEVEE settings, online asset libraries, and the now built-in To Circle. We also list what changed for older files and scripts.
한국어English
ON THIS PAGE
- 011. Check that your Blender is 5.2
- 022. The big changes in 5.2 at a glance
- 033. Cloth physics built from nodes
- 044. New geometry nodes
- 055. What changed in EEVEE
- 066. Online asset libraries
- 077. Compositor and video editor
- 088. Modeling and sculpting: To Circle built in
- 099. What to check with older files and scripts
- 1010. Common mistakes and fixes
- 1111. In one line
- 12References
Based on: Blender 5.2 LTS (screenshots from 5.2.1, Windows, English UI, default keymap), the blender.org 5.2 release page, and the developer release notes. Checked on November 1, 2026. All images are real screenshots and renders.
Blender 5.2 is the LTS release that came out on July 14, 2026. According to the release page, it gets fix releases for two years, until July 2028. It has many new features, and it is hard to know where to start the first time. For this post we turned on 5.2.1 and picked what you can try right away.
LTS stands for Long Term Support. One release is chosen to be used for a long time and keeps getting fixes, much like a phone's guaranteed security-update period. Companies, schools, and courses that need to stay on one release pick the LTS. Installing Blender for the first time is covered in Blender beginner chapter 1.
This post shows the 5.2 changes in one table, then walks through node physics (cloth), new geometry nodes, EEVEE, online assets, and modeling tools on real screens. Finally, it lists what changed for older files and scripts.
1. Check that your Blender is 5.2
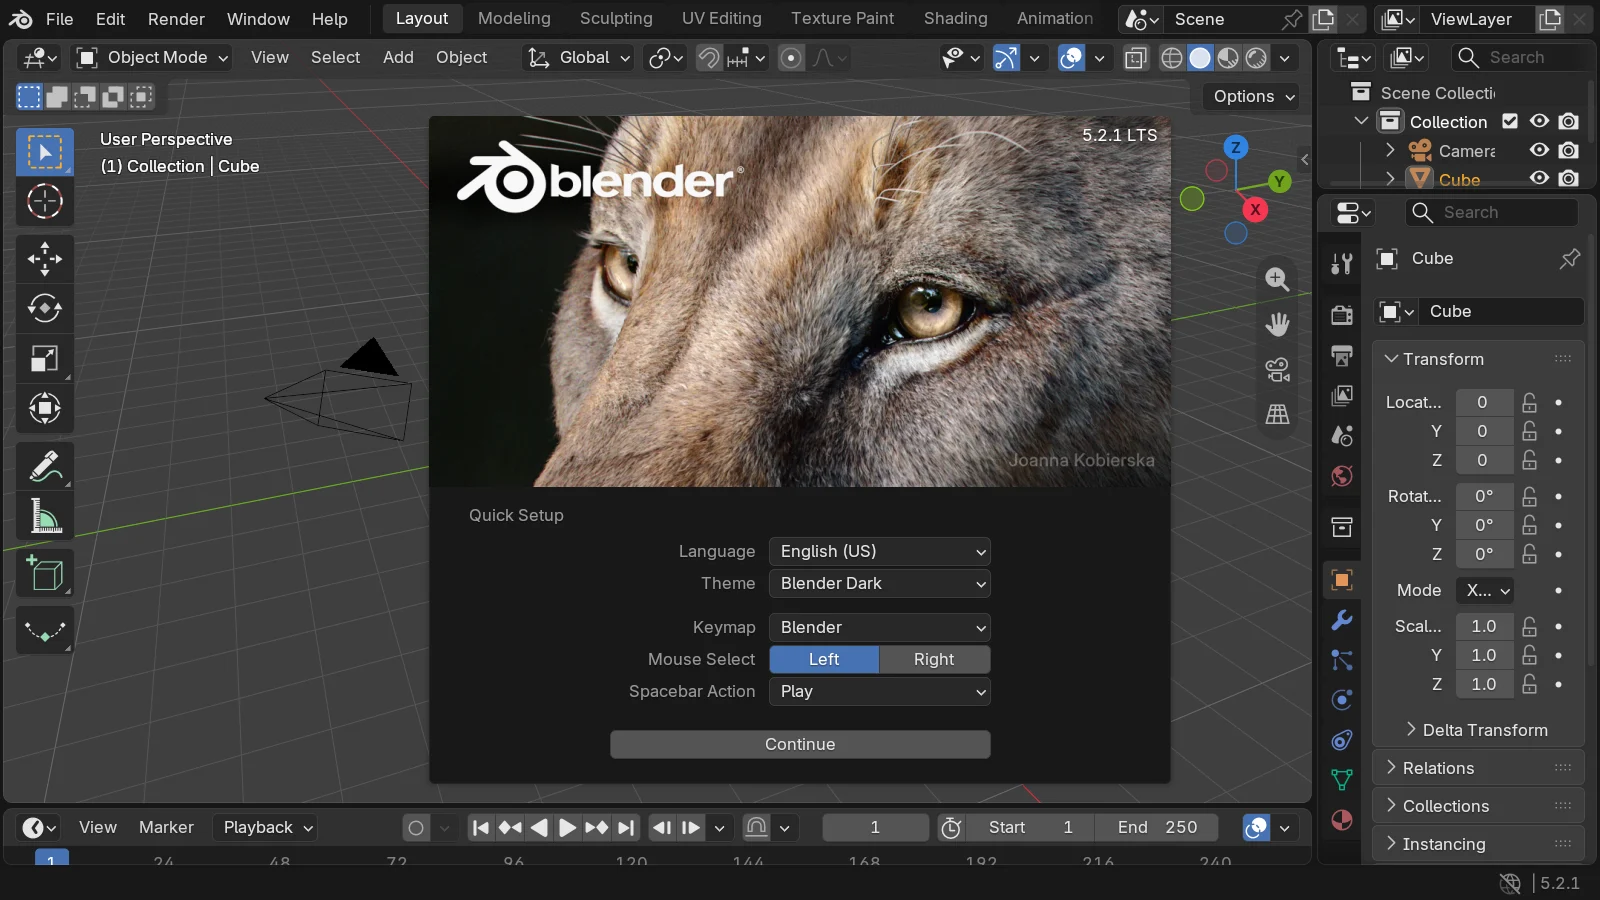 Figure 1. The splash screen on first launch. The version number 5.2.1 LTS is at the top right. The status bar at the bottom right also shows 5.2.1 (Blender screenshot)
Follow along: Start Blender and look at the number at the top right of the splash screen. If you already closed it, click the Blender logo at the very top and choose Splash Screen, or look at the number in the status bar at the bottom right of the window. If it starts with 5.2, such as 5.2.0 or 5.2.1, you can follow this post as written. Fix releases within the same LTS (5.2.0 to 5.2.1) only fix bugs, so the screens are the same.
2. The big changes in 5.2 at a glance
| Area | What changed | Section |
|---|---|---|
| Physics | Cloth and hair simulated with nodes (XPBD Solver), Collider modifier | 3 |
| Geometry nodes | Mesh Bevel, Sample Sound Frequencies, List and String nodes | 4 |
| EEVEE | Faster in instance-heavy scenes, anisotropic filtering, 1.5 and 2 GB shadow pools | 5 |
| Assets | Online asset libraries, an Asset Libraries section in Preferences | 6 |
| Compositor and video editor | 6 new socket types and 35 new nodes, Compositor effect strip, 3 text presets | 7 |
| Modeling and sculpting | LoopTools' To Circle, Flatten, and Space Edge Loops Evenly built in, adding primitives in Sculpt Mode | 8 |
3. Cloth physics built from nodes
The biggest new feature in 5.2 is node-based physics. Before, you turned on Cloth in the Physics tab and could only change fixed fields. Now cloth and hair simulation are built from geometry nodes, so you can open them up, edit them, or mix them with other nodes. It is like going from a finished take-out dish to a meal kit where every ingredient and step is visible.
The node doing the math is the XPBD Solver. XPBD sets up rules that points must keep with each other, such as distances and angles, and adjusts them several times per frame to find the motion. The developer release notes say this node powers both the Cloth Dynamics and Hair Dynamics assets. The same notes say the feature is experimental and may change.
3-1. Adding Cloth Dynamics
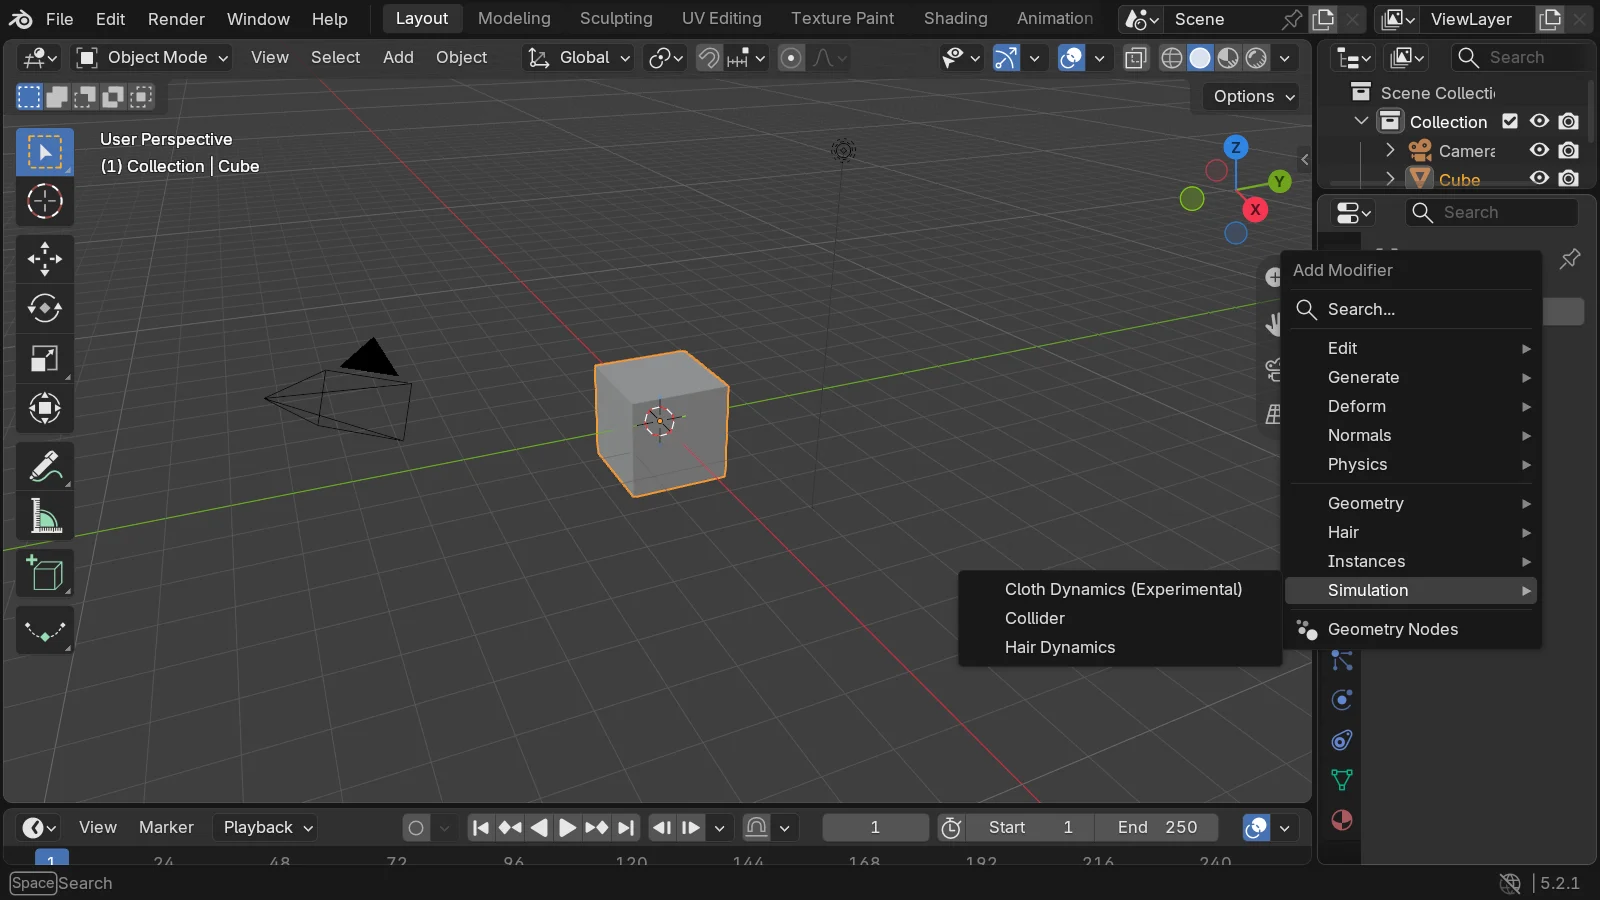 Figure 2. Add Modifier > Simulation in the Modifier tab, with Cloth Dynamics (Experimental), Collider, and Hair Dynamics (Blender screenshot)
Starting state: Start from the default cube in a new file (File > New > General).
Follow along:
- Select the default cube and press
X→ Delete. - Add a grid with Add > Mesh > Grid. In the Add Grid panel at the bottom left, set X Subdivisions and Y Subdivisions to
50and Size to2.4 m. - Move the grid up with
G→Z→2.6→Enter. - Press
Tabto enter Edit Mode andShift+left-click three points on one edge: both ends and the middle. - In the Object Data tab of the Properties editor (green triangle icon), click
+under Vertex Groups, rename the group topin, and click Assign. PressTabto return to Object Mode. - In the Modifier tab (wrench icon), choose Add Modifier > Simulation > Cloth Dynamics (Experimental).
- Click the small button to the right of the modifier's Pin Group field to switch it to attribute input, and type
pinin the field. - Go back to frame 1 on the timeline and press
Spaceto play.
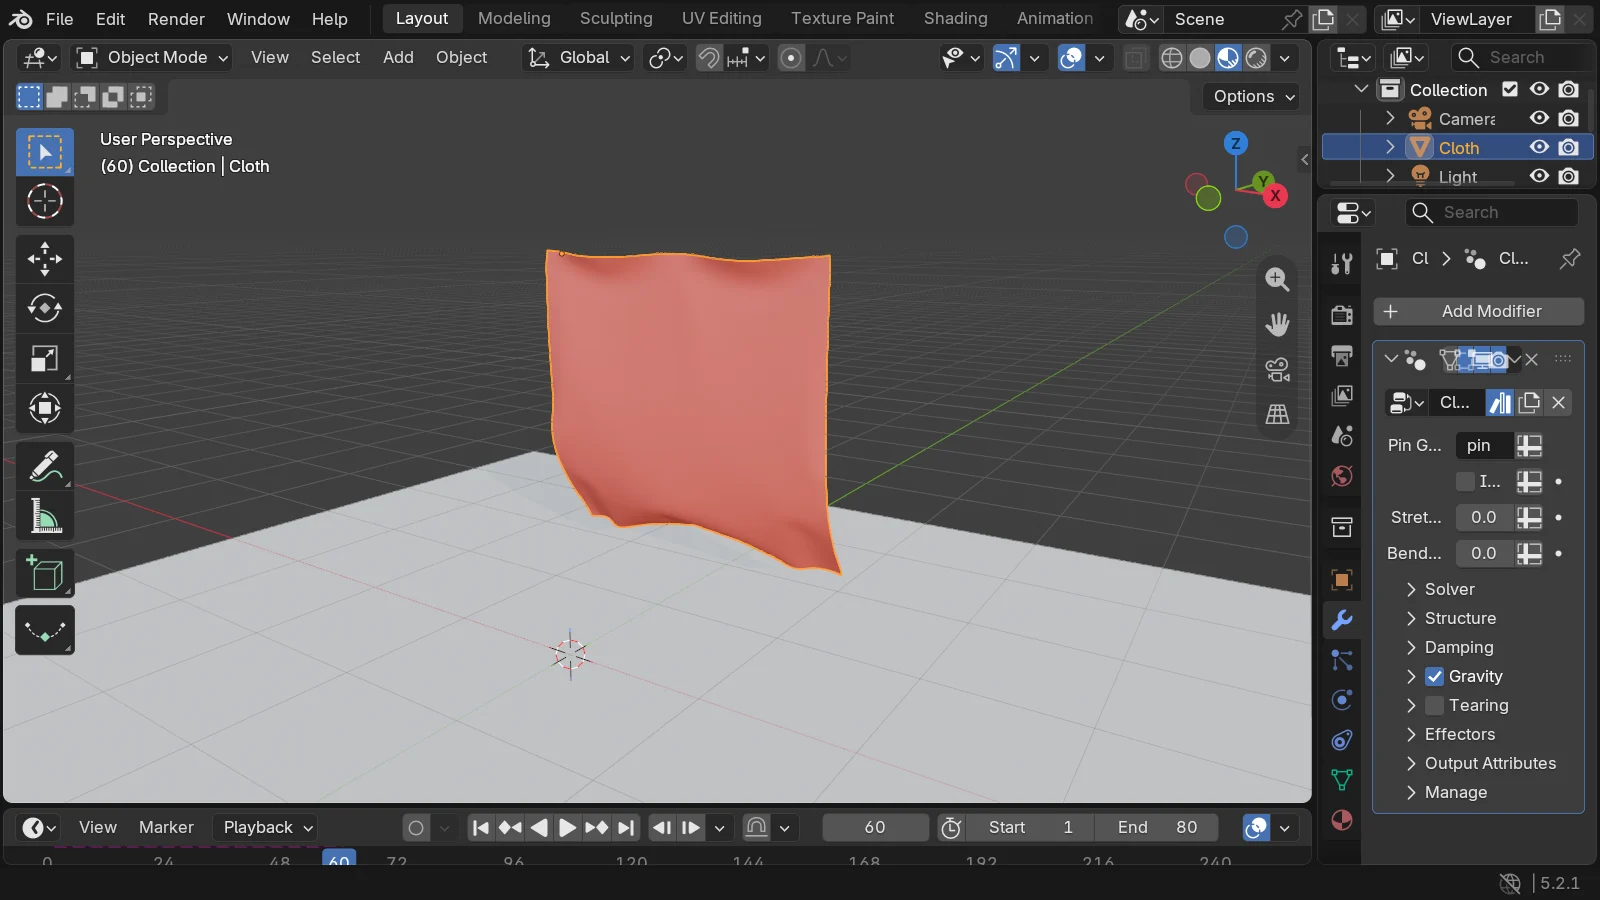 Figure 3. The cloth and the Cloth Dynamics modifier at frame 60. Pin Group holds pin, and the Solver, Structure, Damping, Gravity, Tearing, and Effectors panels are collapsed below (Blender screenshot)
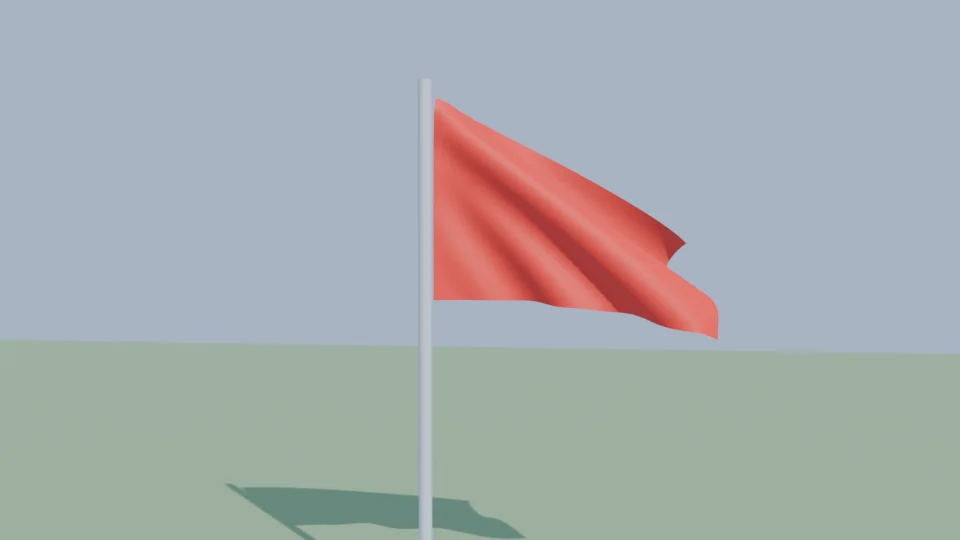
How to read it: The top edge of the cloth hangs from the three pinned points, and the rest falls under gravity. The cloth sags a little between the pins, making folds. The panel on the right is narrow, so names are cut off. From the top they are Pin Group, Invert Pin Group, Stretchiness (how much it stretches), and Bendiness (how much it bends). Drag the left edge of the Properties editor to widen it and see the full names.
Turn on the Tearing panel to let the cloth tear, and use the Gravity panel to change the direction and strength of gravity. Collider, in the same menu, is a modifier that turns another object into a wall the cloth hits. The release notes say the collider object must be a closed shape. Collisions and wind are covered step by step in the node physics basics post in this series.
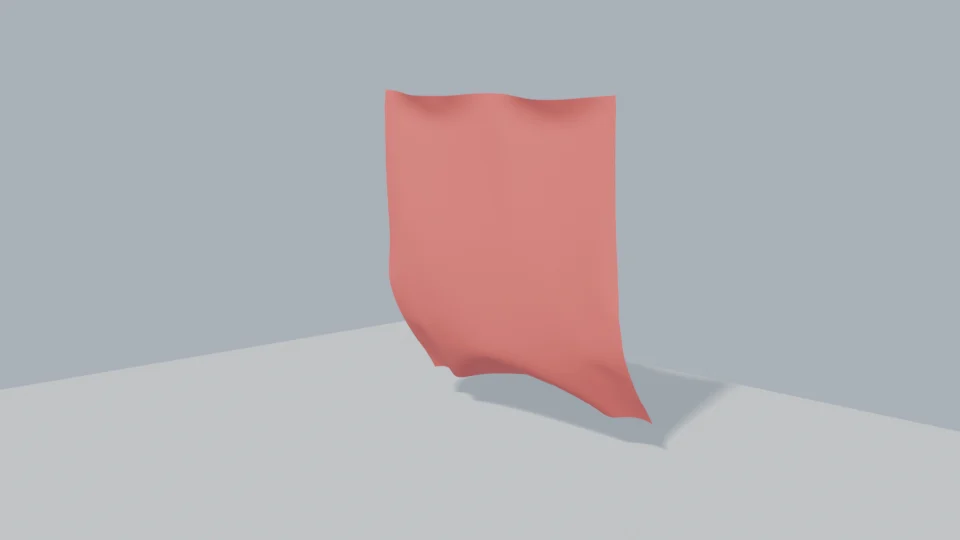 Figure 4. The same scene rendered with EEVEE at frame 60, at 960x540 (Blender render)
4. New geometry nodes
Geometry nodes describe how to build a shape as a chain of node boxes. If you are new to them, read Blender geometry nodes basics first. 5.2 added many new nodes. We added two that show results right away.
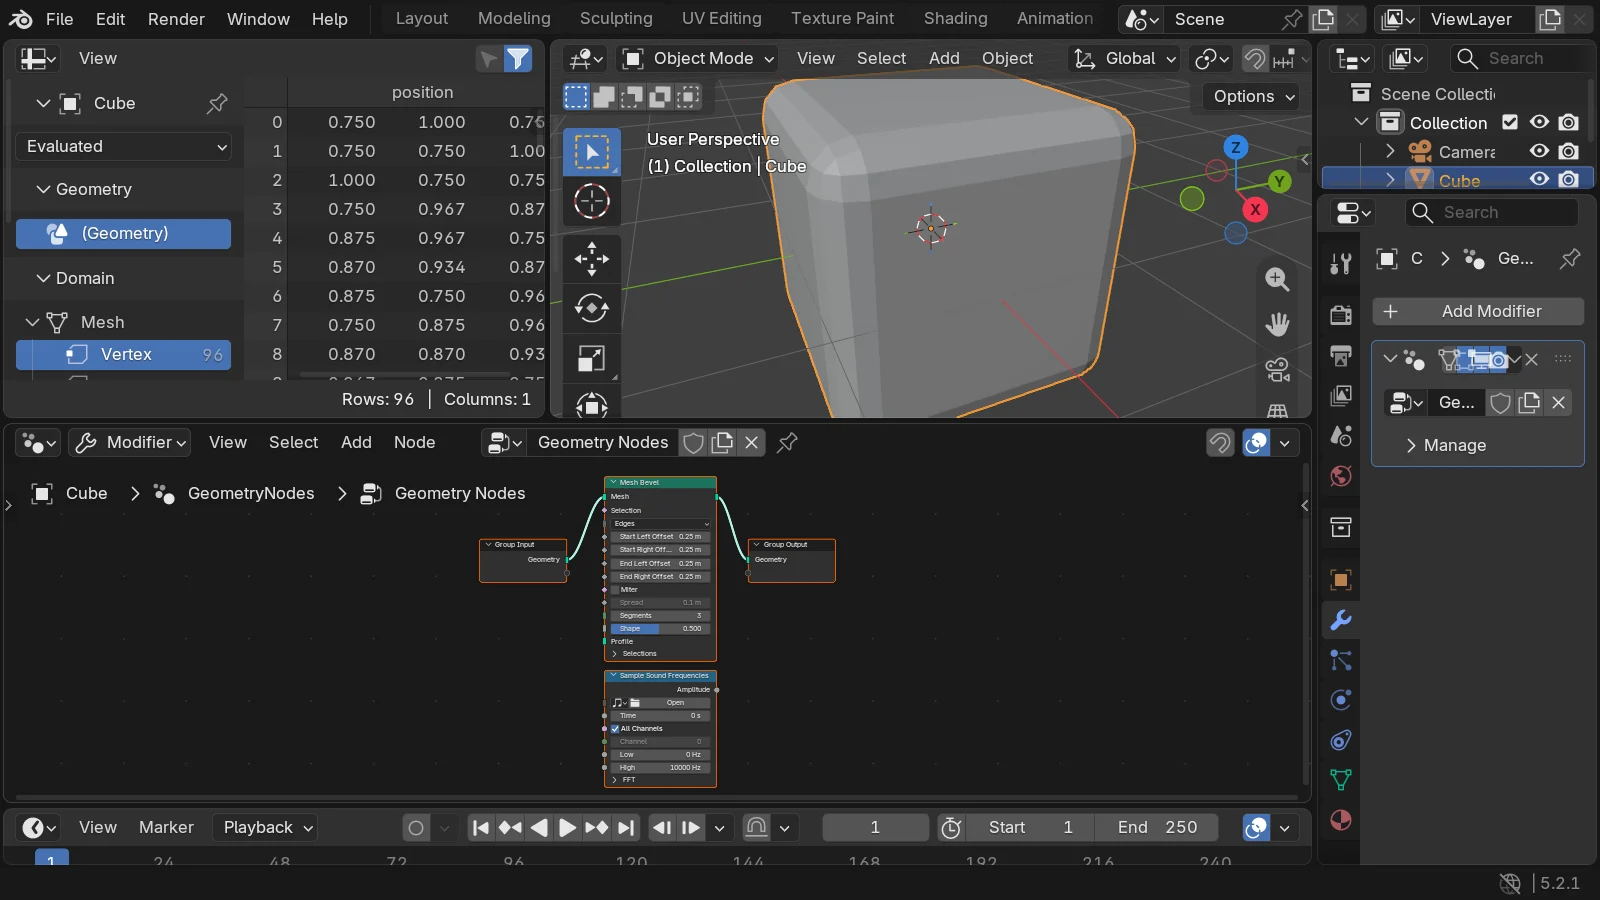 Figure 5. The Geometry Nodes workspace. The node editor below has a Mesh Bevel node (green header) and a Sample Sound Frequencies node (blue header). The cube in the 3D viewport above has its edges beveled by Mesh Bevel. The four Offset fields on Mesh Bevel are 0.25 m and Segments is 3 (Blender screenshot)
Starting state: Start from the default cube in a new file (File > New > General).
Follow along:
- Click Geometry Nodes in the workspace tabs at the top.
- Click New in the header of the node editor below. Two boxes appear: Group Input and Group Output.
- With the mouse over the node editor, press
Shift+A, typeMesh Bevelin the search field at the top, and pressEnter. - Drag the new box onto the line between the two boxes. The line now runs through Mesh Bevel.
- Set the Offset fields on the Mesh Bevel box (Start Left Offset and so on) to
0.25 mand Segments to3. The cube's edges become rounded.
Mesh Bevel lets you bevel edges or corners inside a node tree. Before, you had to stack a separate Bevel modifier.
Sample Sound Frequencies reads a sound file and outputs how loud each pitch (frequency) is as a number. You use it for "sound-reactive animation," such as a box that grows with the low notes of a song. Pick a sound file with the Open button at the top of the box, and set the frequency range with the Low and High fields. The release page says that to keep sound and picture in sync during playback, you should also add the same sound to the Video Sequencer and set playback to Sync to Audio.
5.2 also added a new List data type with nodes such as Field to List, Get List Item, and Sort List, plus text nodes such as Trim String and Split String. You can skip these while you are learning.
5. What changed in EEVEE
| Change | Official wording | Where to find it |
|---|---|---|
| Speed in instance-heavy scenes | The release page says "2x speed-up"; the developer notes say "up to twice as fast" in CPU-bottlenecked instance-heavy scenes | No setting |
| Anisotropic filtering | A scene-level anisotropic filtering setting was added | Render tab > Performance |
| Shadow pool | 1.5 GB and 2 GB options added for Shadow Pool size | Render tab > Performance > Memory |
| Material attributes | The limit of 8 object attributes per material was removed | No setting |
| Dithering | Dithering to reduce banding | No separate setting to turn on (per the official notes) |
An instance places the same object many times. It is used where thousands of the same thing appear, such as trees in a forest or grass in a field. 5.2 says EEVEE got faster in these scenes. This post covers 5.2 only, so it does not include times compared with older releases. Instead, render times for a 43,000-instance scene in 5.2.1 EEVEE are in Blender EEVEE on an 8 GB laptop GPU.
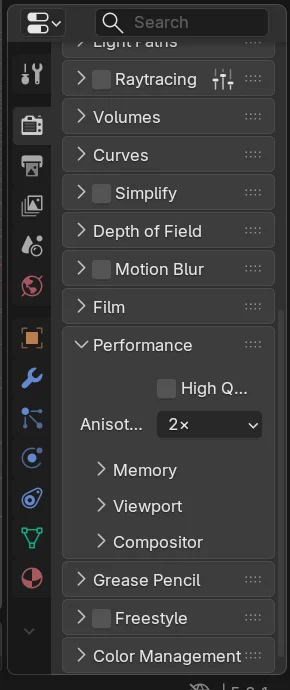 Figure 6. Render tab > Performance. The field with the cut-off name in the middle is Anisotropic Filter, set to 2× by default (Blender screenshot)
Follow along: Check that Render Engine is EEVEE in the Render tab. Scroll down and click the Performance title to open it. Choose a value in the Anisotropic Filter field. Anisotropic filtering keeps textures on floors and roads seen at a slant from smearing in the distance. It is what keeps the pattern of railroad ties sharp when you look far down the tracks. Higher values make distant textures sharper and add a little computation.
6. Online asset libraries
Starting with 5.2, some of the basic assets (Essentials) can be downloaded from the internet when you need them. The release page says dozens of materials, compositor effects, HDR sky backgrounds, and geometry node setups are hosted online, so the Blender download did not get bigger. You can also add asset libraries that others put online, by address.
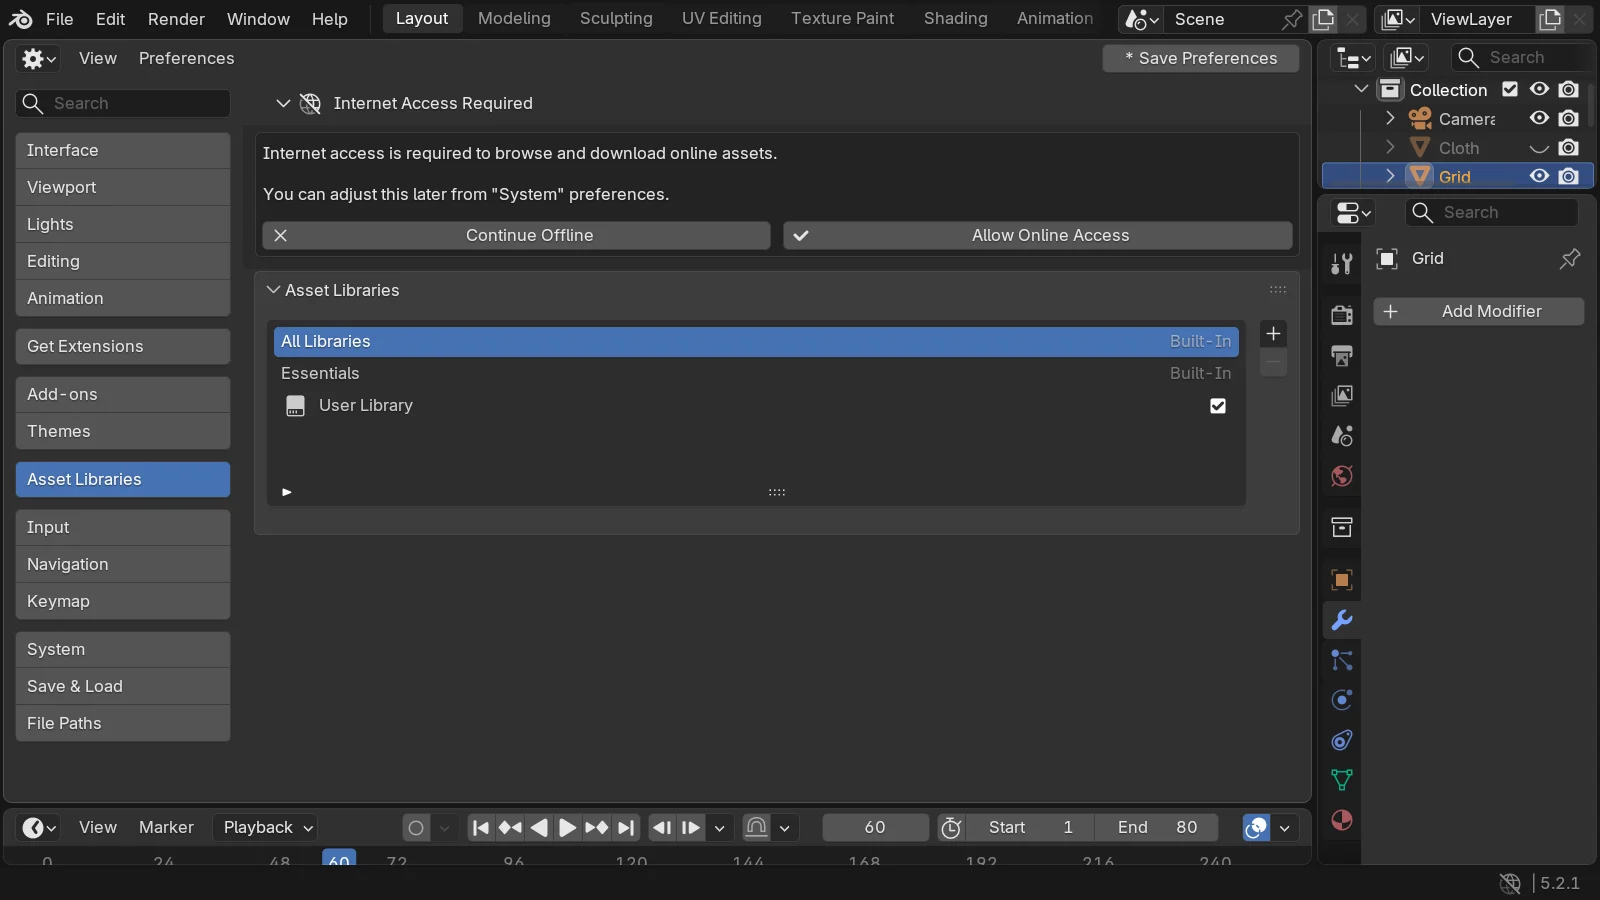 Figure 7. Edit > Preferences > Asset Libraries. Online access has not been allowed yet, so the Internet Access Required box shows at the top. Add a library with the
+ button on the right (Blender screenshot)
Follow along:
- Open Edit > Preferences and click Asset Libraries in the list on the left.
- The first time, you see the Internet Access Required box. To use online assets, click Allow Online Access. If you do not want to connect to the internet, click Continue Offline.
- Essentials in the list is the basic library that ships with Blender. To add a new library, click
+on the right.
The box says you can change internet access later in the System section. Preferences save automatically by default (Auto-Save Preferences in the Save & Load section). The figure shows a screen with auto-save turned off, which is why a Save Preferences button appears at the top right. If you turned auto-save off, click that button so your changes are still there next time. You actually use assets in the Asset Shelf at the bottom of the 3D viewport or in the Asset Browser.
7. Compositor and video editor
This section summarizes the release page.
- The compositor got 6 new socket types (Matrix, Rotation, String, Object, Font, Integer Vector) and 35 new nodes.
- The Video Sequencer got a Compositor effect strip that runs a compositor node tree right on the video timeline.
- Text strips got three built-in styles (presets): Subtitle, Main Title, and Corner Title. They help when adding captions quickly.
- Strip modifiers can be saved as assets and reused.
8. Modeling and sculpting: To Circle built in
Three tools that used to need the LoopTools add-on (To Circle, Space Edge Loops Evenly, and Flatten) are built in from 5.2. The release page says they were rewritten in C++ and run faster.
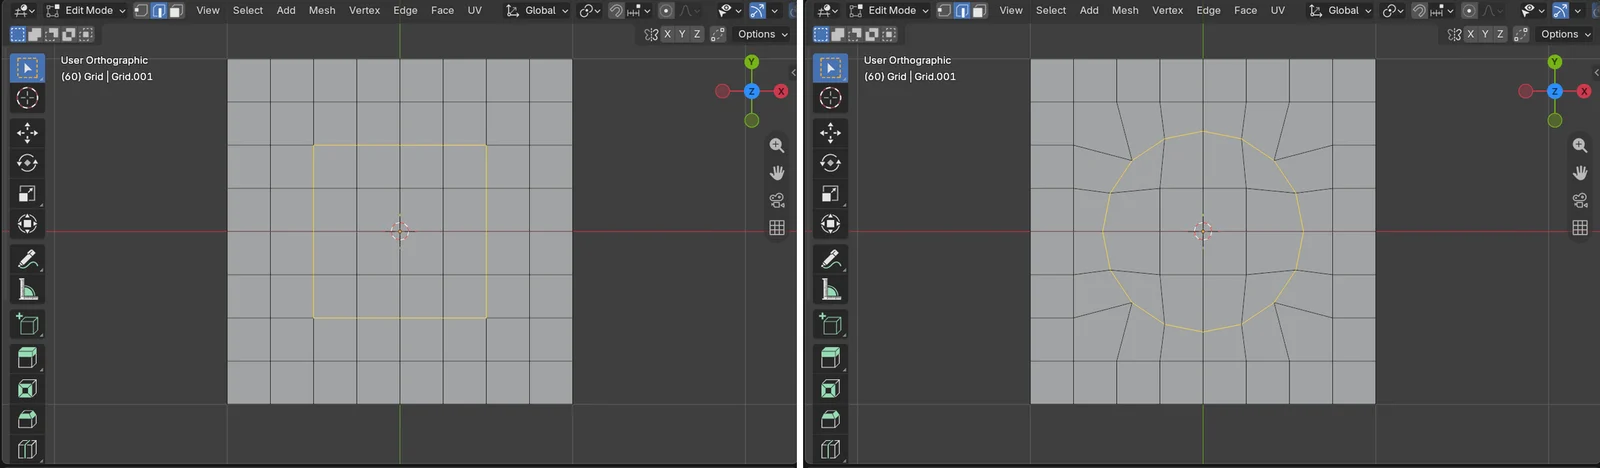 Figure 8. Left: the 16 edges of the square ring in the middle of the grid are selected. Right: after To Circle, the ring is round (Blender screenshot)
Starting state: In a new file (File > New > General), delete the default cube and add a grid with Add > Mesh > Grid (Subdivisions 8 each in the Add Grid panel).
Follow along:
- Press
Tabto enter Edit Mode, then press2for edge select mode. - Press numpad
7to look from the top. Shift+left-click all the edges that make up the square ring in the middle.- Click Mesh > Transform > To Circle in the 3D viewport header.
The square ring becomes a circle. It is often used to cut a round hole in a box or to make a spot where a cylinder will join. In the same menu, Flatten puts the selected points on one plane, and Space Edge Loops Evenly evens out the gaps between loops.
Sculpt Mode got an Add Primitive tool that inserts basic shapes such as cubes, cones, cylinders, and spheres. Grease Pencil got a new fill method that makes faces from boundary strokes.
9. What to check with older files and scripts
This combines the "Compatibility" section of the developer release notes with what we checked ourselves in 5.2.1.
| What | What changed | What to do |
|---|---|---|
| Geometry node Tool asset files | Must be re-saved to work properly in 5.2 (release notes) | Open in 5.2 and save once |
| Setting geometry node modifier inputs from Python | The old mod["Socket_7"] = … form fails in 5.2.1 ("this type doesn't support IDProperties"). Inputs moved under mod.properties.inputs | Change it to mod.properties.inputs.Socket_7.value = … |
| Compare and Random Value nodes | Socket identifiers changed (release notes). Scripts that find sockets by number put values in the wrong field or fail | Find sockets by name and type instead of number |
| Meshes created by nodes | No longer share the original object's mesh name (release notes) | Check scripts that relied on mesh names |
If you only work in the interface, you mostly do not need to worry. If you drive Blender with scripts or an AI helper, know that code from older releases may not run as is. Script basics are in Blender Python automation.
10. Common mistakes and fixes
| Symptom | Cause | Fix |
|---|---|---|
| There is no Simulation in the Add Modifier menu | An older release than 5.2 | Check the version as in section 1 and install 5.2 |
| The cloth falls off the screen | Pin Group is empty | Make a vertex group, switch the Pin Group field to attribute input, and enter the name |
| You cannot type a name in the Pin Group field | The field is in number mode | Click the small button to the right of the field to switch to attribute input |
| You changed a value but the cloth stays the same | It was changed mid-animation | Go back to frame 1 and play again |
| There is no To Circle in Mesh > Transform | You are in Object Mode | Press Tab to enter Edit Mode |
| Online assets do not show | Online access is not allowed | Allow Online Access in Preferences > Asset Libraries |
| An old script throws errors in 5.2 | Modifier inputs and socket names changed | Fix it using the table in section 9 |
11. In one line
5.2 LTS: fixes until July 2028, cloth and hair built from nodes, To Circle built in, and check how scripts set inputs. The next post, Blender EEVEE on an 8 GB laptop GPU, measures 5.2.1 EEVEE render times.
References
- Blender 5.2 LTS release page
- Blender 5.2 developer release notes
- Blender 5.2 release notes: Physics
- Blender 5.2 LTS manual
- Keymap: Blender 5.2 default keymap
- Images: all Blender screenshots and renders are our own.