Audio-reactive bars with the Sample Sound Frequencies node in Blender 5.2
Use the new Sample Sound Frequencies node in Blender 5.2 to read the low, middle and high parts of a sound file separately, make three bars grow and shrink with the sound, and render the result with EEVEE.
한국어English
Based on: Blender 5.2 LTS (screenshots from 5.2.1, English interface, default shortcuts), EEVEE render engine. Checked in November 2026. All pictures are real Blender screenshots and EEVEE renders. The red numbers and boxes were added to explain them.
On the graphic equalizer of a stereo, the left bar rises when the bass is loud and the right bar rises when the high sounds are loud. Blender 5.2 adds the Sample Sound Frequencies node, which lets you build this with nodes only. It drives animations and simulations with an imported sound.
In this guide you build three bars that follow the low, middle and high sounds. The result looks like Figure 1. If nodes are new to you, read Getting started with Blender Geometry Nodes first.
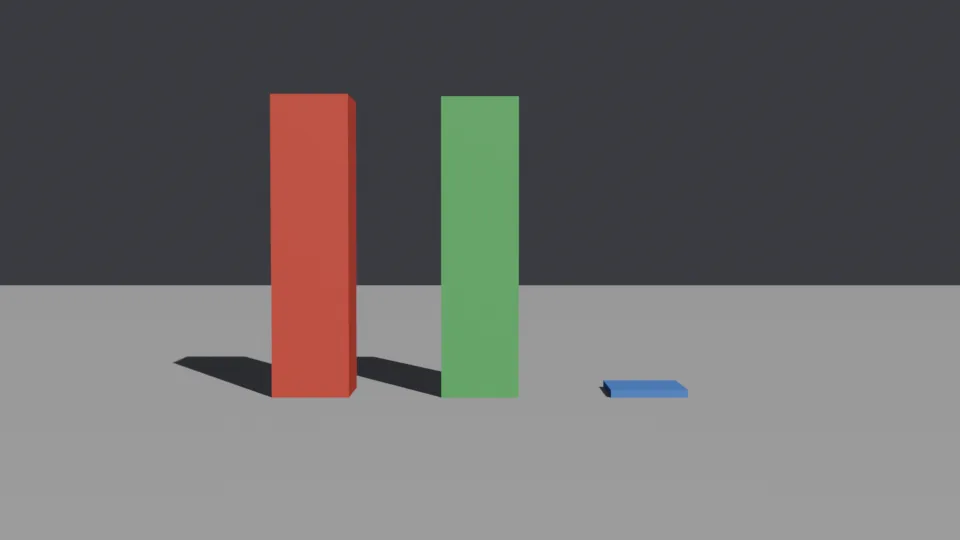 Figure 1. The scene you build. The bass drum and the melody play at this moment, so the red and green bars are tall (Blender render)
By the end of this guide you will be able to:
- Tell apart the inputs and the output of the Sample Sound Frequencies node.
- Build one bar whose height follows the loudness of the sound.
- Move the frequency range (Low, High) and the height multiplier (Gain) out to the modifier panel.
- Make three bars and give each one the low, middle or high sounds.
- Play back with sound and render the result with EEVEE.
Before you start
- Get one sound file. WAV or MP3 is fine. The pictures in this guide use an 8-second beat made for this guide (a low drum, a short high "tss" between beats, and a melody in the middle range). If you use music made by someone else, check its license before you publish a video.
- Open a new file (File > New > General).
- Type the number of frames that matches the sound length into the End field on the right of the timeline. At the default 24 fps, 8 seconds is
192.
1. What the Sample Sound Frequencies node does
Sound is air shaking very fast. How many times it shakes per second is the frequency, measured in Hz (hertz). A low drum has a lot of sound from a few tens up to a bit over a hundred Hz. Voices and melodies sit in the hundreds to thousands of Hz. A cymbal-like "tss" has a lot above a few thousand Hz.
The node cuts the sound at one moment into small parts and gives you one number: how loud the chosen frequency range is. Think of it as a meter that measures only how loud the bass singers in a choir are. Figure 2 shows each field.
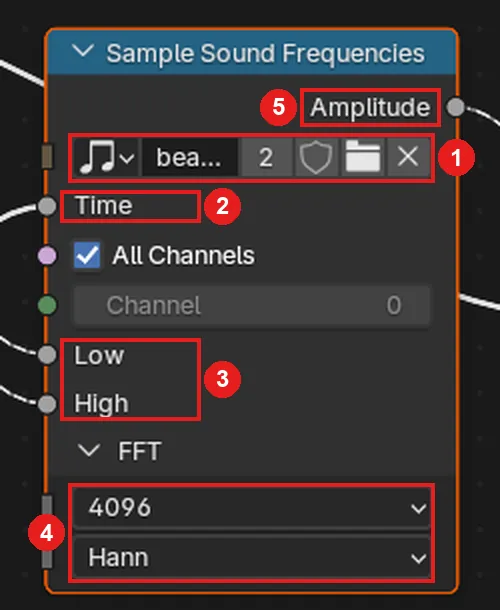 Figure 2. The Sample Sound Frequencies node. ① Sound field and folder button ② Time ③ Low and High ④ FFT panel (FFT Size, Window Function) ⑤ Amplitude output (Blender screenshot)
| Field | What it does | Default |
|---|---|---|
| Sound (①) | The sound to read. Open a file with the folder button | Empty |
| Time (②) | Which second of the sound to measure | 0 |
| All Channels | Mixes left and right into one before measuring | On |
| Channel | The channel to measure when All Channels is off | 0 |
| Low, High (③) | Bottom and top of the frequency range | 0 Hz, 10000 Hz |
| FFT Size (④) | How long a piece of sound is cut at a time | 4096 |
| Window Function (④) | How the edges of each piece are smoothed | Hann |
| Amplitude (⑤) | The summed loudness inside the range | Output |
FFT is the name of the math that splits a piece of sound by frequency. A larger FFT Size gives finer frequency detail but less exact timing. Keep the default 4096 at first.
One important point: the Time field does not move by itself. If you leave it alone, the node keeps measuring second 0 and the bar stays still during playback. In section 2 you connect the scene time to it.
2. One bar that follows the sound
Start state: Start from the default cube in a new file (File > New > General).
Steps:
- Click the Geometry Nodes workspace tab at the top. Check that the cube is selected.
- Click New in the header of the node editor at the bottom. Group Input and Group Output nodes appear, and a Geometry Nodes modifier is added to the cube. Double-click the group name and rename it
SoundBar. - Press
Shift+A> Geometry > Operations > Transform Geometry and drop it on the link between the two nodes. Set Translation Z to1 m(① in Figure 3). The default cube is 2 m tall with its center at floor level. Moving it up 1 m puts its bottom on the floor, so later it only grows upward. - Add
Shift+A> Input > Scene > Scene Time (② in Figure 3). - Add
Shift+A> Utilities > Sound > Sample Sound Frequencies (③ in Figure 3). Connect Seconds of Scene Time to Time of this node. Now the current playback time goes in. - Click the folder button on the same node (① in Figure 2) and open your sound file.
- Add
Shift+A> Utilities > Math > Math and change the operation to Multiply Add (④ in Figure 3). Connect Amplitude to Value and set Addend to0.05. Addend keeps a thin bar even when there is no sound. - Add
Shift+A> Utilities > Vector > Combine XYZ (⑤ in Figure 3). Set X and Y to0.5, and connect the Multiply Add result to Z. The bar becomes half as wide and stretches upward with the loudness. - Add a second Transform Geometry between the first one and Group Output (⑥ in Figure 3). Connect Vector of Combine XYZ to its Scale.
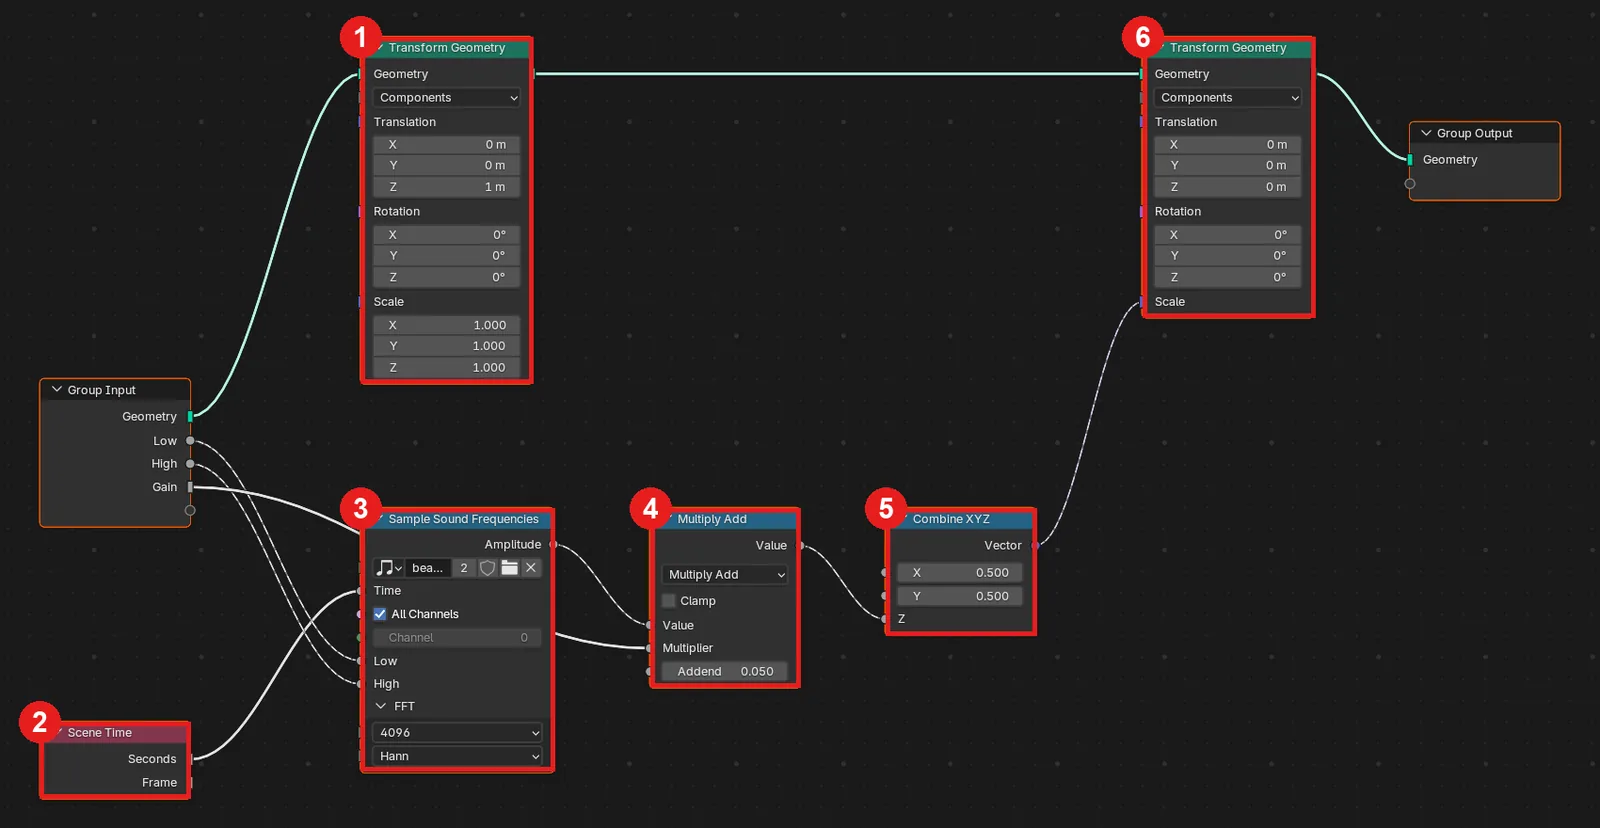 Figure 3. The finished nodes. ① First Transform Geometry (Translation Z 1 m) ② Scene Time ③ Sample Sound Frequencies ④ Multiply Add ⑤ Combine XYZ ⑥ Second Transform Geometry (Blender screenshot)
Group Input in Figure 3 also shows Low, High and Gain. You make them in the next step.
3. Move the range and the multiplier to the modifier panel
With three bars, each bar needs different Low and High values. If the values live inside the nodes, you have to edit the nodes for each bar. Instead, turn them into group inputs. Then you only change numbers per bar in the Modifier tab of the Properties editor. A group input is a handle on the outside of the node box.
Start state: Continue from the nodes in the previous section.
Steps:
- Drag the Low socket (left circle) of Sample Sound Frequencies to the empty socket at the bottom of Group Input. A Low field appears on Group Input.
- Do the same with the High socket.
- Drag the Multiplier socket of Multiply Add to the empty socket of Group Input too. Press
Nin the node editor to open the sidebar, and in the Group tab rename the new Multiplier input toGain. - Open the Modifier tab (wrench icon) in the Properties editor. Set Low to
20, High to150and Gain to2.5(① in Figure 4).
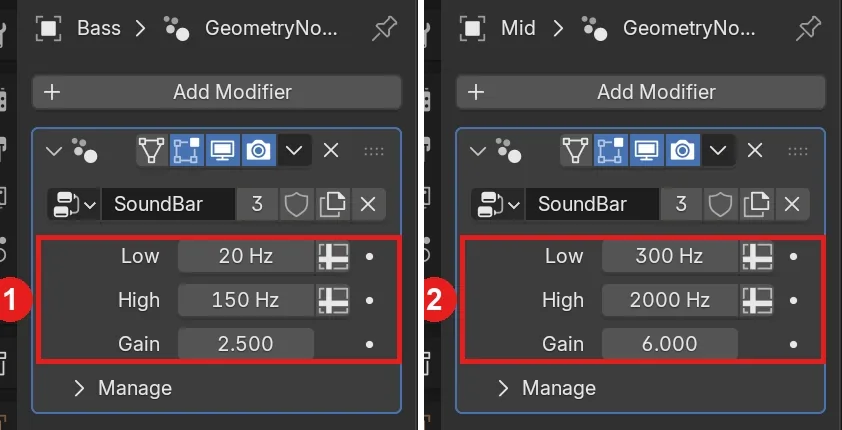 Figure 4. Different values per bar. ① Low-sound bar (Low 20 Hz, High 150 Hz, Gain 2.5) ② Middle-sound bar (Low 300 Hz, High 2000 Hz, Gain 6) (Blender screenshot)
Gain multiplies the bar height. If the loudness is 0.8 and Gain is 2.5, Multiply Add gives 0.8 × 2.5 + 0.05 = 2.05. That becomes the Z scale, so the 2 m cube grows to about 4 m. Measured on the sound used here, the low range peaked at about 0.81, the middle range at about 0.32 and the high range at about 0.72. Each range has a different loudness, so use Gain to make the three bars similar in height.
4. Play back with sound
Start state: Continue from the cube with the values set in the previous section.
Hover the mouse over the 3D Viewport and press Space to play. If the bar grows and shrinks with the beat, it works. But the node only reads the file. It does not play the sound through your speakers. To hear the sound during playback, also add it to the Video Sequencer and turn on Sync to Audio so the sound and the picture stay together. This is the method given in the release notes.
Steps:
- Put the timeline on frame 1.
- Click the editor type button at the top left of any editor, switch it to Video Sequencer, and add the same file with Add > Sound.... The sequencer is explained in Blender Video Sequencer basics. Switch the editor back when you are done.
- Click Playback in the timeline header and set Sync to Sync to Audio.
- Press
Spaceagain. The sound and the bar now move together.
5. Make three bars
Start state: Continue from the cube in the previous section.
Steps:
- Select the cube in the 3D Viewport and type
-2.2 minto Location X in the sidebar (N) to move it left. This cube is the low-sound bar. Then pressShift+D→X→2.2→Enter. A second bar appears at X 0 m. - In the Modifier tab of the new bar, set Low
300, High2000, Gain6(② in Figure 4). - Press
Shift+D→X→2.2→Enteronce more for the third bar at X 2.2 m, and set Low5000, High12000, Gain3. - Click New in the Material tab of each bar and give it a color. The pictures use red for low, green for middle and blue for high. Renaming them
Bass,MidandHighin the Outliner helps too.
Look at the number next to the node group name in the modifier (the 3 next to SoundBar in Figure 4). If it is 3, the three bars share one node group. Editing the nodes then changes all three bars at once, and only the numbers in the modifier panel differ per bar. If it is 1, Shift+D copied the node group too, so you must edit each bar's nodes separately.
6. Render with EEVEE
Start state: Continue from the three bars in the previous section.
Steps:
- Add a floor. Add
Shift+A> Mesh > Plane and widen it withS→30→Enter. Give it a grey material in the Material tab. - Change the light to sunlight. Select the default Light, click Sun in the Light tab of the Properties editor and set Strength to
3.5. Type50into Rotation X and30into Z in the sidebar (N) to get bar shadows to the left as in the pictures. If there is no default light, addShift+A> Light > Sun. - In the Render tab of the Properties editor, check that Render Engine is EEVEE.
- Select the camera and in the sidebar set Location X
0, Y-16 m, Z2.2 mand Rotation X88°, Y0, Z0. Set Focal Length to45 mmin the Camera data tab. Enter camera view with numpad0, move the timeline to loud parts, and check that even the tallest bar stays inside the frame. - Render single frames with
F12. For a video, useCtrl+F12.
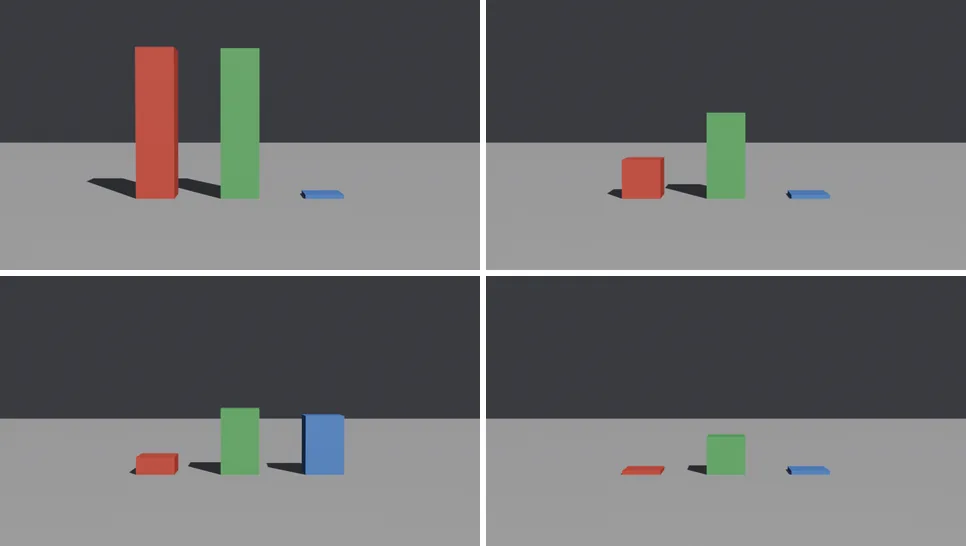 Figure 5. Frames 13, 16, 19 and 22 (left to right, top to bottom) (Blender render)
Figure 5 shows how the sound and the bars match. Frame 13 is right after the drum and the melody start together, so red and green are tall. By frame 16 the drum has faded quickly and red is lower. Frame 19 is the "tss" between beats, so blue shoots up. At frame 22 only a little melody is left, so only green stands.
Practice
- Raise Low of the third bar to
8000. Write down how the blue bar changes. - Change FFT Size to
1024and play. See if the bars react faster or look less smooth. - Make five bars instead of three and split 20–12000 Hz into five ranges.
- Instead of Scale, connect the Multiply Add result to X of Combine XYZ so the bar grows wider.
Common mistakes and fixes
| Symptom | Cause | Fix |
|---|---|---|
| The bar does not move during playback | Time is empty, so the node measures second 0 only | Connect Seconds of Scene Time to Time |
| The bar grows both up and down | The first Transform Geometry is missing or Translation Z is 0 | Set Translation Z of the first Transform Geometry to 1 m |
| The bar disappears when there is no sound | Addend is 0 | Put a small value such as 0.05 in Addend |
| The high-sound bar hardly moves | That range is quiet | Raise that bar's Gain or widen the range |
| No sound during playback | The node only reads the file | Add the same file with Add > Sound... in the Video Sequencer |
| The sound and the bars drift apart | Playback sync favors frames | Set Playback > Sync to Sync to Audio |
| Editing one bar's nodes does not change the others | The node group was copied (number 1) | Pick the same SoundBar group in the group field |
Summary
Scene Time → Sample Sound Frequencies → Multiply Add → Combine XYZ → Transform Geometry Scale, with Low, High and Gain as group inputs so each bar can differ.
References
- Blender 5.2 release notes, Geometry Nodes (Sample Sound Frequencies, Sync to Audio): https://developer.blender.org/docs/release_notes/5.2/geometry_nodes/
- Blender 5.2 manual, Sample Sound Frequencies node: https://docs.blender.org/manual/en/5.2/modeling/geometry_nodes/utilities/sound/sample_sound_frequencies.html
- Shortcuts: add node
Shift+A, duplicateShift+D, playSpace, sidebarN, renderF12, render animationCtrl+F12 - Pictures: all real Blender 5.2.1 screenshots and EEVEE renders. The sound file is an example made for this guide