Blender 5.2 node physics basics: a cloth flag in the wind with the Cloth Dynamics node
Build one flag with the node-based physics (XPBD) that arrived in Blender 5.2 as an experimental feature. Pin it to a pole, make it collide with the pole, add wind and gusts, then bake and render with EEVEE, step by step.
한국어English
ON THIS PAGE
- 011. Old cloth simulation vs node physics
- 022. Make the flag and the pole
- 033. Mark the pole-side points as pinned
- 044. Drop the cloth with the Cloth Dynamics node
- 055. Stop the cloth passing through the pole: Collider
- 066. Add wind: Custom Force
- 077. Try a different value: Bendiness
- 088. Bake and render with EEVEE
- 09Practice
- 10Common mistakes and fixes
- 11Summary
- 12References
Based on: Blender 5.2 LTS (screenshots from 5.2.1, English interface, default shortcuts), EEVEE render engine. Checked in November 2026. All pictures are real Blender screenshots and EEVEE renders. The red numbers and boxes were added to explain them.
Blender 5.2 adds physics you build with nodes. The official release page calls it a "brand new procedural approach to physics for hair and cloth simulations", and it says the XPBD Solver node behind it is experimental. Experimental means names and behavior may change in a later version. The menu and node names in this guide are written exactly as they appear in 5.2.1.
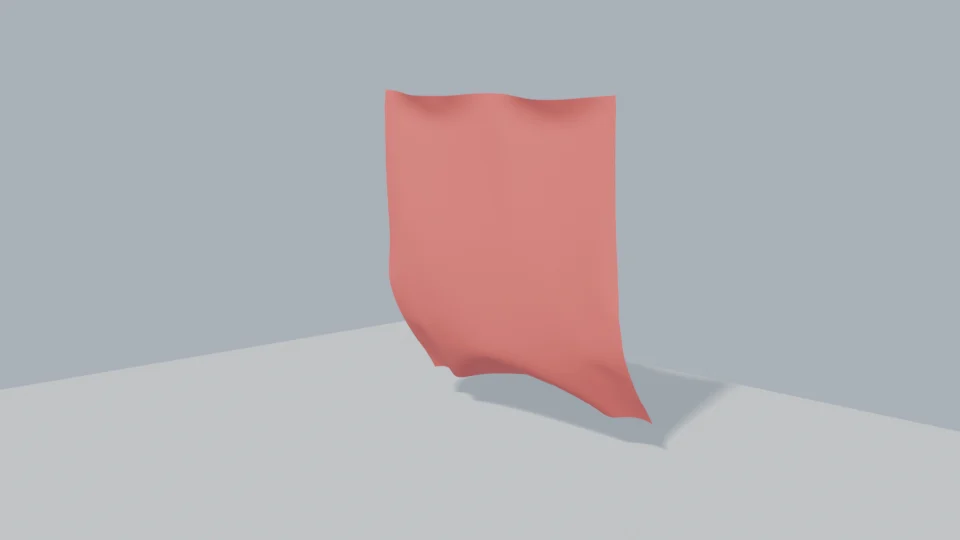
In this guide you build one flag tied to a pole, from scratch. The result looks like Figure 1. If nodes are new to you, read Getting started with Blender Geometry Nodes first. It makes this much easier.
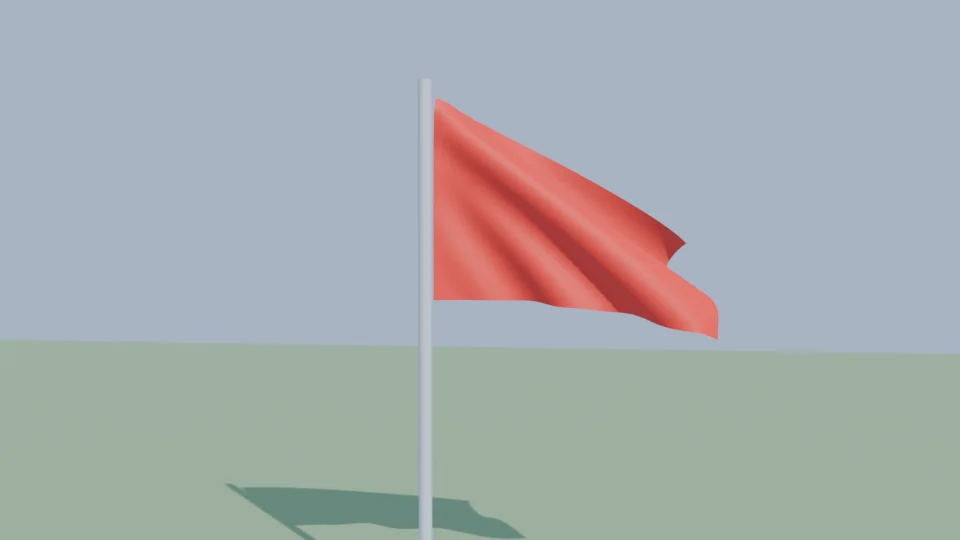 Figure 1. The flag you build in this guide, frame 90 rendered with EEVEE (Blender render)
By the end of this guide you will be able to:
- Make a flag plane and a pole, and mark the pole-side points as "pinned".
- Drop the cloth with the Cloth Dynamics (Experimental) node.
- Add a Collider to the pole so the cloth does not pass through it.
- Add wind and gusts with the Custom Force node.
- Bake the simulation and render it with EEVEE.
1. Old cloth simulation vs node physics
Blender has had a cloth tool for a long time: the Cloth button in the Physics tab of the Properties editor (① in Figure 2). You turn it on with one button and pick values from fixed fields.
Node physics does the same job by linking nodes. Think of the old way as a restaurant with a fixed menu, and node physics as a kitchen where you choose the ingredients and the steps. With a few nodes you can make the wind different at each point, or pin only certain points. Node simulations are baked in the Simulation Nodes panel at the bottom of the Physics tab (② in Figure 2).
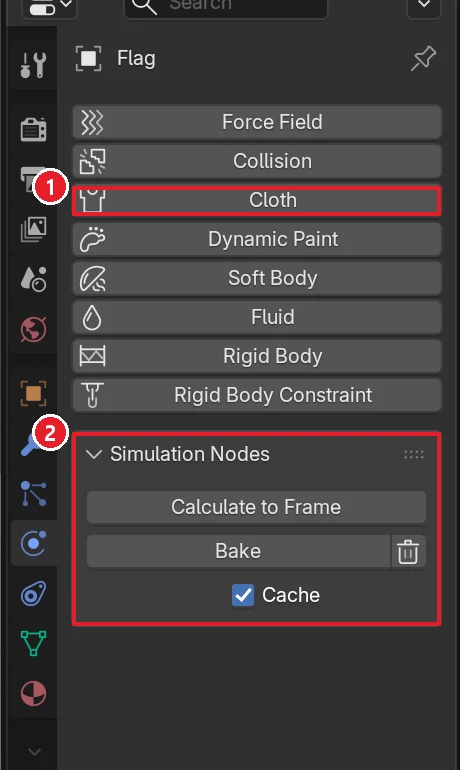 Figure 2. The Physics tab. ① The old Cloth button ② The Simulation Nodes panel that bakes node simulations (Blender screenshot)
XPBD is the name of the calculation method behind node physics. It treats cloth as a net of short strings between points, and keeps moving the points so the strings do not stretch or fold too much. This guide does not wire the XPBD Solver node by hand. It uses the ready-made Cloth Dynamics (Experimental) node group. A node group is several nodes packed into one box, and the XPBD calculation is inside it.
2. Make the flag and the pole
Starting point: a new file (File ‣ New ‣ General) with the default cube.
Steps:
- Select the default cube and press
X→ Delete. - Add a cylinder with
Shift+A‣ Mesh ‣ Cylinder. Open the Add Cylinder panel at the bottom left and set Vertices24, Radius0.04 m, Depth3.2 m, Location Z1.6 m. This is the pole. Rename itPole(double-click it in the Outliner). - Add a grid with
Shift+A‣ Mesh ‣ Grid. In the Add Grid panel set X Subdivisions48, Y Subdivisions32, Size1 m, Location X0.95 m, Location Z2.5 m, Rotation X90°. Rename itFlag. - Press
Nto open the sidebar and set Scale X1.8and Scale Y1.2. - Press
Ctrl+A‣ All Transforms. Scale and rotation are baked into the object, so the simulation runs at the real size.
The grid needs many cells because cloth can only fold along cell edges. With too few cells you get sharp bends instead of folds. The flag is now 1.8 m wide and 1.2 m tall, and its left edge sits right next to the pole (X 0.05 m).
3. Mark the pole-side points as pinned
Starting point: continue from the Flag in the previous section.
Left alone, the cloth falls to the ground. The left column next to the pole has to stay in place. You mark it with a vertex group. A vertex group is a name tag on points. With it you can tell a node "keep these points fixed".
Steps:
- Select Flag and press
Tabfor Edit Mode. Press1for vertex select. - Press numpad
1for the front view. - Press
Alt+Ato deselect all, then drag a box around only the leftmost column (① in Figure 3). If the status bar showsVerts:33/1,617, you picked exactly one column of 33 points (④ in Figure 3). - Open the Data tab (green triangle icon) in the Properties editor. Click
+next to Vertex Groups, then double-click the new group and rename itpin(② in Figure 3). - Check that Weight is
1.000and click Assign (③ in Figure 3). - Press
Tabto go back to Object Mode.
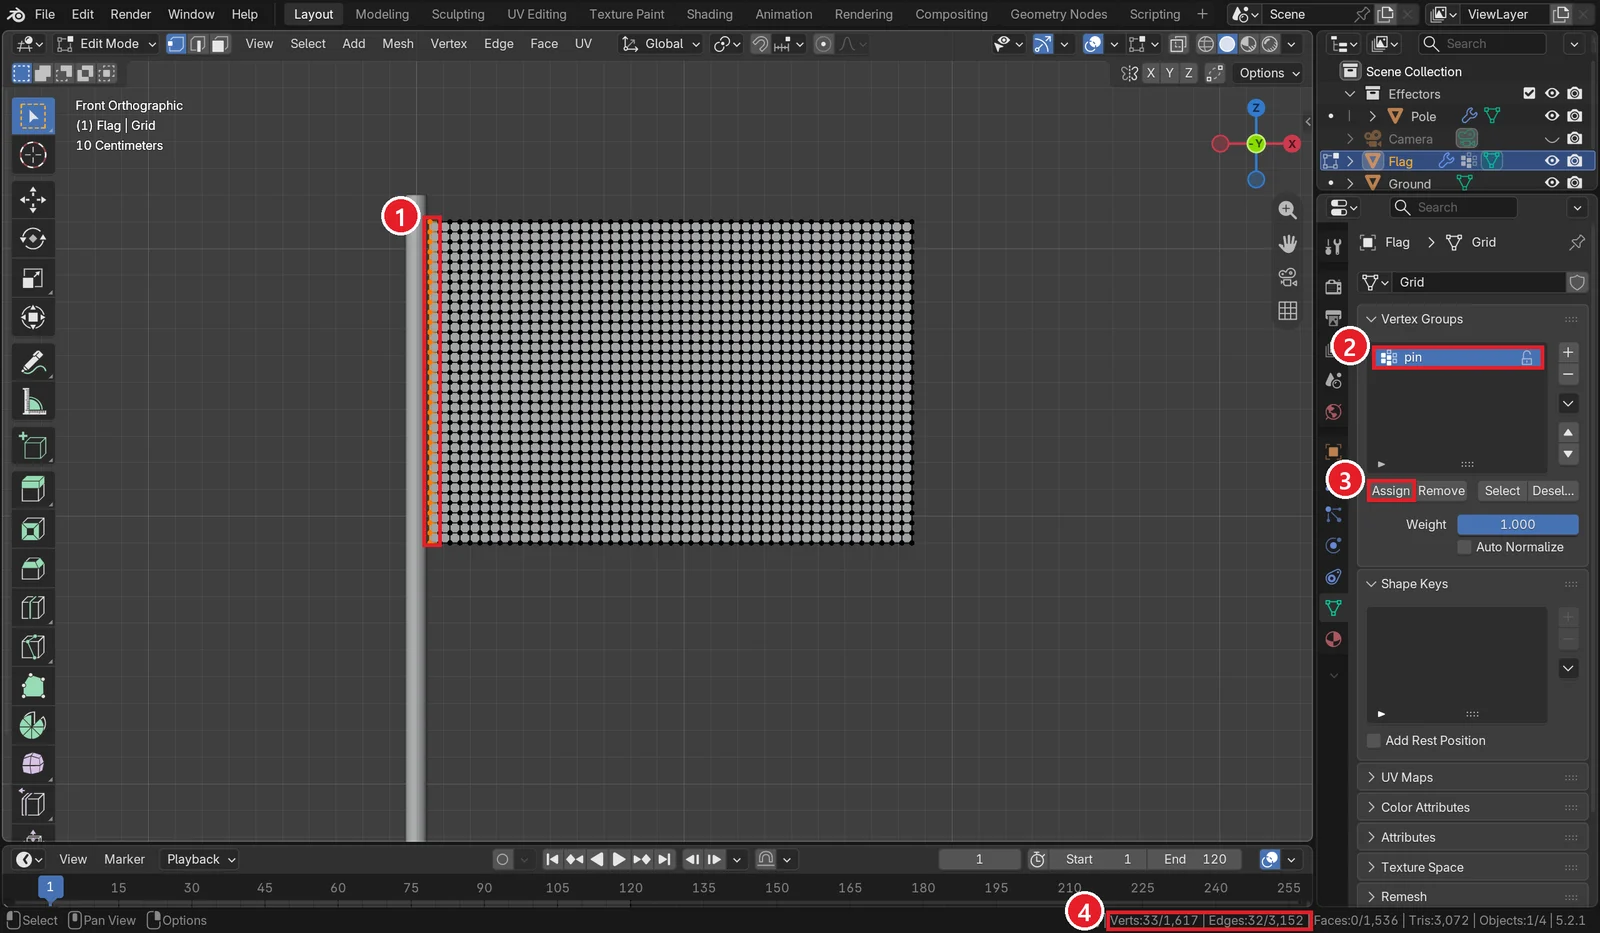 Figure 3. Marking pinned points. ① The selected left column ② Vertex group pin ③ Assign ④ 33 points selected (Blender screenshot)
4. Drop the cloth with the Cloth Dynamics node
Starting point: continue from the Flag with the pin group.
Steps:
- Click the Geometry Nodes workspace tab at the top. Make sure Flag is selected.
- Click New in the header of the node editor in the middle. A Group Input and a Group Output box appear, and Flag gets a Geometry Nodes modifier.
- With the mouse over the node editor, choose
Shift+A‣ Simulation ‣ Cloth Dynamics (Experimental) (Figure 4). Drop the box on the line between Group Input and Group Output, and it links itself in. - Press
Shift+A, typeNamed Attributein the Search... field at the top of the menu, and add it. Set the type toFloatand the name topin. Searching by name is the easiest way to find a node when you are not sure which menu it lives in. - Drag from the Attribute output of Named Attribute to the Pin Group input of Cloth Dynamics (① and ② in Figure 5).
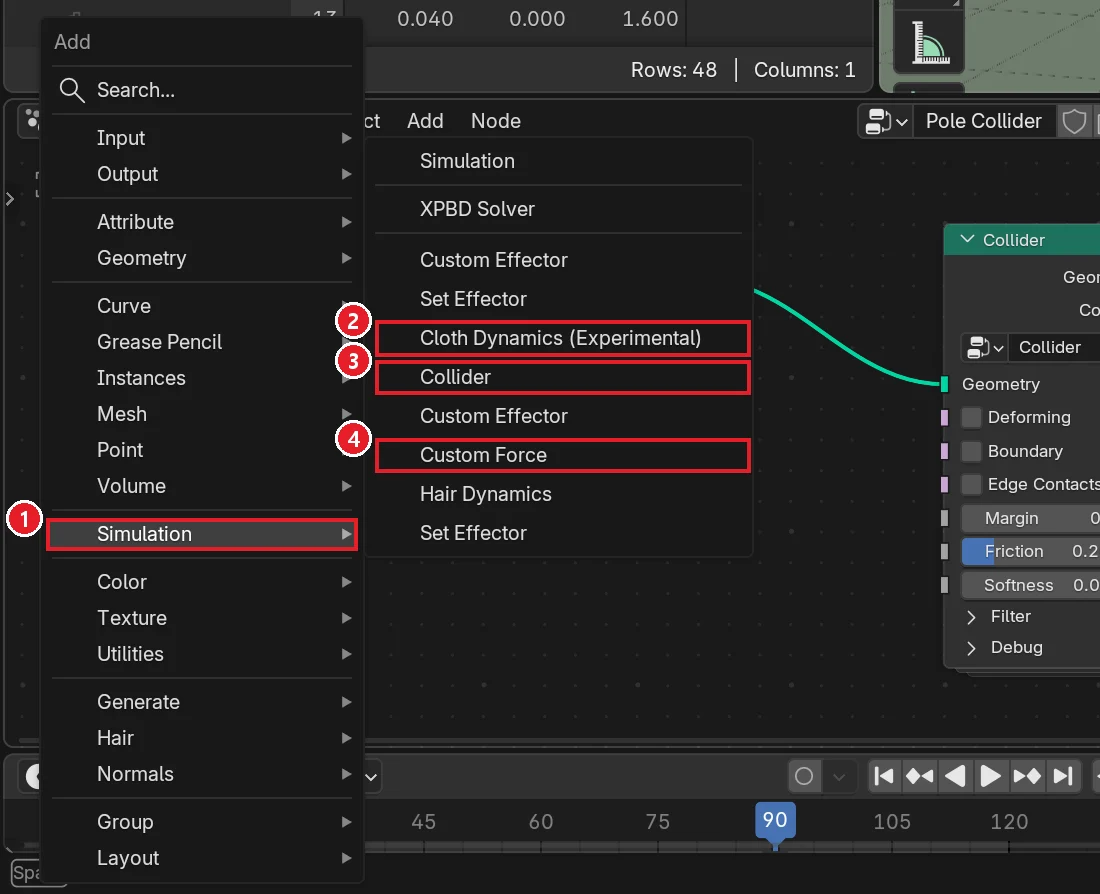 Figure 4. The Simulation group in the Add menu. ① Simulation ② Cloth Dynamics (Experimental) ③ Collider ④ Custom Force. Custom Effector and Set Effector appear twice in the list, but this guide does not use them (Blender screenshot)
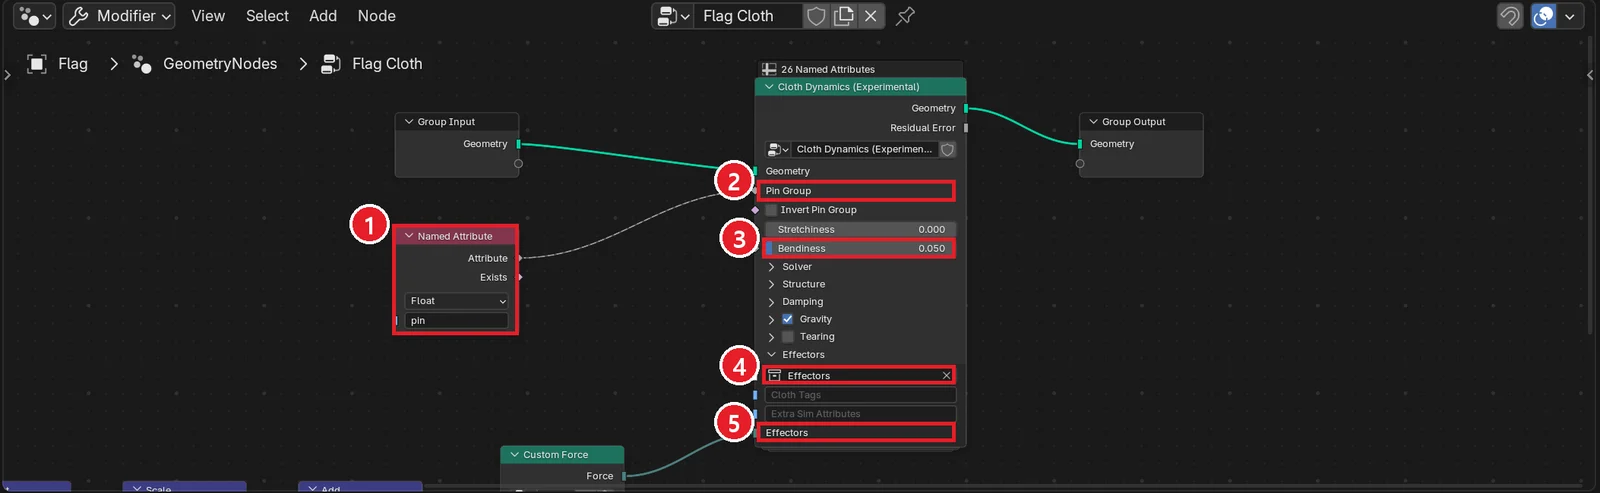 Figure 5. The finished cloth nodes. ① Named Attribute (pin) ② Pin Group input ③ Bendiness ④ Effectors Collection field ⑤ Effectors input. ③ to ⑤ are used in sections 5 to 7 (Blender screenshot)
Now put the timeline on frame 1 and press Space to play. The cloth starts to sag. A node simulation computes each frame from the frame before it. So the first playback is a bit slow, and going back to frame 1 starts the calculation over. Press Space again to stop.
The defaults of the Cloth Dynamics node are Substeps 5, Constraint Steps 15, Mass 1, and Gravity Z -9.81. Substeps is how many smaller steps one frame is split into. Constraint Steps is how many times the string lengths are fixed within each of those steps. Raising both makes the cloth stretch less but slows things down. Leave them at the defaults for now.
5. Stop the cloth passing through the pole: Collider
Starting point: continue from the scene in the previous section.
Play it without wind and the cloth hangs down, but it passes through the pole to the other side, as in ① of Figure 6. The cloth does not know the pole is there. Tell it the pole is a collider, and it drapes over the pole as in ②. A collider is a label that says "this object is a solid wall, do not go through it".
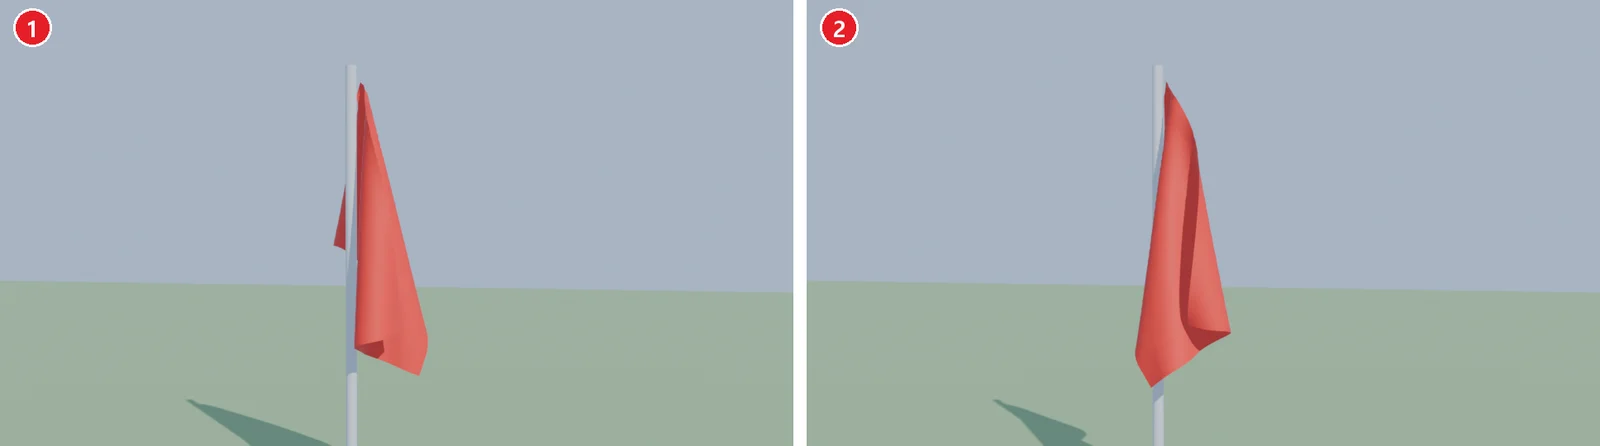 Figure 6. Frame 90 with no wind. ① No collider: the cloth passes through the pole ② With a Collider on the pole: the cloth drapes over it (Blender render)
The collider goes on the pole. You then put the pole in a collection called Effectors and tell the cloth node about it. Effector is the general word for anything that acts on the cloth. There are three kinds: colliders, forces, and custom effectors.
Steps:
- Select
Polein the Outliner. In the 3D Viewport pressM‣ New Collection and name itEffectors. The pole moves into the new collection (① in Figure 7). - With Pole selected, click New in the node editor header. The pole also gets a Geometry Nodes modifier (③ in Figure 7).
- Add
Shift+A‣ Simulation ‣ Collider and drop it on the line between Group Input and Group Output (② in Figure 7). Friction defaults to0.200. - Select
Flagagain. Open the Effectors panel in the Cloth Dynamics box, click the first field (④ in Figure 5), and pick theEffectorscollection. - Go back to frame 1 and play again. The cloth should now hang over the pole.
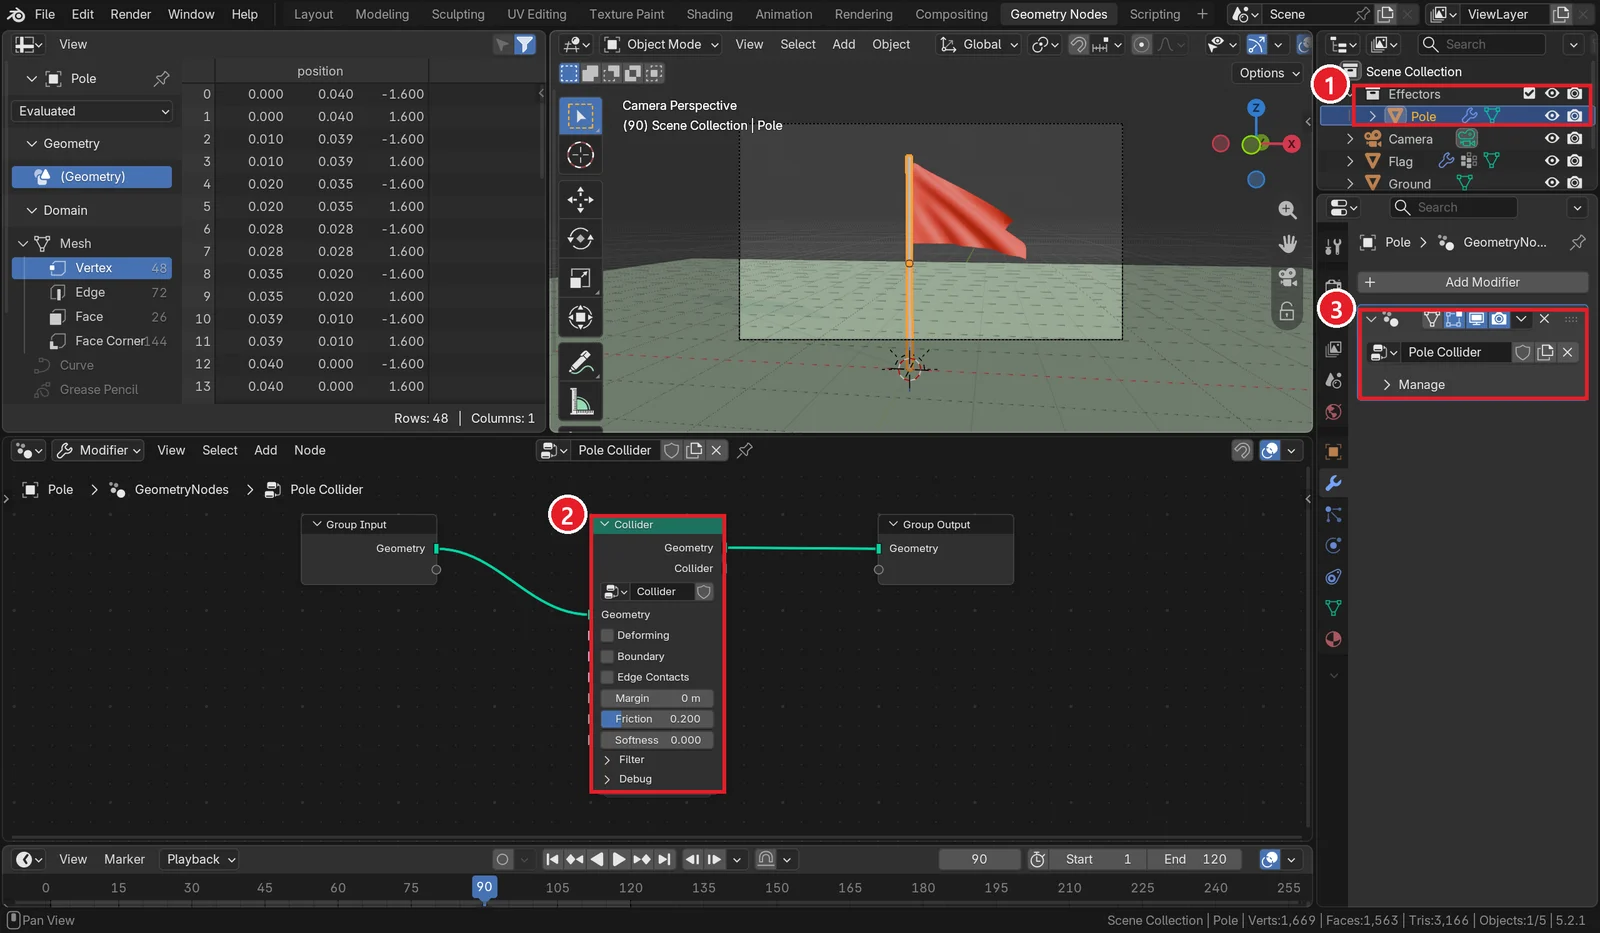 Figure 7. Pole setup. ① Pole inside the Effectors collection ② Collider node ③ The pole's Geometry Nodes modifier. In the picture the node group was renamed Pole Collider (Blender screenshot)
6. Add wind: Custom Force
Starting point: continue from the previous section with Flag selected.
Wind is a force. Think of a hand that keeps pushing every point of the cloth in the same direction.
Steps:
- In Flag's node editor, add
Shift+A‣ Simulation ‣ Custom Force. - Check that Mode on Custom Force is
Field. - Set Force to X
12, Y3.6, Z0. That is a strong push to the right (+X) and a light push away from the camera (+Y). - Link the Force output of Custom Force to the Effectors input of Cloth Dynamics (⑤ in Figure 5).
- Play again from frame 1. The flag spreads out to the right.
With steady wind the flag spreads out and almost stops moving (① in Figure 9). To make the wind rise and fall like real wind, mix in gusts.
Steps (gusts):
- Add
Shift+A‣ Texture ‣ Noise Texture, set it to4D, and set Scale to1.5. A noise texture makes a pattern that ripples in a natural way. - Use
Shift+A‣ Search... to add Position and Scene Time. Link Position to the noise Vector and the Seconds output of Scene Time to the noise W. As time passes, the pattern drifts. - Use Search... to add three Vector Math nodes in a row: the first set to Subtract with
0.5, 0.5, 0.5, the second to Scale with18, the third to Add with12, 3.6, 0. Link noise Color → Subtract → Scale → Add. - Link the Add output to the Force input of Custom Force (Figure 8). The Add node now supplies the values you typed into Force in step 3.
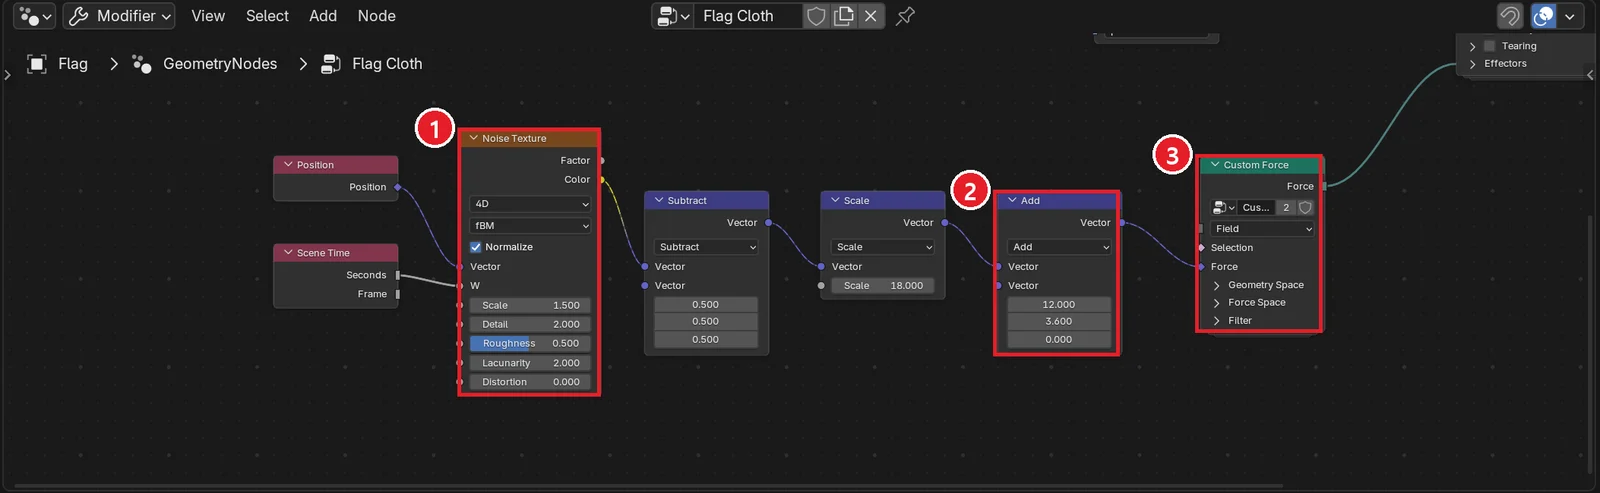 Figure 8. Gust nodes. ① Noise Texture (4D) ② Add, which adds the base wind 12, 3.6, 0 ③ Custom Force (Blender screenshot)
You subtract 0.5 because noise values run from 0 to 1. After subtracting, they run from -0.5 to 0.5, so the wind gets both stronger and weaker than the base value. A larger Scale value makes the gusts rougher.
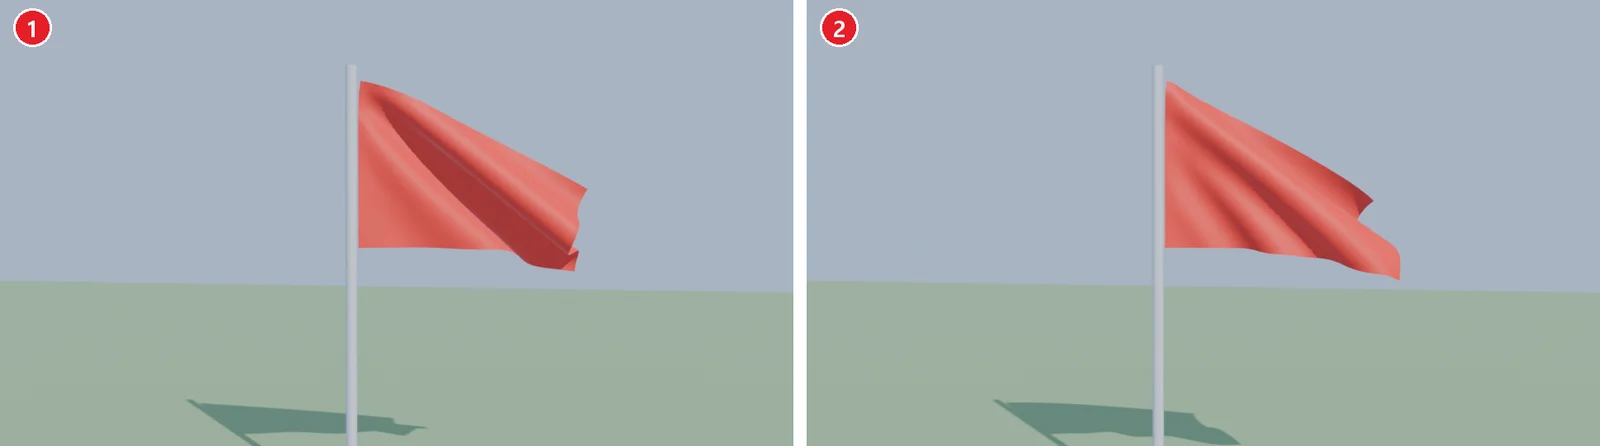 Figure 9. Frame 90 compared. ① Steady wind (12, 3.6, 0) ② Wind with gusts (Blender render)
7. Try a different value: Bendiness
Starting point: continue from the gust scene.
Bendiness on Cloth Dynamics (③ in Figure 5) is how easily the cloth folds. Higher values make the cloth bend more easily. Comparing the default 0.050 with 1.0 at the same frame gives Figure 10. The higher value looks floppier and has more small wrinkles.
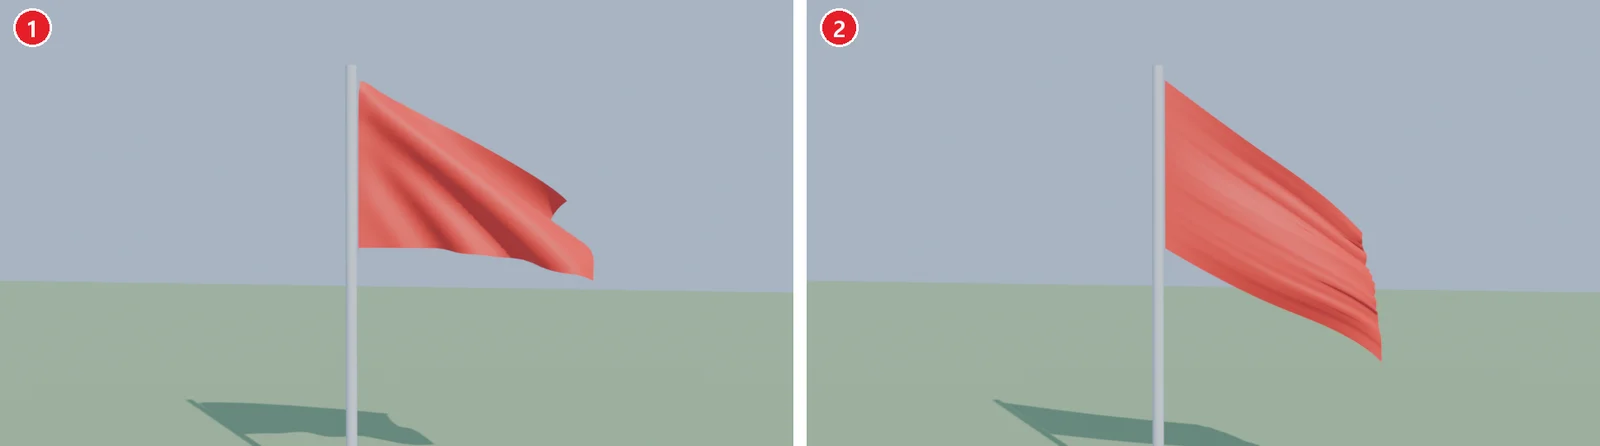 Figure 10. Frame 90 with the same wind. ① Bendiness 0.05 ② Bendiness 1.0 (Blender render)
Steps: set Bendiness to 1, play again from frame 1, and compare. When you are done, set it back to 0.05.
Raise it for a thin silk flag and lower it for heavy canvas. If the cloth stretches like rubber, keep Stretchiness close to 0 and raise Constraint Steps.
8. Bake and render with EEVEE
Starting point: continue from the scene with Bendiness set back to 0.05.
What you compute during playback is a temporary cache, and it is lost when you change the scene. Baking stores the result like a file. It is like cooking side dishes ahead of time and putting them in the fridge. Always bake before rendering. If you render an animation without baking, the cloth may stay in its starting shape.
Steps:
- Set End on the timeline to
120(4 seconds at 30 fps). - Select Flag and open the Physics tab. Click Bake in the Simulation Nodes panel at the bottom (② in Figure 11) and wait for it to finish.
- In the Render tab, check that Render Engine is
EEVEE. In the Output tab, set the resolution to960×540. - Go to frame 90 and press
F12for a still like Figure 1. Render the video withCtrl+F12.
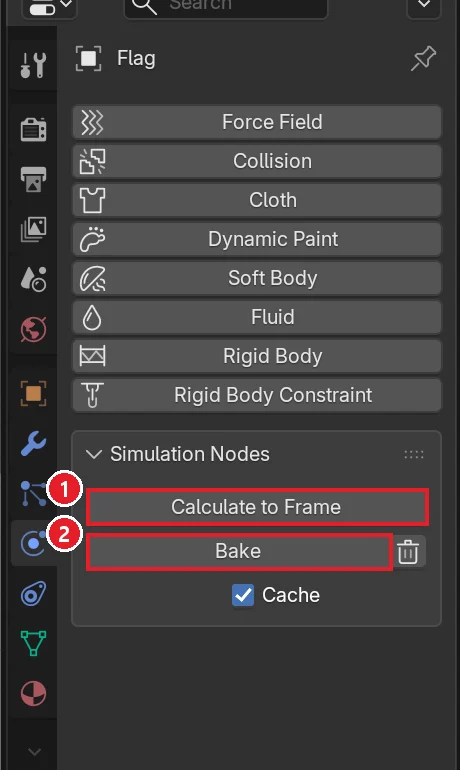 Figure 11. Bake buttons. ① Calculate to Frame ② Bake. The trash button on the right deletes the baked result (Blender screenshot)
Calculate to Frame (① in Figure 11) only computes up to the current frame. To bake again after changing a value, delete the bake with the trash button first. If render settings are new to you, see Blender render settings basics. For what EEVEE is, see Fast EEVEE, accurate Cycles.
Practice
- Change the Y value of the wind Add node to
-3.6and see which way the flag bends. - Set the Noise Texture Scale to
0.5and4, and write down how the gusts change. - Raise Mass on Cloth Dynamics to
3. Check whether the flag spreads out more or less in the same wind. - Put a UV Sphere under the pole, move it into the Effectors collection, and give it a Collider so the cloth catches on the ball too. Save this scene.
Common mistakes and fixes
| Symptom | Cause | Fix |
|---|---|---|
| The whole flag falls to the ground | Nothing is linked to Pin Group, or the name is not pin | Check Named Attribute type Float and name pin, and link it to Pin Group |
| Everything except the pole side is pinned | The wrong points were assigned | In Edit Mode use the group's Select to see pinned points, then assign only the left column again |
| The cloth passes through the pole | The Effectors Collection field is empty, or the pole is outside the collection | Check the pole is in the Effectors collection and that collection is in the Cloth node's Effectors field |
| Changing values does nothing | You are looking at an old bake | Delete the bake with the trash button in the Physics tab and bake again |
| The cloth does not move in the video render | The animation was rendered without baking | Click Bake first, as in step 2 of section 8 |
| The cloth bends at sharp angles | Too few grid cells | Make the Grid again with more Subdivisions |
| Playback is very slow | Substeps and Constraint Steps are set high | Go back to the defaults (5, 15) and reduce the grid cells |
Summary
Pin pole-side points with a vertex group, use Collider + an Effectors collection for things to hit, Custom Force for wind, and Bake before you render.
As a next step, try Hair Dynamics from the same Simulation menu. If modifiers still feel new, see What is a modifier?.
References
- Blender 5.2 LTS release page (node physics, XPBD Solver, effectors): https://www.blender.org/download/releases/5-2/
- Blender 5.2 manual, Geometry Nodes: https://docs.blender.org/manual/en/latest/modeling/geometry_nodes/index.html
- Shortcuts: play
Space, renderF12, render animationCtrl+F12, apply transformsCtrl+A, move to collectionM - Pictures: all real Blender 5.2.1 screenshots and EEVEE renders. The flag scene was made for this guide