Blender compositor basics: color grading, glow, and vignette after rendering
In the Compositing workspace of Blender 5.2, we create a new node tree, adjust the colors of a rendered image with Color Balance, add a glow around lights with Glare, darken the edges with Vignette, and save the result to a file.
한국어English
ON THIS PAGE
- 01Before you start
- 021. Three words
- 032. Opening the Compositing workspace
- 043. The default nodes and the preview
- 054. Adjusting colors with Color Balance
- 065. Adding a glow with Glare
- 076. Darkening the edges with Vignette
- 087. The finished node tree and saving
- 09Practice
- 10Common mistakes and fixes
- 11In one line
- 12References
Based on: Blender 5.2 LTS (screenshots from 5.2.1, English UI, default keymap), EEVEE render engine. Checked in November 2026. All figures are real Blender screens and real renders. Red numbers and boxes were added for explanation.
Sometimes a finished render looks a little flat. You might want a glow around strong lights, or slightly darker edges to pull the eye to the center. You could change the scene and render again, but Blender has a separate place for working on the image after rendering. That place is the compositor.
The compositor is like the filter stack in a photo editing app. Just as you stack brightness, glow, and dark edges on a photo, you chain effect boxes (nodes) onto a rendered image. The scene stays the same and only the image changes. If you don't like an effect, you remove one box.
Figure 1 shows what we make in this guide. The left is the original render, and the right is the render after the compositor.
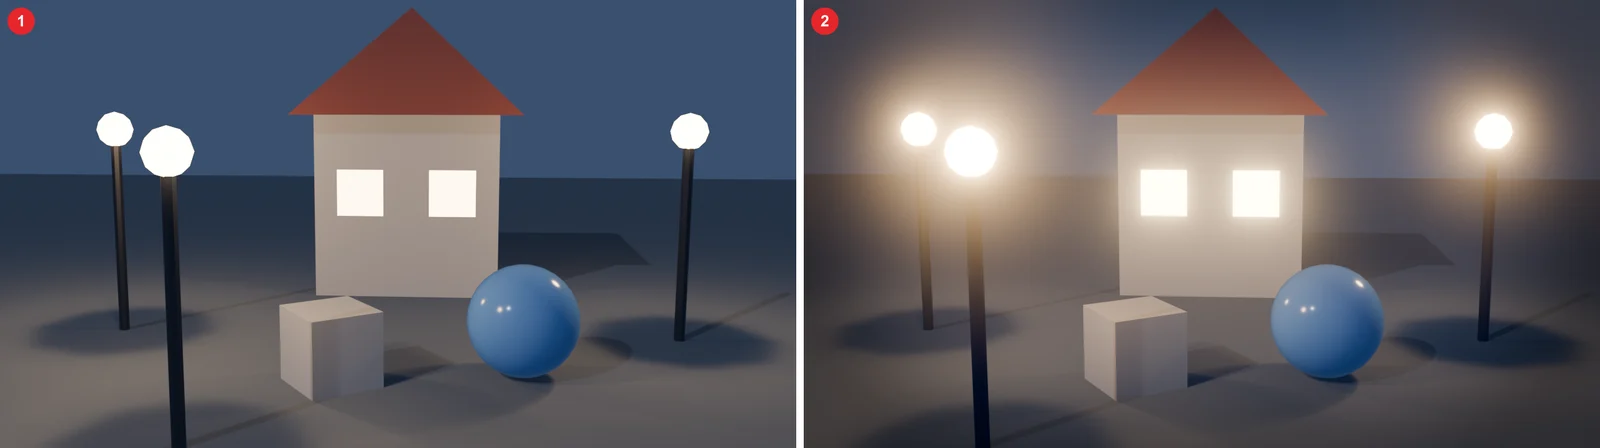 Figure 1. ① Original render ② Render with color grading, glow, and vignette (darker edges) (Blender render)
By the end of this guide, you will be able to:
- Open the Compositing workspace and create a new node tree.
- Preview the rendered image with the Viewer.
- Adjust the colors of the dark and bright parts separately with the Color Balance node.
- Add a glow around bright lights with the Glare node.
- Darken the edges of the image with Vignette.
- Save the composited image to a file.
Before you start
- Prepare a scene to render. A glowing object (emission material) or a very bright light makes the glow in section 5 easy to see. The figures in this guide use a night village scene, but you can follow the same steps with any scene.
- Keep your usual render settings. This guide renders 1280x720 with EEVEE. What the render settings mean is covered in Blender render settings basics.
1. Three words
| Word | Meaning | Comparison |
|---|---|---|
| Compositor | A node editor that keeps working on the image after rendering | The filter stack in a photo app |
| Node | A box that does one job. It takes input on the left dots and sends output from the right dots | One station on a conveyor belt |
| Link | A line that connects one node's output to another node's input | The belt between stations |
If node editors are new to you, read Shader nodes and materials first. They work the same way as the shader nodes used for materials.
2. Opening the Compositing workspace
Starting point: Your scene file is open.
Steps:
- Click Compositing in the workspace tabs at the top of the screen (Figure 2, ①).
- Click the New button in the header of the node editor in the middle (Figure 2, ②).
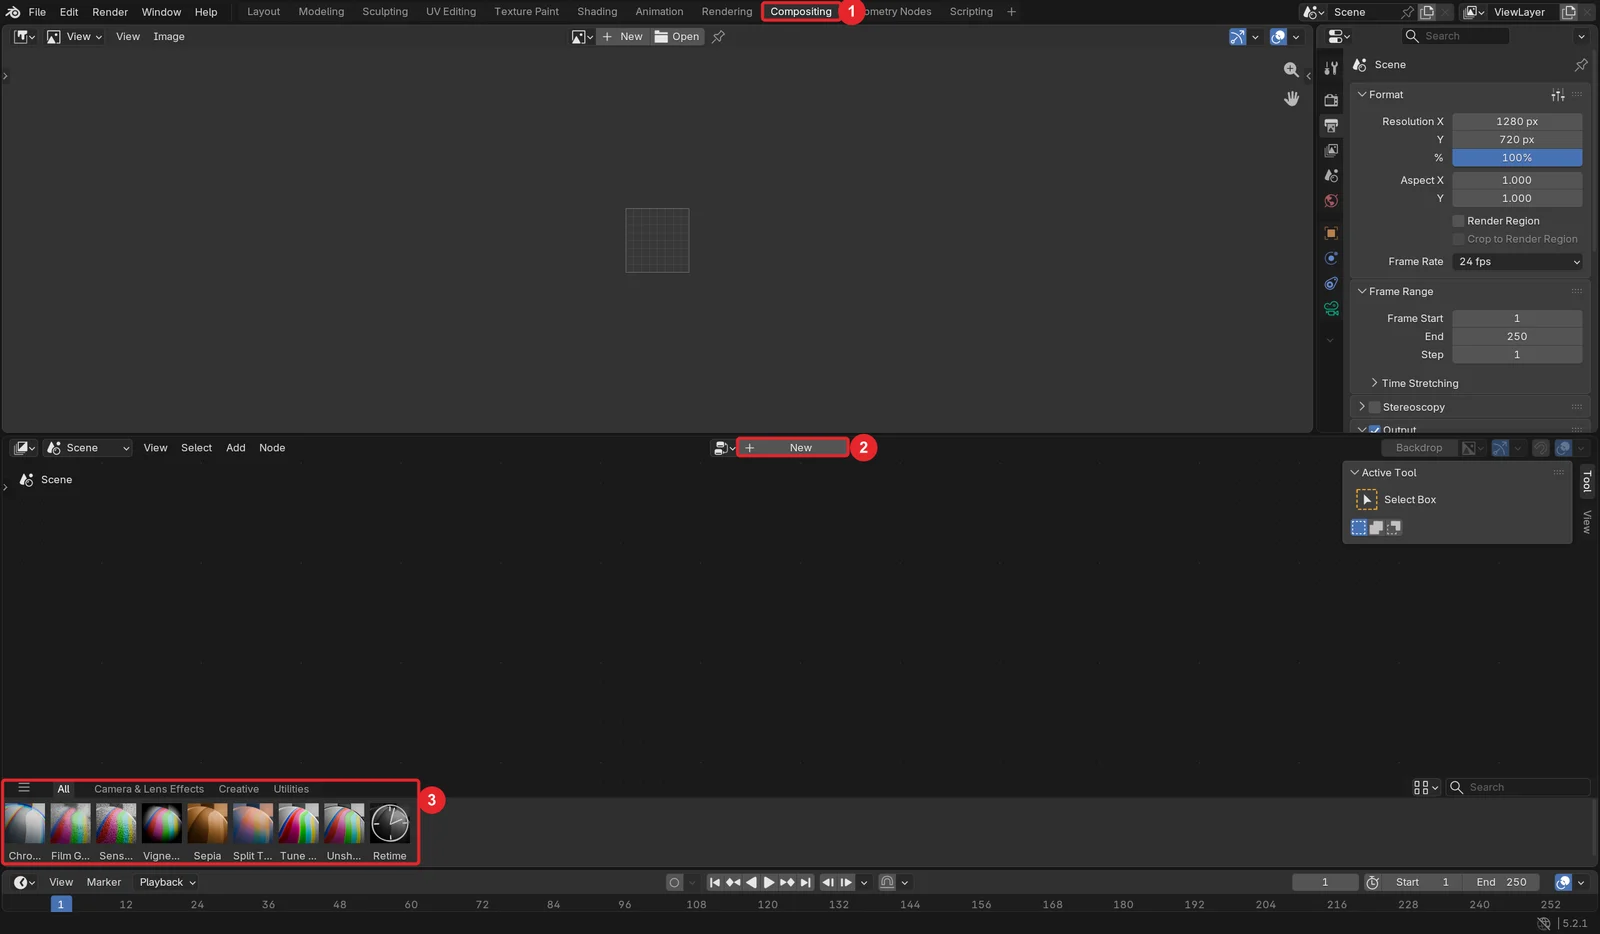 Figure 2. The Compositing workspace. ① Workspace tab ② New button that creates a node tree ③ Asset shelf with ready-made effect groups (Blender screenshot)
The Compositing workspace has four parts. The large Image Editor at the top shows the result, the Properties editor on the right changes render and output settings, the node editor in the middle connects effect boxes, and the Timeline at the bottom picks the frame. The strip below the node editor is the Asset Shelf. Common effect groups sit there as thumbnail buttons, and you drag them into the node editor. The Vignette in section 6 is here.
3. The default nodes and the preview
Starting point: You just clicked New in the previous section.
Steps:
- Check that three nodes appeared in the node editor (Figure 3, ② to ④).
- Press
F12to render one image. If a separate render window opens, look at the result and close it. - Click the image browse button in the header of the Image Editor at the top and choose Viewer Node. The rendered image appears (Figure 3, ①).
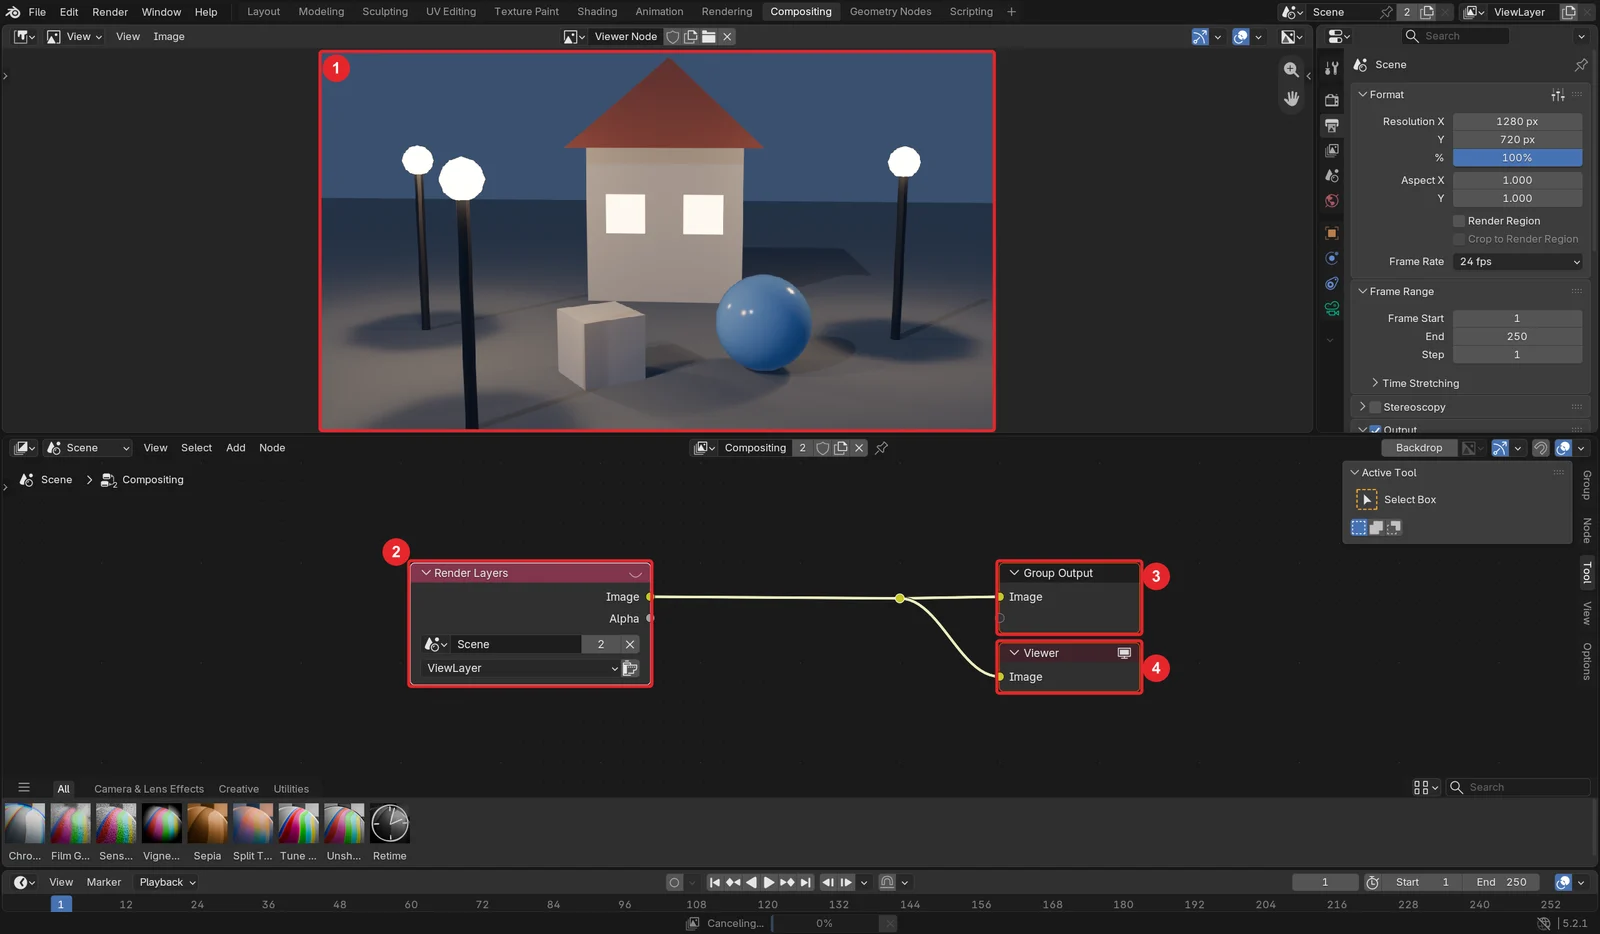 Figure 3. The default setup after clicking New. ① The result shown by the Viewer ② Render Layers ③ Group Output ④ Viewer (Blender screenshot)
| Node | What it does |
|---|---|
| Render Layers | Sends out the image you just rendered. The start of the chain |
| Group Output | The image that reaches it becomes the final result: it shows in the render window and is saved to files |
| Viewer | Shows the image that reaches it as a preview in the Image Editor |
Right now, the image from Render Layers goes out without passing through anything, so the result is the same as the original render. Next, we insert effect nodes one at a time between Render Layers and the split point.
If you drag a node onto a link, the link lights up and the node is inserted there automatically. All the steps below use this method.
4. Adjusting colors with Color Balance
Starting point: The default setup from the previous section.
Steps:
- In the node editor header, choose Add ‣ Color ‣ Adjust ‣ Color Balance.
- Place the node that follows the mouse on the link between Render Layers and the split point, then left-click.
- Check that the node's method field says Lift/Gamma/Gain (Figure 4).
- Click the white color field under Lift and shift it very slightly toward blue (this guide uses R
0.99, G0.995, B1.01). - Click the white color field under Gain and shift it slightly toward orange (R
1.05, G1.0, B0.95).
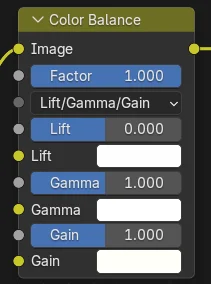 Figure 4. The Color Balance node. The figure shows it after changing the Lift and Gain colors. The changes are small, so the color fields still look almost white (Blender screenshot)
Lift controls the darkest areas (shadows), Gamma the midtones, and Gain the brightest areas. A little blue in the shadows and a little orange in the bright areas brings out the cool and warm contrast of a night scene (Figure 5).
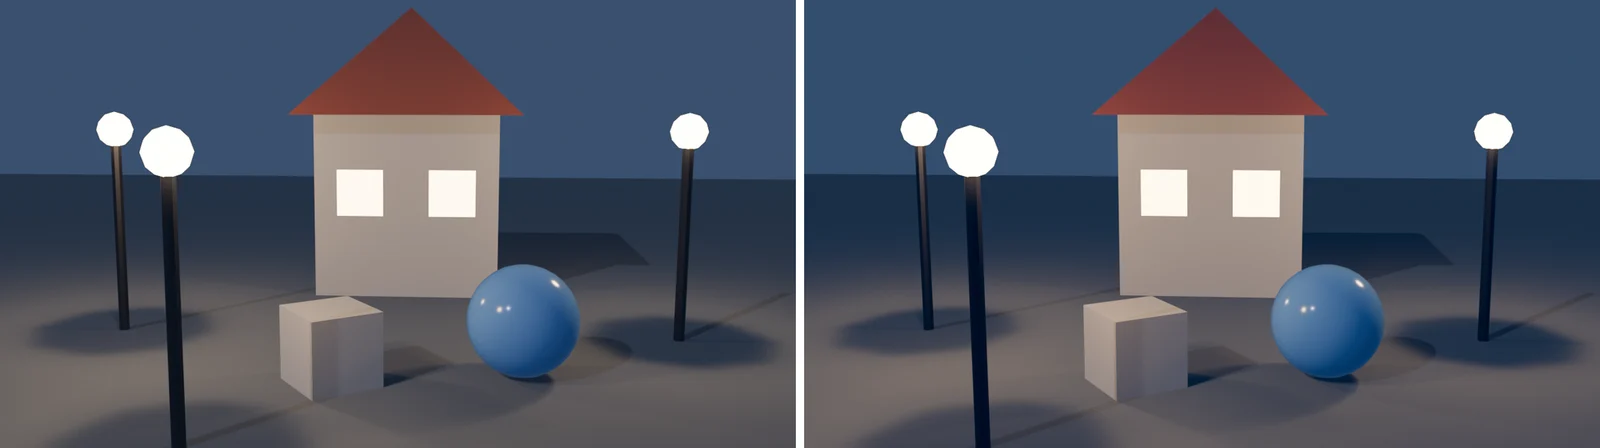 Figure 5. Left: original. Right: render after Color Balance. The dark floor and shadows became bluer (Blender render)
The biggest change in Figure 5 is in the dark areas. Comparing the average color of the dark parts of both images, red went down and blue went up. Areas that are already almost white, such as the lamps and windows, barely changed even with a new Gain, because there is no room left for them to get brighter.
Change the color fields only a little. While writing this guide, I first set Lift to R 0.92, G 0.97, B 1.08, and the whole image turned very blue. Small numbers on the shadow side change the screen a lot. Factor sets how much of this node's effect is mixed in. At 0 there is no effect, and at 1 the full effect is applied.
5. Adding a glow with Glare
Starting point: The setup with Color Balance from the previous section.
Steps:
- Choose Add ‣ Filter ‣ Glare.
- Place the node on the link between Color Balance and the split point.
- Click the node's type field (Streaks at first) and change it to Bloom. The name at the top of the node changes to Bloom (Figure 6). Leave the other values at their defaults.
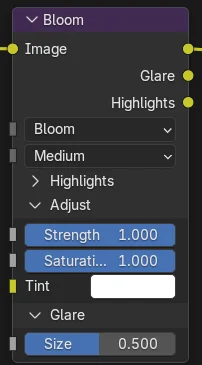 Figure 6. The Glare node with Bloom selected. The header name changes to the chosen type (Blender screenshot)
Glare adds a glow around bright areas. It imitates how light seems to spread when a camera lens or your eye looks at a strong light. There are seven types: Bloom, Ghosts, Streaks, Fog Glow, Simple Star, Sun Beams, and Kernel. Figure 7 compares two types with the same values.
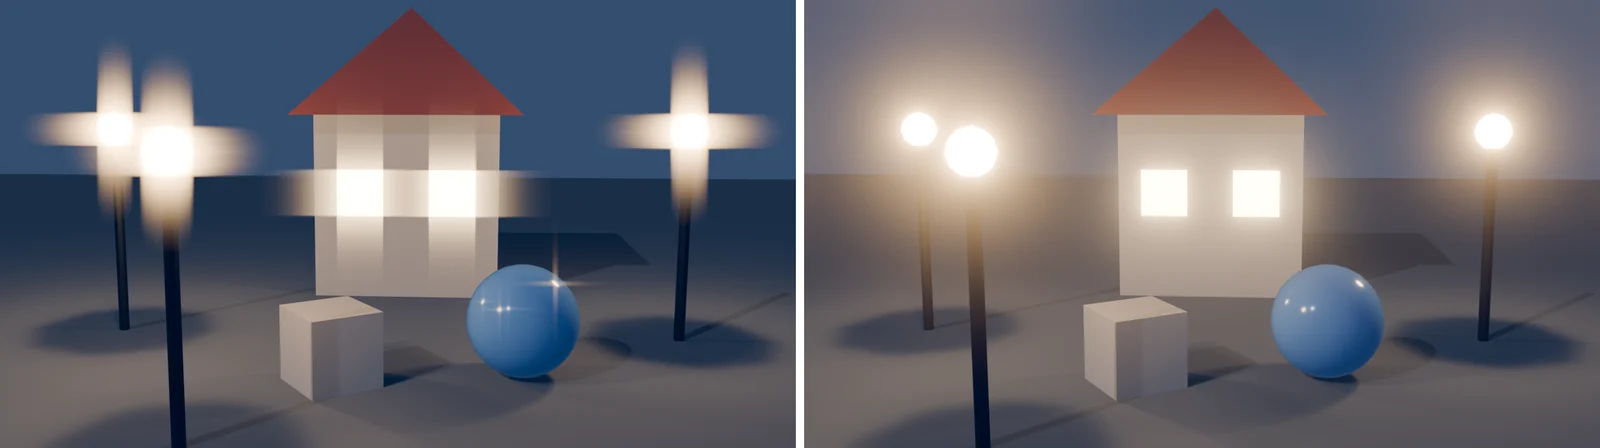 Figure 7. Left: Streaks (light rays). Right: Bloom (round glow). All other values are defaults in both (Blender render)
If the glow is too wide or too narrow, change these values.
| Value | Default | Effect when changed |
|---|---|---|
| Threshold (inside the collapsed Highlights group) | 1 | Lower: less bright areas glow too. Higher: only the brightest areas glow |
| Strength | 1 | How strong the glow is |
| Size | 0.5 | How far the glow spreads. At 1 it spreads across the full image (manual) |
| Quality | Medium | High computes at full resolution and looks smoother; Low is faster but rougher |
6. Darkening the edges with Vignette
Starting point: The setup with Glare from the previous section.
Steps:
- In the asset shelf below the node editor, click the Camera & Lens Effects tab (Figure 2, ③).
- Drag the Vignette thumbnail into an empty spot of the node editor. A Vignette node appears.
- Drag that node onto the link between Glare and the split point.
- Look at the result. The default (Factor
1) is quite strong (Figure 8, left). - Change Factor on the Vignette node to
0.6(Figure 8, right).
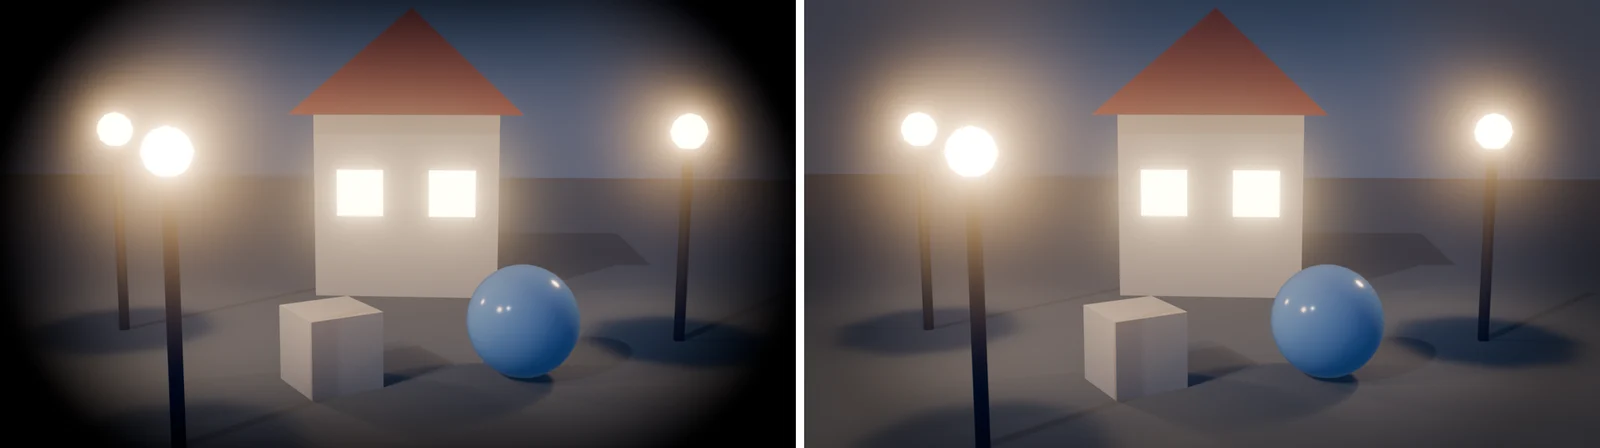 Figure 8. Left: Vignette default (Factor 1). Right: Factor 0.6 (Blender render)
A vignette darkens the edges of an image to draw the eye to the center. It looks like the dim corners of photos taken with old cameras. Unlike the other nodes, Vignette is a node group asset that ships with Blender. That is why it is not in the Color or Filter parts of the Add menu. You find it in the asset shelf and in the Camera & Lens Effects category near the bottom of the Add menu.
| Value | Default | What it does (manual) |
|---|---|---|
| Factor | 1 | Strength of the vignette. 0 means no effect |
| Feather | 0.4 | How softly the center fades into the edges |
| Corner Roundness (inside Transform) | 1 | 0 gives square corners, 1 a fully round shape |
| Scale (inside Transform) | 0.8 | Size of the center area that stays bright |
7. The finished node tree and saving
Starting point: The setup after all the previous sections.
The node chain now runs Render Layers → Color Balance → Glare (Bloom) → Vignette → Group Output and Viewer (Figure 9).
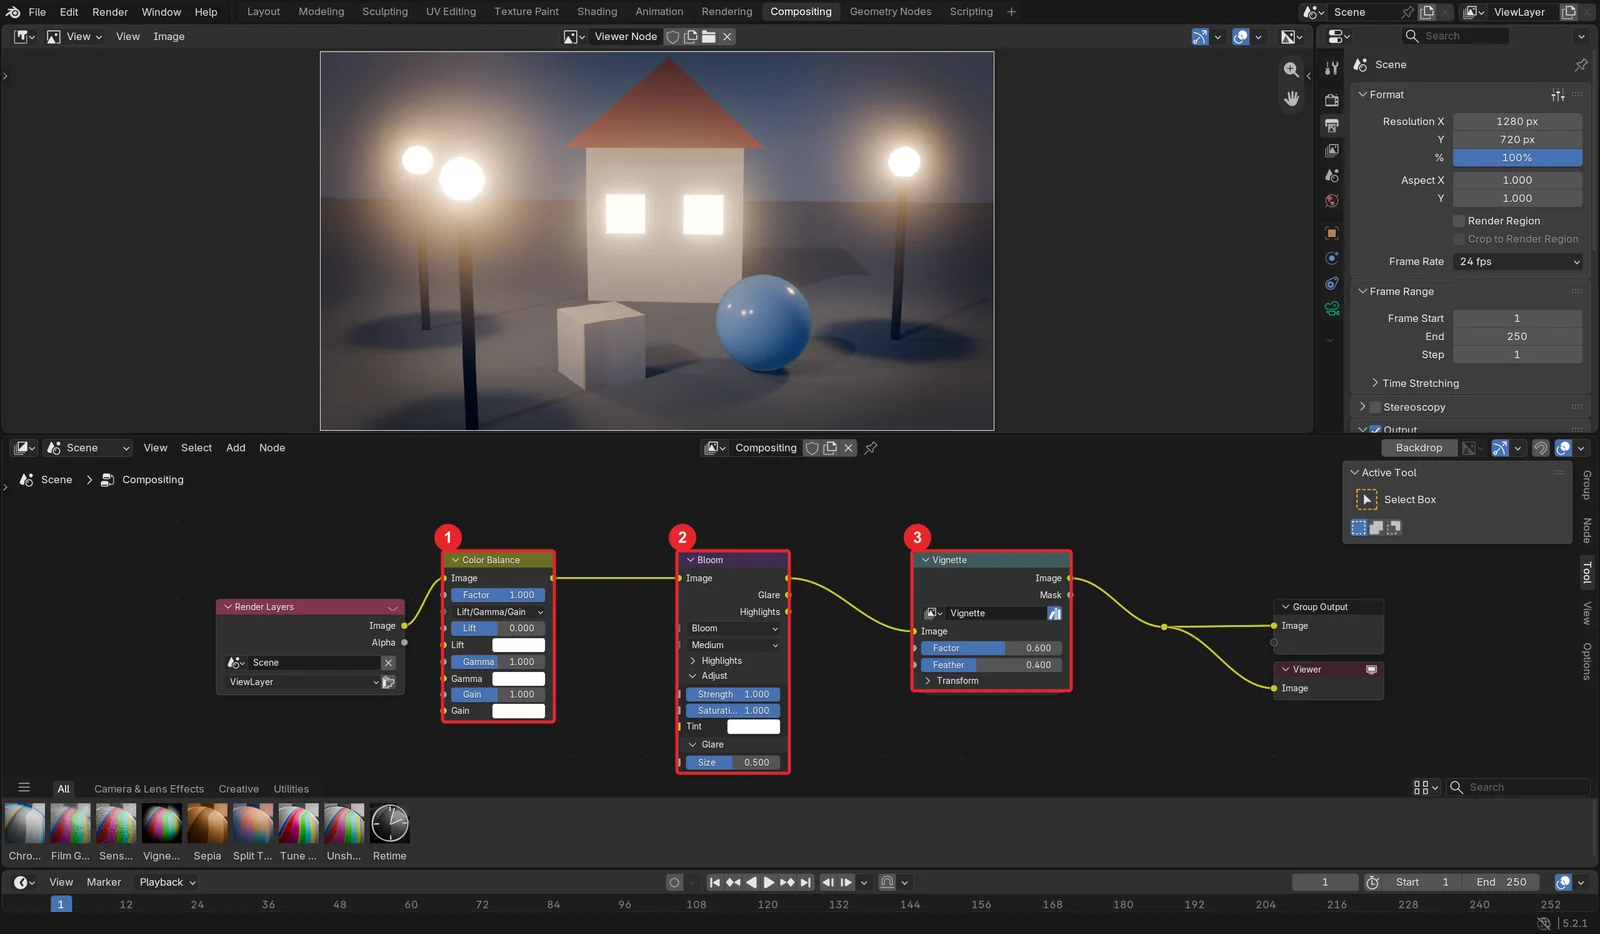 Figure 9. The finished node chain. ① Color Balance ② Glare (Bloom) ③ Vignette (Blender screenshot)
Steps:
- Press
F12to render again. The render window shows the composited image. - In the render window, choose Image ‣ Save As, pick a location and a name, and save.
If the render window shows the original without the effects, open the Post Processing panel in the Output tab of the Properties editor and check that Compositing on the Pipeline row is on. If it is off, renders do not use the compositor. It is on by default in new scenes.
The compositor runs after rendering, so you don't need to render the whole scene again just to see a changed node value. When you change a value, the Viewer preview updates. In this guide's scene, adding three compositor nodes did not noticeably increase the render time of one image (on my PC, every re-render while adding the effects one at a time took under 1 second).
Practice
- Change the Glare type to Fog Glow and see how it differs from Bloom.
- Lower the Glare Threshold to
0.5and check whether less bright areas, such as the house wall, start to glow. - Set Vignette's Corner Roundness to
0and see whether the dark border becomes square. - Select the Color Balance node and press
Mto mute it, then compare the image with and without color grading. PressMagain to turn it back on.
Common mistakes and fixes
| Symptom | Cause | Fix |
|---|---|---|
| I added nodes, but the render window image did not change | Compositing is off, or the effect node is outside the chain that reaches Group Output | Turn on Compositing under Post Processing in the Output tab, and check that the links reach Group Output |
| The Image Editor is empty | You have not rendered yet, or Viewer Node is not selected | Render once with F12, then choose Viewer Node in the Image Editor |
| I can't find Vignette in the Add menu's node lists | Vignette is a node group asset, not a built-in node | Drag it from the Camera & Lens Effects tab of the asset shelf |
| The whole image turned blue or yellow | The Lift or Gain color in Color Balance was changed too much | Set the color fields back close to 1 and change them in small steps |
| Cross-shaped rays appear on the lights | The Glare type is Streaks | Change the type field to Bloom |
| The glow is barely visible | Nothing in the scene is brighter than the Threshold (default 1) | Raise the Emission Strength of the glowing material or lower the Threshold |
In one line
Compositing tab → New → insert Color Balance (small Lift and Gain changes), Glare (Bloom), and Vignette (Factor 0.6) between Render Layers and the output → F12 → Image ‣ Save As.
References
- Blender 5.2 LTS Manual, Compositing Introduction: https://docs.blender.org/manual/en/5.2/compositing/introduction.html
- Blender 5.2 LTS Manual, Compositing Workspace: https://docs.blender.org/manual/en/5.2/compositing/compositing_workspace.html
- Blender 5.2 LTS Manual, Color Balance Node: https://docs.blender.org/manual/en/5.2/compositing/types/color/adjust/color_balance.html
- Blender 5.2 LTS Manual, Glare Node: https://docs.blender.org/manual/en/5.2/compositing/types/filter/glare.html
- Blender 5.2 LTS Manual, Vignette Node: https://docs.blender.org/manual/en/5.2/compositing/types/camera_lens_effects/vignette.html
- Shortcuts: render
F12, mute or unmute a nodeM - Figures: all real Blender 5.2.1 screens and EEVEE renders (a test scene we made)