From Blender to a 3D printer: millimeter units, wall thickness, STL export, and slicing in Bambu Studio
Make a pencil holder in Blender in millimeters, check the wall thickness with colors, export it as STL, and slice it in Bambu Studio. Along the way you avoid the common mistake where the size comes out 1000 times off.
한국어English
Based on: Blender 5.2 LTS (screenshots from 5.2.1, English interface, default shortcuts) and Bambu Studio (screenshots from 2.7.1, Korean interface). Checked in November 2026. All pictures are real screenshots. The red numbers and boxes were added to explain them. The latest stable Bambu Studio is 2.8.2, so some buttons on your screen may look different.
A 3D printer turns a model on screen into plastic, one layer at a time. But a model that looks fine in Blender often shows up tiny in the printer software, or with walls so thin they have holes. The cause is usually units and thickness.
In this guide you make a pencil holder 80 mm across and 100 mm tall, and take it from Blender → STL file → slicing in Bambu Studio. Slicing cuts the model into thin layers and works out the path the printer will follow (G-code). It is a bit like slicing a roll of sushi to look at one piece at a time. Making a 3D model from one picture with AI and printing it is covered in Printing a 3D model from one picture with Meshy AI and Claude Code. This guide starts from a model you build yourself in Blender.
By the end of this guide you will be able to:
- Set the length unit of a Blender scene to millimeters.
- Give walls a thickness with Solidify and check it with colors using Mesh Analysis.
- Pick STL export settings that keep the size right.
- Open the model in Bambu Studio and read the slice result (time and material).
1. Five things to check before printing
| Check | Why | Section |
|---|---|---|
| Units | Printer software reads numbers as millimeters | 2 |
| Size | A model bigger than the print plate cannot be printed | 2 |
| Wall thickness | Walls that are too thin break or come out hollow | 3 |
| Closed surfaces | A model with holes has no clear inside and outside | 3 |
| Bottom | A flat bottom sticks to the plate well | 2 |
STL is the most common file format for 3D printing. It stores the shape as triangles only, with no color or material. How it compares with other formats is in 3D file formats compared.
2. Make the pencil holder in millimeters
Starting point: a new file (File ‣ New ‣ General) with the default cube.
An STL file stores only numbers, with no unit, and the slicer reads those numbers as millimeters. So if you keep Blender's default unit (meters) and enter the real size, such as a diameter of 0.08 m, the slicer shows a dot only 0.08 mm across. If you set the scene to 1 unit = 1 mm, the numbers in Blender and in the slicer match, so nothing gets confusing. It is like switching your ruler from the centimeter side to the millimeter side.
Steps:
- Select the default cube and press
X→ Delete. - Open the Scene tab in the Properties editor and expand the Units panel.
- Check that Unit System is
Metric, set Unit Scale to0.001, and set Length toMillimeters(① and ② in Figure 1). - Add
Shift+A‣ Mesh ‣ Cylinder, and in the Add Cylinder panel at the bottom left set Vertices64, Radius40, Depth100, Location Z50. The fields now showmm. - Rename it
PencilHolder. - Press
Nto open the sidebar and check that Dimensions read X80 mm, Y80 mm, Z100 mm(① in Figure 2).
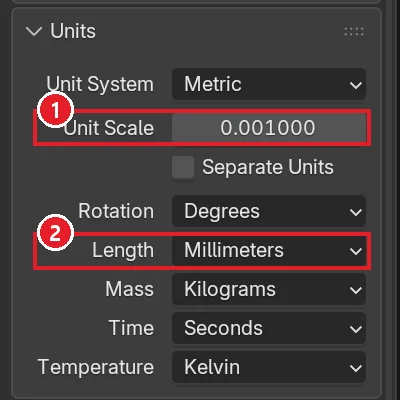 Figure 1. Scene units. ① Unit Scale 0.001 ② Length Millimeters (Blender screenshot)
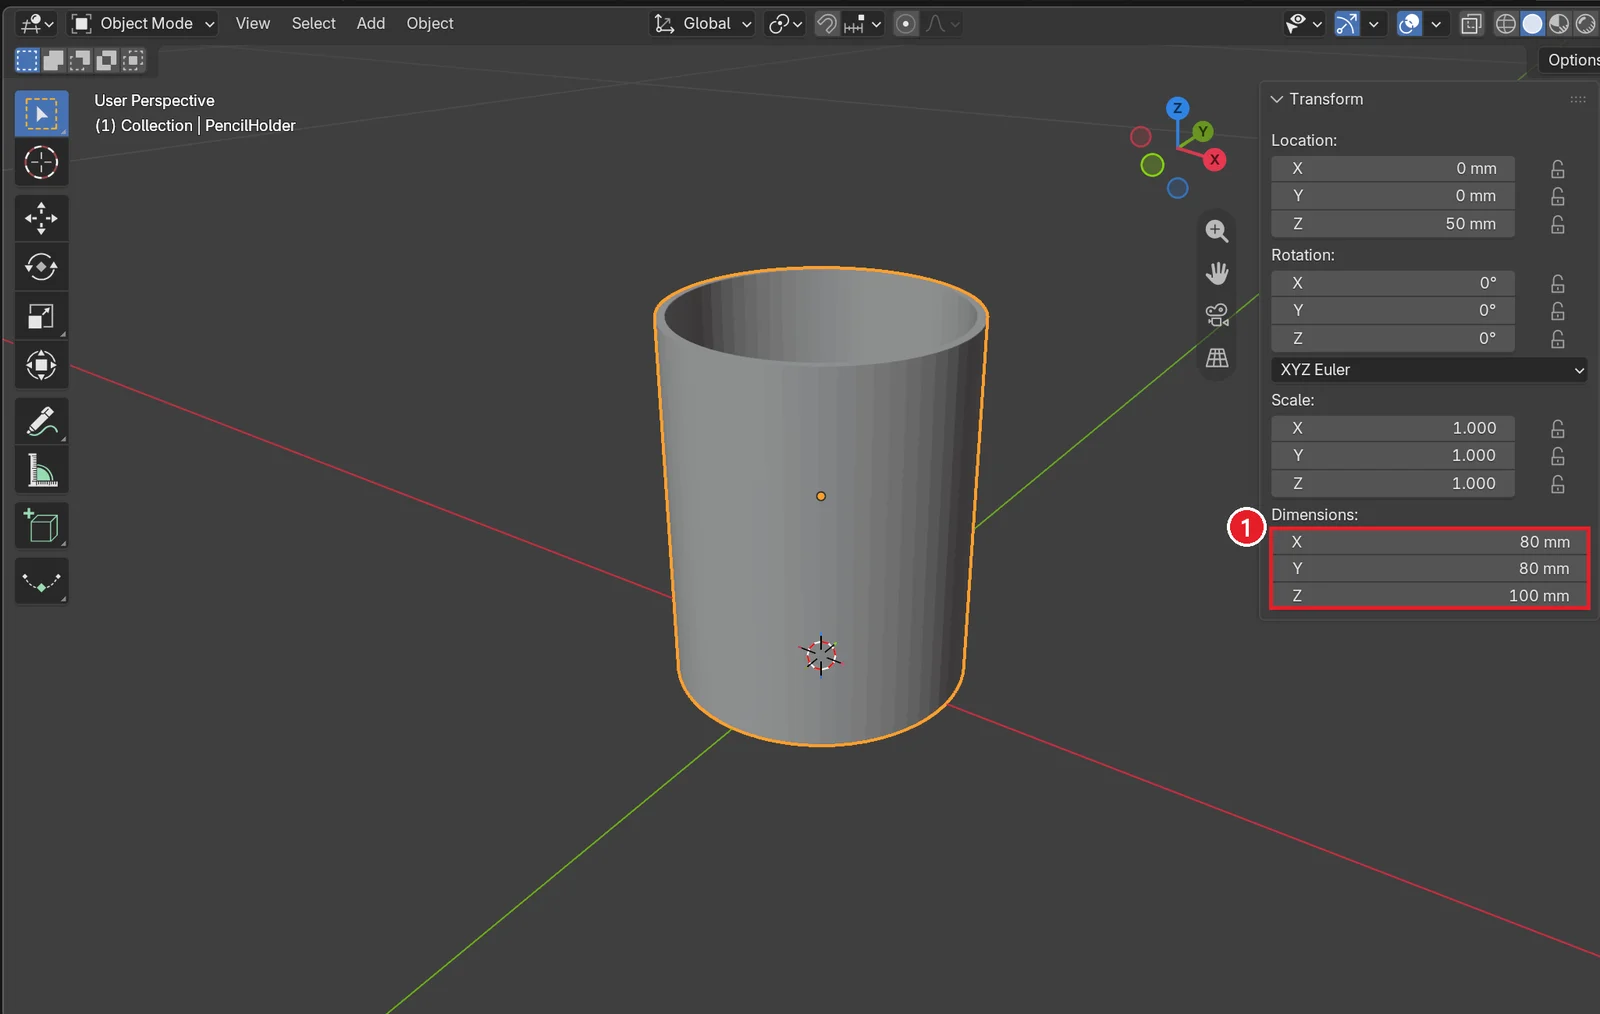 Figure 2. The pencil holder cylinder. ① Dimensions 80 × 80 × 100 mm (Blender screenshot)
Location Z is 50 to lift the cylinder by half its 100 mm height so the bottom touches Z 0. With the bottom at 0 in Blender, you have less to fix in the slicer.
3. Add wall thickness and check it with colors
Starting point: continue from PencilHolder in the previous section.
Right now the cylinder is a solid lump. To hold pencils, you need to open the top and give the wall a thickness.
Steps:
- Press
Tabfor Edit Mode and3for face select. - Click only the top face of the cylinder and press
X‣ Faces. You now have a cup shape with an open top. - Press
Tabto go back to Object Mode. - In the Modifier tab (wrench icon), choose Add Modifier ‣ Generate ‣ Solidify.
- Set Thickness to
2.4and Offset to-1(① and ② in Figure 3). Also turn on Even Thickness.
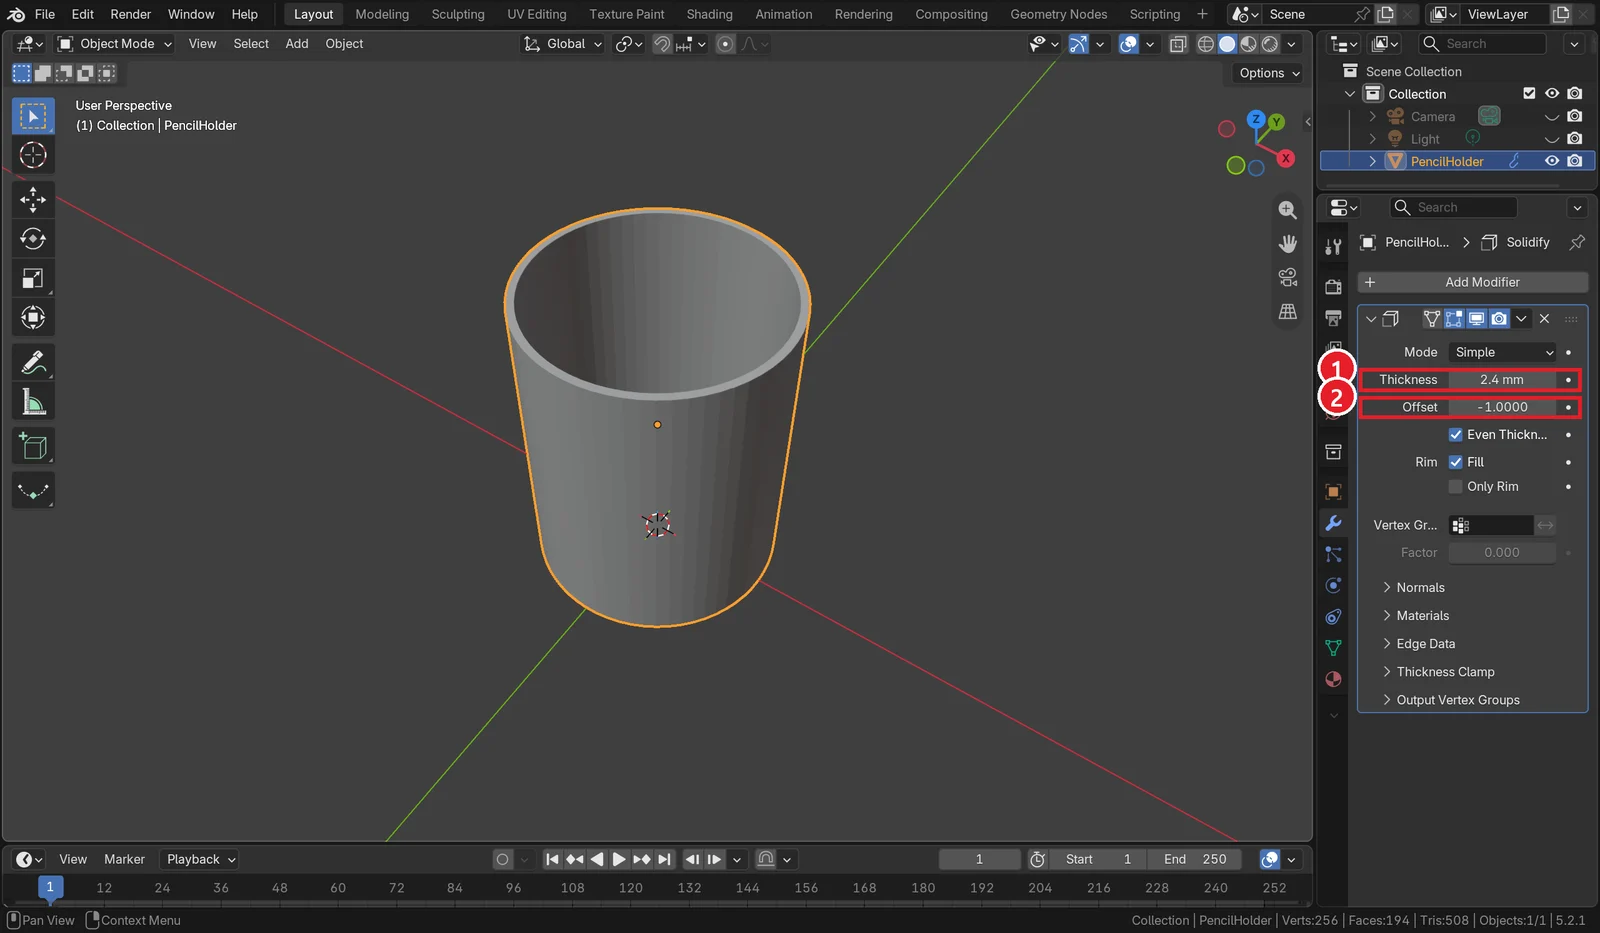 Figure 3. Solidify. ① Thickness 2.4 mm ② Offset -1 (Blender screenshot)
Solidify is a modifier that adds thickness to thin surfaces. Offset -1 adds the thickness inward, so the outer diameter stays 80 mm. The bottom gets the same 2.4 mm thickness. If modifiers are new to you, see Blender beginner chapter 7: modifiers.
A wall thinner than the nozzle (often 0.4 mm) may not print properly. At first it is safer to keep it generous, around 2 mm. Thickness is hard to judge by eye, so color it with Mesh Analysis. It works like a thermometer that paints each thickness a different color.
Steps:
- Apply Solidify to the real shape with the down arrow at the top right of the modifier panel ‣ Apply. You can also press
Ctrl+Awith the mouse over the modifier panel. - Press
Tabfor Edit Mode. - Click the arrow next to the Mesh Edit Mode overlays button in the 3D Viewport header (① in Figure 4).
- Turn on Mesh Analysis (② in Figure 4), and set Type
Thickness, Minimum1 mm, Maximum3 mm(③ in Figure 4).
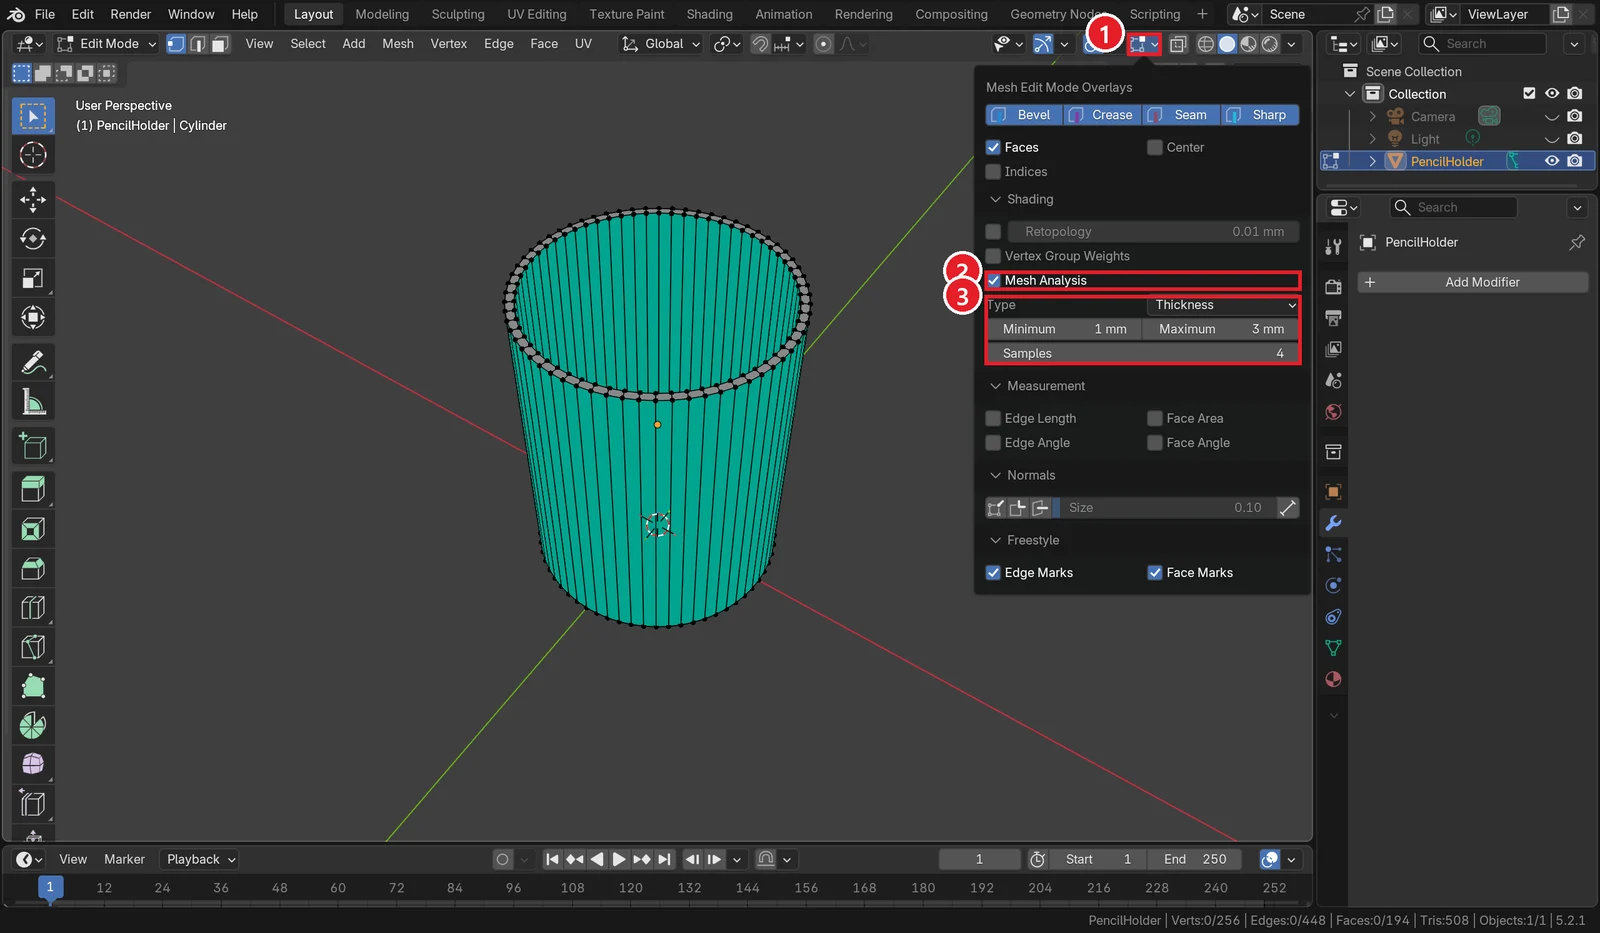 Figure 4. Checking thickness. ① Mesh Edit Mode overlays button ② Mesh Analysis ③ Type Thickness, 1 to 3 mm (Blender screenshot)
If the whole wall is one color, the thickness is even. If one spot has a different color, the wall is a different thickness there, so look at that spot first. When you are done, press Tab to go back to Object Mode.
4. Export as STL
Starting point: PencilHolder with Solidify applied, selected in Object Mode.
Steps:
- Choose File ‣ Export ‣ STL (.stl) (① and ② in Figure 5).
- In the save window, pick the folder and the file name (
pencil_holder.stl). - In the settings on the right, check that Scale is
1.000and Scene Unit is off (② and ③ in Figure 6). Leave Apply Modifiers on (④ in Figure 6). - If the scene has other objects, turn on Selection Only to export only the selected one (① in Figure 6).
- Click Export STL (⑤ in Figure 6).
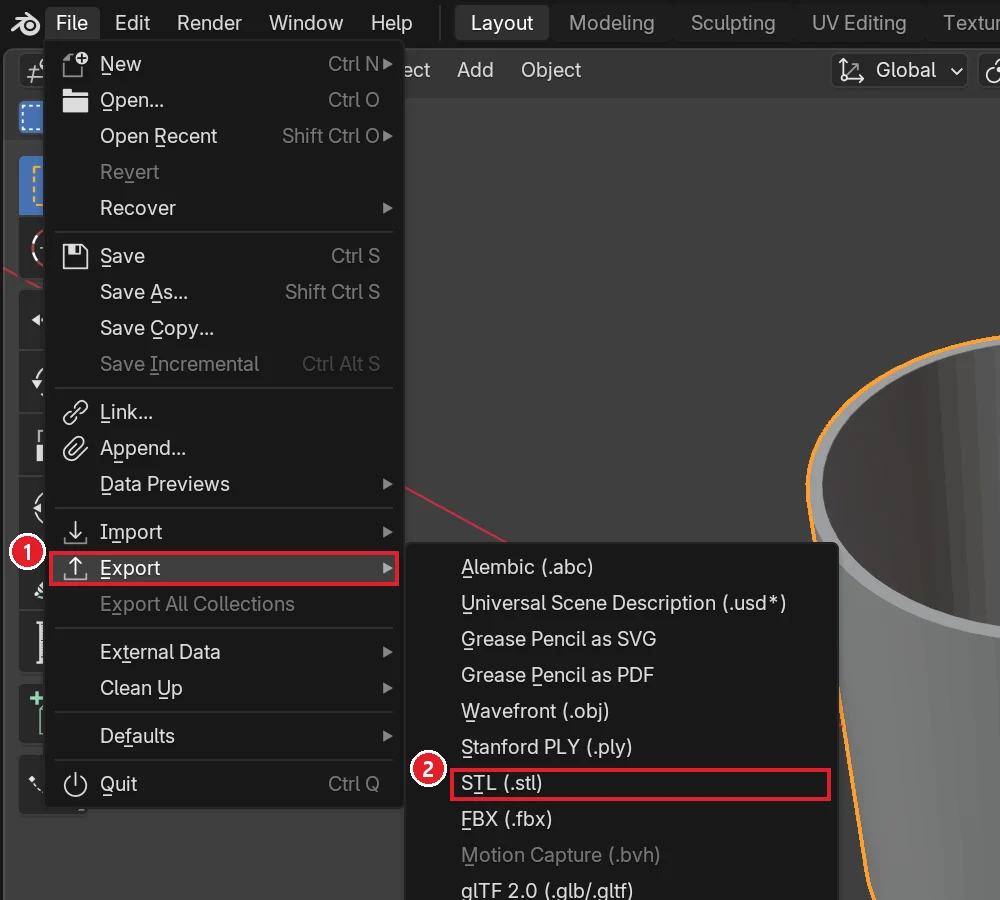 Figure 5. The export menu. ① Export ② STL (.stl) (Blender screenshot)
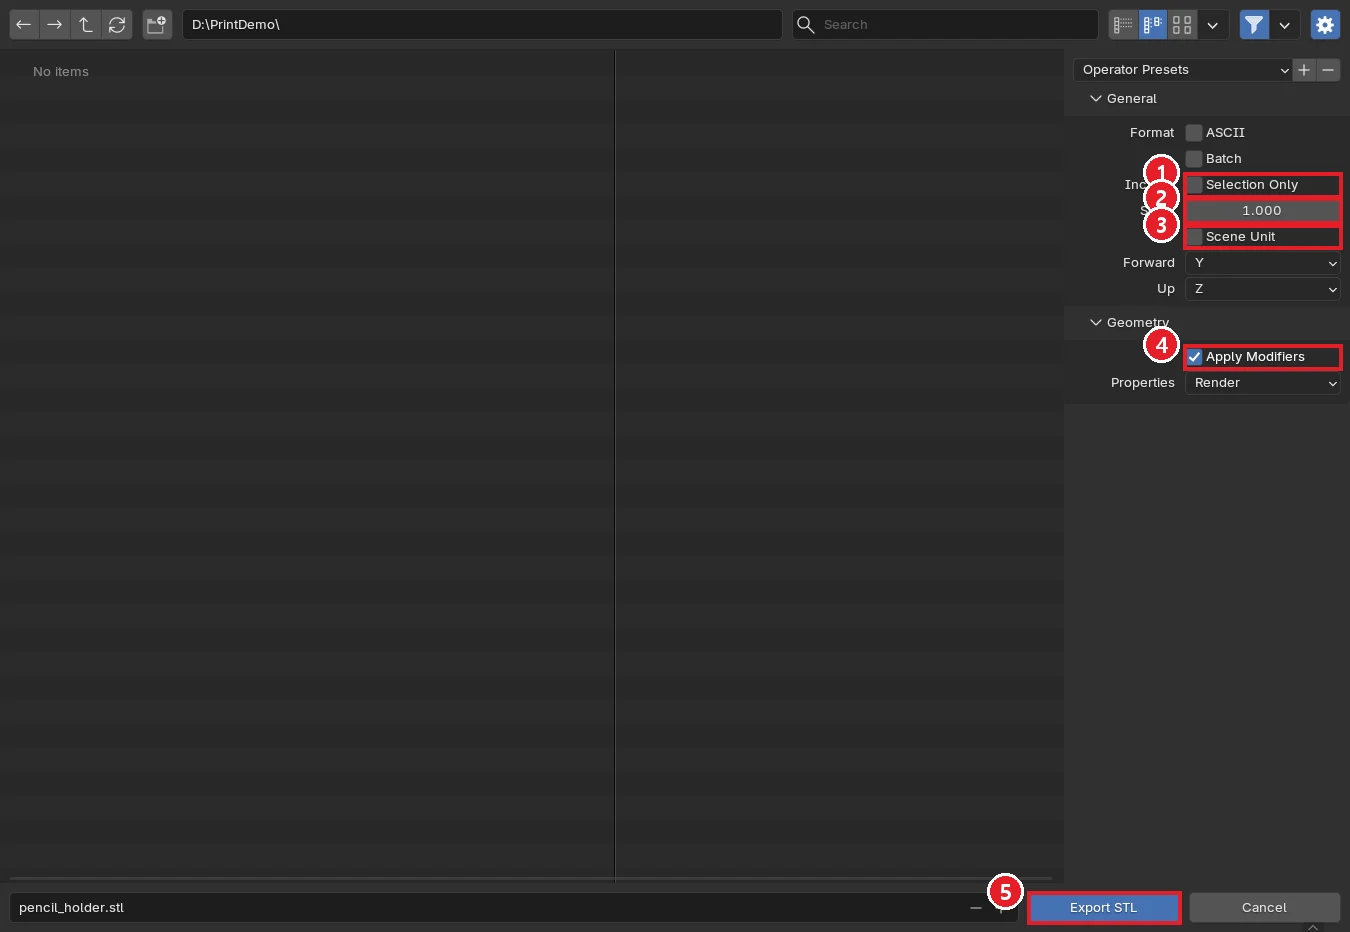 Figure 6. STL export settings. ① Selection Only ② Scale 1.000 ③ Scene Unit off ④ Apply Modifiers ⑤ Export STL (Blender screenshot)
An STL file has no unit written in it. It holds only numbers, and the slicer reads them as millimeters. Because section 2 set 1 unit to 1 mm, the cylinder's diameter is stored as the number 80, and the slicer reads it as 80 × 80 × 100 mm with 508 triangles, as the notice in Figure 8 of section 5 shows.
As the manual describes, Scene Unit applies the scene's Unit Scale (0.001 here) to the exported numbers. Turning it on makes the numbers 0.001 times smaller, so the model can look tiny in the slicer. Keep it off with the settings in this guide.
Blender 5.2's built-in export menu has no 3MF (Figure 5). 3MF is a format that stores color, plate layout, and printer settings in one file, and it is usually made when you save a project in a slicer such as Bambu Studio.
5. Open and slice in Bambu Studio
Starting point: Bambu Studio installed, with your printer chosen on first launch.
Bambu Studio is a free slicer made by Bambu Lab. The pictures below use a Bambu Lab X1 Carbon (0.4 mm nozzle), the 0.20mm Standard print setting, and Bambu PLA Basic filament. The screenshots show the Korean interface, so the English names of the buttons are given in the steps.
Steps:
- Open the Prepare tab in Bambu Studio (① in Figure 8). If the settings bar on the left is collapsed, click the small button at the top left of the 3D view to open it.
- In the Printer group on the left, pick the plate type you actually have on your printer from the list under the plate picture (① in Figure 7). The plate type changes the plate temperature and first-layer settings, so always match your real plate.
- Also check that the nozzle diameter (② in Figure 7), the filament (③ in Figure 7), and the print setting (④ in Figure 7) match what you use.
- Drag
pencil_holder.stlfrom File Explorer onto the Bambu Studio window. - Check that the notice at the bottom right shows the size 80 x 80 x 100 mm (③ in Figure 8). If the numbers look tiny, like 0.08, or bigger than the plate, see the "Common mistakes and fixes" table at the end.
- Click Slice plate at the top right (② in Figure 8).
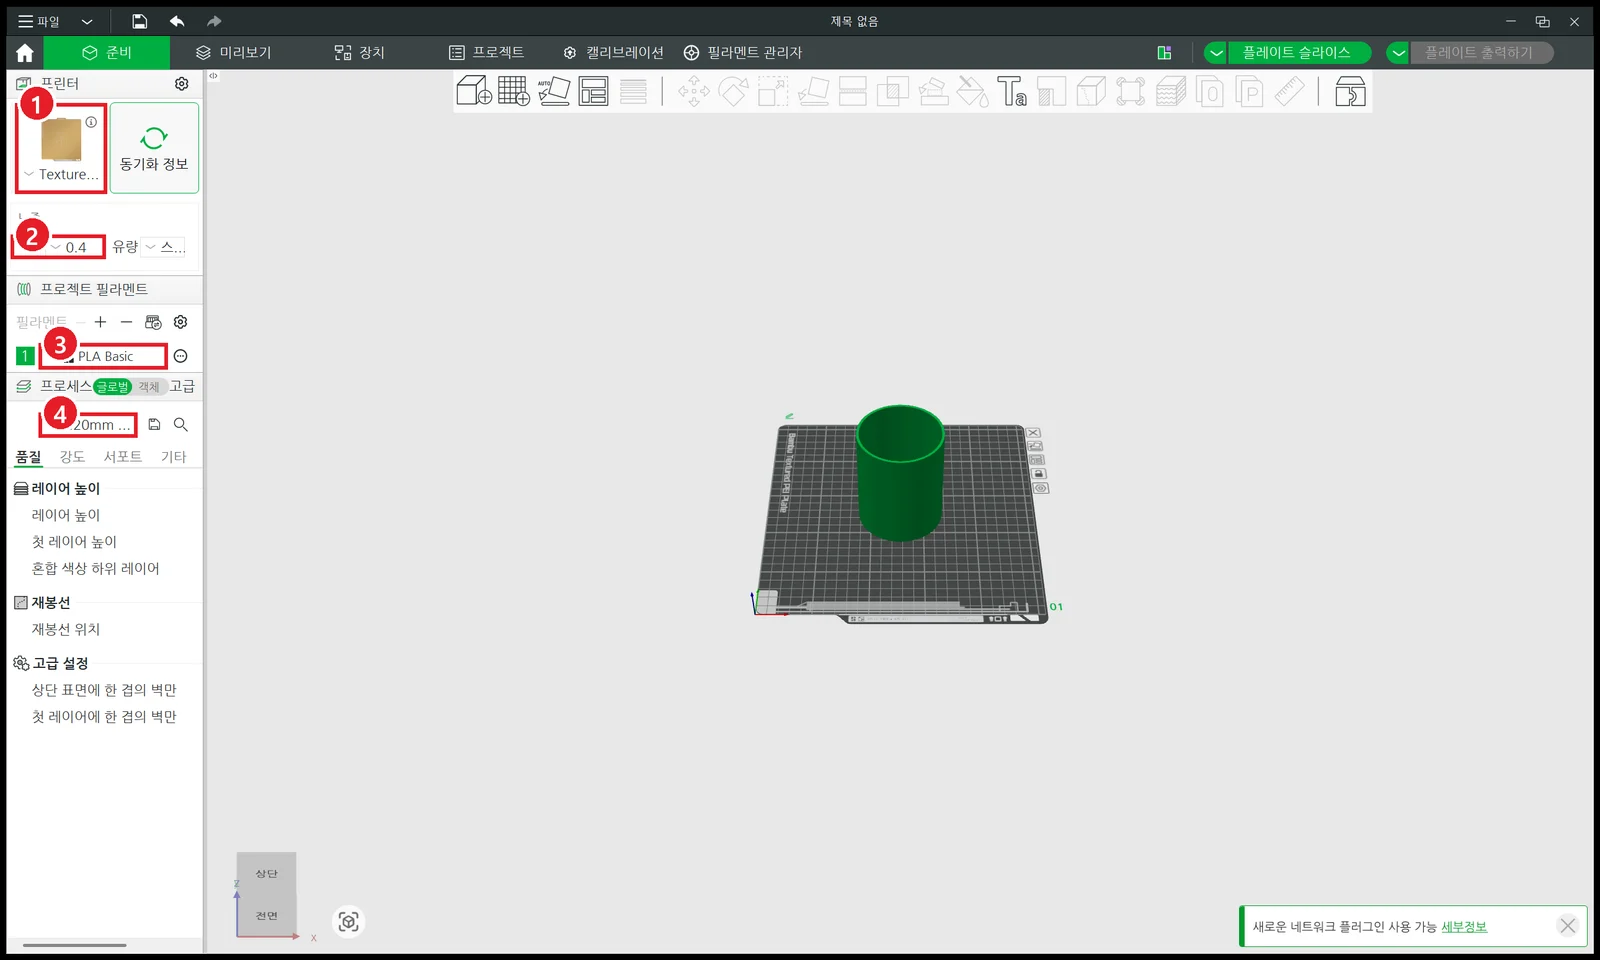 Figure 7. Left-side settings in the Prepare tab (Korean interface). ① Plate type (Textured PEI Plate in the picture) ② Nozzle diameter 0.4 ③ Filament PLA Basic ④ Print setting 0.20mm (Bambu Studio screenshot)
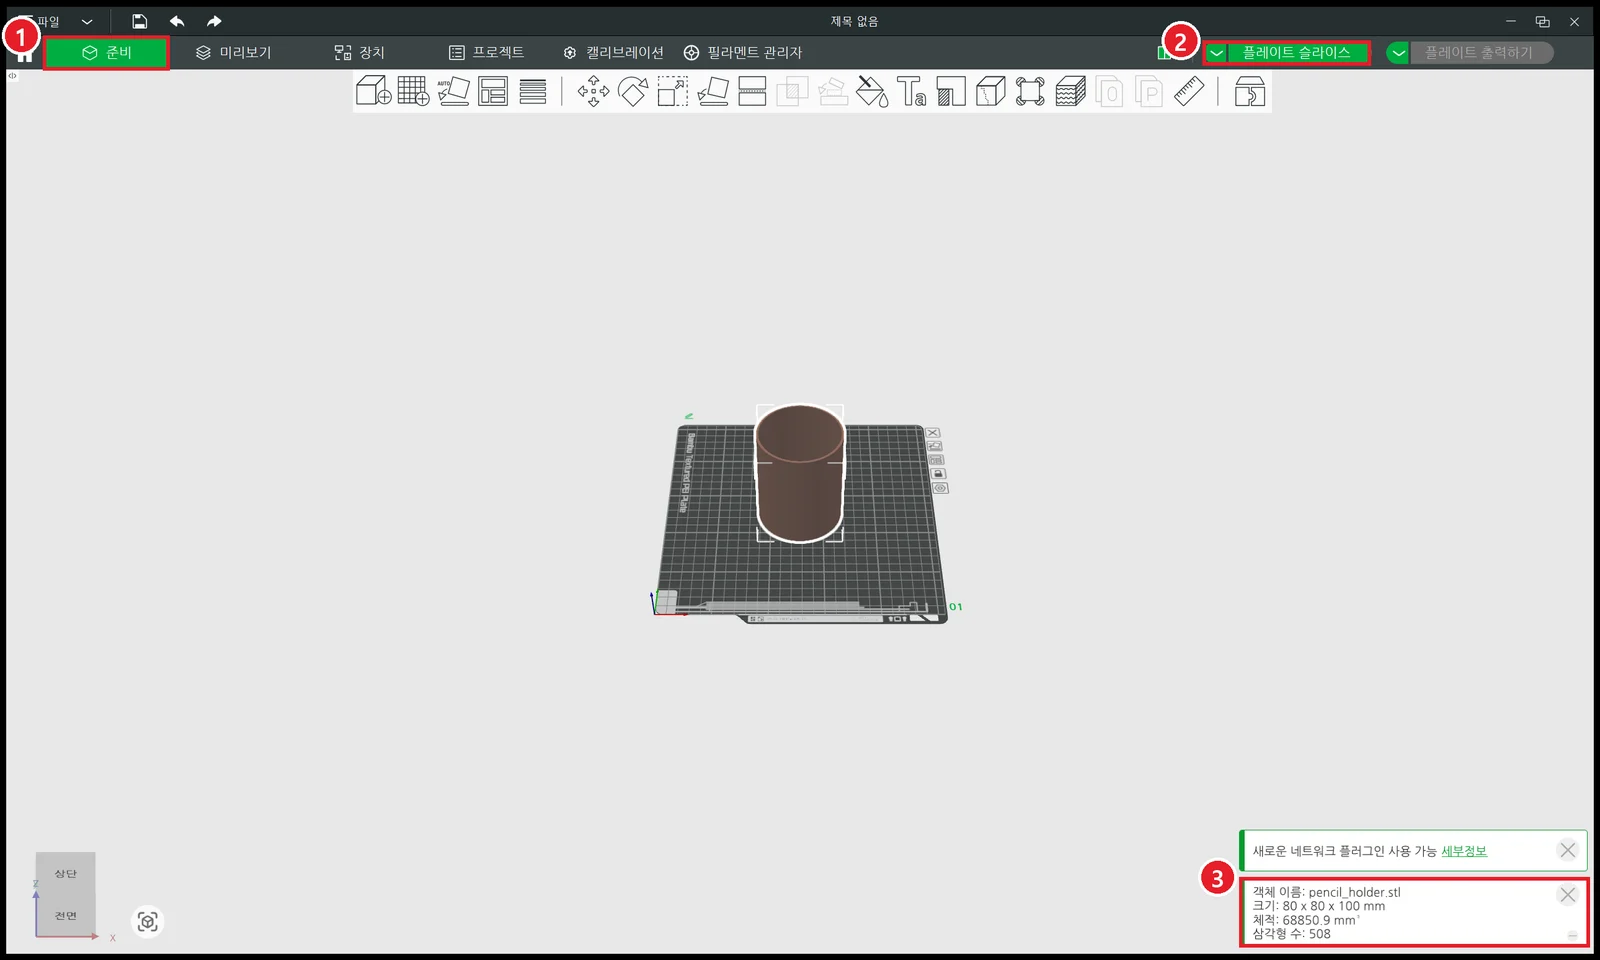 Figure 8. The Prepare tab with the STL open (Korean interface). ① Prepare tab ② Slice plate ③ Size notice. The plate reads Bambu Textured PEI Plate (Bambu Studio screenshot)
When slicing finishes, the view switches to the Preview tab, with the model built up in layers and a result window (Figure 9).
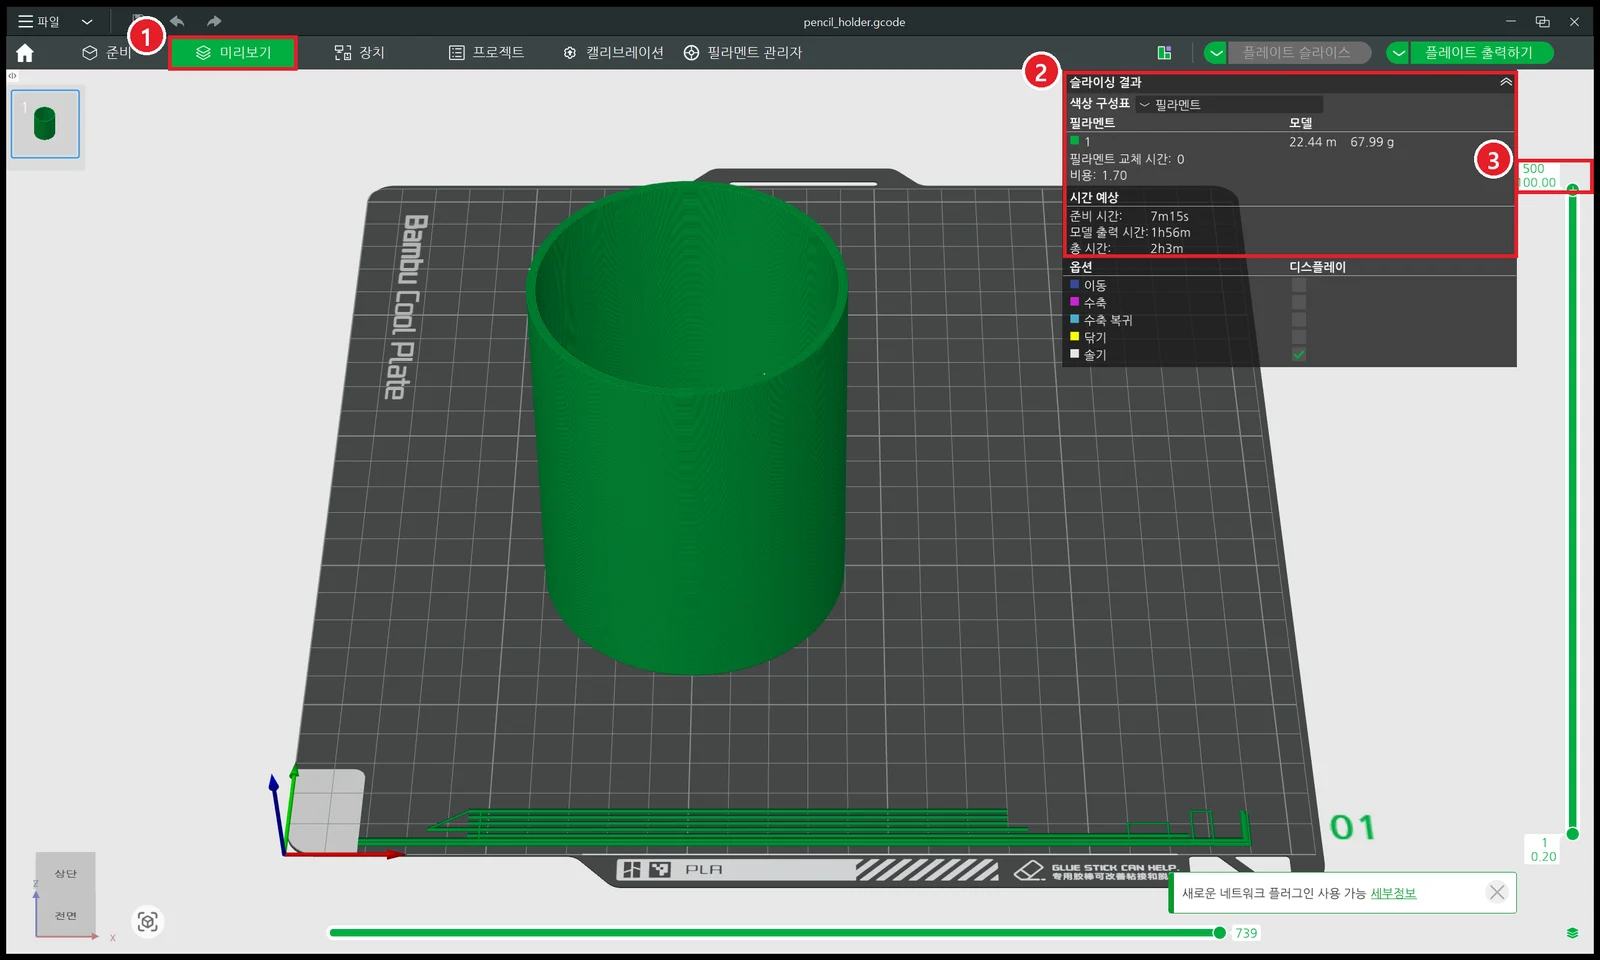 Figure 9. The slice result (Korean interface). ① Preview tab ② Slicing result window ③ Top of the layer bar (500 layers, height 100.00 mm). This result was sliced with the plate type set to Cool Plate, so the plate reads Bambu Cool Plate and looks different from Figure 8. Slice with the real plate you picked in step 2 (Bambu Studio screenshot)
Read the result window like this:
| Field | Value in the picture | Meaning |
|---|---|---|
| Filament length and weight | 22.44 m, 67.99 g | How much material is used |
| Prepare time | 7m15s | Pre-print steps such as heating the plate and cleaning the nozzle |
| Model printing time | 1h56m | Time spent actually building |
| Total time | 2h3m | The two added together |
| Top of the layer bar | 500 / 100.00 | 500 layers of 0.2 mm, 100 mm tall |
Drag the top handle of the layer bar down to see a cross section in the middle. Use it to check how the inside of the wall is filled. Time and material depend on the printer, filament, and print settings, so your numbers may differ from the picture. If the result looks fine, send it to the printer with Print plate.
6. Settings worth trying
- Lowering the layer height from 0.2 mm to 0.12 mm gives a smoother surface, but more layers and a longer print.
- The infill ratio is how much of the space inside the walls is filled. For a thin-walled model like this pencil holder, the difference is small.
- Supports are temporary pillars under parts that hang in the air. A pencil holder with a flat bottom does not need them.
After changing a setting, click Slice plate again and compare the numbers in the result window.
Practice
- Change the Solidify Thickness to
1.2, export again, and write down how much lighter the result in Bambu Studio is. - Change the cylinder Depth to
60and Location Z to30. Check what number appears at the top of the layer bar. - Cut a 10 mm hole in the side with a Boolean modifier, and see how the colors around the hole look in Mesh Analysis.
Common mistakes and fixes
| Symptom | Cause | Fix |
|---|---|---|
| The model is a tiny dot in the slicer | Unit Scale was not changed and small numbers like 0.08 were typed in meters, or Scene Unit was on at export | Build with Unit Scale 0.001 and Millimeters as in section 2, and export with Scale 1.000 and Scene Unit off |
| The model is far bigger than the plate | Unit Scale was changed to 0.001 but Length was left at Meters and 80 (m) was typed | Set Length to Millimeters and check that Dimensions show 80 mm |
| It prints as a tube with no walls | Solidify was not applied and Apply Modifiers was off at export | Apply Solidify, or turn on Apply Modifiers at export |
| Parts of the wall look empty | The wall is thinner than the nozzle | Raise Thickness to around 2 mm and check again with Mesh Analysis |
| The bottom floats above the grid in Blender | The bottom face is above Z 0 | Set Location Z to half the height |
| Other objects come along | Selection Only was off at export | Turn on Selection Only in the export window |
Summary
Build with Unit Scale 0.001 and Millimeters, give walls about 2 mm with Solidify, check thickness with Mesh Analysis, export STL with Scale 1 and Scene Unit off, and read the size in the slicer notice first.
References
- Blender 5.2 manual, STL export: https://docs.blender.org/manual/en/latest/files/import_export/stl.html
- Blender 5.2 manual, Solidify modifier: https://docs.blender.org/manual/en/latest/modeling/modifiers/generate/solidify.html
- Bambu Lab wiki, Bambu Studio: https://wiki.bambulab.com/en/software/bambu-studio
- Bambu Studio releases (GitHub): https://github.com/bambulab/BambuStudio/releases
- Shortcuts: sidebar
N, Edit ModeTab, face select3, deleteX - Pictures: all real screenshots (Blender 5.2.1, Bambu Studio 2.7.1). The pencil holder was made for this guide