Blender Video Sequencer (VSE) basics: join two rendered clips, add a title, and export an MP4
In Blender's Video Editing workspace, put two rendered clips in a row, trim and split strips, add a title with the text style presets new in 5.2, and export everything as one MP4 with sound, step by step.
한국어English
Based on: Blender 5.2 LTS (screenshots from 5.2.1, English interface, default shortcuts). Checked in November 2026. All pictures are real Blender screenshots and stills from the exported video. The red numbers and boxes were added to explain them.
Many people install a separate editing program just to join clips they rendered in Blender. But Blender has a video editor built in, the Video Sequencer (VSE for short). Joining two or three short results and adding one title line can all be done in Blender.
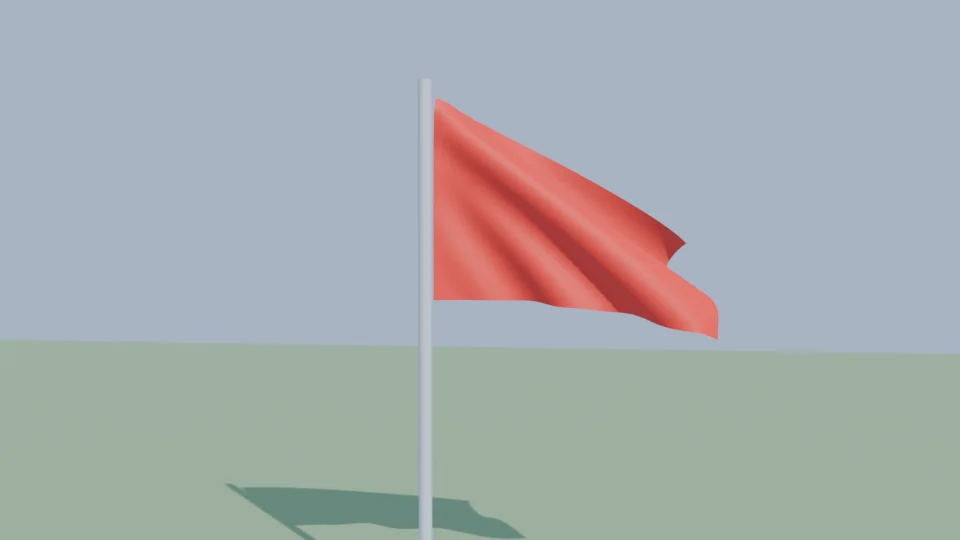
In this guide you join two rendered flag clips (a wide shot and a closer shot) into one 7-second MP4. The result looks like Figure 9. The clips were rendered from the flag scene in Blender 5.2 node physics basics, but you can follow the same steps with any two MP4 files you have. One difference: a clip with sound adds a sound strip as well when you add it with Movie, and you need one extra sound setting when you export (step 4 in section 7). The flag clips in this guide have no sound, so only movie strips appear.
By the end of this guide you will be able to:
- Open the Video Editing workspace.
- Add two clips as strips and put them in a row.
- Trim a strip to an exact length.
- Split a strip in two at the playhead with
K. - Add a text strip and use a 5.2 style preset.
- Export an MPEG-4 (H.264) video that keeps the sound.
1. Three words
| Word | Meaning | Comparison |
|---|---|---|
| Strip | One piece of video, sound, or text placed in the sequencer | A piece of film on the timeline |
| Channel | A row for strips. Higher-numbered rows show on top | Layers of clear film stacked up |
| Sequencer | The editing view where strips are lined up in time | The editing desk |
2. Open the Video Editing workspace
Starting point: just after starting Blender.
Steps:
- Choose File ‣ New ‣ Video Editing. The screen switches to an editing layout.
- In the Output tab of the Properties editor, set Resolution X
960, Y540, and Frame Rate30 fps, matching the size and speed of your clips.
The new layout has four parts, as in Figure 1. Find video files in the file browser at the top left (①), watch the result in the preview in the middle (②), line up strips in the sequencer below (③), and change the selected strip's values in the Properties editor on the right (④).
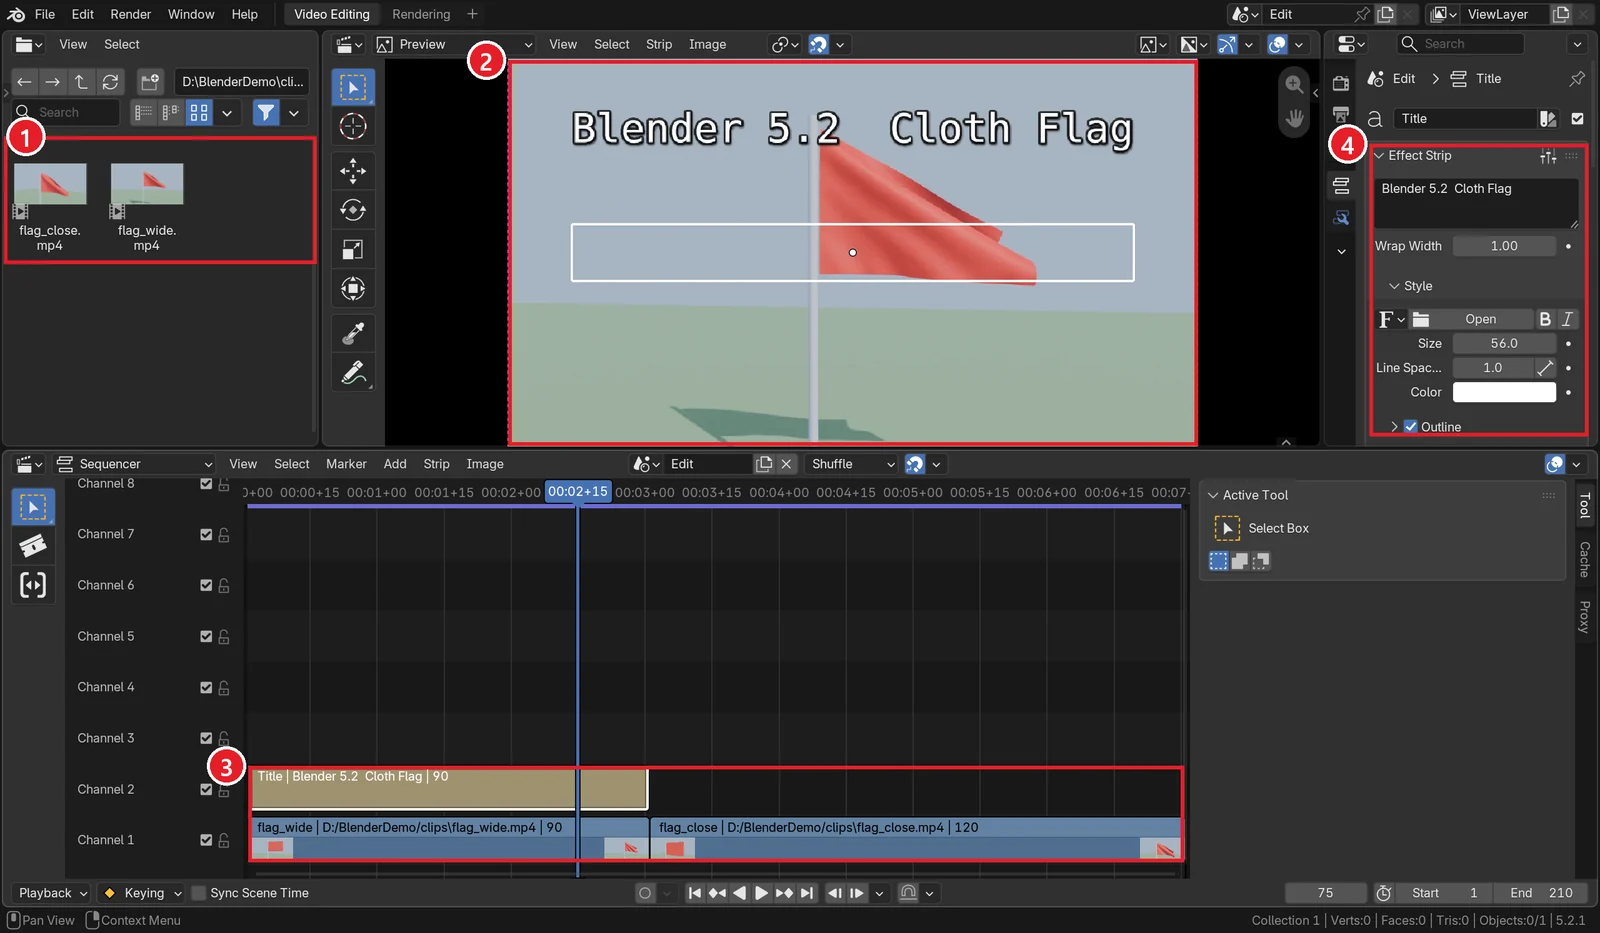 Figure 1. The finished edit. ① File browser ② Preview ③ Strips in the sequencer ④ Settings of the selected strip (Blender screenshot)
3. Add two clips and put them in a row
Starting point: the empty Video Editing screen from the previous section.
Steps:
- Choose Add ‣ Movie... in the sequencer header (① in Figure 2).
- In the file window, pick the first clip (
flag_wide.mp4) and click the blue confirm button at the bottom right. A strip appears at the playhead (frame 1). - Add the second clip (
flag_close.mp4) the same way. It also goes in at the playhead (frame 1), so it lands on a channel above the first strip instead of overlapping it. - Select the second strip and press
Gto move it onto Channel 1, right after the first strip. If the magnet (snap) button in the sequencer header is on, it snaps to the end.
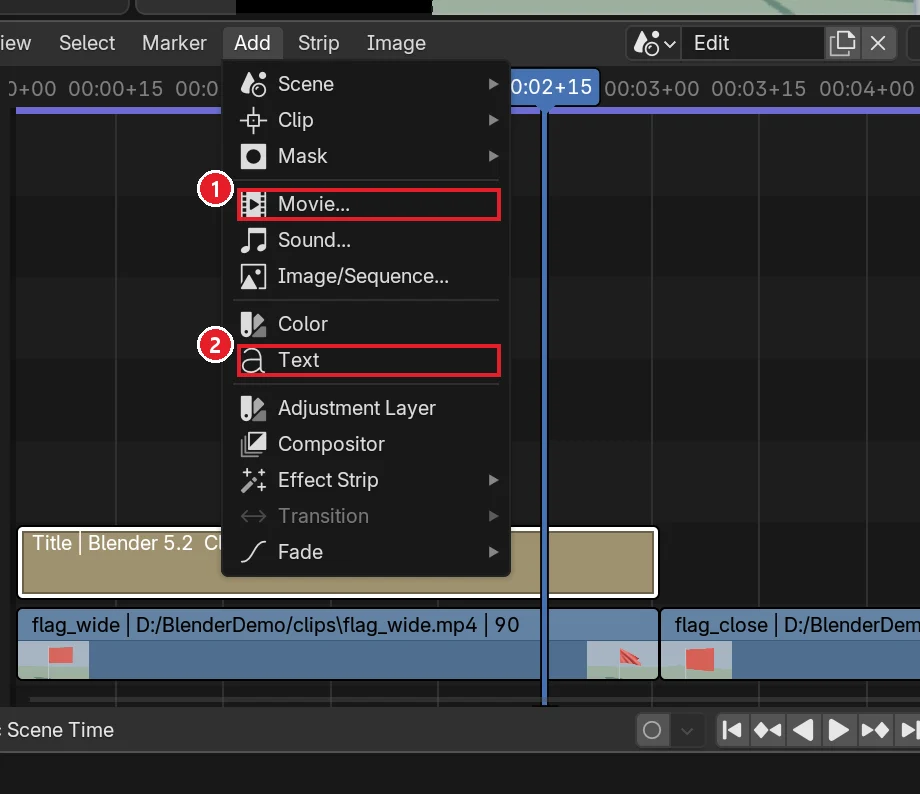 Figure 2. The Add menu. ① Movie... ② Text (Blender screenshot)
If you put the folder with your clips into the path field of the file browser at the top left (① in Figure 1), you can see the clips while you choose.
4. Trim a strip
Starting point: the sequencer with the two strips in a row.
The first clip is 120 frames (4 seconds), but we will use only the first 90 frames (3 seconds). You can drag the end of the strip, but typing a number is exact.
Steps:
- Click the first strip (
flag_wide) to select it. - Expand the Time panel in the strip settings in the Properties editor.
- Set Strip Duration to
90(② in Figure 3). The right end of the strip moves back to frame 91. - Press
Gand move the second strip back to frame 91. - Set End at the bottom right of the timeline to
210. 90 + 120 = 210 frames, which is 7 seconds at 30 fps.
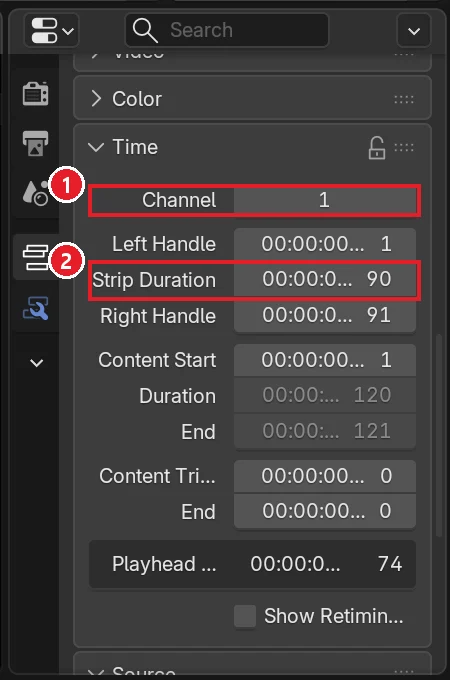 Figure 3. The Time panel. ① Channel ② Strip Duration 90. The Duration of 120 below is the length of the original clip (Blender screenshot)
Strip Duration is how long the strip is shown. The grey Duration below it is the full length of the original clip. The trimmed part is not deleted, only hidden, so you can extend it again later. It is like folding back the end of a film strip.
5. Split with K
Starting point: the sequencer from the previous section. Figure 4 shows the 120-frame strip before trimming, split at frame 60. It works the same way on the trimmed strip.
When you watch a clip and think "cut here", use Split. It is like putting scissors on the film at the playhead and cutting it in two.
Steps:
- Move the playhead (the blue vertical line) to where you want to cut. Click the time ruler at the top of the sequencer, or type
60into the current frame field at the bottom of the timeline. - Click the strip to split (
flag_wide) to select it. - With the mouse over the sequencer, to the right of the playhead, press
K. The strip splits in two at the playhead, and the piece on the mouse side is selected. In Figure 4 the mouse was on the right, so the back piece (flag_wide.001, ① in Figure 4) is selected. - If you do not need the back piece, delete it with
X(orDelete). To use it somewhere else, move it withG. - When you are done trying it, press
Ctrl+Zto undo the split and go on to the next section. The finished edit in this guide uses the Strip Duration trim from section 4.
 Figure 4. After splitting with K. ① The back piece ② Settings of the split you just made (Blender screenshot)
Expand the Split Strips panel at the bottom left (② in Figure 4) to change the settings of the split you just made. K (Split in the Strip menu) is a soft split, so if you later drag the end of a piece, the cut part comes back. Shift+K (Hold Split in the Strip menu) splits so that the piece cannot be extended past the cut.
Which one to use: use Strip Duration from section 4 when you want an exact number, and K when you pick the cut point by watching, or when you remove a section from the middle. To remove a middle section, split at both ends with K and delete the middle piece.
6. Add a title: style presets
Starting point: the sequencer with the lengths set.
Steps:
- Put the playhead on frame 1 and choose Add ‣ Text (② in Figure 2). Place the text strip on Channel 2, above the clips. Higher channels show on top of lower ones.
- Drag the right end of the text strip, or set its Strip Duration to
90, so it shows only during the first shot. - Type a title (for example
Blender 5.2 Cloth Flag) into the text field in the Effect Strip panel of the Properties editor. - Click the preset button in the header of the same panel (① in Figure 5) and choose Main Title (② in Figure 5).
- Main Title makes the text large (Size
100), centers it, and turns on the outline and shadow. That is too big for a 960 × 540 frame, so set Size to56and raise Location Y to0.82. The preview in Figure 1 shows this state.
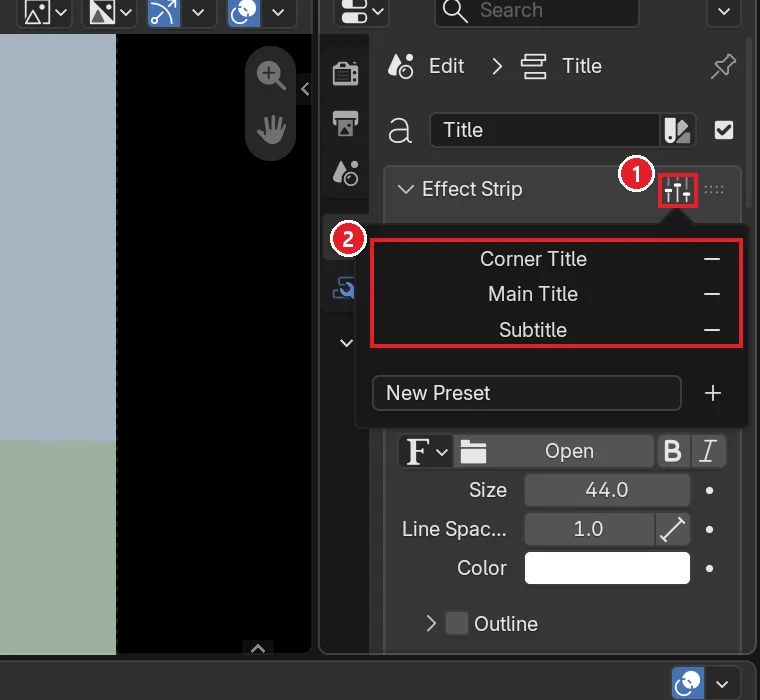 Figure 5. Text style presets. ① Preset button ② The three built-in presets (Blender screenshot)
Style presets are new in 5.2. The official release page says they store the font, outline, shadows, and layout together, and that three presets come built in: Subtitle, Main Title, and Corner Title. Once you have a look you like, type a name in New Preset and click + to save your own. You can then load the same title look in your next video in one click.
7. Export an MP4
Starting point: the scene with the title added.
Steps:
- Open the Output tab in the Properties editor. Type the folder and file name (for example
flag_edit.mp4) into the path field of the Output panel (① in Figure 6). - Set Media Type to
Video(② in Figure 6). - Expand the Encoding panel below and set Container to
MPEG-4(① in Figure 7) and Video Codec toH.264(② in Figure 7). - Expand the Audio panel lower in the same Encoding panel and set Audio Codec to
AAC(① in Figure 8). The starting value,No Audio, means no sound is written, so if you leave it, the exported MP4 has no sound even when your clips or background music have sound. If you only use clips without sound, like the flag clips here, you can leave it. - Choose Render ‣ Render Animation (
Ctrl+F12). Frames pass one by one in the render window, and when it finishes, the MP4 is in the folder you chose.
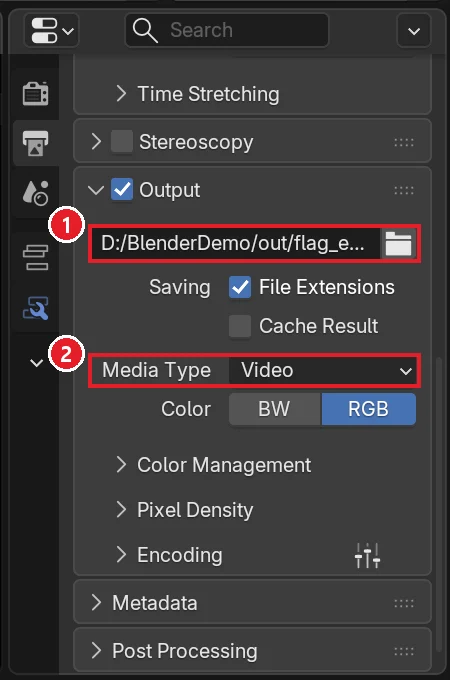 Figure 6. Output path. ① Path field ② Media Type Video (Blender screenshot)
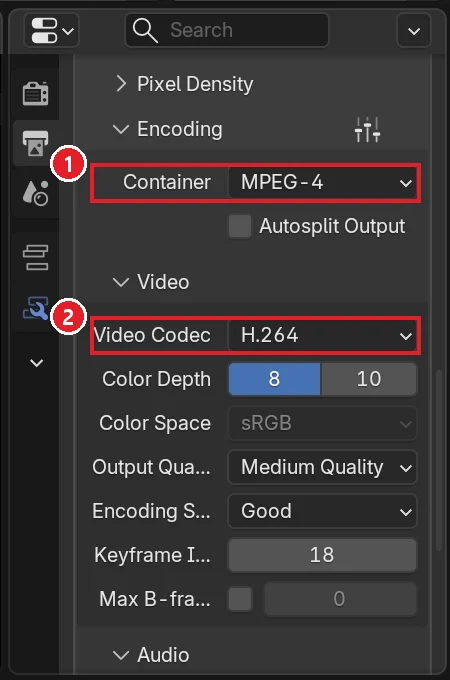 Figure 7. Encoding. ① Container MPEG-4 ② Video Codec H.264 (Blender screenshot)
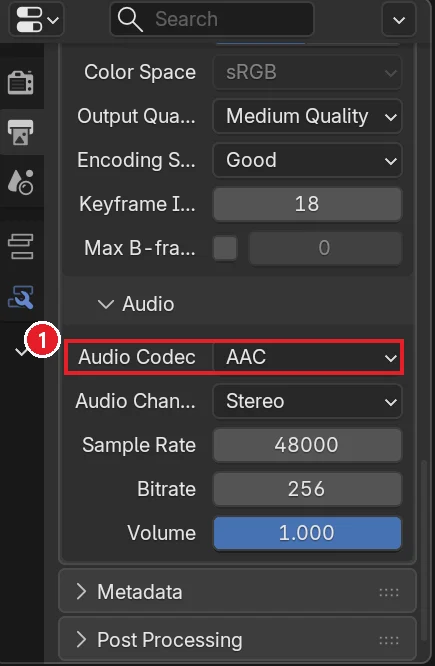 Figure 8. Sound settings. ① Audio Codec AAC (Blender screenshot)
Add background music with Add ‣ Sound... (in the menu in Figure 2). The music file becomes a sound strip in the sequencer, and you can move it with G and split it with K just like a movie strip. If you add a sound strip, be sure to set Audio Codec in step 4 to AAC.
A container is the box (file format) that holds the video, and a codec is how the video inside the box is compressed. H.264 in an MPEG-4 box opens as is on most phones and social media sites. The details are in Video codecs and containers.
On my PC, exporting this 7-second edit took about 26 seconds. The resulting file was 960 × 540, 30 fps, and 7.0 seconds long. The sequencer does not recompute the 3D scene. It only joins finished clips, so it is much faster than a 3D render.
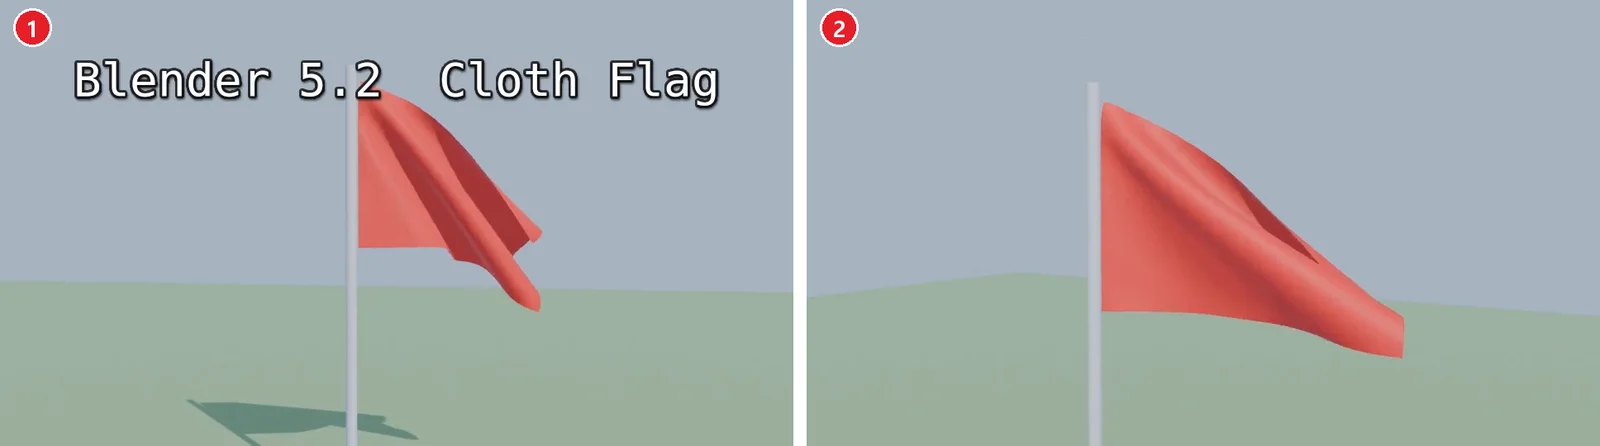 Figure 9. The exported video. ① Frame 41: the first shot with the title ② Frame 151: the second shot (MP4 still)
Practice
- Use Add ‣ Fade to fade out the end of the first shot and fade in the start of the second.
- Switch the text preset to Subtitle and write down where the text moves on screen.
- Use Add ‣ Color to put a 15-frame black strip at the very start, and work out what End should become.
- Save the edited scene with File ‣ Save. Next time you can swap in new clips and reuse it.
Common mistakes and fixes
| Symptom | Cause | Fix |
|---|---|---|
| The preview shows only part of the clip, zoomed in | The output resolution is larger than the clips (for example 1920 × 1080) | Set Resolution in the Output tab to match the clips (960 × 540) |
| The video plays too fast or too slow | The scene Frame Rate differs from the clip fps | Set Frame Rate to the clips' 30 fps |
| A long black screen at the end | End is past the end of the last strip | Set End to the end of the last strip (210 in this guide) |
| The title does not show | The text strip is on a lower channel than the clips | Move the text strip to Channel 2 or higher |
| The export is a pile of PNG files | Media Type is set to Image | Set Media Type to Video and Container to MPEG-4 |
| The exported video has no sound | Audio Codec is No Audio | Set Audio Codec under Encoding ‣ Audio to AAC |
| Pressing K does not split | No strip is selected, or the playhead is outside the strip | Click the strip to select it, move the playhead over it, and press K again |
Summary
File ‣ New ‣ Video Editing, join clips with Add ‣ Movie, trim with Strip Duration or split with K, add a title with Add ‣ Text and a style preset, then MPEG-4, H.264, and AAC with Ctrl+F12.
If resolution and fps are confusing, see Resolution and aspect ratio and Understanding frame rate (fps).
References
- Blender 5.2 LTS release page (text strip style presets): https://www.blender.org/download/releases/5-2/
- Blender 5.2 manual, Video Editing: https://docs.blender.org/manual/en/latest/video_editing/index.html
- Shortcuts: move
G, splitK(Hold SplitShift+K), deleteXorDelete, render animationCtrl+F12, playSpace - Pictures: all real Blender 5.2.1 screenshots and stills from the MP4 exported in this guide. The clips were rendered with EEVEE from an example scene on this site