Join and Separate in Blender: when to make one object and when to keep them apart
How to join several objects into one with Ctrl+J and split part of a mesh off again with P in Edit Mode. Why the name, origin and modifiers follow the active object, how Selection, By Material and By Loose Parts differ, and how parenting or collections can group objects without joining them.
한국어English
ON THIS PAGE
Based on: Blender 5.2 LTS (English interface, default shortcuts). Checked in November 2026. The pictures are real Blender 5.2.1 screenshots already used in other Blender guides on this site, plus diagrams drawn for this guide. The steps follow the official Blender 5.2 manual and the default keymap. The red numbers and boxes were added to explain them.
As you build more objects in Blender, sooner or later you want to "stick these two together", or the opposite, "take just this part off as its own piece". The first is Join and the second is Separate.
Both take a single shortcut. But if you do not know which object becomes the owner when you join, a name or a modifier can vanish and surprise you. This guide looks at the rules for joining and separating first, then compares when to join and when to keep objects apart.
After this guide you can:
- Tell the active object from the other selected objects.
- Join objects with
Ctrl+Jand know what stays and what goes. - Split part of a mesh into a new object with
Pin Edit Mode. - Tell Selection, By Material and By Loose Parts apart.
- Choose parenting or collections instead of joining.
Before you start: Selecting objects and adding to the selection with
Shift+click are in Beginner chapter 3. Adding, duplicating and undo are in Beginner chapter 4. If you are new, read those two first.
1. Set up a practice scene
Starting point: Start from the default cube in a new file (File > New > General).
Steps:
- With the mouse over the 3D Viewport, press
Shift+A→ Mesh → Cylinder. - The cylinder appears overlapping the cube (Figure 1). The Outliner lists Cube and Cylinder separately.
- With the cylinder selected, press
G→X→2→Enterto move it 2 m to the right. The steps in this guide are easier to see when the two are apart.
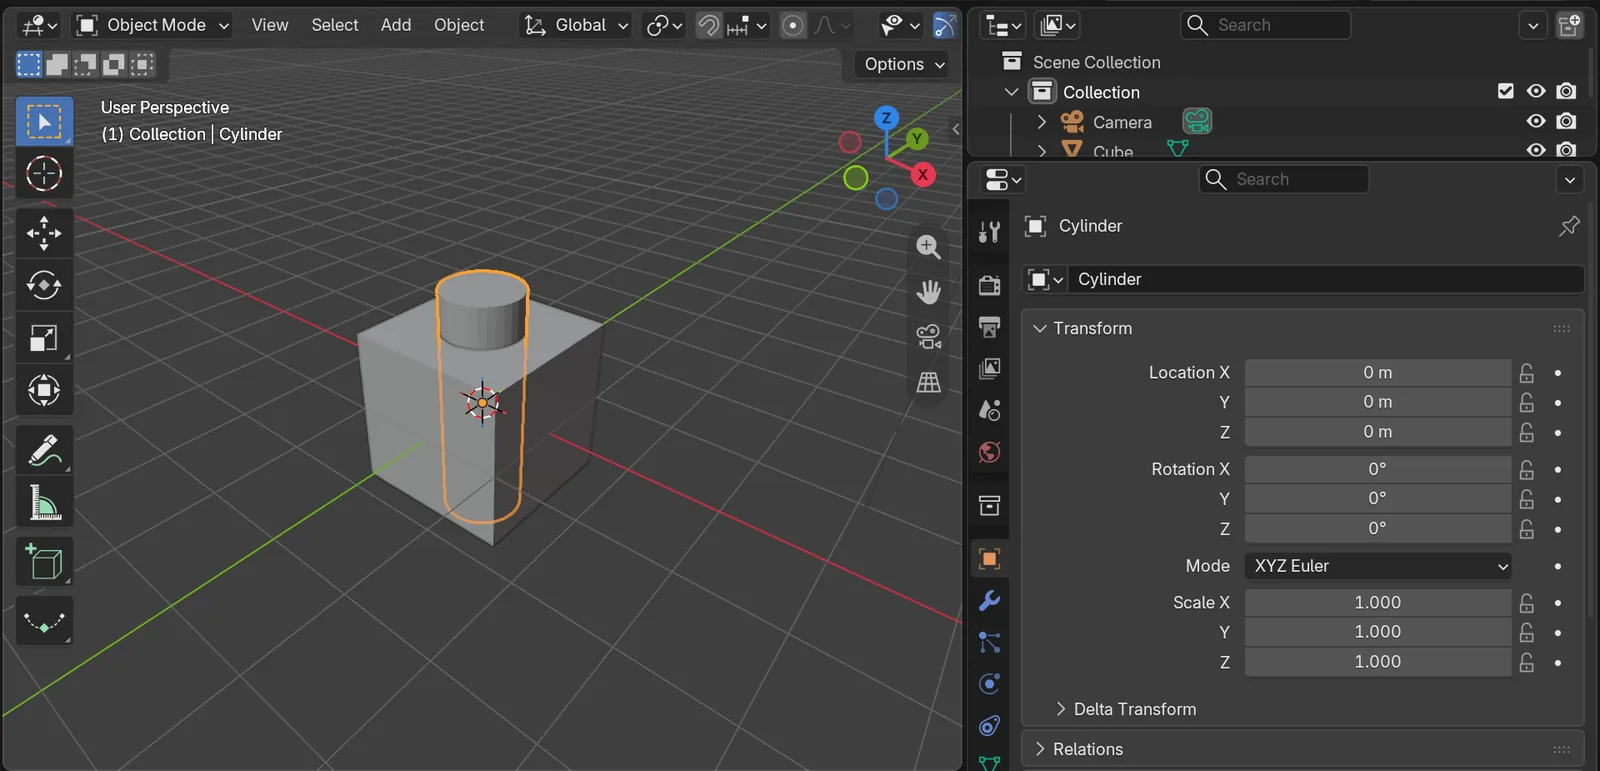 Figure 1. The cube and the cylinder are separate objects. The picture shows the cylinder before it is moved (Blender screenshot)
2. The active object: the owner when you join
When you select several objects, one of them is the active object. The object you selected last is the active one. In the 3D Viewport the active object has a bright yellowish outline, and the other selected objects have a darker orange outline. The Properties editor shows the settings of the active object.
Starting point: Continue with the scene from section 1.
Steps:
- Left-click empty space to deselect everything.
- Left-click the cylinder.
- Hold
Shiftand left-click the cube. The cube becomes the active object. - Check that the name at the top of the Properties editor is Cube.
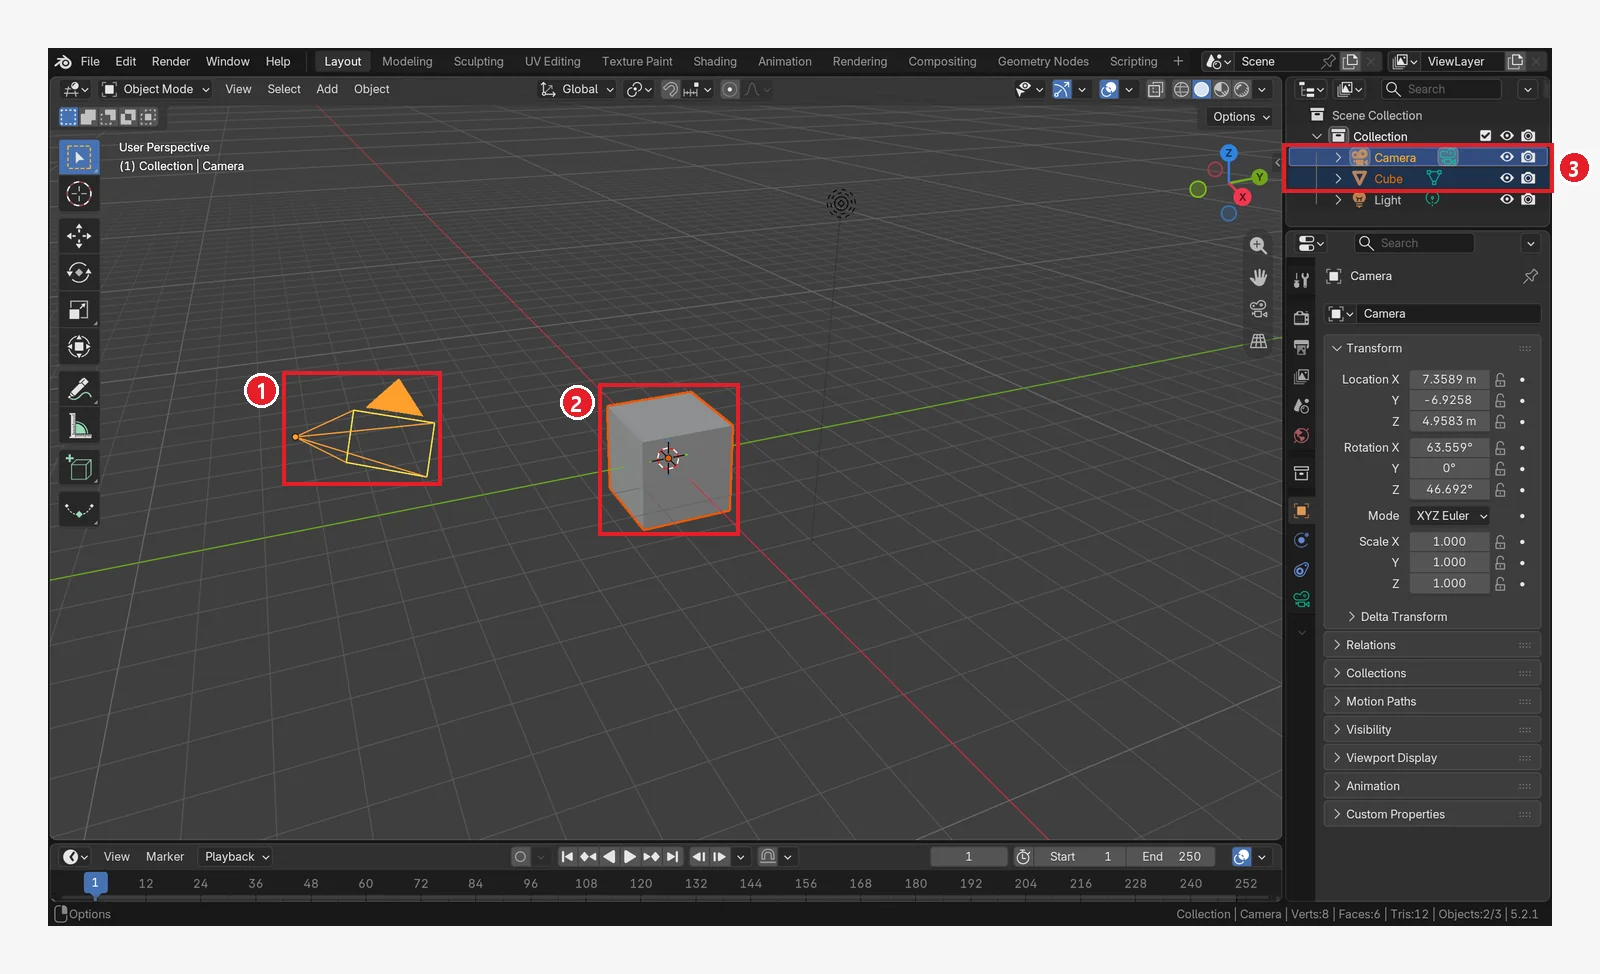 Figure 2. Two objects selected together. ① Camera (bright yellowish, active) ② Cube (darker orange, also selected) ③ both rows are highlighted in the Outliner too. The picture shows the camera selected last (Blender screenshot)
Figure 2 is a different scene with the cube and the camera selected, but you read it the same way. The name in the Properties editor (Camera in the picture) is the active object.
3. Join: Ctrl+J
Joining puts the selected objects inside the active object. It is like moving your things into one big box. The box (the active object) keeps its label and its place, and the other things go inside it.
Starting point: Continue from section 2 with the cylinder selected first and the cube last (the cube is active).
Steps:
- Check that the header says Object Mode. Joining works only in Object Mode.
- With the mouse over the 3D Viewport, press
Ctrl+J. The menu entry is Object > Join. - Check in the Outliner that the Cylinder row is gone and only Cube remains.
- Press
Tabto enter Edit Mode. The points of both the cube and the cylinder are shown. PressTabagain to leave.
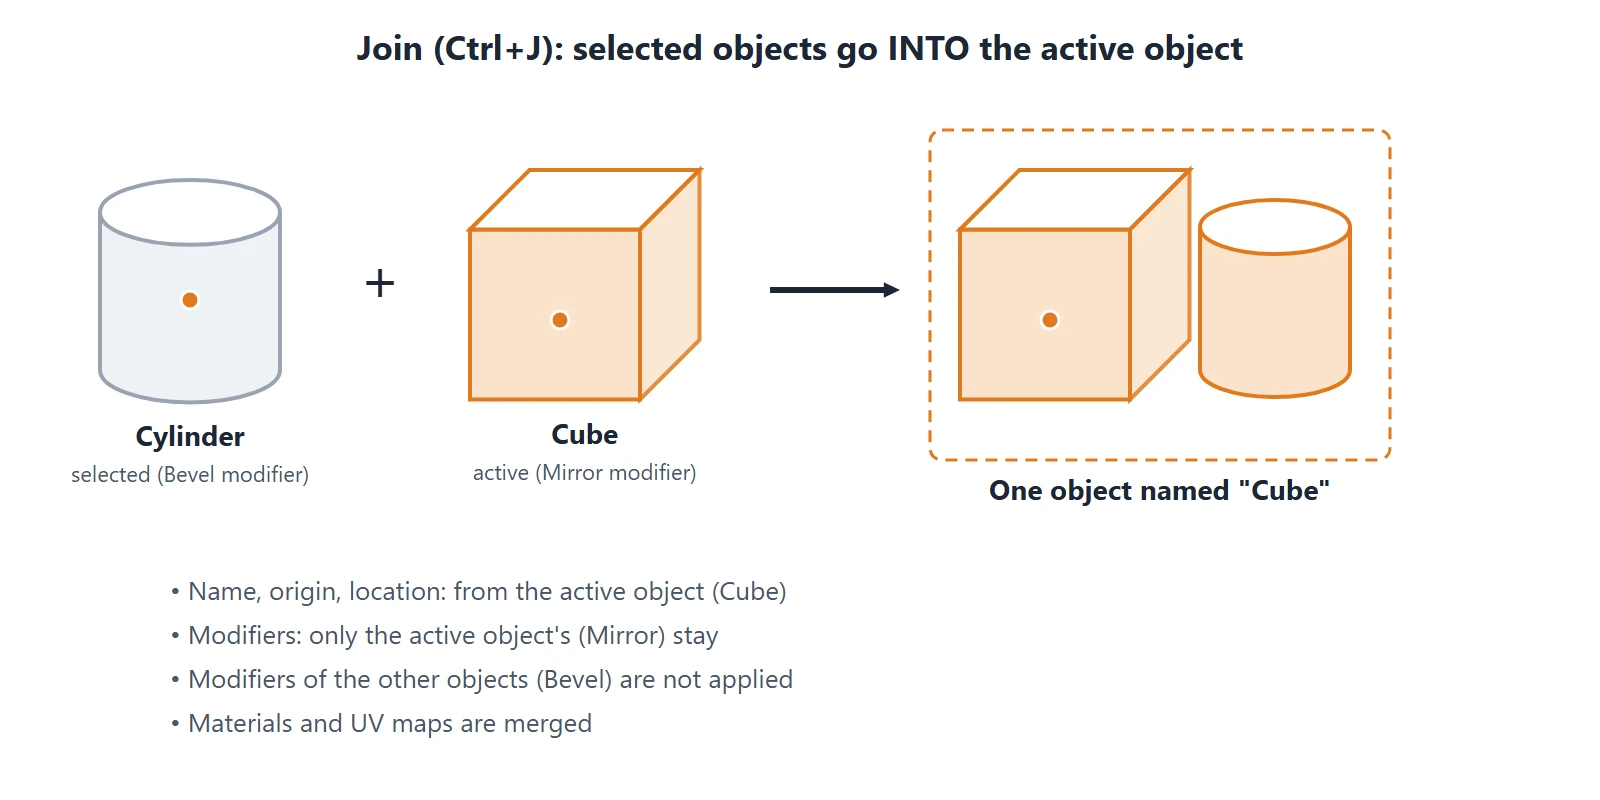 Figure 3. What stays and what goes when you join. The modifier names are examples (diagram)
The rules after joining are shown in Figure 3.
| What | After joining |
|---|---|
| Name, origin, location, rotation and scale | Taken from the active object |
| The active object's modifiers | Stay, and now apply to the whole joined shape |
| The other objects' modifiers | Not applied, and lost |
| The other objects' constraints and parent relationships | Ignored |
| Materials, vertex groups, UV maps | Merged. The material slots end up on one object |
To keep a modifier's result: If you want to keep the result of a modifier on one of the other objects, click Apply in that object's modifier panel before joining. The shape is then fixed before it is joined. If Apply is new to you, see Beginner chapter 7.
You can only join objects of the same type. Meshes join with meshes and curves with curves. Cameras and lights cannot be joined, so leave them out of the selection and select only the objects you want to join.
Joining does not weld the shapes together. The cube and the cylinder are now one object, but their points and faces are still two separate pieces. To turn the overlapping part into one surface, use Union in the Boolean modifier.
4. Separate: P in Edit Mode
Separating is the opposite of joining. It takes part of one object and makes it a new object. You separate in Edit Mode, the mode for editing the points, edges and faces inside an object (points are vertices, edges are lines). If Edit Mode is new, see Beginner chapter 6.
Starting point: Continue with the joined Cube (cube + cylinder) from section 3.
Steps:
- Select the joined object and press
Tabto enter Edit Mode. - Press
Alt+Ato deselect everything. - Hover the mouse over the cylinder and press
L. Only the connected piece under the mouse (the cylinder) is selected. - Press
Pand pick Selection from the menu. The menu entry is Mesh > Separate. - Press
Tabto go back to Object Mode and check that the Outliner has one more object.
The menu that opens with P has three choices (Figure 4).
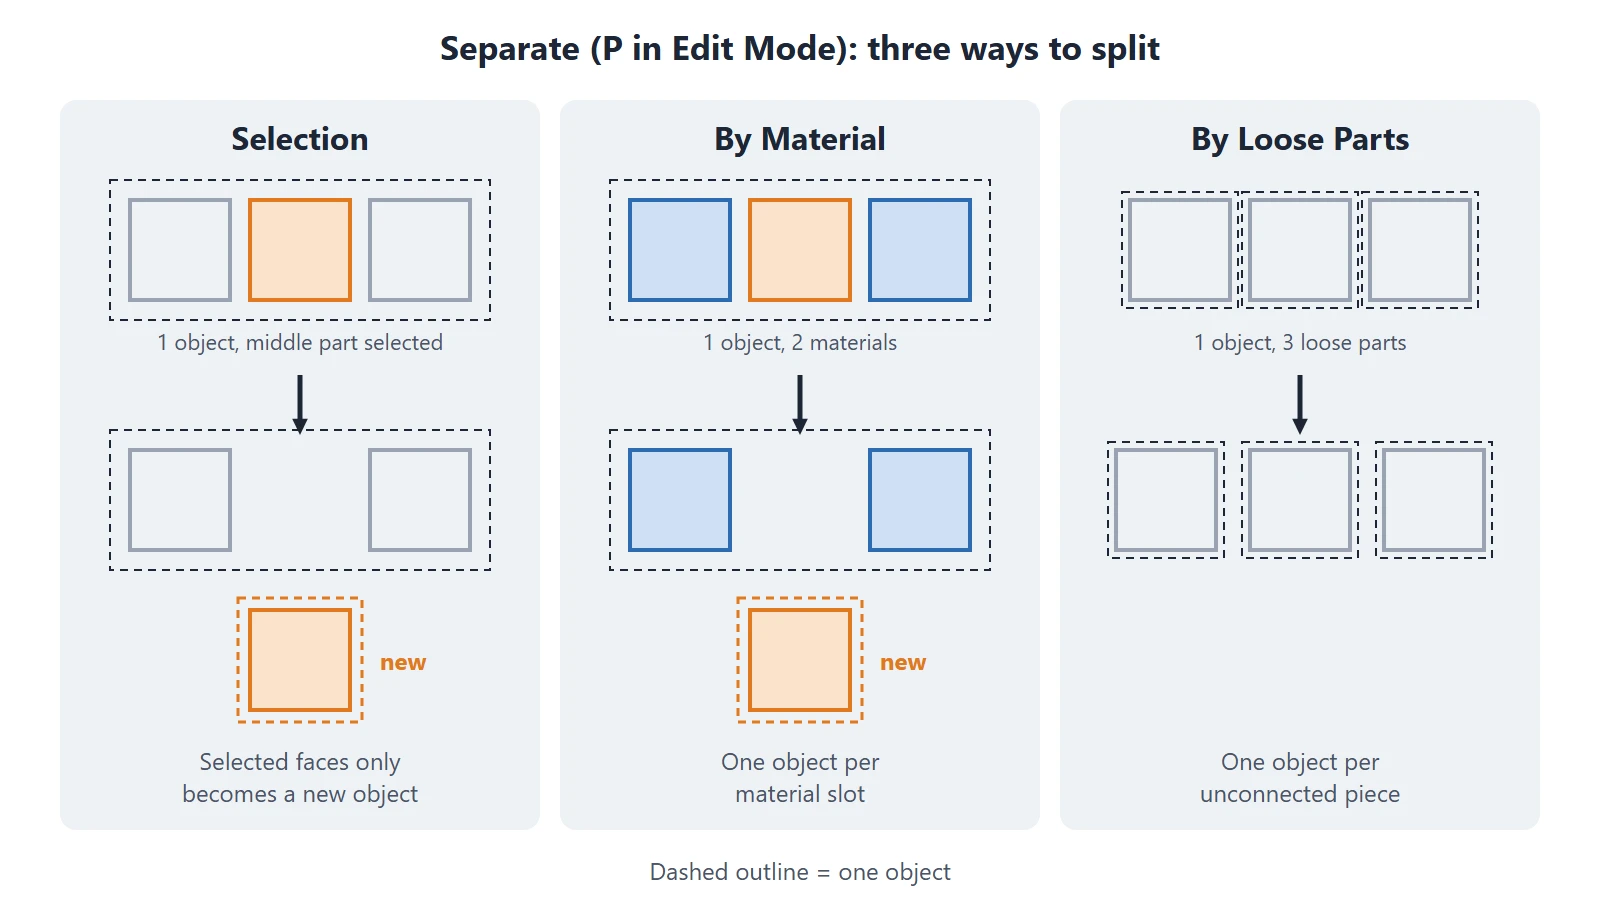 Figure 4. Three ways to separate. One dashed outline is one object (diagram)
| Choice | What it does | Needs a selection? |
|---|---|---|
| Selection | Takes only the selected part into a new object | Yes |
| By Material | Makes one object per material slot | No. Splits the whole mesh |
| By Loose Parts | Makes one object per unconnected piece | No. Splits the whole mesh |
For the object joined in section 3, pressing P → By Loose Parts alone splits it back into a cube and a cylinder, because the two pieces are not connected by any points.
Check the origin: If the origin (the orange dot) of a separated object is in an odd place, select the object and use Object > Set Origin > Origin to Geometry. The origin moves to the middle of the shape. What the origin is, is covered in Moving the origin in Blender.
5. When it is already merged: meshes added in Edit Mode
There is a common case where objects end up merged without you joining them. If you add a new mesh with Shift+A while still in Edit Mode, no new object is made. The mesh goes into the object you were editing.
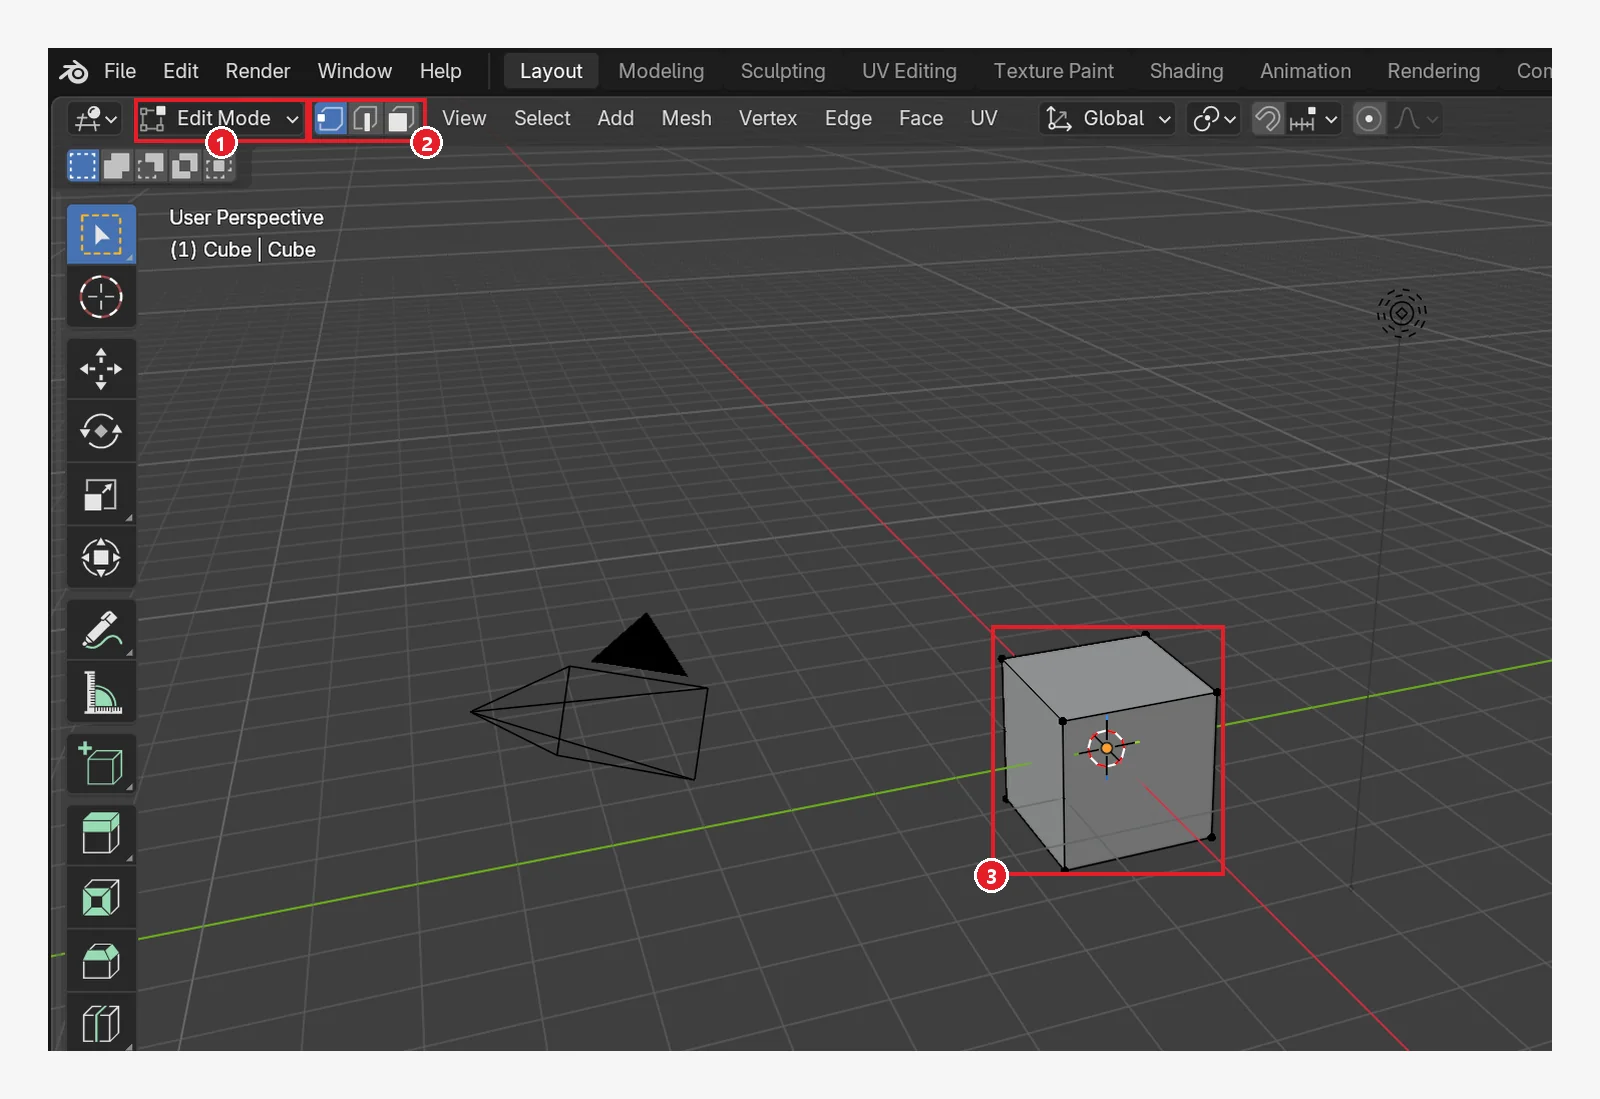 Figure 5. If the header shows ① Edit Mode and ② the point, edge and face buttons, you are in Edit Mode. A mesh added now goes ③ into the current object (Blender screenshot)
Starting point: Select the default cube in a new file and press Tab to enter Edit Mode.
Steps:
- With the mouse over the 3D Viewport, press
Shift+A→ Mesh → UV Sphere. No new row appears in the Outliner. - With the new sphere still selected, press
P→ Selection. - Press
Tabto leave and check that the sphere is now its own object in the Outliner.
Right after adding, the easiest fix is Ctrl+Z and adding it again in Object Mode. If you have done too much work to undo, take it off with P → Selection as above. This trap is also covered in section 8 of Beginner chapter 4.
6. When to join and when to keep apart
Joining is hard to undo later, and the other objects' modifiers are lost. So do not join only because you want objects to move together. There are other ways to do that.
| What you want | Choose | Why |
|---|---|---|
| Export as one item (one file for a game engine or 3D print) | Join (Ctrl+J) | One object goes neatly into one file |
| Fewer objects, tidier Outliner | Join | Dozens of small parts become one row |
| Change one material for all at once | Join, or share the material | Joining gathers the material slots in one place |
| Use different modifiers on each part | Keep apart | After joining only the active object's modifiers remain |
| Cut holes with Boolean | Keep apart | The cutter must be a separate object |
| Parts that turn on their own, like wheels | Keep apart + parenting | The wheels follow the body but can still spin on their own |
| Just group them to stay organized | Collection | Shapes stay as they are; it works like a folder |
Parenting hangs one object on another. Select the child, then hold Shift and select the parent last, and press Ctrl+P → Object. When the parent moves, the child follows, but you can still edit and rotate the child on its own. It is like a child holding a parent's hand: they walk together, but the child can still turn its head.
A collection is a folder in the Outliner. Select objects and press M to get a menu for choosing the collection to move them to. It has no effect on the shapes; it only organizes them.
7. Practice
- Select the cube and the cylinder in the order cube → cylinder this time and press
Ctrl+J. Write down the name of the joined object. - Add a Bevel modifier to the cylinder and join with the cube as the active object. Check whether Bevel is still in the Modifier tab after joining. Then undo with
Ctrl+Z, apply the cylinder's Bevel, join again and compare. - Split the joined object with
P→ By Loose Parts in Edit Mode. Write down how many objects appear in the Outliner.
8. Common mistakes and fixes
| Symptom | Cause | Fix |
|---|---|---|
| The name changed after joining | It takes the name of the object selected last (the active object) | Select the object whose name you want to keep last, then join |
| A modifier disappeared after joining | Modifiers on objects other than the active one are not applied | Ctrl+Z, apply that object's modifier, then join again |
Ctrl+J does nothing | You are in Edit Mode, or the active object is not a mesh | Tab to Object Mode, select only meshes and pick a mesh last |
P shows no menu | You are in Object Mode | Tab into Edit Mode, then P |
| Separate by Selection made nothing | Nothing was selected | Select the part first with L or A |
| A newly added sphere is not in the Outliner | It was added in Edit Mode and went into the current object | Take it off with P → Selection (section 5) |
| A separated object rotates around an odd point | Its origin (orange dot) is away from the shape | Object > Set Origin > Origin to Geometry |
Summary
Join with Ctrl+J; the object selected last is the owner. Separate with P in Edit Mode. Do not join parts that must move on their own; use parenting or collections. The next guide covers snapping, which lines objects up exactly with points or the floor.
Previous: When the Blender viewport is slow · Next: Snapping in Blender
References
- Blender 5.2 Manual: Join
- Blender 5.2 Manual: Separate
- Blender 5.2 Manual: Parent
- Blender 5.2 Manual: Collections
- Shortcuts: default (Blender) keymap of Blender 5.2.
- Pictures: screenshots made in Blender 5.2.1 for Blender guides on this site, and diagrams drawn in code for this guide.