Moving the origin in Blender: fix an object that turns around the wrong point with Set Origin and the 3D cursor
What an object's origin is in Blender, and how to move it with the items in Object ‣ Set Origin and with the 3D cursor when an object rotates or scales around the wrong point. Also covers moving only the origin with Affect Only Origins, how this differs from changing the Transform Pivot Point, and where to put the origin of objects that stand on the floor.
한국어English
ON THIS PAGE
- 011. What the origin is
- 022. Why the origin drifts from the shape
- 033. The Set Origin menu: origin to shape, or shape to origin
- 044. An exact spot with the 3D cursor
- 055. Dragging only the origin: Affect Only Origins
- 066. Moving the origin vs changing the pivot
- 077. Exercises
- 088. Common mistakes and fixes
- 09Summary
- 10References
Based on: Blender 5.2 LTS (screenshots from 5.2.1, English interface, default shortcuts). Checked in November 2026. Figures 1 and 3 are real Blender screenshots, Figure 4 is a Godot screen, Figure 5 is a picture from the Blender manual, and Figure 2 is a diagram. The red numbers, boxes and labels were added to explain them. Steps that have no picture follow the official Blender 5.2 manual and the default keymap.
Sometimes you press R and the object does not turn in place. It swings around some other point. Or you press S and it slides to one side while it grows. The cause is usually where the origin sits.
This guide explains what the origin is and three ways to move it: the Object ‣ Set Origin menu, the 3D cursor for an exact spot, and Affect Only Origins to drag only the origin. At the end it compares this with the Transform Pivot Point, which changes the turning center without moving the origin.
After this guide you can:
- Find an object's origin (the orange dot) and tell whether it has drifted away from the shape.
- Move the origin to the middle of the shape with Set Origin ‣ Origin to Geometry.
- Put the origin at an exact spot, such as the bottom center or a hinge, with the 3D cursor and Origin to 3D Cursor.
- Tell moving the origin apart from changing the pivot.
1. What the origin is
The origin is one reference point that every object has. When you select an object, it shows as a small orange dot. The Location values in the Object tab are where this dot is. By default, rotating (R) and scaling (S) also use this dot as the center.
Think of a sheet of paper pinned to a wall. Turn the paper and it turns around the pin. Move the pin and the whole sheet comes along. The origin is the pin. If the pin is in the middle of the paper, it turns in place. If the pin is off the corner, the paper swings wide.
Steps: Open a new file (File ‣ New ‣ General) and left-click the default cube. Find the small orange dot in the middle of the cube. In a new file the 3D cursor (the red and white striped ring) is at the same place (0, 0, 0), so the two overlap.
The dot's color shows the selection state. The official manual lists the active object's origin as yellow, but in the default theme it looks closer to orange, as in Figures 1 and 3. The origin of an unselected object is white.
2. Why the origin drifts from the shape
The most common reason is moving the shape in Edit Mode. When you move points or faces in Edit Mode (Tab), only the shape moves. The origin stays where it was, as if you slid the paper but left the pin.
Starting point: The default cube in the new file from section 1.
Steps:
- Select the cube and press
Tabto enter Edit Mode. - Select everything with
A, then pressG→X→1→Enter. The shape moves 1 m along X. - Press
Tabto go back to Object Mode. The origin (orange dot) is now in the middle of the cube's left face (Figure 1).
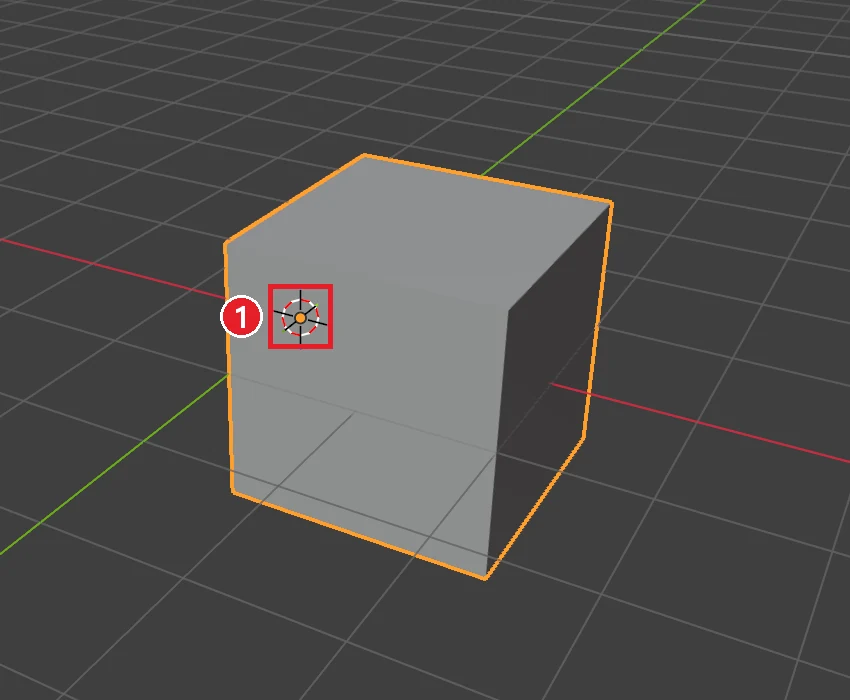 Figure 1. A cube whose shape was moved 1 m along X in Edit Mode. ① The origin stays at (0, 0, 0), now on the cube's left face (Blender screenshot)
- Now rotate it with
R→Z→90→Enter. The cube does not turn in place; it swings around the origin on its left face. Undo withCtrl+Zafter you look.
Sometimes you want the origin outside the middle on purpose. The Mirror modifier uses the plane through the origin as its mirror, so you use exactly this step to put the origin on the symmetry plane. Where the origin belongs depends on how the object will turn and where it will stand.
Figure 2 is a top-view diagram of a door (a thin board). With the origin in the middle, turning it 60° pushes half of the board through the wall. With the origin at the hinge end, it opens like a real door, staying against the wall.
 Figure 2. The same board turned 60° on Z. Left: origin in the middle. Right: origin at the hinge end (diagram)
3. The Set Origin menu: origin to shape, or shape to origin
The fastest way to move the origin is the Object ‣ Set Origin menu. Set Origin is also in the menu you get by right-clicking the 3D Viewport in Object Mode. It has five items.
| Item | What it does | Does the shape move? |
|---|---|---|
| Geometry to Origin | Moves the shape to the origin | Yes |
| Origin to Geometry | Moves the origin to the middle of the shape | No |
| Origin to 3D Cursor | Moves the origin to the 3D cursor | No |
| Origin to Center of Mass (Surface) | Moves the origin to the center of mass calculated from the surface area | No |
| Origin to Center of Mass (Volume) | Moves the origin to the center of mass calculated from the volume. The shape must be closed | No |
The item names and descriptions follow the Blender 5.2 manual and the operator description. At first, the two in bold are all you need.
Starting point: The state from step 3 of section 2 (the origin is on the cube's left face).
Steps:
- With the cube selected, choose Object ‣ Set Origin ‣ Origin to Geometry in the header menu.
- The origin moves to the middle of the cube (X 1 m). The cube stays where it is. Location X in the Object tab changes to
1 m. - Rotate with
R→Z→90→Enter. This time it turns in place.
Geometry to Origin works the other way. It leaves the origin and pulls the shape to it. If you choose it in step 3 of section 2, the cube goes back to the center at (0, 0, 0).
How Origin to Geometry measures the "middle" can be changed with Center in the Adjust Last Operation panel that appears at the lower left of the 3D Viewport right after you use it. The two choices are Median Center (the average position of the points) and Bounds Center (the middle of the box around the shape). On a shape with points bunched on one side, they give different results.
4. An exact spot with the 3D cursor
To put the origin at an exact spot that is not the middle of the shape, such as the bottom center or a hinge, use the 3D cursor. The 3D cursor is the red and white striped ring in the 3D Viewport. New objects appear there too. The order is "move the cursor to the spot → move the origin to the cursor". The steps in this section follow the official manual and the menu names.
Starting point: The state from section 3 (the origin is in the middle of the cube). The goal is to move the origin to one bottom corner point of the cube.
Steps:
- Press
Tabto enter Edit Mode and press1for vertex select. - Left-click one corner point on the bottom of the cube.
- With the mouse over the 3D Viewport, press
Shift+S. In the round snap menu, choose Cursor to Selected. The 3D cursor moves to that point. - Press
Tabto go back to Object Mode. - Choose Object ‣ Set Origin ‣ Origin to 3D Cursor. The origin moves to the cursor, which is the corner point you picked.
- When you are done, put the cursor back at (0, 0, 0) with
Shift+S→ Cursor to World Origin.
To place the cursor by eye, you can also click the spot with Shift+right-click. A spot clicked on screen does not have an exact depth, though, so when it must be exact, select a point and use Cursor to Selected as above. You can also type numbers into the 3D Cursor fields in the View tab of the sidebar (N).
Objects that stand on the floor: origin at the bottom center
For objects that stand on the floor, like chairs, barrels and buildings, an origin at the bottom center is handy. Figure 3 shows the same barrel twice. On the left the origin is at the bottom center; on the right it is at mid-height.
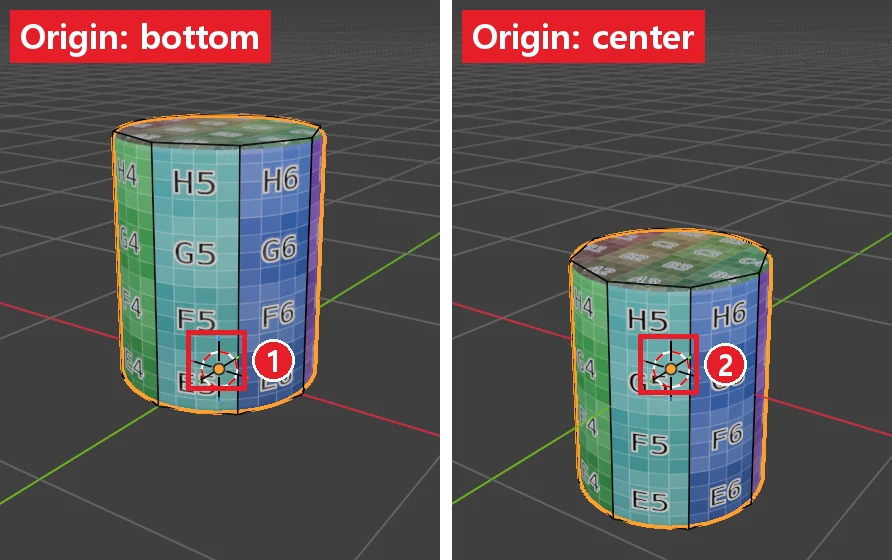 Figure 3. ① Origin at the bottom center ② Origin in the middle (Blender screenshot)
Bring both barrels into a game engine (Godot) and place them at the same height 0, and you get Figure 4. The barrel with its origin at the bottom stands on the floor. The one with its origin in the middle sinks halfway into the floor. It works the same way inside Blender: with the origin at the bottom, typing 0 into Location Z puts the object right on the floor.
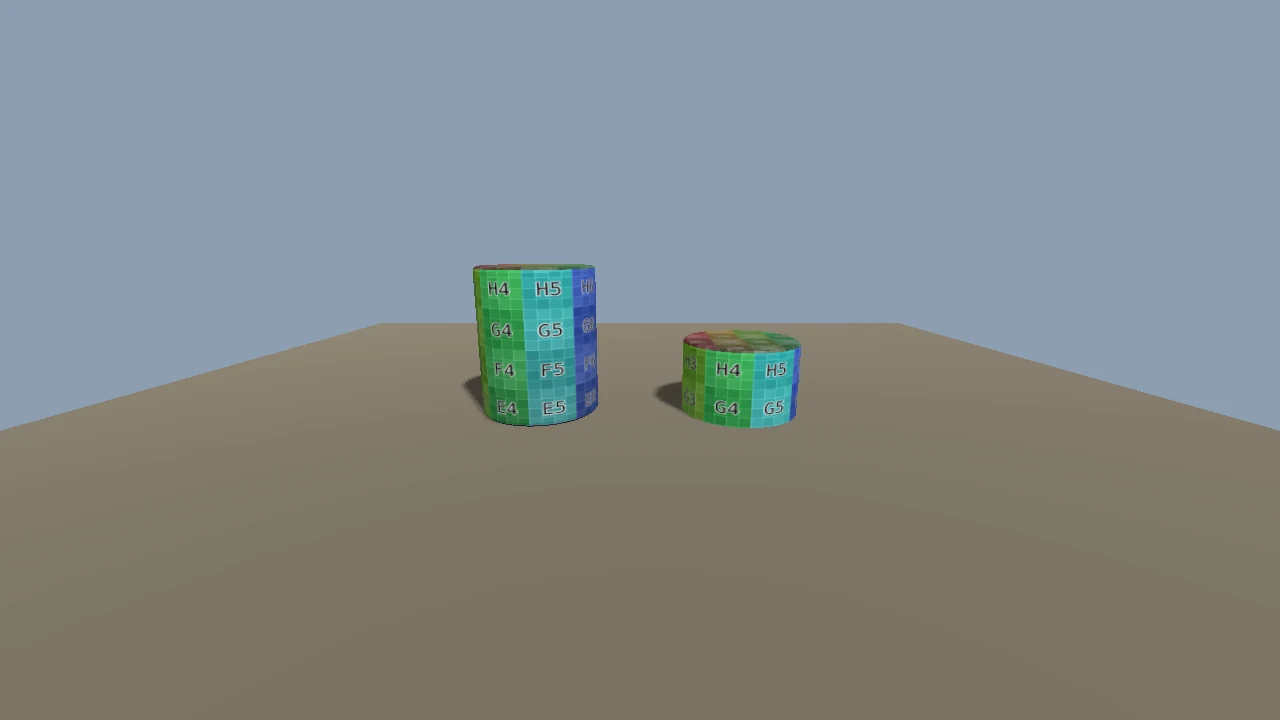 Figure 4. The two barrels placed at the same height (0). Left: origin at the bottom center. Right: origin in the middle (Godot screen)
To move it to the bottom center: if the object sits so that its bottom center is at the world origin (0, 0, 0), use Shift+S → Cursor to World Origin, then Object ‣ Set Origin ‣ Origin to 3D Cursor. Origin rules for game export are in section 4 of Rules for game-ready 3D assets.
5. Dragging only the origin: Affect Only Origins
Sometimes you just want the origin "about here" rather than at an exact spot. Turn on the mode that moves only the origin and drag it with G. This section also follows the official manual and the menu names.
Starting point: Object Mode, with the object whose origin you want to move selected.
Steps:
- Left-click the Options button on the right of the 3D Viewport header.
- Turn on Origins under Affect Only.
- Move with
Gor rotate withR. The shape stays put and only the origin (and its orientation) moves. - When you are done, turn Origins off again. If you leave it on, the shape will not follow the next time you move the object, which is confusing.
Locations and Parents in the same place do other jobs. To move the origin, use only Origins.
6. Moving the origin vs changing the pivot
If you only want a different turning center for a moment, you do not have to move the origin. The Transform Pivot Point button in the middle of the 3D Viewport header picks the center for the current operation. The shortcut is the period key (.).
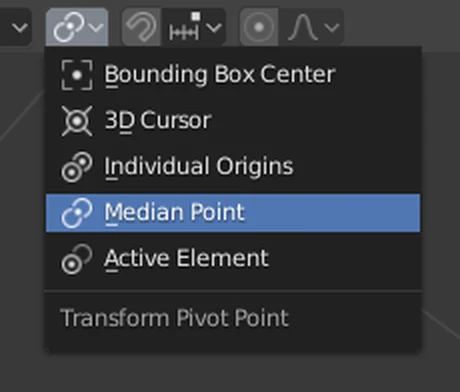 Figure 5. The pivot menu. The default is Median Point (picture from the Blender 5.2 manual, CC BY-SA 4.0, enlarged 2x)
| Pivot | Center |
|---|---|
| Bounding Box Center | The middle of the box around everything selected |
| 3D Cursor | The 3D cursor |
| Individual Origins | Each object's own origin |
| Median Point (default) | The middle of the selection (for one object, its origin) |
| Active Element | The last selected object |
The difference between the two is whether it lasts.
| Moving the origin (Set Origin) | Changing the pivot | |
|---|---|---|
| What changes | The object's reference point itself | The center of the current operation |
| Where it is kept | Saved in the file, goes along on export | Only a 3D Viewport setting |
| Animation and game engines | Turns and places around the origin | No effect |
| Good for | Doors and wheels that always turn around the same point | Turning around a different point just once |
If you plan to animate a door opening, move the origin to the hinge instead of changing the pivot. Keyframes store rotation values around the origin.
7. Exercises
- In Edit Mode, raise the default cube with
G→Z→1, then scale it withSin Object Mode. See which way it grows. Then use Origin to Geometry and scale again to compare. - Move the default cube's origin to its bottom center following section 4. (Hint: if you select the bottom face in Edit Mode, Cursor to Selected puts the cursor at the middle of that face.) Then type
0into Location Z and check that the cube stands on the grid floor. - Leave the origin as it is, change only the pivot to 3D Cursor, and rotate the cube. Write down whether Location in the Object tab changes.
8. Common mistakes and fixes
| Symptom | Cause | Fix |
|---|---|---|
| It swings around a strange point when rotated | The origin is outside the shape (the shape was moved in Edit Mode) | Object ‣ Set Origin ‣ Origin to Geometry (section 3) |
| After Set Origin, the origin went somewhere odd | Origin to 3D Cursor was chosen while the cursor was elsewhere | Ctrl+Z, then check the cursor first (section 4) |
| The shape does not follow when I move the object | Affect Only Origins is on in Options | Turn off Options ‣ Affect Only ‣ Origins (section 5) |
| I changed the pivot but the game engine shows no change | The pivot only affects operations in the 3D Viewport | Move the origin itself (section 6) |
| It sinks halfway when placed on the floor | The origin is in the middle of the object | Move the origin to the bottom center (section 4) |
| Origin to Center of Mass (Volume) gives a strange result | The shape has holes or mixed face directions | Check that it is closed. Start with Origin to Geometry |
Summary
If the turning center is wrong, fix the origin: Origin to Geometry for the middle, 3D cursor → Origin to 3D Cursor for an exact spot, and the bottom center for things that stand on the floor. The next guide covers applying the scale you changed in Object Mode (Apply Scale).
Previous: Switching Blender to Korean menus · Next: Apply Scale
References
- Blender 5.2 Manual: Object Origin (origin colors, Set Origin, Affect Only Origins)
- Blender 5.2 Manual: Transform Pivot Point
- Blender 5.2 Manual: 3D Cursor
- Related: Blender beginner chapter 3: select, move, rotate and scale, Mirror modifier
- Shortcuts: default (Blender) keymap of Blender 5.2.1.
- Pictures: Figures 1 and 3 are screenshots made in Blender 5.2.1 while writing this site's Blender guides, Figure 4 is a Godot screen with the same model, Figure 5 is from the Blender 5.2 manual (CC BY-SA 4.0), and Figure 2 is a diagram drawn for this guide.