Switching Blender to Korean menus: where the language setting is, and why English menus are often better
Change Blender's interface language from the first-start Quick Setup or from the Language panel in Preferences, following real screenshots. Covers the four Translate boxes (Tooltips, Interface, Reports, New Data), why keeping English menus helps when you follow tutorials, and a Korean-English menu table.
한국어English
ON THIS PAGE
- 011. Two places to set the language
- 022. First start: choose in Quick Setup
- 033. Any time: the Language panel in Preferences
- 044. The four Translate boxes
- 055. Why English menus are often better
- 066. A middle way: English menus, Korean tooltips
- 077. Korean-English menu table
- 088. Exercises
- 099. Common mistakes and fixes
- 10Summary
- 11References
Based on: Blender 5.2 LTS (screenshots from 5.2.1, default shortcuts). Checked in November 2026. All pictures are real Blender screenshots. The red numbers and boxes were added to explain them. Only this guide's pictures show the Korean interface on purpose.
Blender starts with an English interface. You can switch it to another language, such as Korean. There are two places to do it: the Quick Setup that appears the first time you start Blender, and the Language panel in Preferences, which you can open at any time.
This site's Blender guides, and most tutorials, use the English menu names. So besides the steps, this guide explains why English menus are often the better choice, and shows a middle way: English menus with Korean tooltips. At the end there is a Korean-English menu table built only from what the screenshots show.
After this guide you can:
- Pick a language in the Quick Setup on first start.
- Find the Language panel in Preferences, change the language and change it back.
- Tell what each of the four Translate boxes (Tooltips, Interface, Reports, New Data) changes.
- Match Korean menu names to the English names used in tutorials.
1. Two places to set the language
Blender keeps the interface language in Preferences. Preferences belong to the Blender program, not to your project file (.blend). Once you change the language, every file opens in that language. It is like a house where all the light switches sit on one breaker panel instead of in each room.
| Place | When you see it | Note |
|---|---|---|
| Quick Setup | The first time you start Blender, or a new version | Appears in the lower part of the splash screen. If a new version imports your previous preferences, the language comes along too |
| Preferences ‣ Interface ‣ Language panel | Any time | Open it with Edit ‣ Preferences… |
2. First start: choose in Quick Setup
Starting point: Blender 5.2 right after installing, on its first start. Installation is in Blender beginner chapter 1.
On the first start, the Quick Setup area sits under the splash image (Figure 1). Here you set the language, theme, keymap, mouse select button and spacebar action in one place.
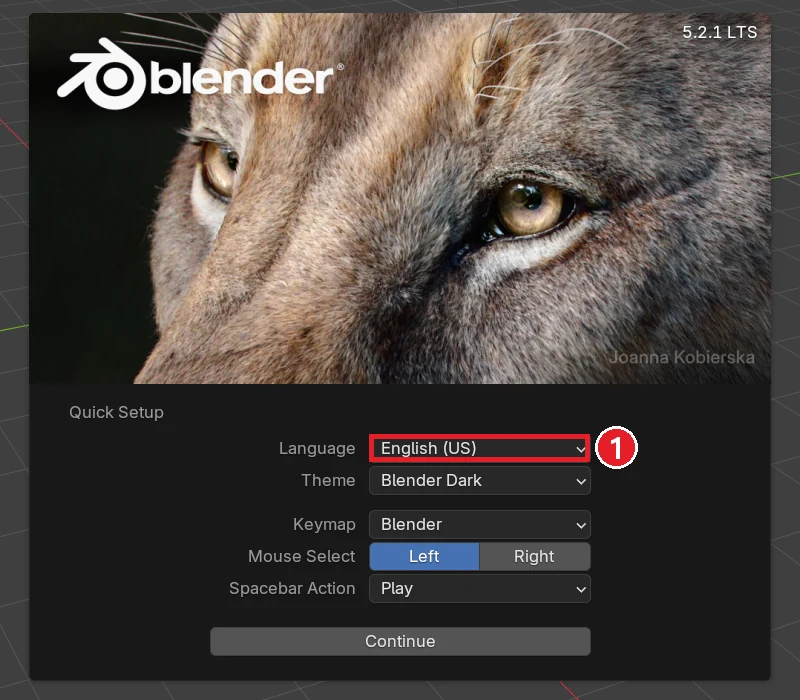 Figure 1. Quick Setup on first start. ① Language box (Blender screenshot)
Steps:
- Left-click the Language box (① in Figure 1). A language list opens in three columns (Figure 2).
- Left-click Korean - 한국어 in the middle column.
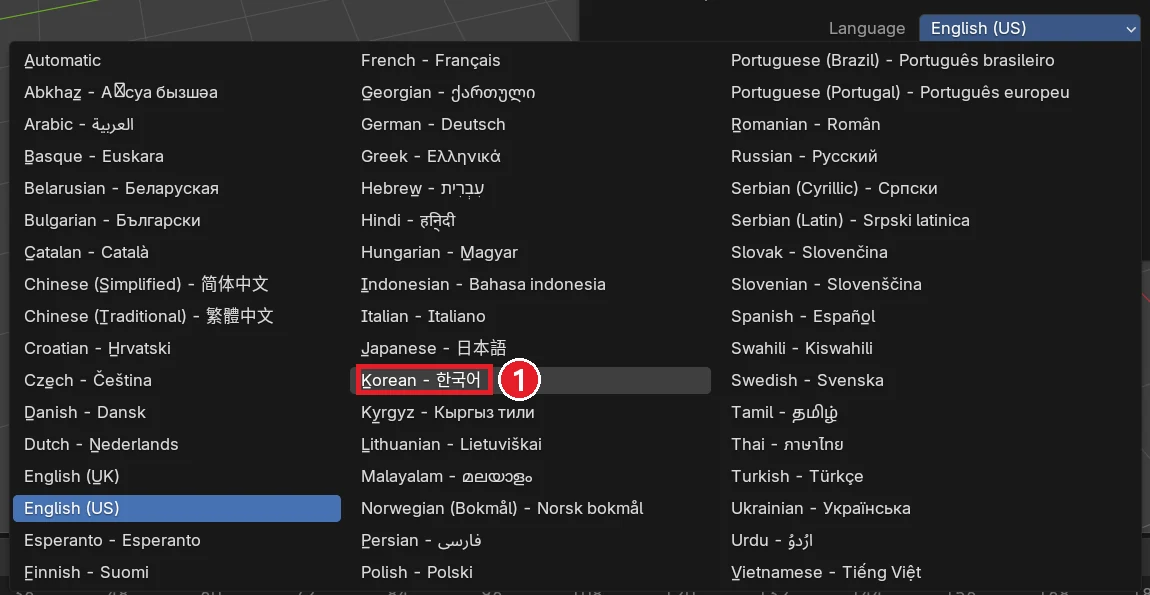 Figure 2. Language list. ① Korean - 한국어 (Blender screenshot)
The whole interface changes at once (Figure 3). No restart is needed. The top menus become 파일, 편집, 렌더, 창, 도움말 (File, Edit, Render, Window, Help), Quick Setup becomes 빠른 설정, and the Continue button becomes 계속하기.
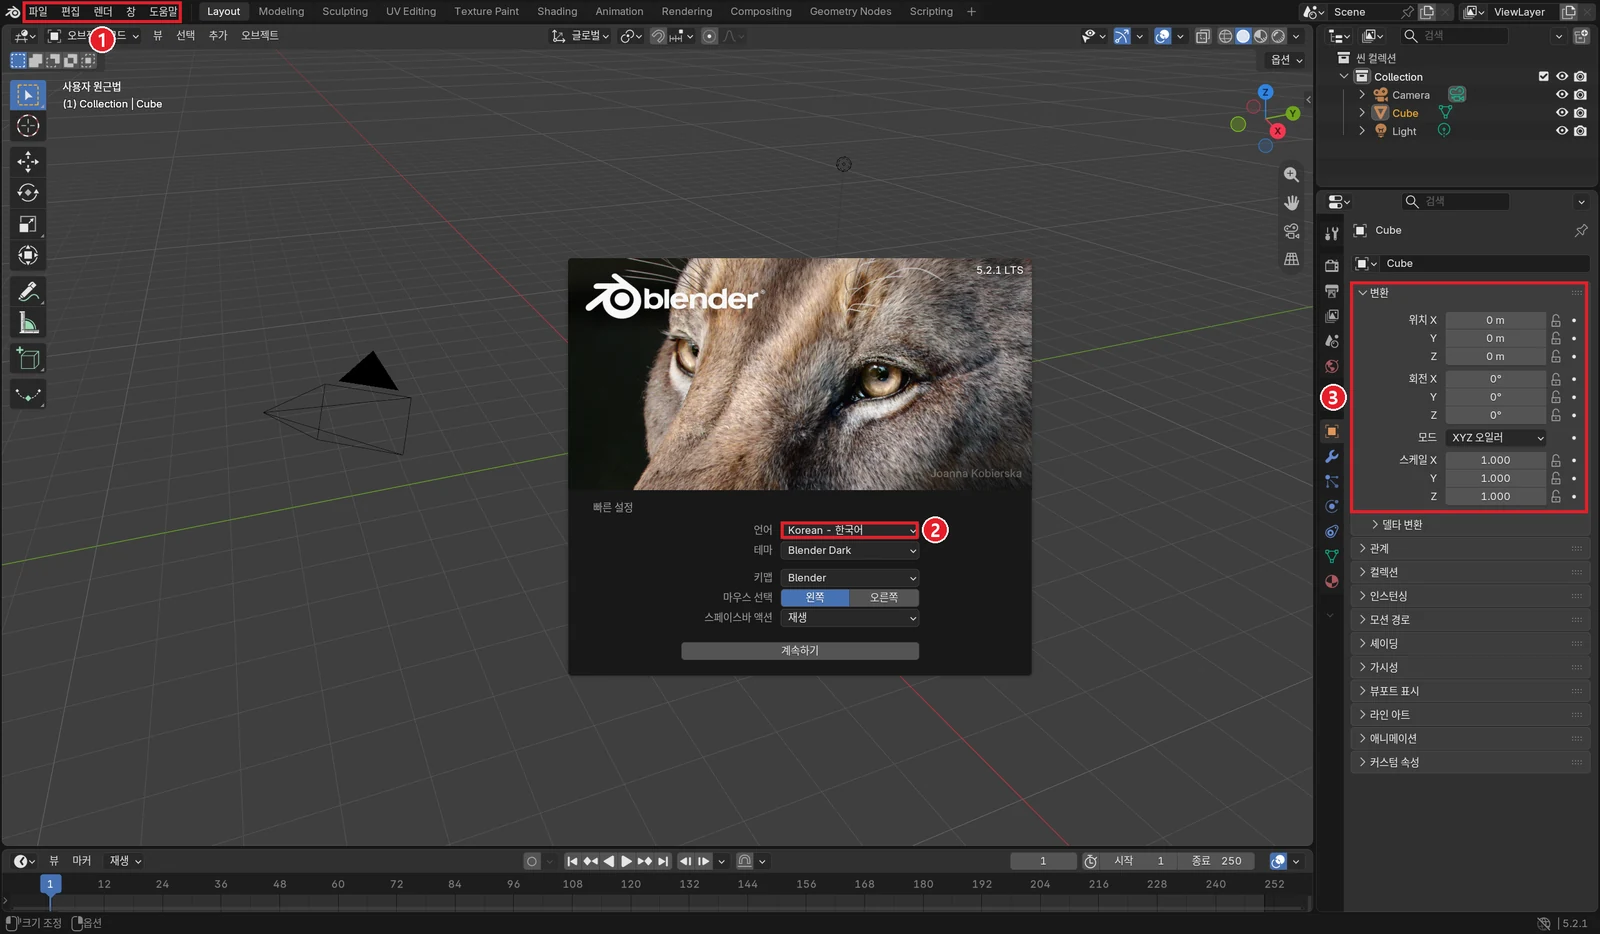 Figure 3. Right after picking the language. ① Top menus ② Language box ③ Properties editor (Blender screenshot)
- Click 계속하기 (Continue). The Quick Setup values are saved to Preferences and the splash closes.
Check: If Blender still shows Korean the next time you start it, the setting was saved. If you closed the splash without Continue, change the language in Preferences (section 3).
3. Any time: the Language panel in Preferences
Quick Setup appears only once. After that, use Preferences.
Starting point: The Korean interface from section 2. If your interface is in English, the order is the same; just read the English names.
Steps:
- Left-click 편집 (Edit) in the top menu.
- Choose 환경 설정… (Preferences…) at the bottom (Figure 4). The shortcut is
Ctrl+,. Preferences opens in a new window.
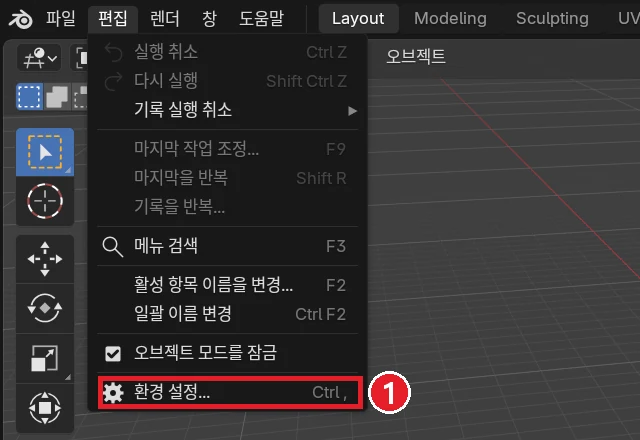 Figure 4. Edit menu. ① 환경 설정… (Preferences…) (Blender screenshot)
- Check that 인터페이스 (Interface) is selected in the list on the left. It is selected when the window first opens.
- Scroll down on the right to the 언어 (Language) panel (Figure 5). It comes after the Display and Editors panels.
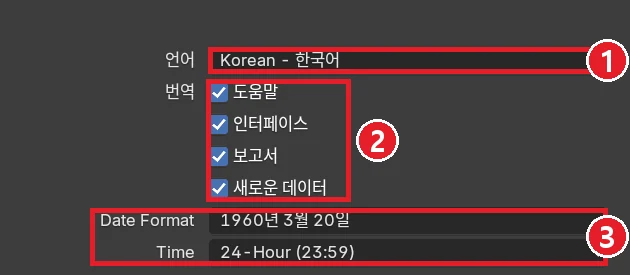 Figure 5. Language panel. ① Language ② Four Translate boxes ③ Date and time format (Blender screenshot)
- Click the 언어 (Language) box (①) and pick a language. To go back to English, pick English (US).
Changes in Preferences apply at once. If Auto-Save Preferences is on in the menu behind the three-line button at the bottom left of the Preferences window, they are saved when you quit Blender. If it is off, click Save Preferences in the same menu.
In Figure 5, ③ Date Format and Time stay in English even after switching to Korean. The Korean translation does not cover the whole interface yet. Section 5 comes back to this.
4. The four Translate boxes
Under Translate in the Language panel there are four check boxes. Picking Korean turns all four on. Each one translates a different part. Think of a restaurant menu: you can choose separately whether to translate the dish names, the dish descriptions, the kitchen announcements, and the name tags on new dishes.
| Box (Korean screen) | English name | What it translates |
|---|---|---|
| 도움말 | Tooltips | The description box that appears when you hold the mouse over a button |
| 인터페이스 | Interface | Names of menus, buttons and panels |
| 보고서 | Reports | Messages in the status bar and the Info editor |
| 새로운 데이터 | New Data | Names of new data such as objects and materials |
Figure 6 shows translated tooltips. In the Add menu opened with Shift+A, holding the mouse over the 검색 (Search) row shows a Korean description.
Steps: With the mouse over the 3D Viewport, press Shift+A, then hold the mouse over the search row at the top of the menu. When the description box appears, click outside the menu to close it.
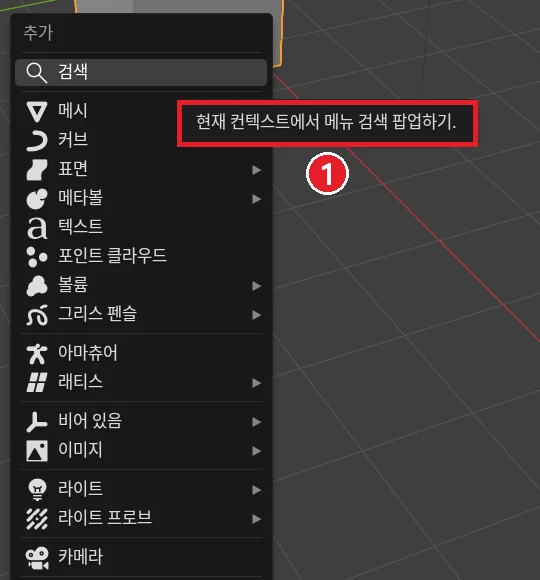 Figure 6. Add menu with a Korean tooltip. ① Description box of the search row (Blender screenshot)
New Data works a little differently. It translates the names of newly created data-blocks. Based on the official manual, with this box on, new objects and materials get Korean names. Existing names do not change. That is why Collection, Camera, Cube and Light in the Outliner stay in English in Figure 7: they were created before the language changed.
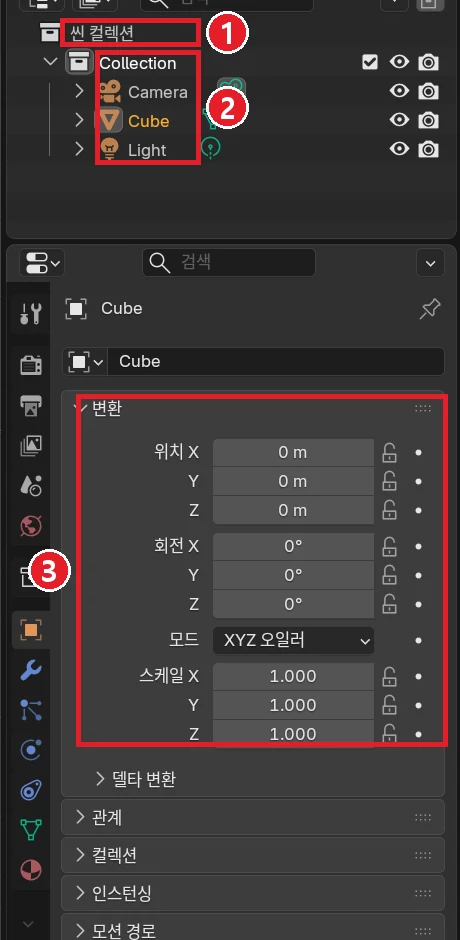 Figure 7. ① Interface text is translated ② Existing names stay English ③ Panel and field names are translated (Blender screenshot)
5. Why English menus are often better
A Korean interface feels easier for the first few days. Still, this site recommends the English interface, for these reasons. The Preferences table in Blender beginner chapter 1 gives the same advice.
- Tutorials, the manual and this site use English menu names. To follow "Object ‣ Apply ‣ Scale" on a Korean screen, you must translate it in your head to "오브젝트 ‣ 적용 ‣ 스케일" every time. The official manual is also written in English first.
- The translation does not cover everything. As Figures 3, 5 and 7 show, the workspace tabs (Layout, Modeling and so on) and Date Format and Time in the Language panel stay in English. Two languages mix on one screen.
- Translated names can differ from the words tutorials use. In the Add menu, Empty shows as "비어 있음" (literally "is empty") and Armature as "아마추어" (Figure 6). When a tutorial says "add an Empty", it is hard to find quickly.
- With New Data on, names get mixed. As in section 4, older objects keep English names and new objects get Korean names. They also differ from names in other people's files and tutorials.
A Korean interface does help in one place: tooltips. When you hold the mouse over an unfamiliar button, reading the description in your own language makes the meaning clear faster.
6. A middle way: English menus, Korean tooltips
Because each Translate box turns on and off by itself, you can mix them. Keep menus in English like the tutorials, and read only the tooltips in Korean. What each box changes in the steps below follows the box descriptions in the official manual.
Starting point: The Language panel in Preferences from section 3 (Figure 5). The language is Korean - 한국어.
Steps:
- Leave 도움말 (Tooltips) on.
- Click 인터페이스 (Interface) to turn it off. Menu and button names go back to English.
- Click 새로운 데이터 (New Data) to turn it off. New objects get English names such as Cube.
- Set 보고서 (Reports) as you like. When it is on, status bar messages appear in Korean.
When Interface is off, this panel's labels also turn English, so after step 2 the boxes read Tooltips, Interface, Reports and New Data. Keep the language box on Korean - 한국어 so tooltip translation stays on. If you switch the language to English (US), the four boxes turn gray and all translation stops.
7. Korean-English menu table
Use this table when you follow an English tutorial on a Korean screen. It lists only translations that appear in this guide's pictures (Figures 3 to 7).
| English screen | Korean screen | Where |
|---|---|---|
| File / Edit / Render / Window / Help | 파일 / 편집 / 렌더 / 창 / 도움말 | Top menus |
| Object Mode | 오브젝트 모드 | Top left of the 3D Viewport |
| View / Select / Add / Object | 뷰 / 선택 / 추가 / 오브젝트 | 3D Viewport header |
| Global / Options | 글로벌 / 옵션 | 3D Viewport header |
| User Perspective | 사용자 원근법 | Text at the top left of the 3D Viewport |
| Undo / Redo | 실행 취소 / 다시 실행 | Edit menu |
| Adjust Last Operation… | 마지막 작업 조정… | Edit menu |
| Repeat Last | 마지막을 반복 | Edit menu |
| Menu Search | 메뉴 검색 | Edit menu |
| Rename Active Item… / Batch Rename | 활성 항목 이름을 변경… / 일괄 이름 변경 | Edit menu |
| Preferences… | 환경 설정… | Edit menu |
| Mesh / Curve / Surface / Text | 메시 / 커브 / 표면 / 텍스트 | Add menu |
| Volume / Grease Pencil / Armature / Lattice | 볼륨 / 그리스 펜슬 / 아마추어 / 래티스 | Add menu |
| Empty / Image / Light / Camera | 비어 있음 / 이미지 / 라이트 / 카메라 | Add menu |
| Scene Collection | 씬 컬렉션 | Outliner |
| Transform | 변환 | Object tab of the Properties editor |
| Location / Rotation / Scale | 위치 / 회전 / 스케일 | Transform panel |
| Delta Transform / Relations | 델타 변환 / 관계 | Object tab |
| Visibility / Viewport Display | 가시성 / 뷰포트 표시 | Object tab |
| Custom Properties | 커스텀 속성 | Object tab |
| Marker / Playback / Start / End | 마커 / 재생 / 시작 / 종료 | Timeline |
| Quick Setup / Language / Continue | 빠른 설정 / 언어 / 계속하기 | Splash screen |
| Interface / Viewport / Editing / Input / Keymap | 인터페이스 / 뷰포트 / 편집 / 입력 / 키맵 | List on the left of Preferences |
| Add-ons / Themes / System / File Paths | 애드온 / 테마 / 시스템 / 파일 경로 | List on the left of Preferences |
Note that both the Edit menu and Editing in Preferences show as "편집". If someone says "pick it in 편집" on a Korean screen, use the location to tell which one.
8. Exercises
- Switch the language in Preferences to Korean - 한국어 and write down the Korean names of the five top menus. Then switch back to English (US).
- Set up the middle way from section 6 (Korean tooltips only). Hold the mouse over a button in the 3D Viewport header and check that the description appears in Korean.
- Without looking at the table in section 7, write what "오브젝트 ‣ 적용 ‣ 스케일" is on the English screen.
9. Common mistakes and fixes
| Symptom | Cause | Fix |
|---|---|---|
| The Quick Setup does not show again | It appears only on the first start (or the first start of a new version) | Change it in Edit ‣ Preferences ‣ Interface ‣ Language, as in section 3 |
| After restarting, it is English again | Preferences were not saved | Check saving in the three-line button menu at the bottom left of Preferences |
| Some text is still English after switching | The translation does not cover everything, or the names already existed | Normal. Workspace tabs and existing object names stay as they are (section 5) |
| I cannot find a menu from an English tutorial | The menu names are translated | Use the table in section 7, or turn off only Interface (section 6) |
| The Translate boxes are gray | The language is English (US) | The boxes work only when another language is chosen |
Summary
Set the language in Quick Setup or Edit ‣ Preferences ‣ Interface ‣ Language, and keep menus in English to follow tutorials. The next guide covers moving the origin, the point an object turns around.
Next: Moving the origin in Blender
References
- Blender 5.2 Manual: Interface (Preferences) (Language, Translate)
- Blender 5.2 Manual: Splash Screen (Quick Setup on first start)
- Related: Blender interface basics
- Shortcuts: default (Blender) keymap of Blender 5.2.1.
- Pictures: screenshots made in Blender 5.2.1 for this guide.