Game asset rules: a checklist for polygons, textures, origin, scale, names, LOD, and collision before sending Blender models to a game engine
We build one game prop (a barrel) in Blender 5.2 and bring it into Godot 4.7.2, and turn the rules a game model should follow into a checklist: polygon count, texture size, origin, applied scale, names, LOD, and collision shapes. We also compare, on real screens, how a version with the wrong origin and scale looks in the engine.
한국어English
ON THIS PAGE
- 011. The checklist first
- 022. Polygons: know the number
- 033. Textures: size and compression
- 044. Origin: at the bottom center
- 055. Scale: apply it to 1.000
- 066. Names: labels that code and the engine read
- 077. LOD: draw less when far away
- 088. Collision shapes: separate and simple
- 099. Practice
- 1010. Common mistakes and fixes
- 1111. Summary
- 12References
Based on: Blender 5.2 LTS (screenshots from 5.2.1, English UI, default keymap), Godot 4.7.2 stable (Windows, English UI), and the official Godot 4.7, Unity 6.6, and Unreal Engine 5.8 docs. Checked on November 4, 2026. All figures are real Blender and Godot screens. The red numbers and boxes were added for explanation. The Blender screenshots use a large UI scale, so the text looks big.
A model that looks great in Blender can end up half buried in the floor in a game engine, collide strangely, or stay heavy even when it is far away. A model for video only has to look good in one render. A model for a game is drawn dozens of times per second, used for physics, and found by code through its name. So there are more rules to follow.
This is part 5 of the series "Solo game development with Blender, AI, and a game engine." We make one barrel prop in Blender 5.2, bring it into Godot 4.7.2, and go through a seven-line checklist for game assets: polygons, textures, origin, scale, names, LOD, and collision shapes. Every setting in the export window is covered in From Blender to Godot 4.7 with glTF, so this guide focuses on what the model itself needs.
By the end of this guide, you will be able to:
- Read a game model's triangle count in Blender.
- Put the origin at the bottom center and apply the scale.
- Export a collision shape together with the model, using name suffixes that Godot recognizes.
- See how the LOD that Godot makes automatically changes.
- Find the naming rules that change when you send models to Unity or Unreal.
1. The checklist first
| # | Item | Rule | Where to check |
|---|---|---|---|
| 1 | Polygons | Match how big it appears on screen. Know the triangle count | Blender statistics overlay (section 2) |
| 2 | Textures | Power-of-two sizes recommended (512, 1024, 2048); 4096 or less for mobile and web | Image size (section 3) |
| 3 | Origin | Bottom center for props that stand on the ground | The object origin dot (section 4) |
| 4 | Scale | Scale 1.000, real size in meters | Object tab Scale, Dimensions (section 5) |
| 5 | Names | Names the code will look for, suffixes and prefixes the engine reads | Outliner (section 6) |
| 6 | LOD | Draw less when far away. Automatic in Godot, naming rules in Unity and Unreal | Draw count in the engine (section 7) |
| 7 | Collision shape | Separate from the visible shape, and simple | The engine's node tree (section 8) |
It is like checking a parcel before you ship it. You weigh it (polygons and textures), mark which side is the bottom (origin), write down the size, stick on a label (name), and add packing material (collision shape).
2. Polygons: know the number
A polygon is a face that makes up a model. A game engine splits every face into triangles to draw it, so game models are weighed by triangle count. If vertices, edges, and faces are new to you, read Polygons and topology first.
Starting point: Start from a new file (File > New > General) and delete the default cube, camera, and light.
Follow along:
- Add a cylinder with Add > Mesh > Cylinder. In the Adjust Last Operation panel at the bottom left, set Vertices
32, Radius0.4 m, Depth1 m, and Location Z0.5 m. This makes a 1 m tall barrel whose bottom touches Z 0. - In the Modifier tab (wrench icon), add Bevel, set Amount
0.03 m, Segments3, Limit Method Angle, then Apply it. The rims become slightly round. Bevel is covered in detail in The Bevel modifier. - Rename the object to
Barrel. - In the Overlays menu at the top right of the 3D Viewport, turn on Statistics. Vertex, edge, face, and triangle counts appear at the top left of the viewport ((1) in Figure 1).
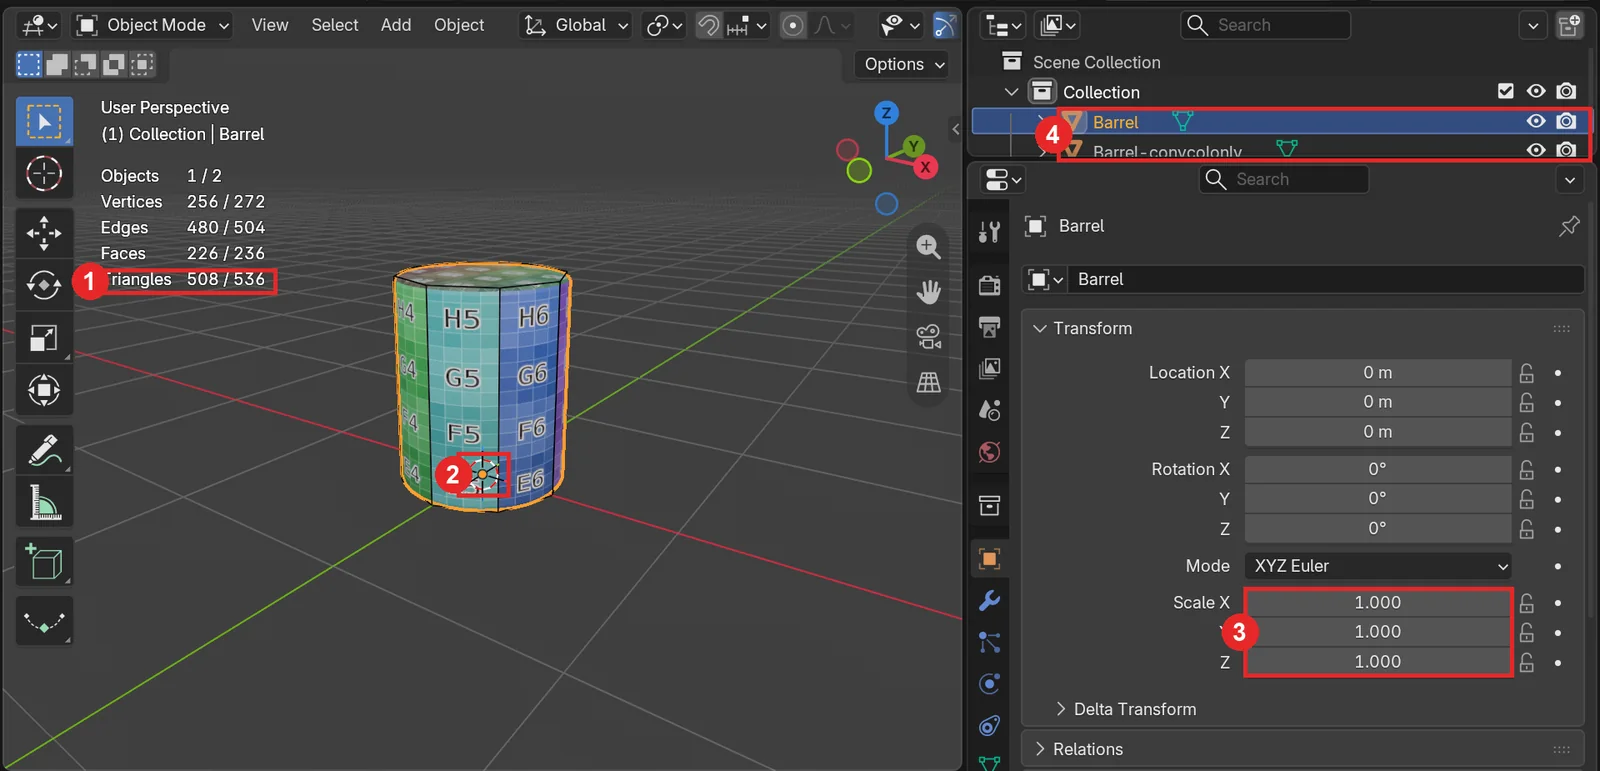 Figure 1. The finished barrel. (1) Triangle count (508 for the selected object / 536 for the whole scene) (2) Origin at the bottom center (3) Scale 1.000 (4) Names (Barrel and the collision object Barrel-convcolonly) (Blender screenshot)
The barrel has 508 triangles. The scene total of 536 includes the 28 triangles of the collision object we make in section 8. Figure 1 shows the screen after adding the texture from section 3 and the collision object from section 8.
There is no fixed right number. It depends on how big the object looks on screen, how many appear at once, and what device runs the game. For reference, in the air defense game test I made with Godot, one launcher truck had 31,360 triangles, the radar truck 30,108, a drone 1,248, and the plan's rough estimate for the whole scene was about 230,000. The game ran with this scene, and the difficulty was tuned over five play sessions. The first rule is do not put a model in without knowing the number; write down the triangle count for each model. The style that uses few faces is covered in Low-poly style basics.
3. Textures: size and compression
A texture is the picture wrapped around a model, like wrapping paper on a gift box. Big paper looks sharp but is heavy.
Starting point: Continue from the barrel in section 2.
Follow along:
- In the Material tab, click New to make a material and rename it
Barrel_Mat. - In the Shader Editor, add an Image Texture node and click New. Make it Width
1024, Height1024, Generated Type Color Grid. Name the imageBarrel_BaseColor. - Connect the Image Texture's Color to the Principled BSDF's Base Color. In Material Preview, you should see the color grid as in Figure 1.
The texture rules in the Godot 4.7 docs are:
| Rule | Details |
|---|---|
| Size | Power-of-two sizes (256, 512, 1024, 2048…) are recommended but not required. Non-square is fine |
| Mobile and web | Usually cannot show textures larger than 4096×4096 |
| Compression | VRAM Compressed is the default for 3D assets. Video memory use usually drops by a factor of 4 to 6 |
| Mipmaps | Stop textures looking grainy at a distance but use about 33% more memory. Recommended for 3D |
| Size limit | The Size Limit import option can shrink a texture inside the engine only |
This barrel, carrying one 1024×1024 image, made a single .glb file of about 250 KB, and Godot also read the texture as 1024×1024 (see the output in section 8). Putting a 4096 texture on a small prop makes almost no visible difference but uses much more memory. Pick the texture size to match how big the object appears on screen.
4. Origin: at the bottom center
The origin is the object's reference point, the small orange dot you see when you select an object in Blender. When code tells the engine "put this at (0, 0, 0)," the engine puts this dot there. It is like the spot where you push a pin: if the pin is in the middle of the barrel, the barrel sinks halfway into the floor when you set it down.
Starting point: Continue from the barrel in section 2. Because you entered Location Z 0.5 m in step 1 of section 2, the origin is now in the middle of the barrel.
Follow along:
- With the mouse over the 3D Viewport, press
Shift+S→ Cursor to World Origin. The 3D cursor moves to the floor center (0, 0, 0). - Click Object > Set Origin > Origin to 3D Cursor. The origin moves to the bottom center of the barrel, and the barrel shape stays in place.
- Check that Location in the Object tab is
0 mon all axes (Figure 1).
To compare in the engine, I made one more version done the wrong way: a cylinder with its origin left in the middle, shrunk in Object Mode to the same size without applying the scale.
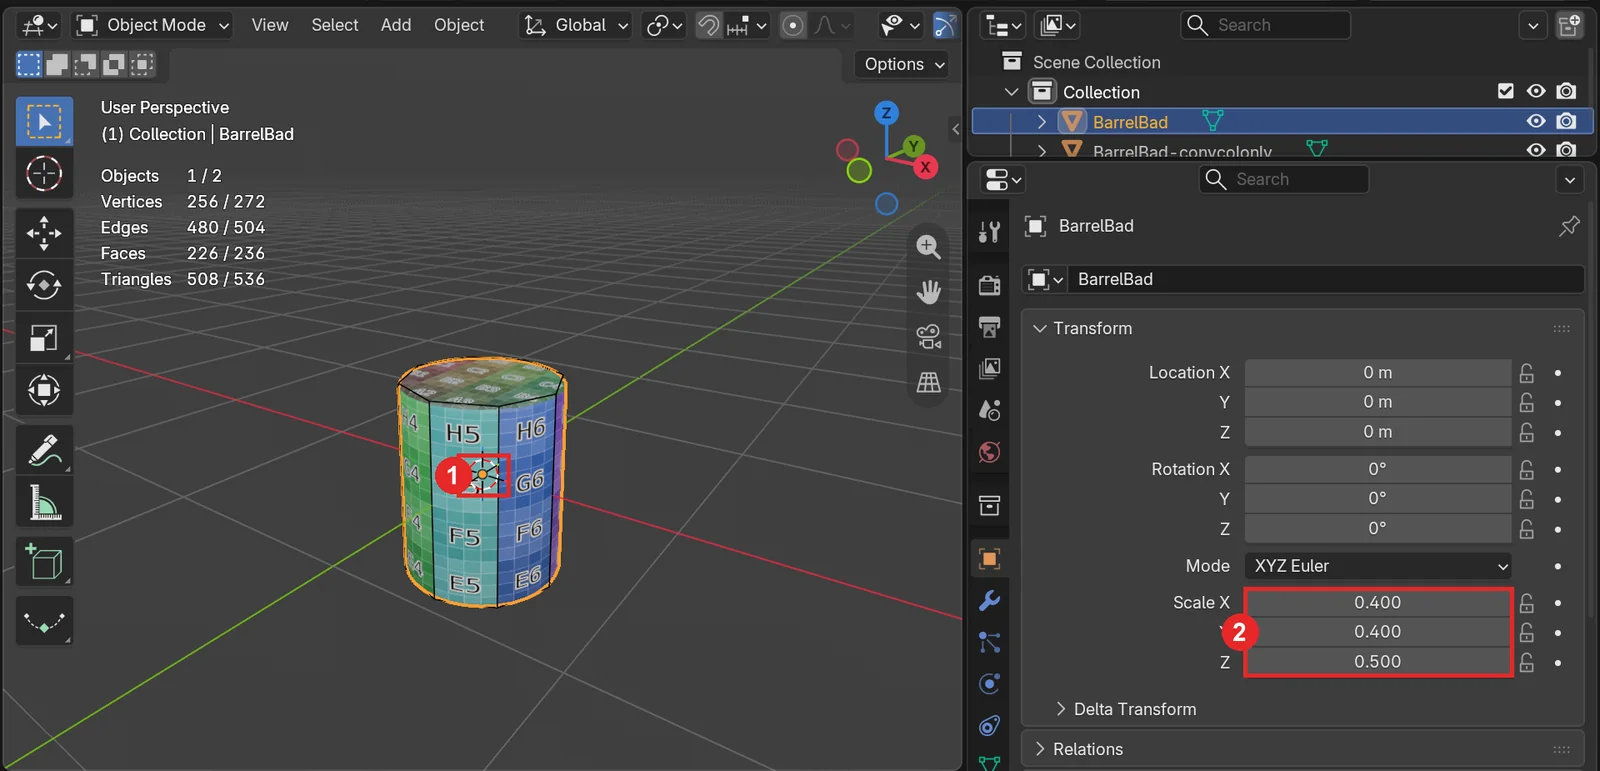 Figure 2. The wrong version (BarrelBad). (1) Origin in the middle of the barrel (2) Scale not applied, so it reads 0.4, 0.4, 0.5 (Blender screenshot)
I exported both versions to glTF (.glb) and placed them at the same spot (height 0) in a Godot scene.
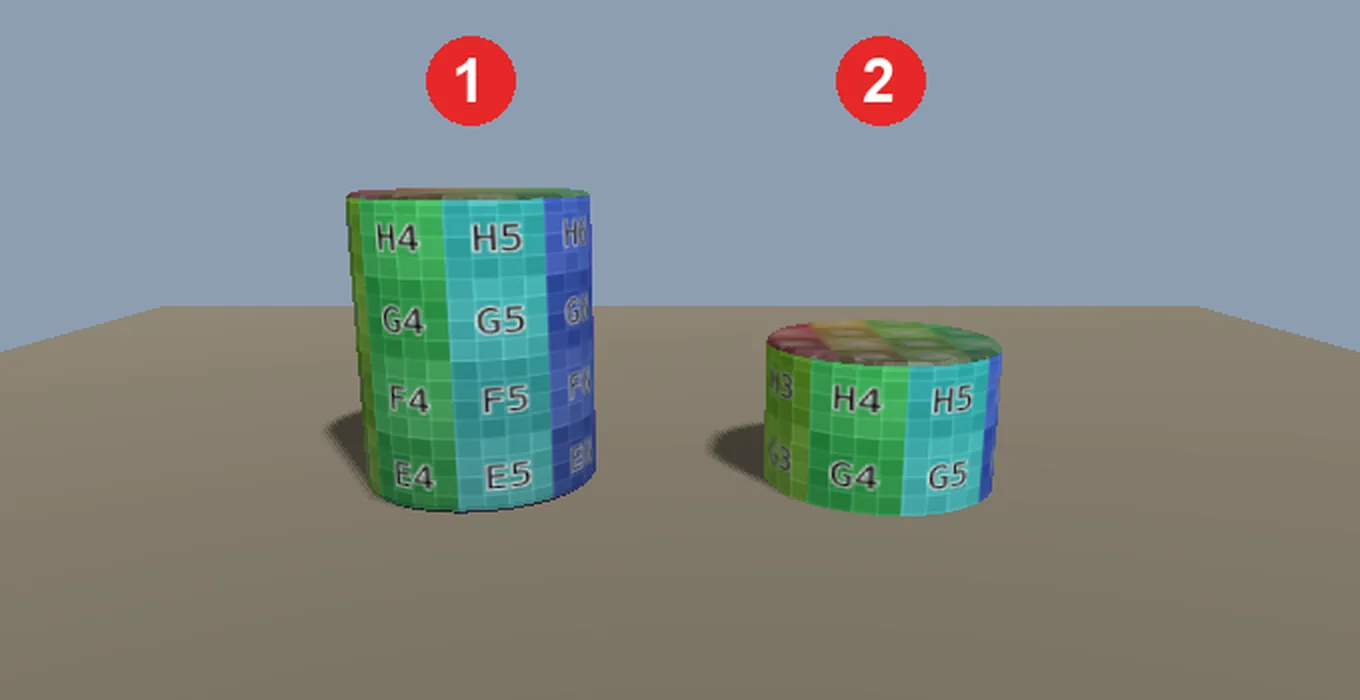 Figure 3. Both versions placed at height 0. (1) Origin at the bottom center (2) Origin in the middle. The lower half is buried in the floor (Godot run screenshot)
You could lift version (2) by 0.5 m every time in the engine, but then you have to remember that number all over the code. With the origin at the bottom, "put it on the floor" is always just height 0. For objects that rotate, such as a door, put the origin at the hinge. In short, put the origin where the object sits or turns.
5. Scale: apply it to 1.000
1 m in Blender is saved as 1 in glTF and read as 1 unit in Godot. So you can build at real size in Blender. The problem is when you change the size with S in Object Mode and do not apply it. The shape looks right, but the Scale fields hold a value other than 1 ((2) in Figure 2).
Follow along:
- Select the object and press
Ctrl+Aover the 3D Viewport. The Apply menu opens (Figure 4). - Click Scale. If you also rotated it, click All Transforms.
- Check that Scale in the Object tab is
1.000,1.000,1.000.
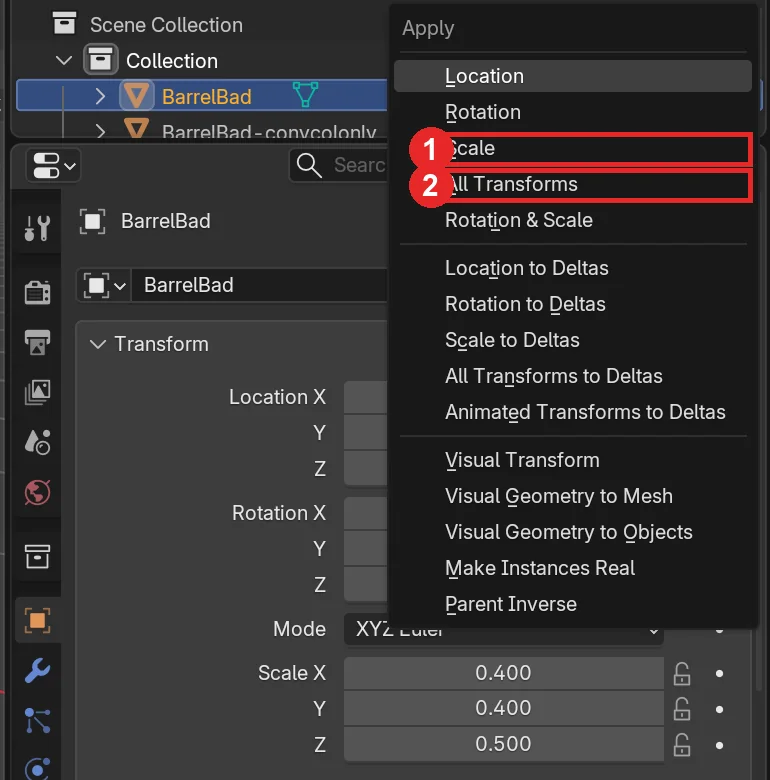 Figure 4. The Apply menu opened with
Ctrl+A. (1) Scale (2) All Transforms (Blender screenshot)
An unapplied scale goes straight into the engine. When I brought the Figure 2 version into Godot and printed its node tree as text, both the visible mesh and the collision object carried a scale of (0.4, 0.5, 0.4). The axis order changes because Godot uses Y as up.
barrel_bad [Node3D] scale=(1.0, 1.0, 1.0)
  BarrelBad [MeshInstance3D] scale=(0.4, 0.5, 0.4)
  @StaticBody3D@19798 [StaticBody3D] scale=(0.4, 0.5, 0.4)
    CollisionShape3D [CollisionShape3D] shape=ConvexPolygonShape3D
The Godot 4.7 docs advise not to move, rotate, or scale collision shapes, so they can benefit from the engine's internal optimizations. A collision object with a different scale on each axis breaks that advice from the start. So apply the object transform in the modeling program before export. The case where the size comes in 100 times too big and covers the screen is in section 8 of From Blender to Godot 4.7 with glTF.
Decide the front direction too. For Godot, an asset's front should face -Y in Blender, which is the side you see in Blender's front view (numpad 1). In my air defense game test, the models made earlier for video faced +Y, so they came into Godot facing -Z, and the game code was written to move them that way. If you already have many models, matching them in code works. For new models, following the rule from the start is less confusing.
6. Names: labels that code and the engine read
In a game, a name is an address. When code says "find Barrel and roll it," the engine looks for a node with that name in the scene. So follow these rules:
- Do not leave Blender's default names (
Cylinder.001). Give names that show the role. - Keep moving parts as separate objects with their own names. The launcher in the air defense game had names like
_packfor the missile pack and_cell_0to_cell_7for the eight tubes, so the code could raise or empty just that part. - Some engines read the end or start of a name and treat it specially. Know these rules so you do not add those letters by accident.
| Engine | Naming rule | What it does |
|---|---|---|
| Godot 4.7 | Ends with -col, -convcol | Keeps the visible mesh and adds a collision shape (exact shape / convex shape) |
| Godot 4.7 | Ends with -colonly, -convcolonly | Removes the visible mesh and makes only a collision StaticBody3D |
| Godot 4.7 | Ends with -noimp | Drops it on import |
| Godot 4.7 | Ends with -loop | Imports the animation set to loop |
| Unity 6.6 | Ends with _LOD0, _LOD1… | Creates a LOD Group automatically on import. 0 is the most detailed, up to 8 levels |
| Unreal 5.8 | Starts with UCX_ (convex), UBX_ (box), UCP_ (capsule), USP_ (sphere) + mesh name | Imported as a collision shape. Example: UCX_Barrel_00 |
Godot's suffixes also work with $ or _ instead of -, and they are not case-sensitive. For example, Rock_COL also triggers the collision rule. If such a name appears by accident, a collision shape may appear or a mesh may vanish without you noticing. In Unreal's UCX_ names, the mesh name after the prefix must exactly match the name of the visible mesh.
7. LOD: draw less when far away
LOD (level of detail) means swapping a distant object for a version with fewer faces. It is like a landscape painting that does not paint every tree on a distant mountain.
Godot 4.7 makes LODs automatically when it imports 3D scenes such as glTF, .blend, and FBX (OBJ is the exception). After importing the barrel, I read the mesh data in Godot and found five extra levels below the original 508 triangles: 254, 126, 62, 30, and 16.
When each level is used is decided by how many pixels of error on screen are acceptable. This value is the LOD threshold, and the default is 1 pixel, tuned so you cannot see the difference. A higher value switches to lower levels sooner: lighter, but rougher.
| Camera distance | Threshold 1 (default) | Threshold 60 |
|---|---|---|
| 1.6 m | 508 | 254 |
| 6 m | 508 | 62 |
| 20 m | 254 | 16 |
The numbers are the triangles Godot actually drew on that screen (my PC, a 1280×720 window, 30° field of view, shadows off). At the default, it drew the full version up to 6 m and halved it at 20 m.
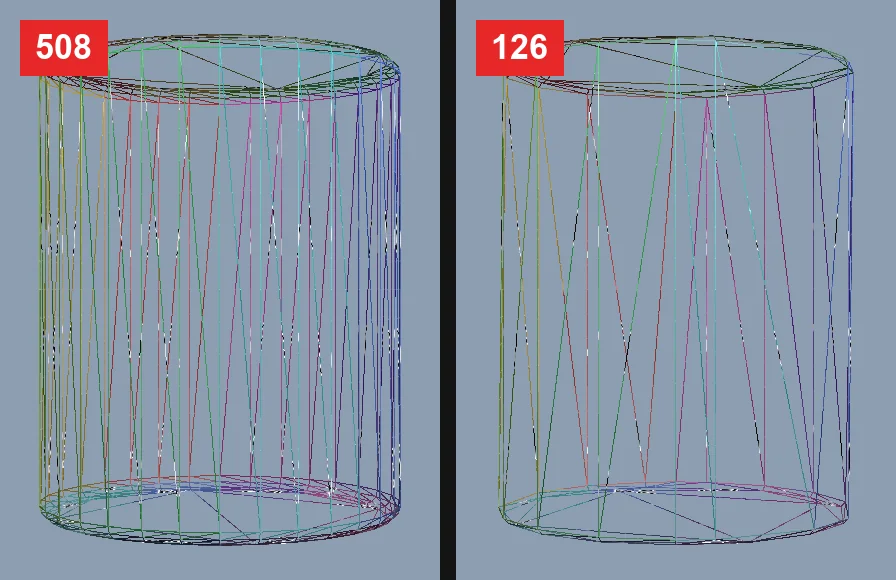 Figure 5. The barrel drawn as lines at the same distance (3 m). Left: threshold 1 (508 triangles). Right: threshold 60 (126) (Godot run screenshot)
As the right side of Figure 5 shows, raising the threshold a lot makes the model rough even up close. Leave the default at first. If you want to swap hand-made versions by distance, Godot uses Visibility ranges instead of automatic LOD. In Unity you add hand-made versions with the _LOD0 naming rule in the section 6 table, and in Unreal you turn on Import LODs when importing FBX. LOD meshes sent to Unreal should sit in the same place and share the same pivot as the base mesh.
8. Collision shapes: separate and simple
A collision shape is an invisible shape used for physics. It is separate from what the player sees and is only used to work out hits. Like a parcel box: whatever is inside, the box is a simple rectangle. The Godot 4.7 docs group shapes like this:
| Kind | Behavior | Where to use |
|---|---|---|
| Primitive shapes (box, sphere, capsule, and so on) | Most reliable and often fastest | Moving objects (RigidBody, CharacterBody) |
| Convex shapes | In between | Simple objects, moving objects |
| Concave shapes (triangle mesh) | Most accurate but slowest | Only in static objects (StaticBody) |
Starting point: Continue from the barrel after section 4.
Follow along:
- Add Add > Mesh > Cylinder and, in Adjust Last Operation, set Vertices
8, Radius0.4 m, Depth1 m, Location Z0.5 m. This is an octagonal prism the same size as the barrel. - Move its origin to the bottom center as in steps 1 and 2 of section 4.
- Rename it
Barrel-convcolonly. This Godot suffix means "convex collision shape only." - In the Object tab, set Viewport Display > Display As to Wire. In Blender it now shows as lines only and does not hide the barrel.
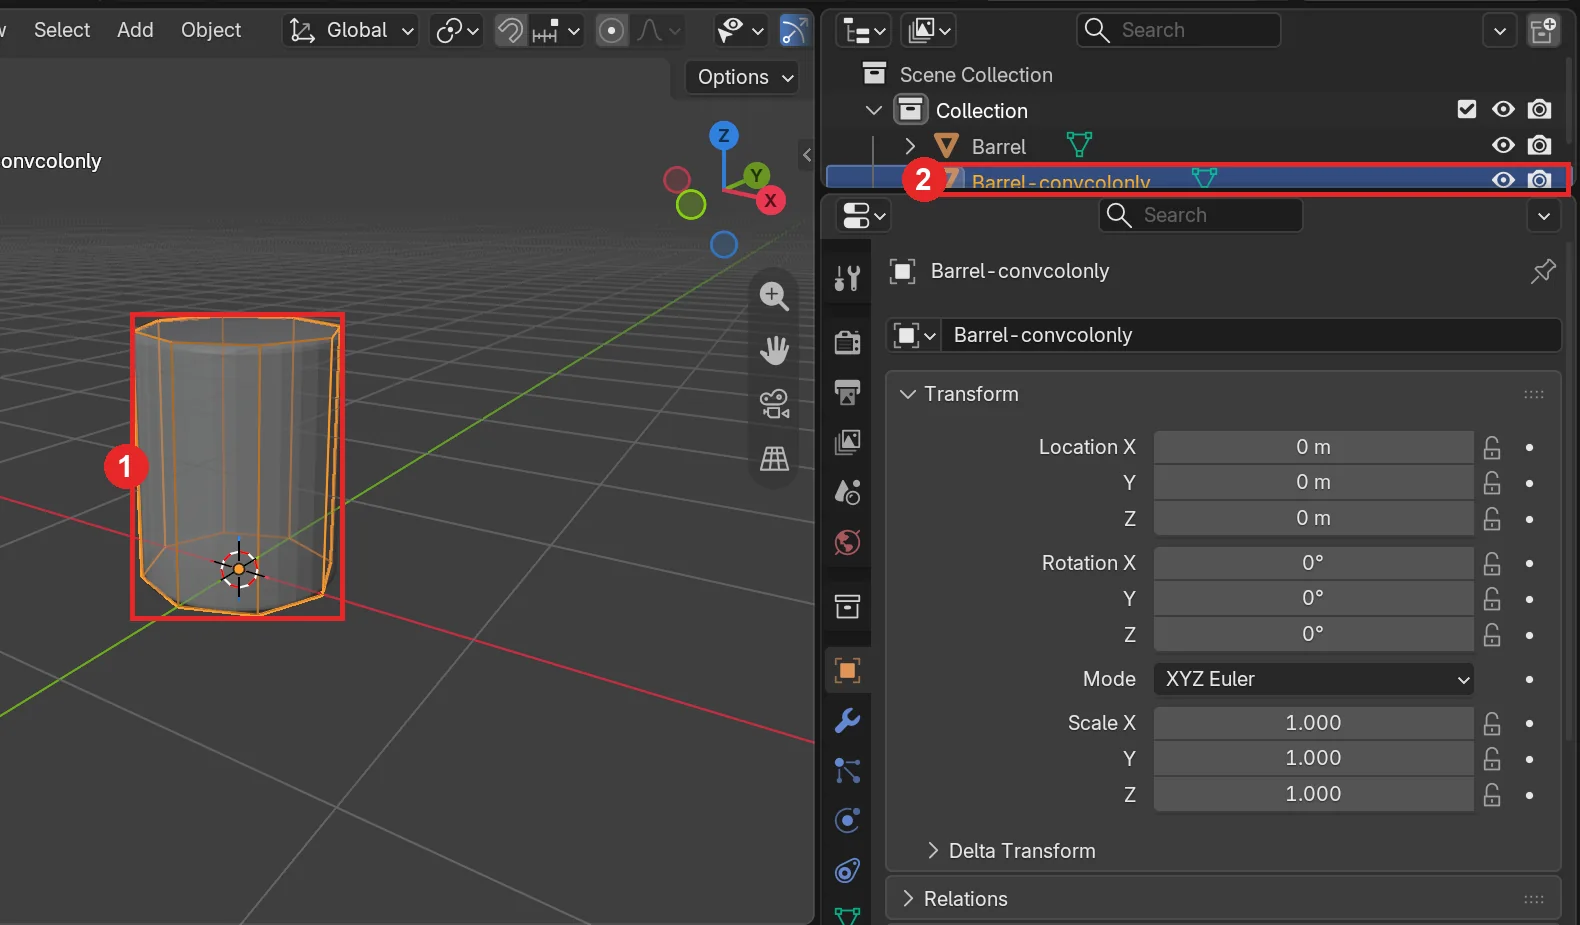 Figure 6. The octagonal collision prism. (1) A 28-triangle shape around the barrel (2) The name Godot reads (Blender screenshot)
Figure 6 is Solid view with X-Ray on, so both overlapping objects are visible. The visible barrel has 508 triangles; the collision prism has 28.
Follow along (check in the engine):
- Export both objects into one file,
barrel_good.glb, with File > Export > glTF 2.0 (.glb/.gltf). Keep the default settings. - Put the file in the Godot project folder. Godot imports it by itself.
- Drag the
.glbinto a new scene, right-click the node, and turn on Editable Children. The inner nodes appear (Figure 7).
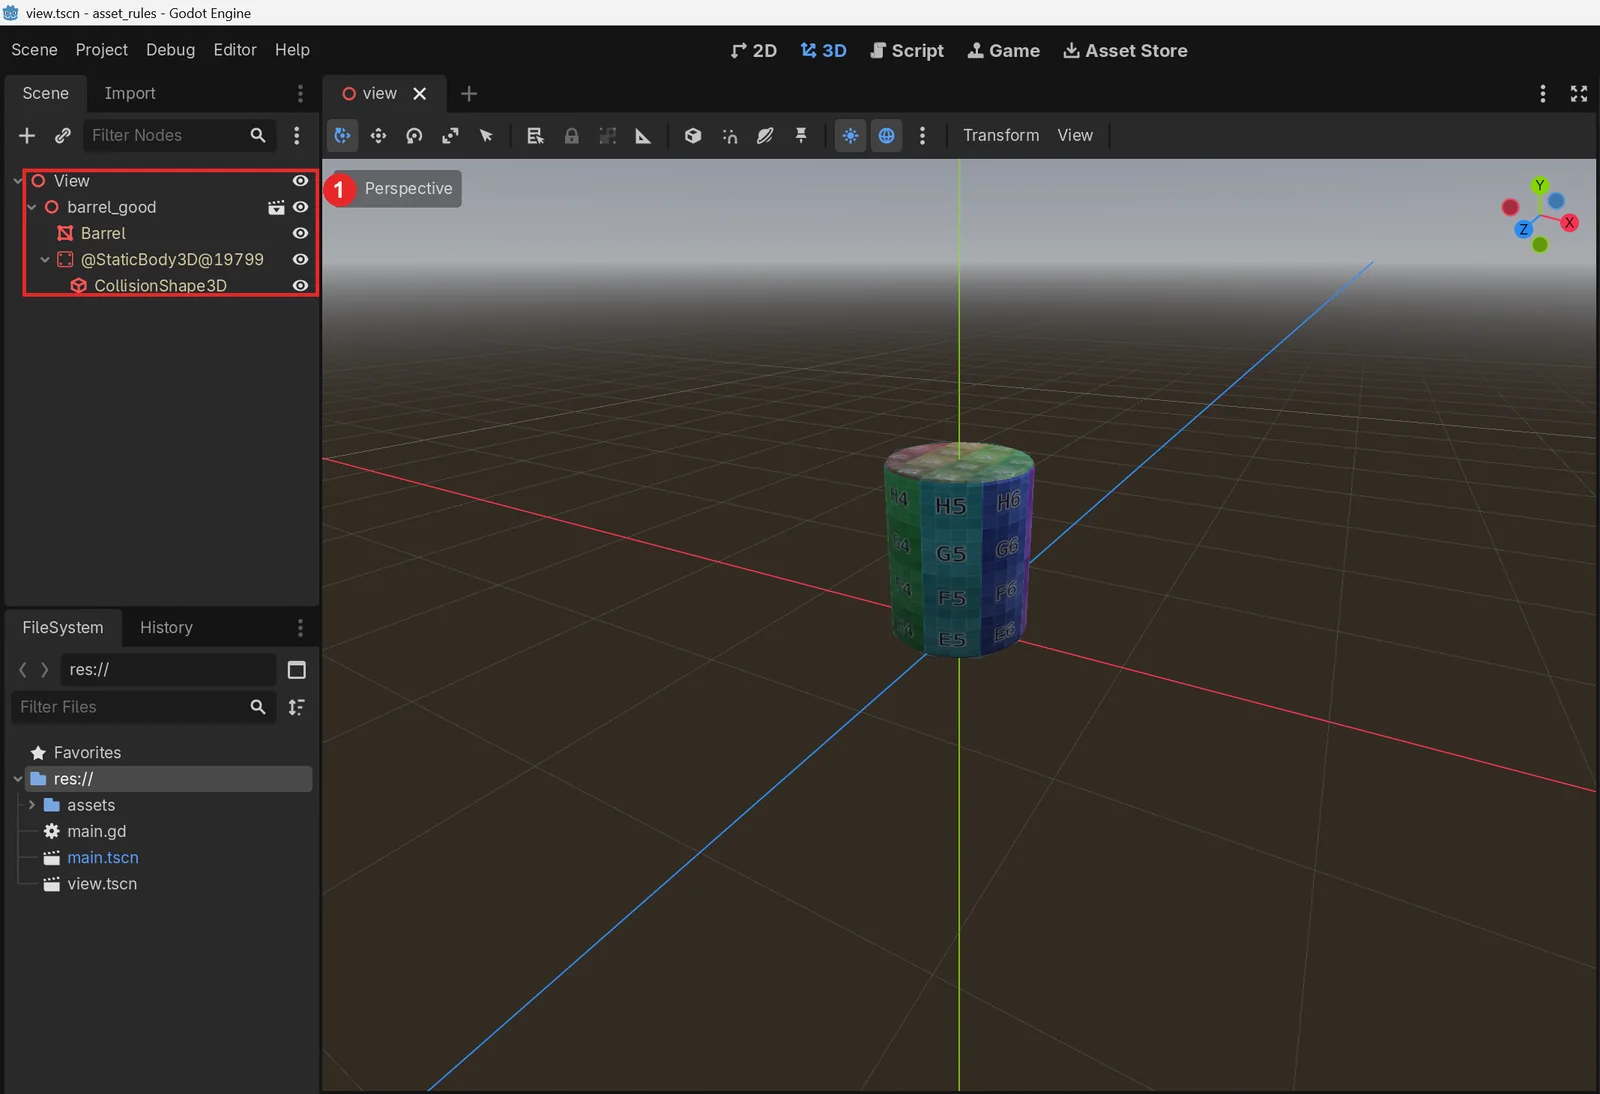 Figure 7. The barrel imported into Godot. (1) The visible mesh Barrel and the collision StaticBody3D and CollisionShape3D (Godot editor screenshot)
Running the same scene and printing the node tree as text gives:
barrel_good [Node3D] scale=(1.0, 1.0, 1.0)
  Barrel [MeshInstance3D] scale=(1.0, 1.0, 1.0) tex=(1024.0, 1024.0)
  @StaticBody3D@19799 [StaticBody3D] scale=(1.0, 1.0, 1.0)
    CollisionShape3D [CollisionShape3D] shape=ConvexPolygonShape3D
The octagonal prism did not come in as a visible mesh. It became a convex collision shape (ConvexPolygonShape3D) under a static physics body (StaticBody3D). Every scale is 1. As the figure and output show, the StaticBody3D came in with a name Godot generated. If your code needs to find this node by name, rename it in the scene after import.
If the barrel will roll or be thrown, the docs' advice points to adding a primitive shape (cylinder, capsule) directly in the engine instead. Making the collision shape in Blender and sending it over is most useful for irregular objects that do not move, such as rocks and buildings.
9. Practice
- Rebuild the Figure 1 barrel with Vertices
16and write down its triangle count. - If you model a door, write down where you would put its origin.
- Find in the section 6 table what happens when you send an object named
Wall_Colto Godot. - Change the barrel texture to 2048×2048 and check in a Godot scene, from 3 m away, whether you can see a difference.
10. Common mistakes and fixes
| Symptom | Cause | Fix |
|---|---|---|
| A model placed in the engine is half buried in the floor | The origin is in the middle of the model | Shift+S → Cursor to World Origin, then Object > Set Origin > Origin to 3D Cursor (section 4) |
| The collision node has a strange scale value | The scale was not applied in Blender | Ctrl+A → Scale or All Transforms, then export again (section 5) |
| The model comes in facing backward | The front faces +Y in Blender | Rotate it so the front shows in front view (numpad 1), then apply |
| A mesh disappeared in the engine | The name ends with a suffix such as -colonly or -noimp | Rename it using the section 6 table |
| A collision shape you did not ask for appeared | The name ends like _col (case does not matter) | Rename it |
| The model looks angular even up close | The LOD threshold was raised too high | Set the LOD threshold in Project Settings back to the default 1 (section 7) |
| A rolling object goes through walls or bounces | A complex collision shape on a moving object | Switch to a primitive shape (cylinder, capsule) in the engine (section 8) |
| Textures do not show on web or mobile | The texture is larger than 4096 | Shrink it in Blender or use Godot's Size Limit (section 3) |
11. Summary
Write down the triangle count, size textures for the screen, put the origin where it sits, keep Scale at 1.000, name by role and watch the suffixes, start with Godot's default LOD, and keep collision shapes separate and simple.
The earlier parts of this series covered the big picture of solo development and how to split the work with AI. To start from the beginning, go to the solo game dev map.
References
- Godot Engine 4.7 docs, Node type customization using name suffixes: https://docs.godotengine.org/en/stable/tutorials/assets_pipeline/importing_3d_scenes/node_type_customization.html
- Godot Engine 4.7 docs, Mesh level of detail (LOD): https://docs.godotengine.org/en/stable/tutorials/3d/mesh_lod.html
- Godot Engine 4.7 docs, Collision shapes (3D): https://docs.godotengine.org/en/stable/tutorials/physics/collision_shapes_3d.html
- Godot Engine 4.7 docs, Model export considerations: https://docs.godotengine.org/en/stable/tutorials/assets_pipeline/importing_3d_scenes/model_export_considerations.html
- Godot Engine 4.7 docs, Importing images: https://docs.godotengine.org/en/stable/tutorials/assets_pipeline/importing_images.html
- Unity 6.6 Manual, Configure LOD levels: https://docs.unity.com/en-us/engine/current/manual/analysis/graphics-performance-profiling/lod/lod-group/lod-group-configure
- Unreal Engine 5.8 docs, FBX Static Mesh Pipeline: https://dev.epicgames.com/documentation/en-us/unreal-engine/fbx-static-mesh-pipeline-in-unreal-engine
- Blender 5.2 Manual, Apply: https://docs.blender.org/manual/en/5.2/scene_layout/object/editing/apply.html
- Blender 5.2 Manual, Origin: https://docs.blender.org/manual/en/5.2/scene_layout/object/origin.html
- Shortcuts: Blender 5.2.1 default (Blender) keymap
- This series: A map of solo game development, What helps to know before solo game development, Setting the scope of your first game, Splitting solo game dev work with AI
- Also read: From Blender to Godot 4.7 with glTF, From Blender to Unreal Engine 5.8, Choosing a game engine in 2026
- Figures: all are Blender screens and Godot editor and run screens of a barrel I made