Moving a Blender scene to Unreal Engine 5.8: FBX and USD export, and checking size, axes, and materials
We export a small prop scene from Blender 5.2 as both FBX and USD, import both into Unreal Engine 5.8, and check what actually arrives: size (meters and centimeters), axes (which way is forward), pivots, materials, and smoothing warnings.
한국어English
Based on: Blender 5.2 LTS (screenshots from 5.2.1, English UI, default keymap) and Unreal Engine 5.8 (screenshots from 5.8.1, Korean UI). Checked in November 2026. All figures are real Blender and Unreal Engine screens. Red numbers and boxes were added for explanation. The Unreal editor is shown with a Korean interface; captions give the English names.
When you move objects from Blender to Unreal Engine for the first time, three things are almost always confusing: whether the size is right, which way the front faces, and whether the materials come through. The two programs use different length units and set up their axes differently.
In this guide, we make four props of known size in Blender 5.2, export them as FBX and as USD, and import both into Unreal Engine 5.8. Then we check, one by one, the size, direction, pivot, materials, and warning messages that actually arrive. Figure 1 shows the result.
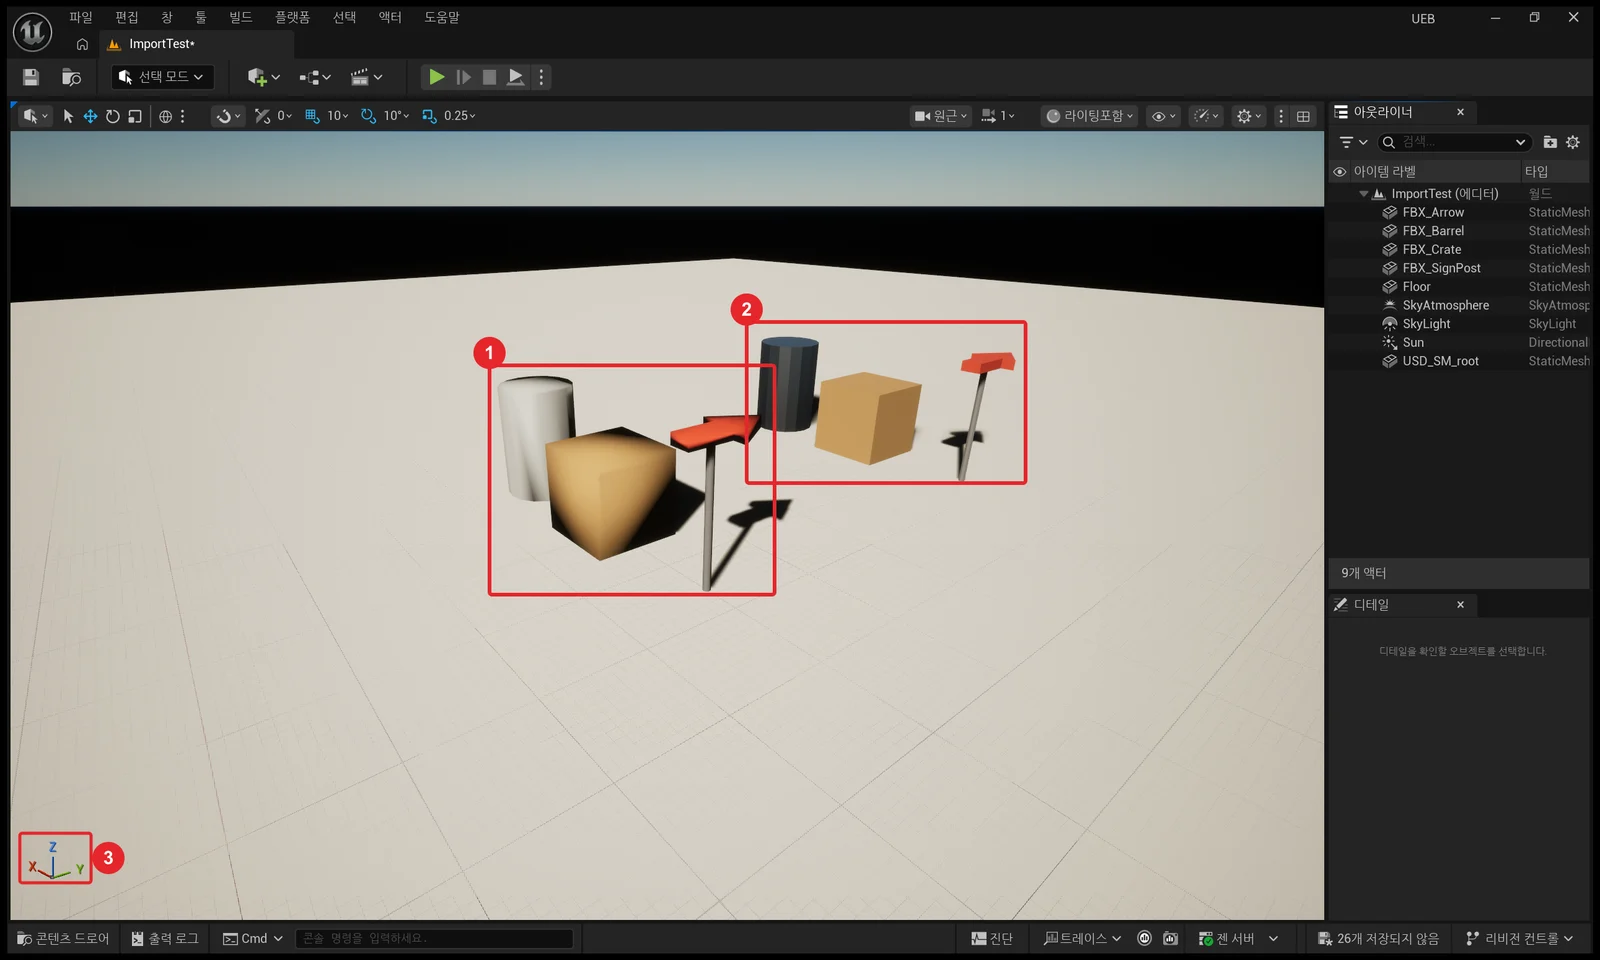 Figure 1. The same props imported in two formats. ① The set imported from FBX ② The set imported from USD ③ Axis indicator (red X, green Y, blue Z) (Unreal Editor screenshot)
By the end of this guide, you will be able to:
- Know the unit and axis differences between Blender and Unreal from a table.
- Export FBX and USD from Blender and know what the defaults are.
- Bring files into Unreal with the import window.
- Check the size, forward direction, and pivot of imported objects.
- Know the material differences between FBX and USD and handle the smoothing warning.
1. The differences at a glance
| Item | Blender | Unreal Engine |
|---|---|---|
| Length unit | Meters (default: 1 unit = 1 m) | Centimeters (the default distance unit in the official docs) |
| Up axis | Z | Z |
| Forward | The manual describes it as "Y Forward, Z Up". The Front view looks along +Y | X is forward and Y is right (official docs) |
| Handedness | Right-handed | Left-handed (official docs) |
Handedness is the rule for which way the X, Y, and Z axes wind around each other. Hold out your thumb, index finger, and middle finger as the three axes: it either fits your right hand or your left hand. Even with the same up axis (Z), a different hand flips the sign of one axis. Section 6 shows in numbers how this appears in practice.
2. Preparing test props
Starting point: A new file (File ‣ New ‣ General) with the default cube deleted.
You need objects of known size so you can compare after import. This guide used these four.
| Object | Size in Blender | Added on purpose |
|---|---|---|
| Crate | A 1 m cube, sitting on the ground | Size check |
| Barrel | A cylinder of radius 0.3 m and height 0.9 m, scaled up with Scale 1.5 | Scale that is not applied |
| SignPost | 1.6 m tall | |
| Arrow | A plate whose tip points to −Y | Direction check |
Steps:
- Add one object of known size (for example, a 1 m box) to your own scene too.
- If you have objects with a front (characters, cars), note which axis they face in Blender.
- Select an object and look at its Scale in the sidebar or in the Object tab of the Properties editor (Figure 2, ②). If it is not
1.000, the scale is not applied.
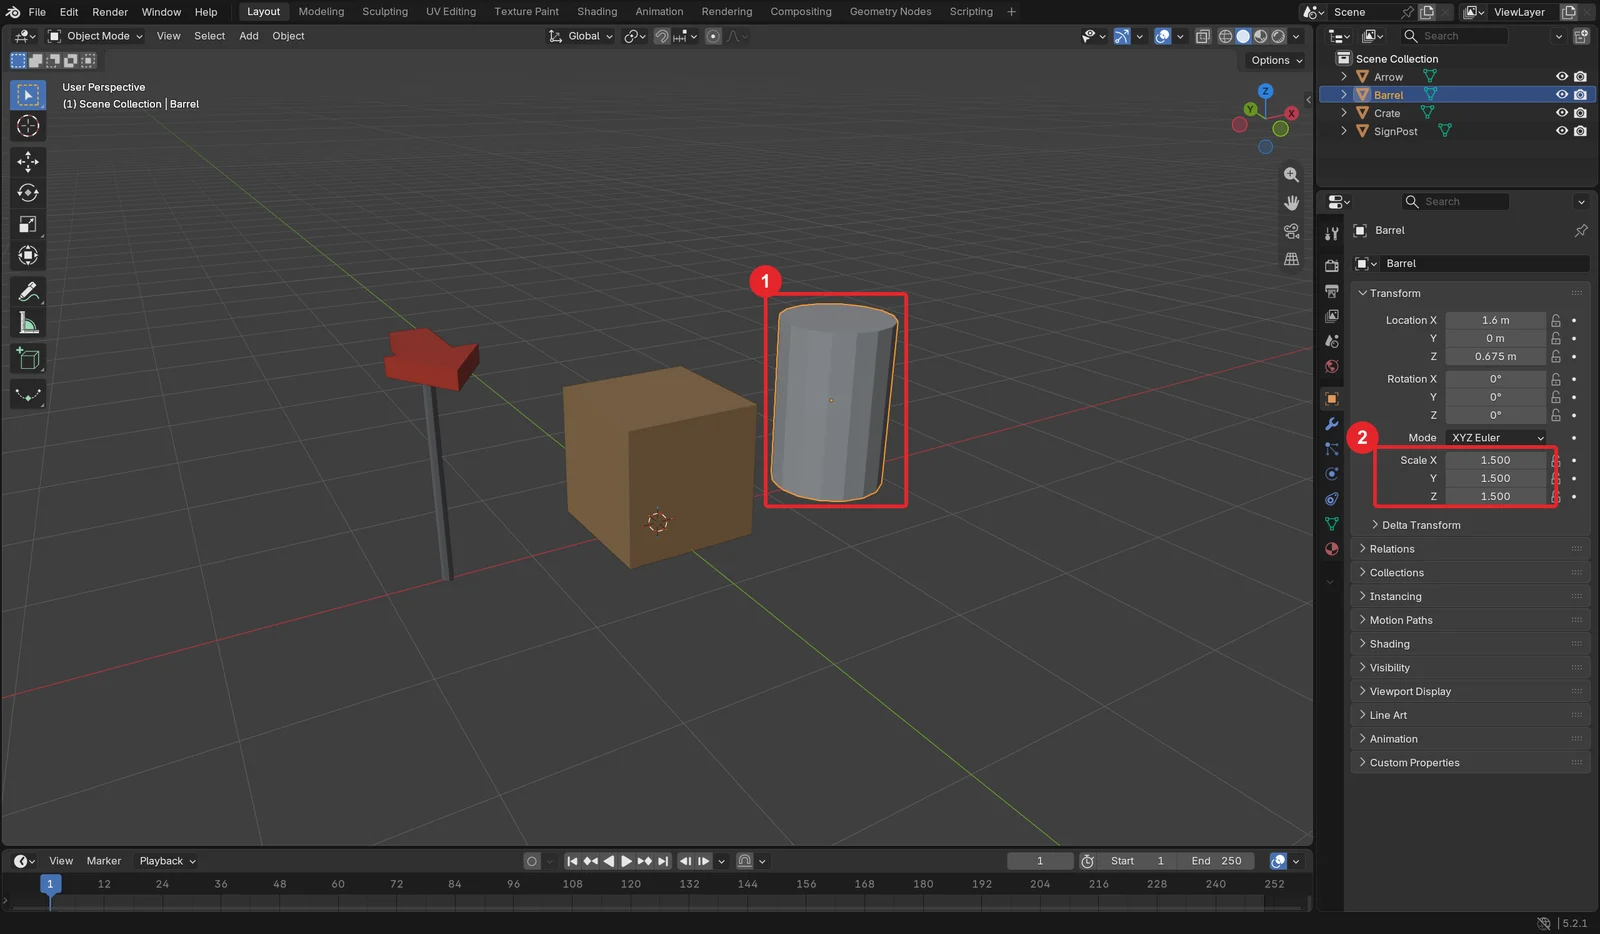 Figure 2. The test props in Blender. ① The barrel with unapplied scale ② Scale 1.500 (Blender screenshot)
3. Exporting FBX
FBX is a file format long used to exchange models, skeletons, and animations between 3D programs. Unreal's FBX import uses FBX version 2020.2.
Starting point: The prop scene from the previous section.
Steps:
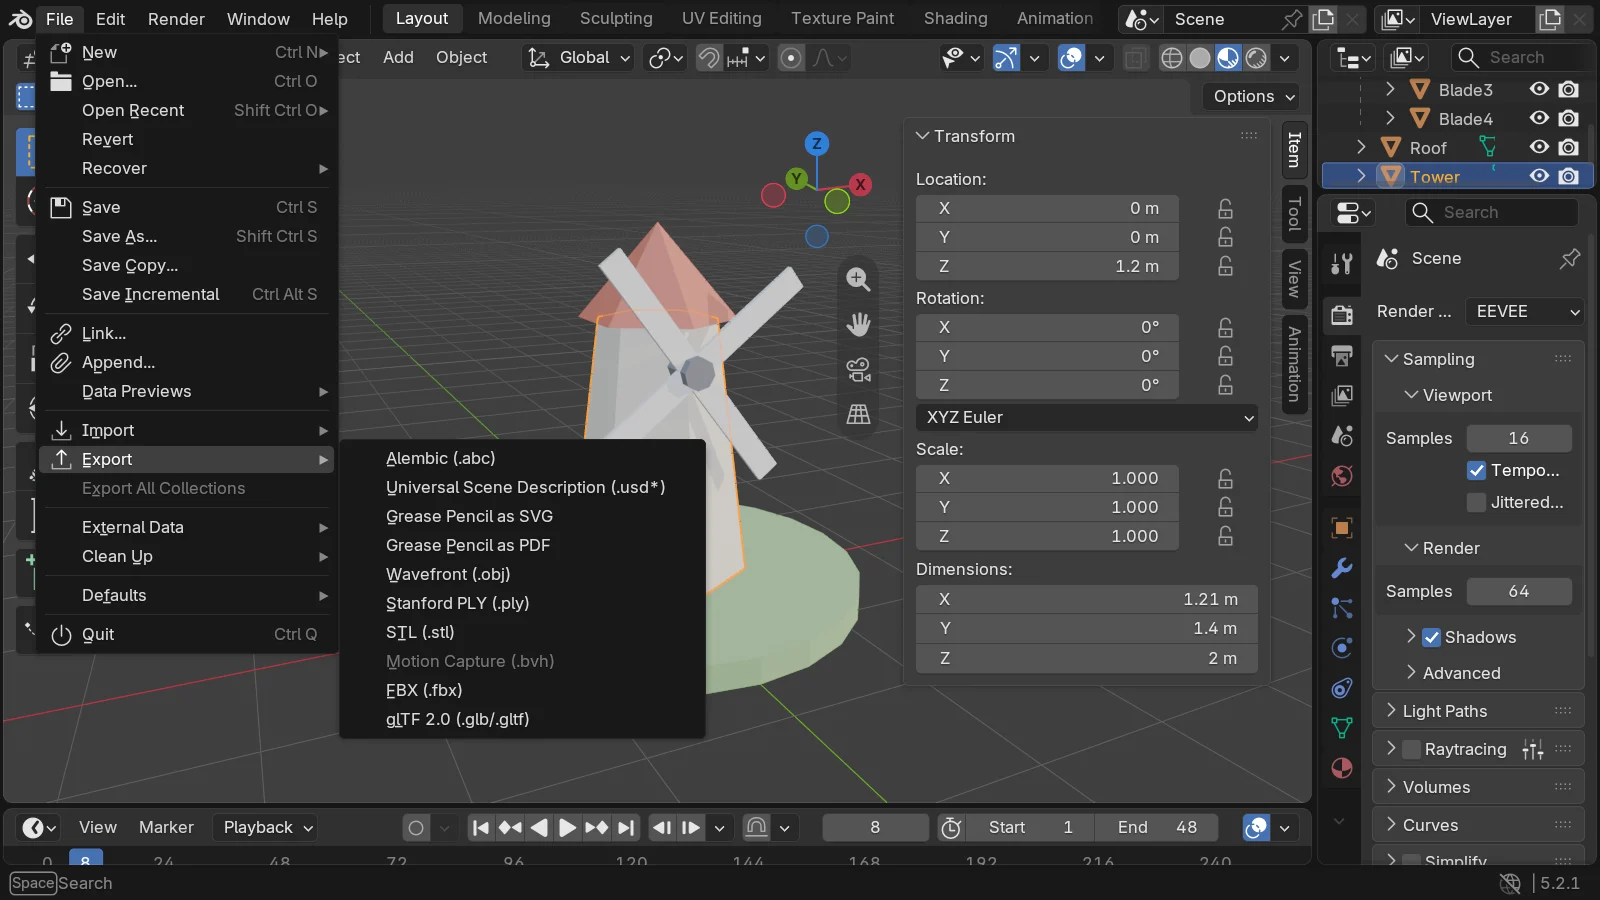
- Choose File ‣ Export ‣ FBX (.fbx).
- Look at the Transform group in the settings panel on the right (Figure 3). This guide exported once with all defaults.
- In the Geometry group (scroll down in the settings panel), change Smoothing to Face. Section 7 explains why.
- Enter a file name and click Export FBX.
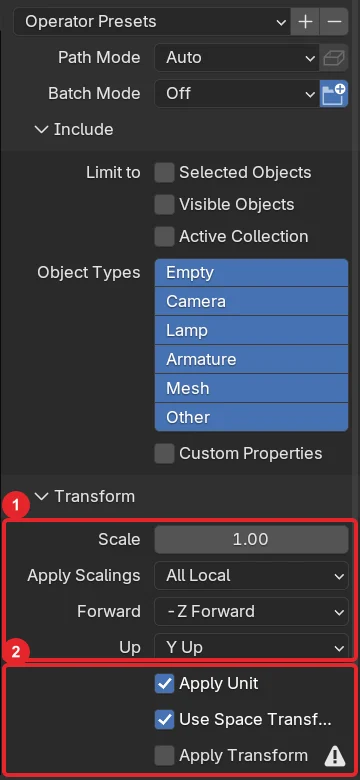 Figure 3. FBX export defaults. ① Scale and axis conversion ② Unit, space transform, and apply transform (Blender screenshot)
| Setting | Default | Meaning |
|---|---|---|
| Scale | 1.00 | How much to scale on export |
| Apply Scalings | All Local | Where to store scale information |
| Forward / Up | −Z Forward / Y Up | Axis conversion. Values that match another program's forward and up axes |
| Apply Unit | On | Writes the scene unit into the file |
| Apply Transform | Off | When on, applies location, rotation, and scale to the mesh and writes world coordinates (manual). It has an experimental warning icon |
In this guide's test, the size came into Unreal correctly even with the default axis and scale settings (section 6). Try the defaults first, look at the result, and only then change things.
4. Exporting USD
USD (Universal Scene Description) is an open format made to hold a whole scene. Objects, materials, lights, and cameras can live in one file structure. If FBX is a box that packs items one by one, USD is closer to a moving list that includes the room layout. In 5.8, USD asset import through Interchange is production ready, while level import is still experimental.
Starting point: The prop scene from the previous section.
Steps:
- Choose File ‣ Export ‣ *Universal Scene Description (.usd)**.
- In the General group, check that Convert Orientation is off and Units is Meters (Figure 4, ①).
- End the file name with
.usdcand click Export USD.
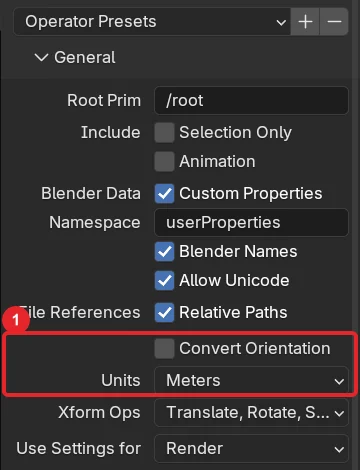 Figure 4. USD export defaults. ① Convert Orientation off and Units Meters (Blender screenshot)
Units sets the USD file's metersPerUnit value (how many meters one unit is). With Meters, the file says "1 unit = 1 m", and the receiving program uses this value to match the size.
5. Importing into Unreal
Starting point: A project open in Unreal Engine 5.8. A practice blank project is recommended.
Steps:
- Open the Content Drawer at the bottom of the editor and click the Import button at the top. You can also drag files onto the Content Drawer.
- Choose the FBX file from section 3. The Import Content window opens (Figure 5).
- Check that a pipeline name appears at the top (Figure 5, ①). FBX is imported with one default pipeline.
- Leave the settings at their defaults and click Import at the bottom right.
- Import the USD file from section 4 the same way.
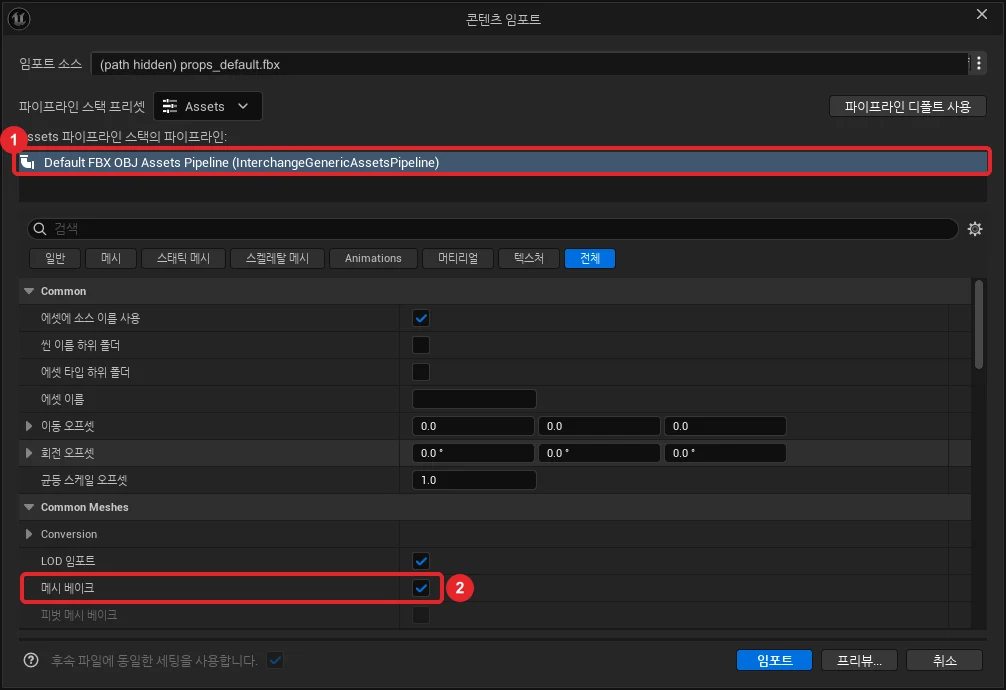 Figure 5. The Import Content window. ① The default pipeline for FBX ② Bake Meshes on. The import source field at the top shows the path of the chosen file, hidden in the figure. The figure shows the Korean UI (Unreal Editor screenshot)
A pipeline is a set of rules that turns a file into Unreal assets. It is like a work order in a factory: the same file can give different results depending on which work order you use. Importing in 5.8 uses Interchange, which works with these pipelines.
Scrolling down the same window shows a Combine Static Meshes field in the Static Meshes group. Its default was Do Not Combine Static Meshes (Figure 6). That is why the four objects in the FBX arrive as four assets (Figure 7).
 Figure 6. The Static Meshes group of the same window. Combine Static Meshes defaults to not combining (Unreal Editor screenshot)
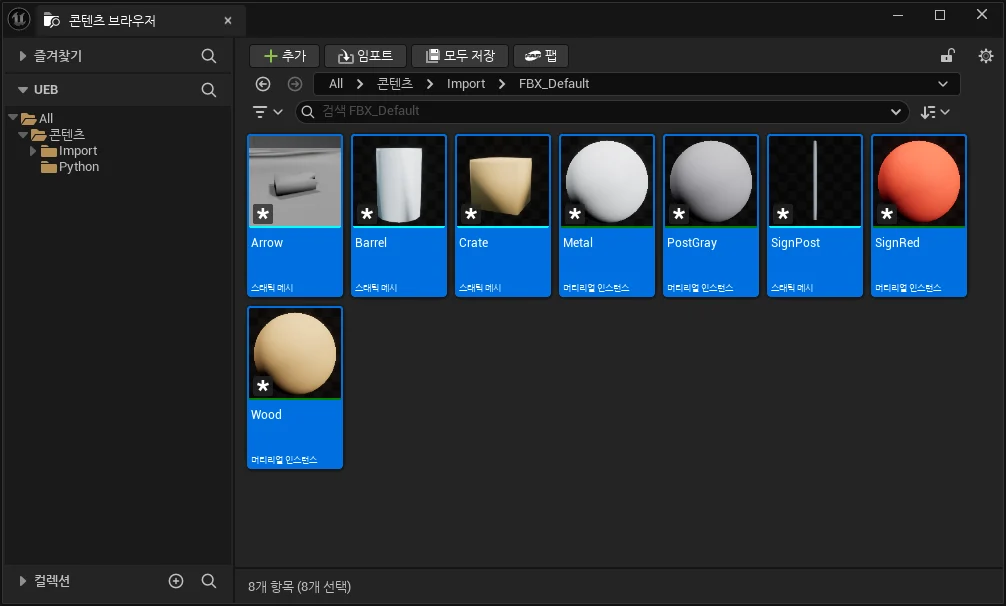 Figure 7. The Content Browser after importing the FBX. One static mesh per object and one material instance per material (Unreal Editor screenshot)
6. Checking size, direction, and pivot
We dragged the imported assets into a level and measured what actually came in. Sizes are read from each asset's bounding box (the box that just encloses the object).
| Object | In Blender | FBX (defaults) | USD (defaults) |
|---|---|---|---|
| Crate | 1 x 1 x 1 m | 100 x 100 x 100 cm | Merged into one mesh |
| Barrel (scale 1.5 not applied) | Looks 0.9 x 0.9 x 1.35 m | 90 x 90 x 135 cm | Merged into one mesh |
| SignPost | 1.6 m tall | 160 cm tall | Merged into one mesh |
| Arrow | 0.56 x 0.95 x 0.12 m | 56 x 95 x 12 cm | Merged into one mesh |
| Whole set | 4 assets | 1 static mesh, 393 x 110 x 161 cm |
The size came in correctly in both formats. Blender's 1 m became Unreal's 100 cm, and the barrel's unapplied scale of 1.5 was baked into the mesh, arriving as 90 x 90 x 135 cm. The barrel actor placed in the level has a Scale of 1.
Steps: Check your own assets the same way.
- Double-click an imported static mesh in the Content Browser to open the Static Mesh Editor.
- Read the size (Approx Size) in the info text at the top left of the editor viewport. The unit is cm.
- Check that a 1 m box reads close to 100. If it reads close to 1 or 10000, the units are off.
Direction was checked with the arrow plate. In Blender, the tip of the arrow was on the −Y side, but in Unreal it was on the +Y side. X and Z kept their signs; only Y flipped. This is the handedness difference from section 1. So a character or car built to face you in Blender's Front view stands facing sideways (+Y) in Unreal, not forward (+X). In that case, rotate it around Z after placing it, or rotate it on import with the rotation offset in the Common group of the Import Content window.
The pivot is the point an object rotates and moves around. In this test, every asset imported from FBX had its pivot at the Blender scene origin (0, 0, 0). For example, the barrel asset's bounds were X 115 to 205 cm, keeping the place where the barrel sat in Blender (X 1.6 m). This appears to be because Bake Meshes was on in the Import Content window (Figure 5, ②). As a result, placing all four assets at the level origin rebuilds the Blender layout exactly. On the other hand, if you place one object alone and rotate it, it spins around the wrong point. If you plan to use props one by one, the simplest fix is to move each object to the origin in Blender before exporting.
7. Materials and the smoothing warning
Materials showed the biggest difference between the two formats. In Blender, the barrel had a metal material (Metallic 1, Roughness 0.35).
| Format | Parent of the Unreal material | Values that came in | Barrel in Figure 1 |
|---|---|---|---|
| FBX | FBXLegacyPhongSurfaceMaterial | Only DiffuseColor, SpecularColor, and Shininess. No metal value | Matte, nearly white |
| USD | UsdPreviewSurface | BaseColor, Metallic 1.0, Roughness 0.35 | Dark metal |
The FBX material came in the old way (the Phong method, which splits light reflection into diffuse and specular), so whether it was metal was lost. USD kept the metal and roughness values set in Blender. On the other hand, importing USD created one extra copy of each material with _0_TwoSided at the end of the name. With either format, plan to touch up materials once in Unreal.
The smoothing warning appeared only with FBX. After importing a file exported with Blender's default FBX Smoothing (Normals Only), the Output Log showed this warning for all four meshes (shown here in English translation; the editor showed it in Korean).
Smoothing group information was not found for this mesh 'Arrow' in the FBX file. Check that the 'Export Smoothing Groups' option is enabled in the FBX exporter before exporting the file.
A smoothing group decides which faces look smoothly joined and which edges look sharp. Re-exporting with Smoothing set to Face, as in step 3 of section 3, made this warning go away. In that version, only the arrow plate kept a tangent (surface direction calculation) warning, which appears to be because this arrow mesh has no UVs (the flattened coordinates used to apply textures).
Practice
- Import a 1 m box from your scene as FBX and check in the Static Mesh Editor that its size reads close to 100.
- Import an object with a front and note which axis it faces in Unreal. Then import it again with a value in the Z rotation offset of the Import Content window.
- Import the same metal object as FBX and as USD, open the material instances, and compare whether a Metallic value exists.
Common mistakes and fixes
| Symptom | Cause | Fix |
|---|---|---|
| The imported size looks wrong next to a 1 m box | The Blender scene unit or export Scale was changed from the default (in this guide's default test, size came in correctly) | Keep Blender units at the default (meters, Unit Scale 1) and export again with Scale 1.00 |
| A character stands facing sideways | Blender's −Y front arrives as Unreal's +Y | Rotate around Z, or use the rotation offset in the import window |
| An object rotates around a strange point | The asset pivot is at the Blender origin | Move the object to the origin in Blender before exporting |
| The Output Log says smoothing group information was not found | FBX Smoothing is Normals Only | Export again with Smoothing set to Face |
| Metal looks like white plastic | The FBX material arrived as Phong and lost the metal value | Set Metallic again in the Unreal material, or import with USD |
| The USD import is one big lump | With this test's defaults, it merged into one static mesh | Import with FBX to keep objects separate, or export each object separately from Blender |
In one line
Check size with a 1 m box, set FBX Smoothing to Face, Blender's −Y front arrives as Unreal's +Y, pivots land at the Blender origin, and USD keeps metal values better.
References
- Unreal Engine 5.8 docs, Coordinate System: https://dev.epicgames.com/documentation/en-us/unreal-engine/coordinate-system-and-spaces-in-unreal-engine
- Unreal Engine 5.8 docs, Units of Measurement: https://dev.epicgames.com/documentation/en-us/unreal-engine/units-of-measurement-in-unreal-engine
- Unreal Engine 5.8 docs, FBX Content Pipeline: https://dev.epicgames.com/documentation/en-us/unreal-engine/fbx-content-pipeline
- Unreal Engine 5.8 release notes: https://dev.epicgames.com/documentation/en-us/unreal-engine/unreal-engine-5-8-release-notes
- Blender 5.2 LTS Manual, FBX (Legacy) export: https://docs.blender.org/manual/en/5.2/files/import_export/fbx_legacy.html
- Blender 5.2 LTS Manual, USD: https://docs.blender.org/manual/en/5.2/files/import_export/usd.html
- Related guides on this site: From Blender to Godot 4.7 with glTF, Choosing a game engine in 2026
- Figures: all real Blender 5.2.1 and Unreal Engine 5.8.1 screens (test props we made)