Unreal Engine 5.8 Lumen Lite and MegaLights on an 8 GB laptop: measuring GPU time yourself
On an RTX 4070 Laptop GPU (8 GB), we opened Unreal Engine 5.8.1 and measured GPU time per frame three times each in a room with 48 shadow-casting point lights, changing only GI quality (Epic, High, Medium, Low) and MegaLights on or off. This guide covers where the settings are, the results, how the image changes, and which combination suits an 8 GB laptop.
한국어English
Based on: Unreal Engine 5.8 (measured with the 5.8.1 installed build, Korean UI), NVIDIA GeForce RTX 4070 Laptop GPU 8 GB (driver 610.62). Measured on my PC on November 1, 2026. The figures are real Unreal Engine screenshots and a chart drawn from the measured values. Red numbers and outlines were added for explanation.
Unreal Engine 5.8 brings two features that laptop users will like. One is Lumen Lite, a medium-quality GI that is twice as fast as Lumen high quality, added as a beta. The other is MegaLights, which is now production ready.
I measured how much difference they make on an 8 GB laptop. I built one room with many lights and measured how long the graphics card spends on each frame, changing only GI quality and MegaLights. Figure 1 shows the results.
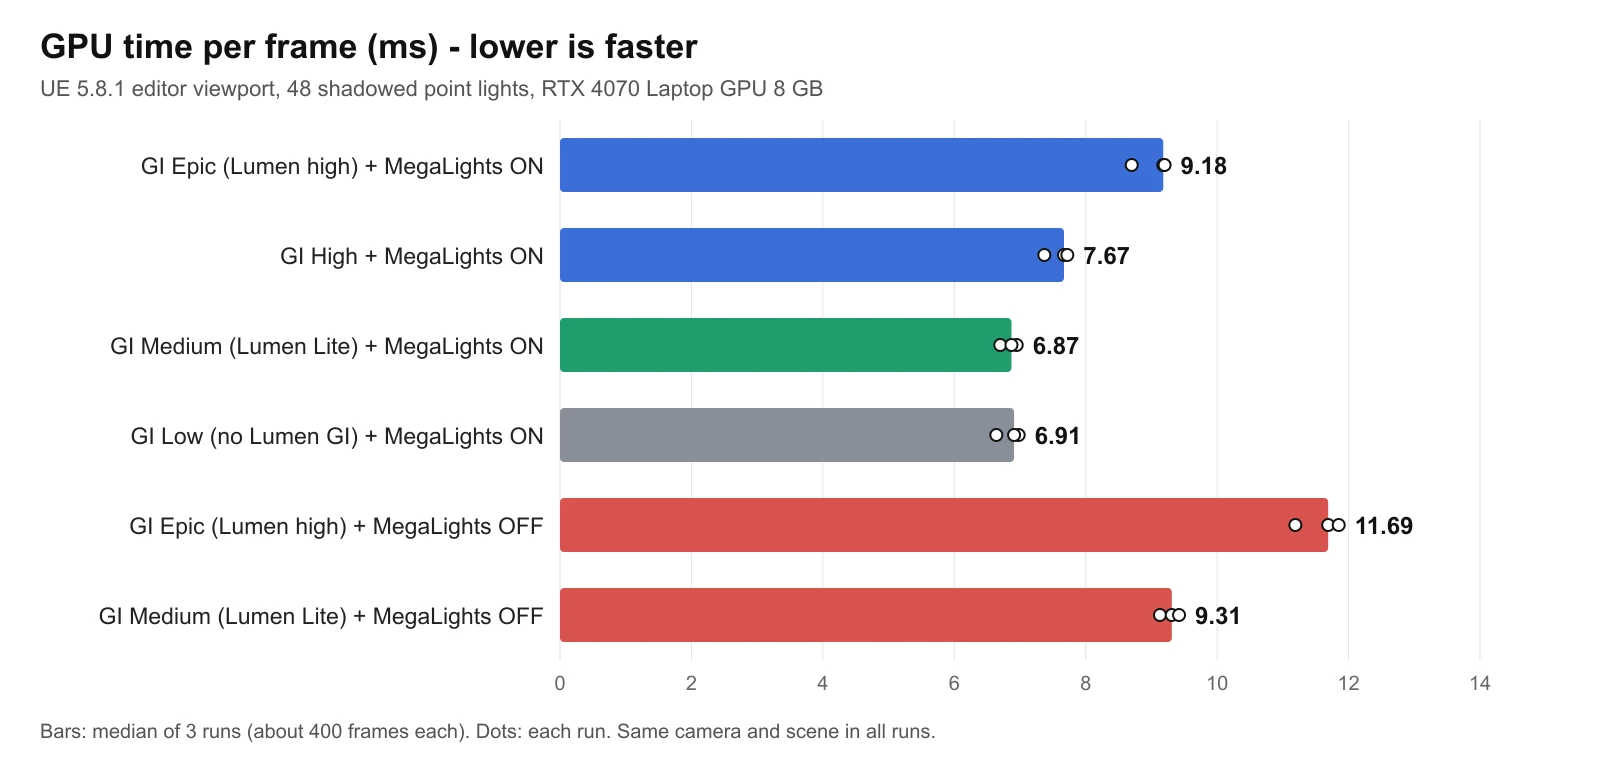 Figure 1. GPU time per frame by condition. Bars are the median of three runs, and dots are each run (chart drawn from measured values)
By the end of this guide you will be able to:
- Understand what Lumen, Lumen Lite, and MegaLights are.
- Find where to change GI quality and turn MegaLights on or off in the editor.
- Know which combination is fastest on an 8 GB laptop and how the image changes.
- Measure GPU time in your own scene.
1. The short answer
| Question | Measured on my PC |
|---|---|
| Lumen high quality (GI Epic) → Lumen Lite (GI Medium) | 9.18 ms → 6.87 ms, about 25% less |
| MegaLights off → on (GI Epic) | 11.69 ms → 9.18 ms, about 21% less |
| MegaLights off → on (GI Medium) | 9.31 ms → 6.87 ms, about 26% less |
| Fastest combination | Lumen Lite + MegaLights on (6.87 ms), almost the same as GI fully off (6.91 ms) |
| Graphics memory | Whole-GPU usage right after measuring: 2727 MiB / 8188 MiB |
In this scene, Lumen Lite together with MegaLights was fastest. The image looked fairly close to Lumen high quality, though marks appeared along the ceiling edge (section 6).
2. Terms to know first
| Term | Meaning |
|---|---|
| GI (global illumination) | Light bouncing off walls and floors to light other places |
| Lumen | Unreal Engine 5's real-time GI and reflection system |
| Lumen Lite | A medium-quality Lumen path, beta in 5.8 (called Lumen Medium Quality in the Lumen section of the release notes). It turns on when GI and Reflection quality are both set to Medium |
| MegaLights | A direct lighting feature that cuts the cost of many shadow-casting lights. Production ready in 5.8 |
| GPU time | Time the graphics card spends drawing one frame. Shorter is faster |
GI is like rolling a white ball in a room and watching it bounce off the walls. Light also bounces from where it lands and brightens its surroundings. Lumen high quality follows these bounces carefully, while Lumen Lite reads values from "light probes" placed around the room and computes faster. This approach is called Irradiance Fields.
MegaLights is like order tickets in a restaurant kitchen. Instead of computing every light for every customer (every pixel on screen), it picks the few lights that matter most. So computation time does not grow much as you add lights.
3. Test setup
| Item | Value |
|---|---|
| Laptop | Acer Predator PHN16-72 |
| Graphics card | NVIDIA GeForce RTX 4070 Laptop GPU 8 GB (driver 610.62) |
| CPU and RAM | Intel Core i9-14900HX, 32 GB |
| Operating system | Windows 11 Pro, adapter plugged in |
| Unreal Engine | 5.8.1 installed build, Korean editor UI |
| Project settings | DirectX 12 SM6, Lumen GI and reflections, hardware ray tracing on |
| Display | Editor viewport (game view), about 2118x1271 pixels, TSR anti-aliasing |
The test scene is a 16 m by 16 m room with 25 white pillars (5x5), one ball, and 48 colored shadow-casting point lights spread evenly under the ceiling. It also has a sun and sky, and exposure is fixed. I added many lights on purpose, because the more lights there are, the more MegaLights shows its effect.
4. Where to change the settings
Changing GI quality
GI and Reflection quality are changed from the toolbar at the top of the viewport.
 Figure 2. The gauge icon on the viewport toolbar (Unreal Editor screenshot, Korean UI)
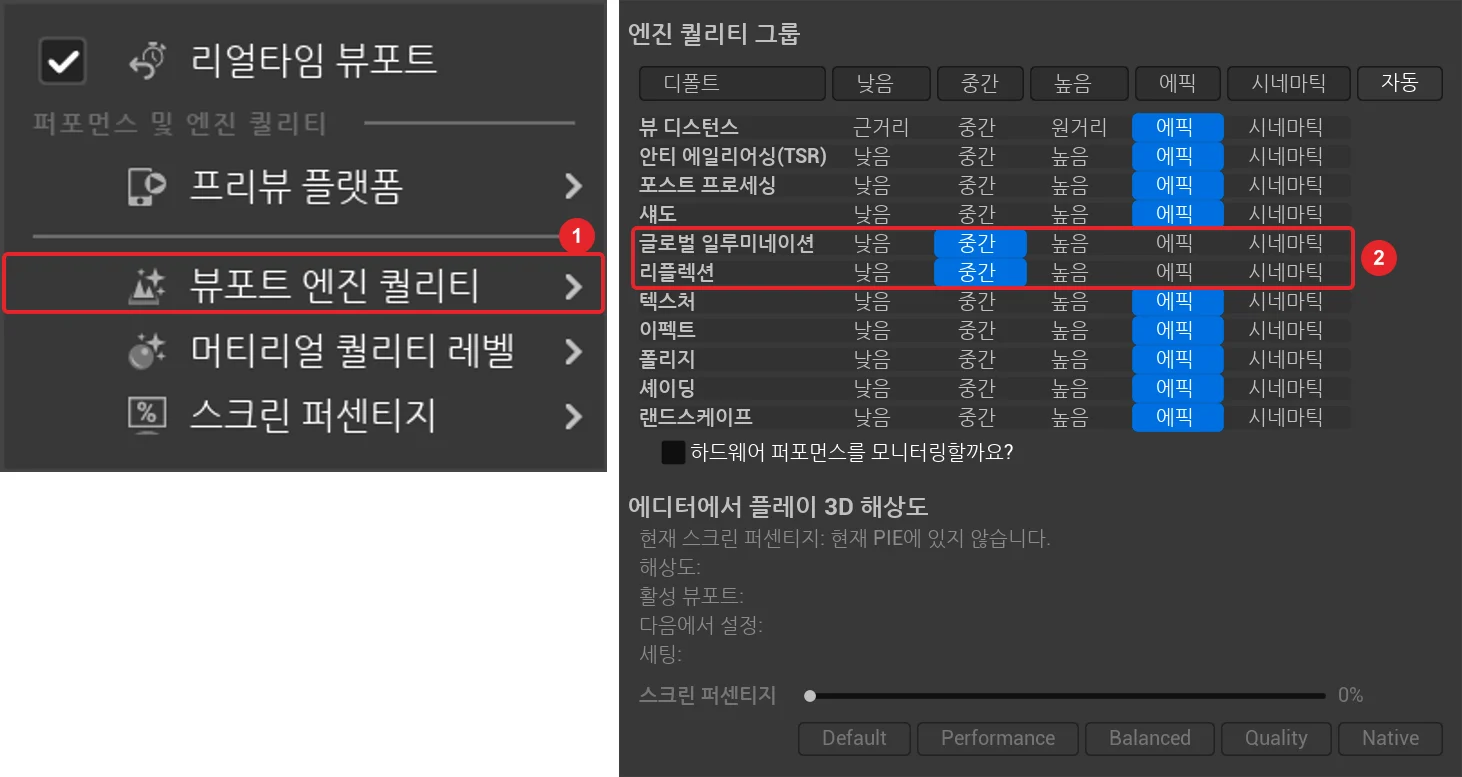 Figure 3. ① The viewport engine scalability menu ② Global Illumination and Reflections set to Medium (Unreal Editor screenshot, Korean UI)
Steps:
- Click the gauge icon on the viewport toolbar (Figure 2).
- In the menu that opens, choose Viewport Engine Scalability (Figure 3, ①).
- In the Engine Scalability Groups table, click Medium on the Global Illumination and Reflections rows (Figure 3, ②). This is Lumen Lite.
- To go back to Lumen high quality, click Epic on the same two rows.
The Low, Medium, High, and Epic buttons on the top row change every item at once. To compare GI only, as in this guide, change just the two rows.
Turning MegaLights on or off
MegaLights is turned on in Project Settings under Rendering › Direct Lighting.
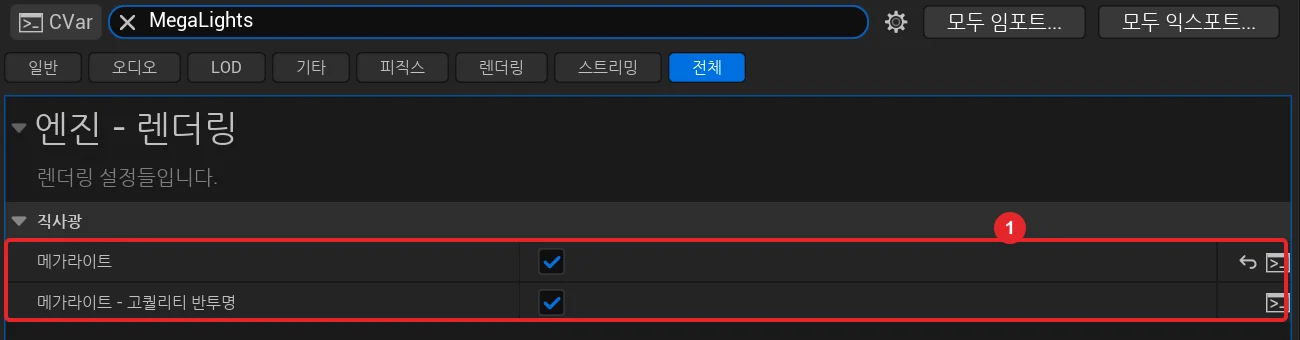 Figure 4. ① The MegaLights checkbox under Direct Lighting in Project Settings (Unreal Editor screenshot, Korean UI)
Steps:
- Open Edit › Project Settings from the menu.
- Type
MegaLightsin the search box at the top. - Turn on MegaLights under Engine - Rendering › Direct Lighting (Figure 4, ①).
- If you are prompted to turn on Support Hardware Ray Tracing, turn it on. It is recommended to enable it together with MegaLights.
In my test, the project file I first created by hand was not set to DirectX 12 SM6, so Lumen and MegaLights did not show up. If the image does not change, check in Project Settings that the Windows platform section is set to use DirectX 12 and SM6.
5. Results
| Condition | Run 1 | Run 2 | Run 3 | Median (ms) |
|---|---|---|---|---|
| GI Epic (Lumen high) + MegaLights on | 8.70 | 9.18 | 9.20 | 9.18 |
| GI High + MegaLights on | 7.37 | 7.67 | 7.72 | 7.67 |
| GI Medium (Lumen Lite) + MegaLights on | 6.70 | 6.95 | 6.87 | 6.87 |
| GI Low (no Lumen GI) + MegaLights on | 6.64 | 6.98 | 6.91 | 6.91 |
| GI Epic + MegaLights off | 11.19 | 11.69 | 11.85 | 11.69 |
| GI Medium + MegaLights off | 9.13 | 9.31 | 9.42 | 9.31 |
Each run recorded about 400 frames, and the table shows the median. The editor viewport was capped at 60 frames per second (16.67 ms), so frame time was the same in every condition. That is why I compared GPU time instead.
Reading the results:
- Lowering GI from Epic to Medium cut GPU time from 9.18 ms to 6.87 ms, about 2.3 ms. That is less than "twice as fast," because GPU time also includes lighting, shadows, and anti-aliasing, not just GI.
- GI Medium (6.87 ms) and GI Low (6.91 ms) were almost the same. In this scene, Lumen Lite's GI cost was very small.
- Turning MegaLights off added about 2.4 to 2.5 ms whatever the GI quality. That is the extra time for computing the 48 lights one by one.
6. How different does it look
These are viewport images from the same camera.
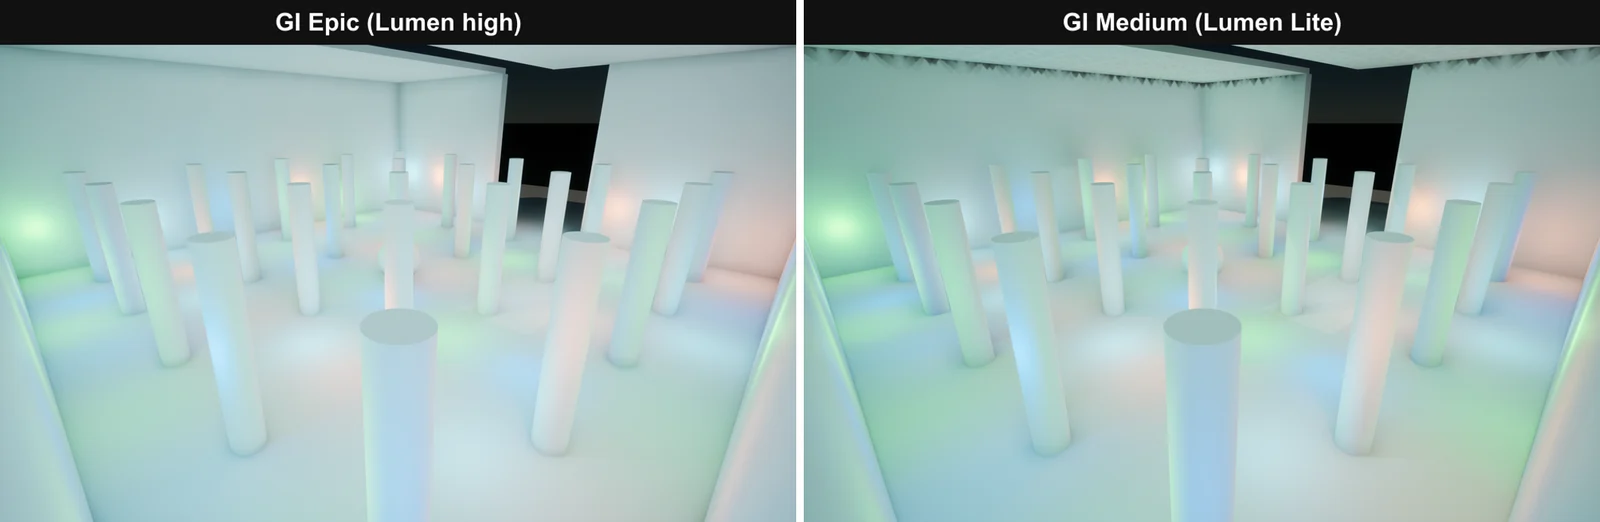 Figure 5. Lumen high quality (left) and Lumen Lite (right) (Unreal Editor screenshot)
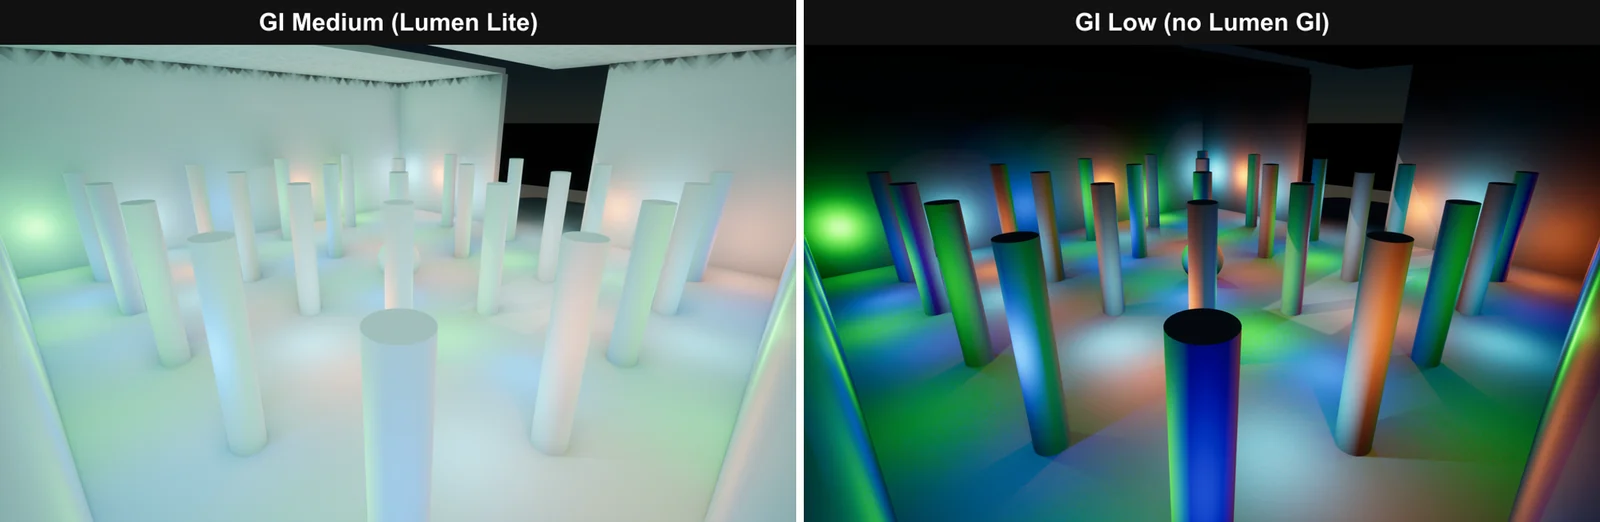 Figure 6. Lumen Lite (left) and GI off (right) (Unreal Editor screenshot)
Steps: In your own scene, change only GI quality in the table from section 4 and compare the images. Keep the camera still so the difference is easy to see.
| Comparison | Difference seen |
|---|---|
| Lumen high → Lumen Lite (Figure 5) | Overall brightness and color spill are similar. Lumen Lite shows jagged marks along the ceiling edge |
| Lumen Lite → GI off (Figure 6) | Bounced light disappears, shadows turn black, and light colors look strong |
The walls and pillars in this room are all white, so there is a lot of bounced light. With GI on, the whole room looks bright and pale; with GI off, places the lights do not reach go black. Figure 6 shows best how much GI changes the image.
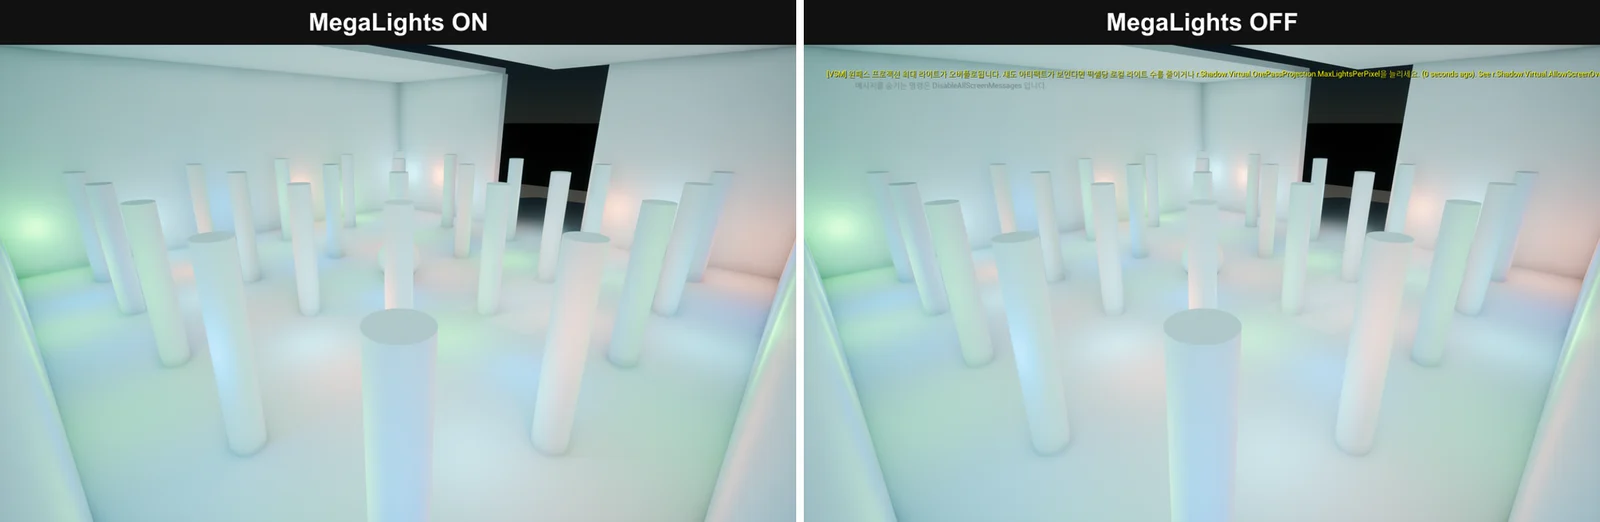 Figure 7. MegaLights on (left) and off (right). A shadow warning appeared with it off (Unreal Editor screenshot, Korean UI)
With MegaLights on and off, the image in this scene was nearly the same. But with it off, a yellow warning appeared saying the VSM one-pass projection max lights per pixel is overflowing. It means too many shadow-casting lights affect each pixel. The warning says that if you see shadow artifacts, reduce the number of local lights per pixel or increase the max lights per pixel (r.Shadow.Virtual.OnePassProjection.MaxLightsPerPixel). With MegaLights on, the warning went away.
7. Choosing on an 8 GB laptop
| Situation | Choice based on my test |
|---|---|
| Working smoothly in the editor on an indoor scene with many lights | MegaLights on + GI Medium (Lumen Lite) |
| Final check, screenshots | Raise GI to Epic briefly to check |
| Scenes that do not need bounced light (night scenes, mostly strong direct light) | Consider GI Low, but check whether shadows go black |
These results come from one scene with 48 lights, measured in the editor viewport. Outdoor scenes, scenes with many trees, and packaged games may give different numbers. Lumen Lite is still beta in 5.8.
8. Measuring in your own scene
Steps:
- Click the viewport and press
`(the tilde key) to open the console. - Type
stat unitand pressEnter. Times such as Frame, Game, Draw, and GPU appear at the top right. - Keep the camera still, wait about 10 seconds, and write down the GPU value.
- Change GI quality or MegaLights as in section 4, wait another 10 seconds, and write down the GPU value again.
- Repeat the same order two or three times and compare medians.
The numbers wobble for a moment right after a change. I waited 8 seconds after each change before recording. Other 3D programs or games running at the same time make GPU time jump a lot, so close them while measuring.
Common mistakes and fixes
| Symptom | Cause | Fix |
|---|---|---|
| Changing GI quality does not change the image | The project is not DirectX 12 SM6, or Lumen is off | Check the Windows DirectX 12 and SM6 settings and the GI method (Lumen) in Project Settings |
| MegaLights does not make it faster | Few shadow-casting lights in the scene | With only a few lights, the difference can be small |
| Frame rate is the same in every condition | The editor frame cap (60 fps in this test) | Compare the GPU value from stat unit instead |
| A yellow [VSM] warning appears | Too many shadow-casting lights affect each pixel | Reduce the lights, increase the max lights per pixel the warning mentions, or turn on MegaLights |
| Marks at the ceiling corners with Lumen Lite | A limit of medium-quality GI | Do the final check with GI Epic |
In one line
On an 8 GB laptop, MegaLights on + GI Medium (Lumen Lite) was fastest for a scene with many lights on my PC; raise it to Epic only for the final check.
References
- Unreal Engine 5.8 release notes (Lumen Lite, MegaLights): https://dev.epicgames.com/documentation/en-us/unreal-engine/unreal-engine-5-8-release-notes
- Unreal Engine documentation, MegaLights: https://dev.epicgames.com/documentation/en-us/unreal-engine/megalights-in-unreal-engine
- Unreal Engine documentation, Lumen Technical Details: https://dev.epicgames.com/documentation/unreal-engine/lumen-technical-details-in-unreal-engine
- Related guides on this site: Moving a Blender scene to Unreal Engine 5.8, Laptop power modes and Blender render times, Choosing a game engine in 2026
- Console command:
stat unit - Figures: real Unreal Engine 5.8.1 screenshots (a test scene I built) and a chart drawn from measured values