From Blender to Godot 4.7 with glTF: exporting, importing, materials, and animation
We export a small windmill model made in Blender 5.2 as a single glTF (.glb) file, bring it into a Godot 4.7.2 project, and walk through import settings, placing it in a scene, light and sky, playing the spinning-blade animation, and running the project. A common mistake that makes models 100 times too big is shown on real screens.
한국어English
ON THIS PAGE
- 011. What you need
- 022. What to check in Blender before exporting
- 033. Exporting to glTF
- 044. Putting it into a Godot project
- 055. Placing the model in a scene
- 066. Playing the animation
- 077. Running it
- 088. A common mistake: the model is 100 times too big
- 099. Common mistakes and fixes
- 1010. In one line
- 11References
Based on: Blender 5.2 LTS (screenshots from 5.2.1, English UI), Godot 4.7.2 stable (Windows, English UI), the Godot 4.7 docs, and the Blender 5.2 manual. Checked on November 1, 2026. All images are real screenshots.
The shortest path from a Blender model to a game engine is one glTF file. The official Godot docs list glTF 2.0 as the recommended format for importing 3D scenes. In this post we export a small windmill from Blender as a .glb file, bring it into Godot 4.7, and run a scene where the blades turn.
Godot is a free, open-source game engine. A game engine loads models and sounds, moves them in response to input such as the keyboard, and redraws the scene dozens of times per second. If Blender is "the workshop where props are made," Godot is "the stage where the show runs with those props." The differences between 3D file formats are covered in 3D file formats compared: FBX, glTF, OBJ, USD.
After this post, you will be able to:
- Check size and direction in Blender and export to glTF (.glb).
- Put the .glb into a Godot 4.7 project and look at its import settings.
- Place the model in a scene and add light, sky, and a camera.
- Play the animation stored in the model and run the project.
- Spot and fix the mistake that makes models 100 times too big.
1. What you need
| What | Version used here | Where to get it |
|---|---|---|
| Blender | 5.2.1 LTS | blender.org |
| Godot | 4.7.2 stable (Windows, standard build) | godotengine.org |
| Model | A small windmill (tower, roof, base, 4 blades, with a spinning-blade animation) | Made by us |
Godot needs no installer. You unzip it and run the program directly. For installing Blender, see Blender beginner chapter 1.
2. What to check in Blender before exporting
Check three things before exporting, the way you check weight, direction, and the label before shipping a parcel.
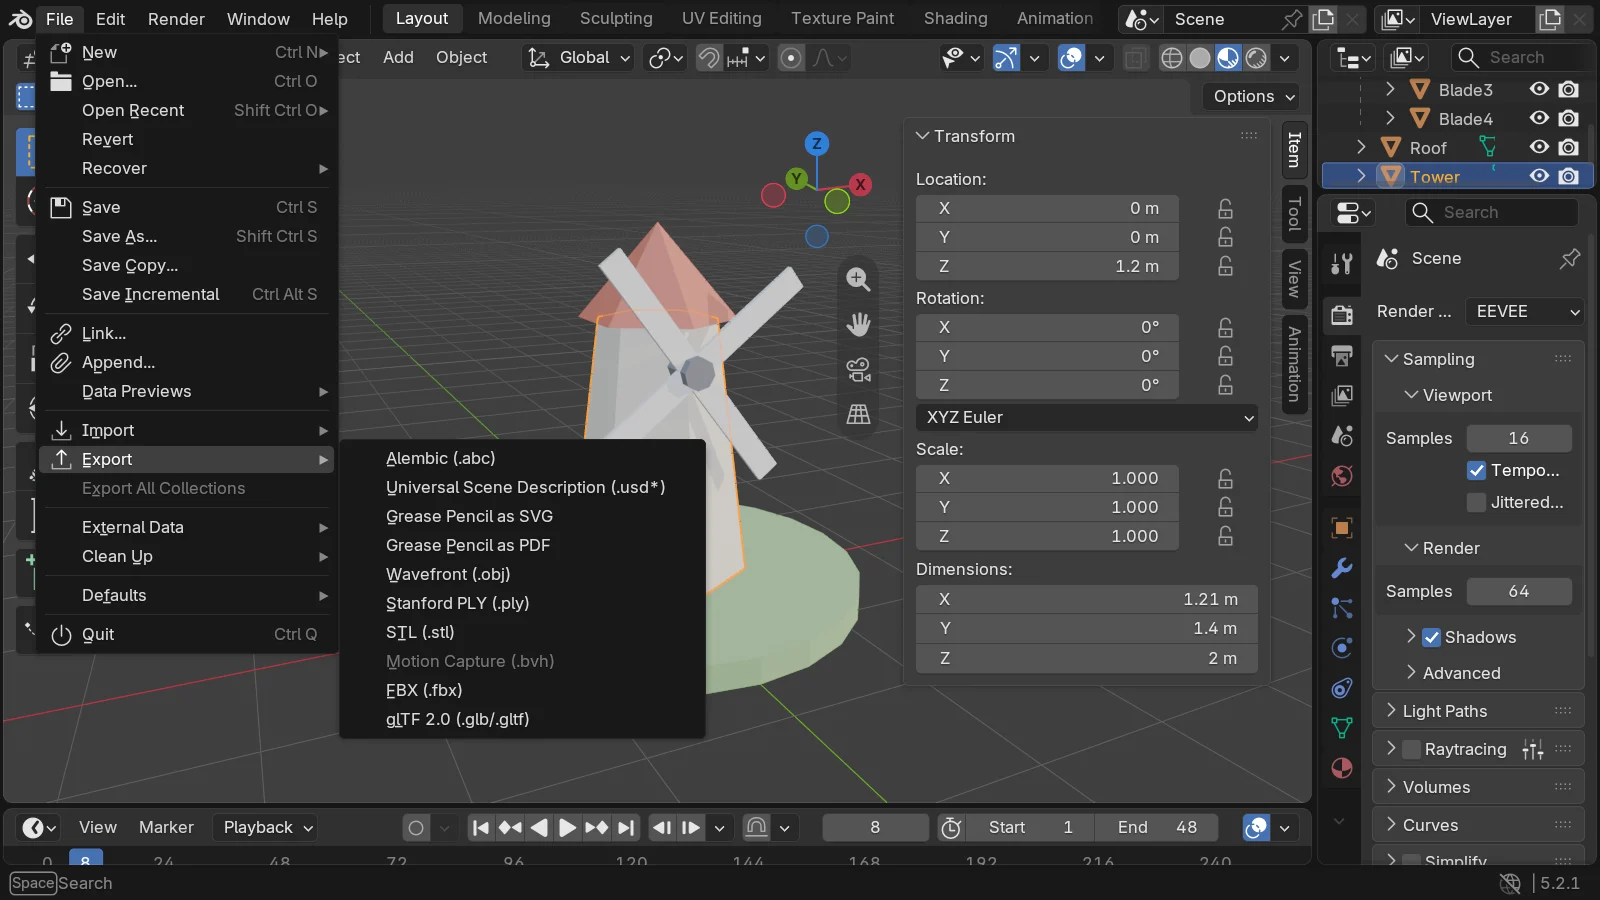
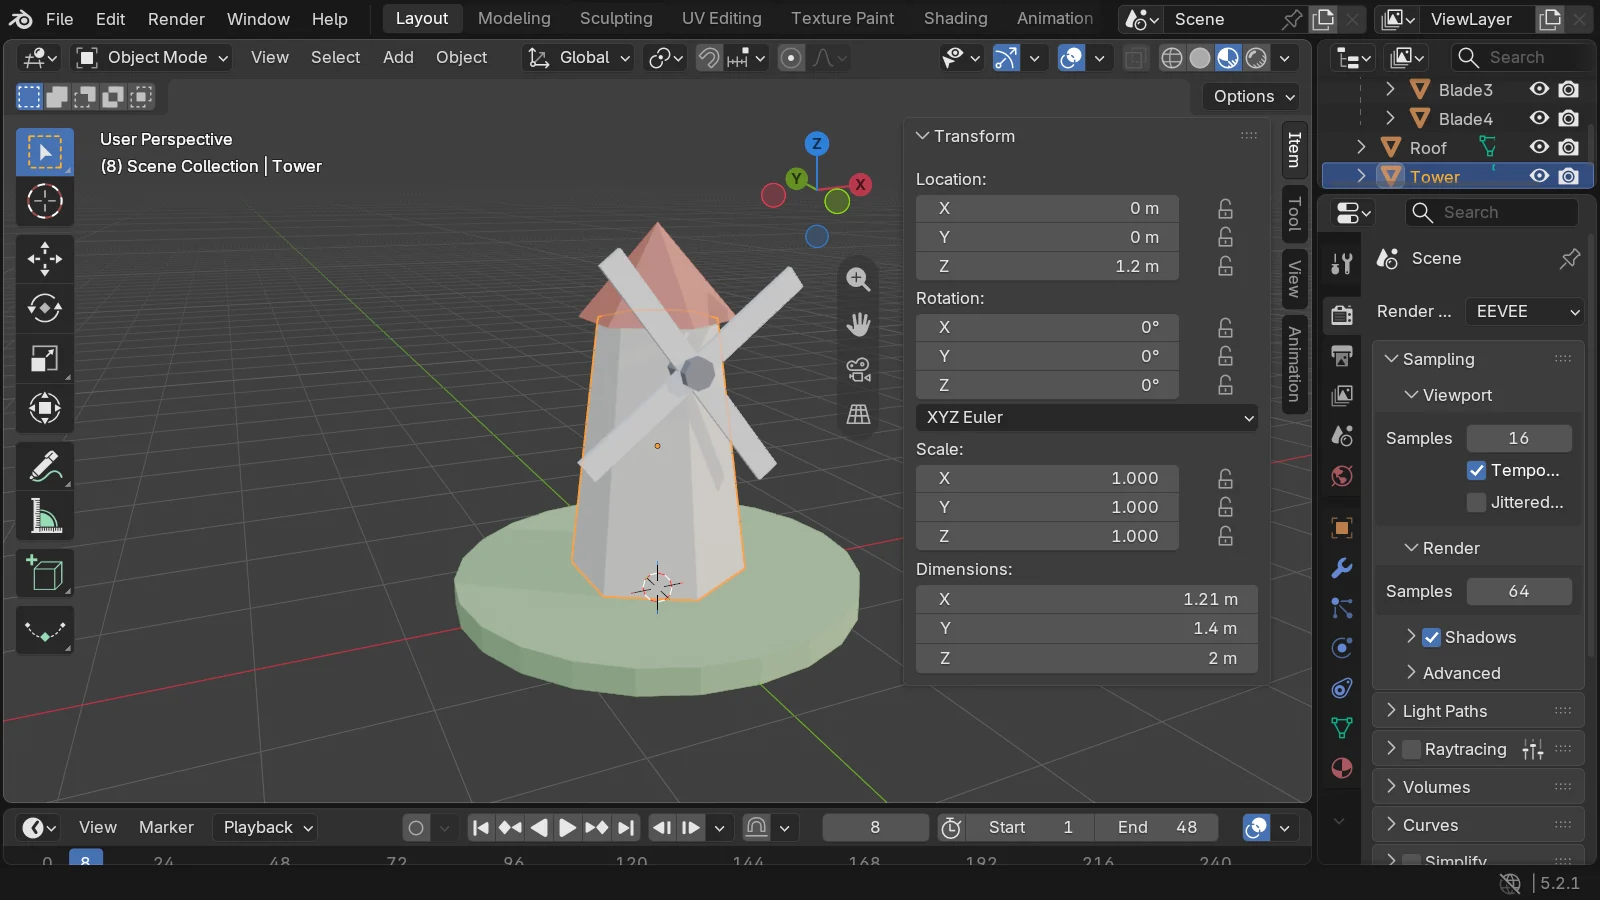 Figure 1. The windmill to export and the Transform panel in the sidebar (
N). The selected tower (Tower) has Scale 1.000 and a height (Dimensions Z) of 2 m (Blender screenshot)
Starting state: Open the .blend file with the model you want to export. This post uses the windmill.
Follow along:
- Click the model, keep the mouse over the 3D viewport, and press
Nto open the sidebar. Look at the Transform panel on the Item tab. - Scale: If Scale is not
1.000, pressCtrl+A→ All Transforms to apply scale and rotation to the shape. The Godot docs also advise applying object transforms before export. - Units: Check that Dimensions match the real size. 1 m in Blender is stored as 1 in glTF and read in Godot as 1 unit (1 m). This windmill's tower is 2 m tall.
- Front: In Blender, front view (numpad
1) looks from the -Y side. If the model's front faces this way, its front faces the camera side (+Z) in Godot too. - Materials: Put colors and roughness into the Principled BSDF node. The glTF exporter reads only nodes it knows, like this one, and ignores nodes it cannot read (Blender manual).
3. Exporting to glTF
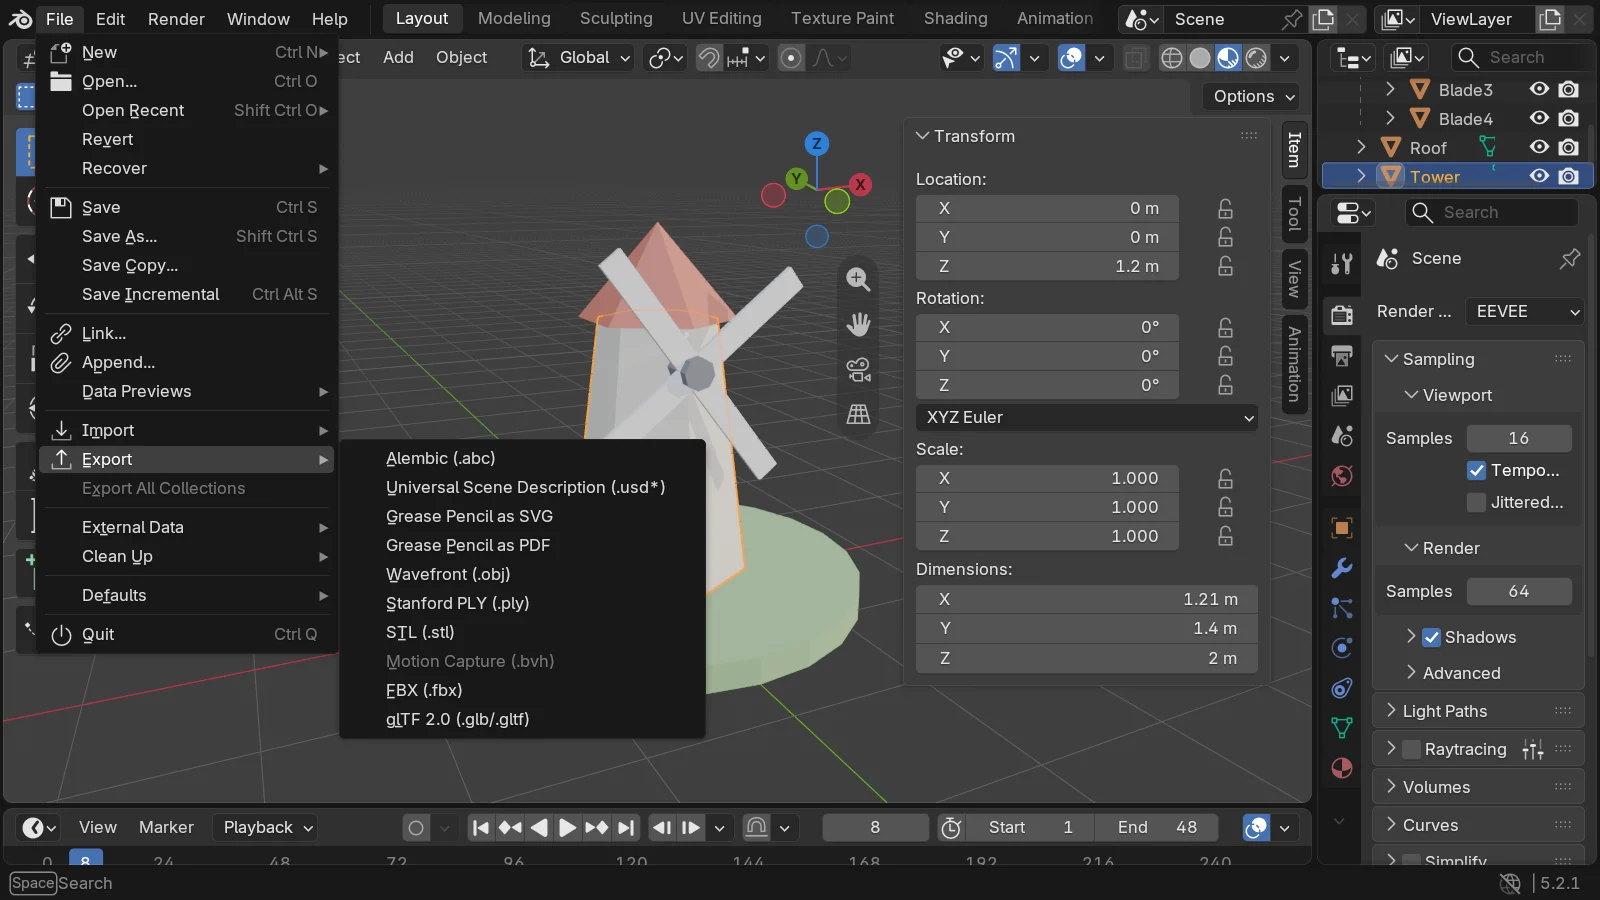 Figure 2. The File > Export submenu. Choose glTF 2.0 (.glb/.gltf) at the bottom (Blender screenshot)
Follow along: In the top menu, click File > Export > glTF 2.0 (.glb/.gltf). When the file window opens, look at the settings panel on the right.
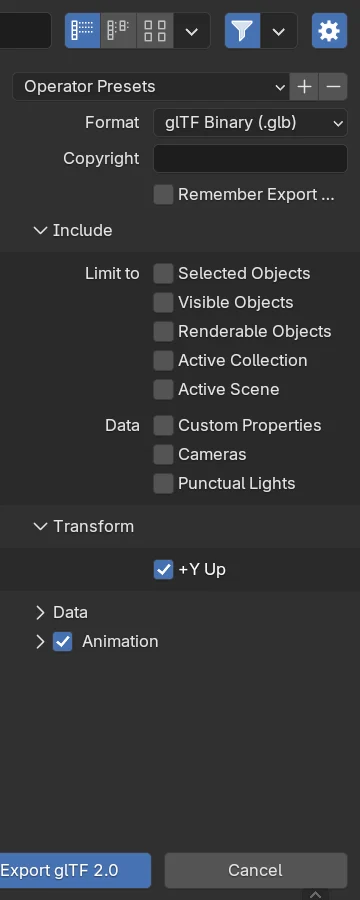 Figure 3. The export settings (defaults). Format is glTF Binary (.glb), every Include option is off, Transform > +Y Up is on, and Animation is on (Blender screenshot)
| Field | Value here | Meaning |
|---|---|---|
| Format | glTF Binary (.glb) | Puts shape, materials, textures, and animation in one file |
| Include > Limit to | All off | When on, exports only the selected objects (Selected Objects). If the scene has other objects such as a floor or camera, you can turn on Selected Objects and select only what you want to export |
| Include > Data > Cameras, Punctual Lights | Off | It is better to place cameras and lights again in Godot |
| Transform > +Y Up | On | Converts Blender's Z-up to glTF's Y-up. Do not turn it off |
| Animation | On | Includes actions (motion) |
The other Format option, glTF Separate, writes .gltf, .bin, and texture files separately. With several files it is easy to leave one behind when moving them, so start with .glb. The Godot docs also say .glb is smaller and embeds the textures.
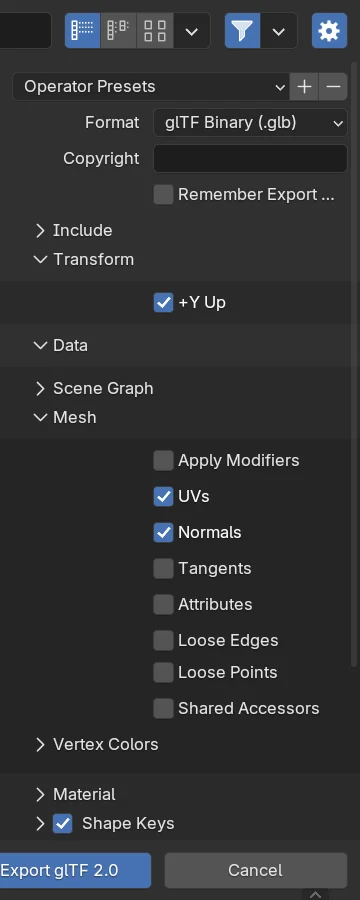 Figure 4. Data > Mesh. Apply Modifiers is off by default (Blender screenshot)
If your model uses modifiers (Subdivision Surface, Mirror, and so on), turn on Data > Mesh > Apply Modifiers. With it on, the shape after the modifiers is exported. With it off, only the original shape before the modifier stack goes out. This windmill has no modifiers, so we left the default. What a modifier is: What is a modifier?
When you are done, type windmill.glb in the file name field at the bottom and click Export glTF 2.0.
4. Putting it into a Godot project
Follow along:
- When Godot starts, the Project Manager appears. Click Create, set a project name and folder, keep the default renderer (Forward+), and create it.
- When the editor opens, copy the exported
windmill.glbinto the project folder. You can also drag it from Windows Explorer into the FileSystem panel at the bottom left of Godot. - Godot notices the file and imports it automatically. A progress bar shows briefly, then
windmill.glbappears in the FileSystem list. - Click
windmill.glbin the list once, then click the Import tab next to the Scene panel at the top left.
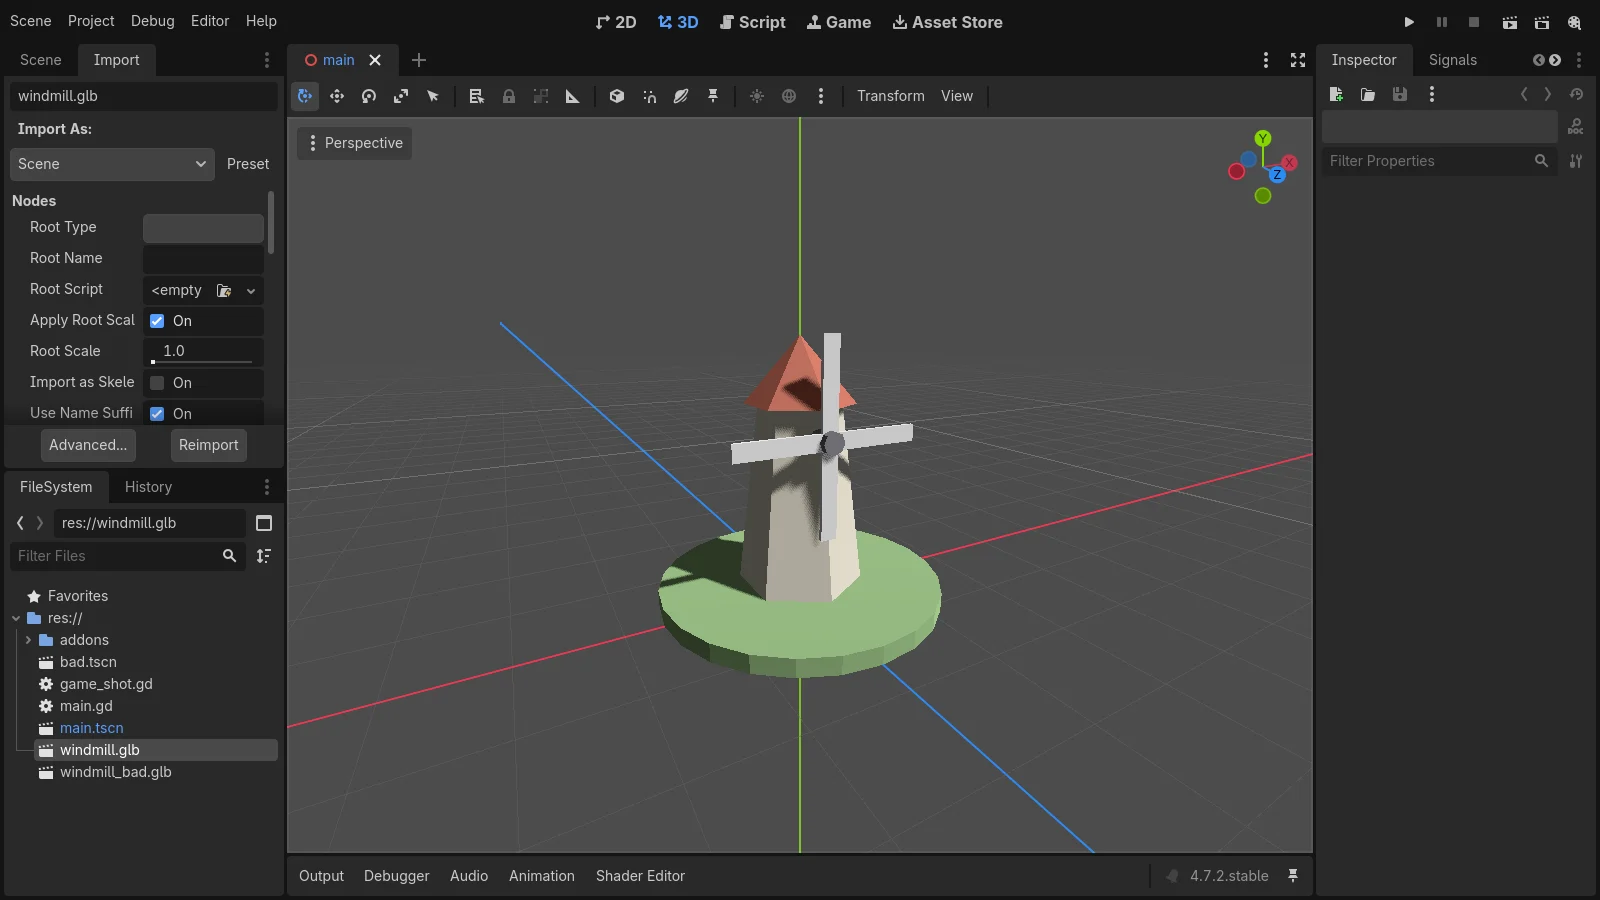 Figure 5. Selecting windmill.glb in FileSystem shows its import settings in the Import tab. Import As is Scene and Root Scale is 1.0 (Godot screenshot)
How to read it: Import As: Scene means the file was imported as "a small scene with several objects in it." Root Scale is a size applied to the whole model. You can fix a wrong size here and click Reimport, but it is better to fix size in Blender (section 8). The Advanced… button opens a detailed window where you set objects, materials, and animations one by one. The FileSystem in the figure also has files such as windmill_bad.glb, used for the test in section 8. Your screen will show only windmill.glb.
Godot can also read .blend files directly. According to the official docs, though, Blender must be installed on that PC, and if it is not in the default location you need to set the Blender path in the editor settings. Everyone you work with would need Blender installed, so exchanging .glb files is simpler at first.
5. Placing the model in a scene
A Godot scene is a tree of parts called nodes, like a toy box holding smaller boxes. An imported .glb is itself a scene, so you can drop it whole into another scene.
Follow along:
- In the top menu, click Scene > New Scene.
- In the Scene panel at the top left, click 3D Scene. A top node (Node3D) appears. Double-click it and rename it to
Main. - Drag
windmill.glbfrom FileSystem ontoMainin the Scene panel.windmillappears underMain, and the windmill shows up in the 3D view. - With
Mainselected, click+(Add Child Node) at the top of the Scene panel, typeDirectionalLight3Din the search field, and add it. It acts as sunlight. In the Inspector on the right, turn on Enabled under Shadow to get shadows. - Add
WorldEnvironmentthe same way. In the Inspector's Environment field, choose New Environment, then set Background > Mode to Sky, the Sky field to New Sky, and the Sky Material field to New ProceduralSkyMaterial. This adds a sky and ambient light. - Add
Camera3Dthe same way, then move and rotate it in the 3D view so the windmill is in view. - Press
Ctrl+Sand save it asmain.tscn.
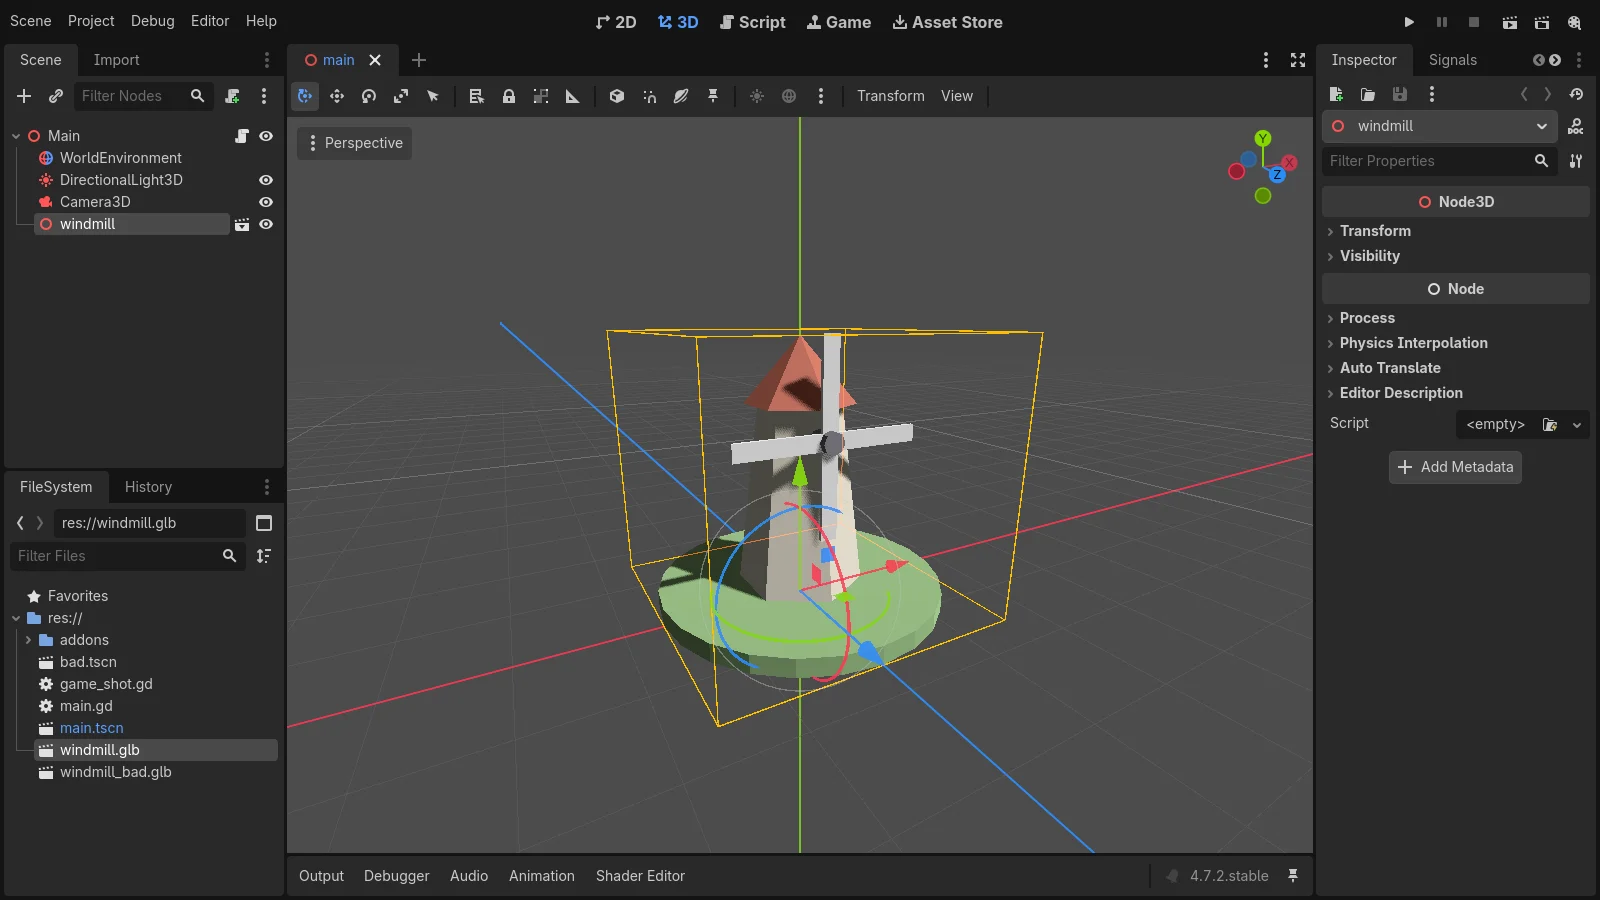 Figure 6. The finished scene. The Scene panel has four nodes under Main: WorldEnvironment, DirectionalLight3D, Camera3D, and windmill. Selecting windmill shows an orange outline in the 3D view (Godot screenshot)
The Godot docs advise placing lights again in Godot rather than bringing them in the .glb. Programs calculate light differently, so imported lights can look too bright or too dark. Blender's Area lights and World sky are not exported to glTF at all (Blender manual). Godot 4.7 added a new AreaLight3D node that emits light from a rectangle. Try it when you need soft light from something like a window or a light panel.
6. Playing the animation
The blade spin made in Blender (an action named Spin) is inside the .glb. In Godot, the AnimationPlayer node inside windmill holds it. It is like a tape already in a player, so you only need to press play.
Follow along:
- Select
Mainin the Scene panel and click the attach script button at the top (a scroll with a+). Keep GDScript as the language and click Create. - Replace the contents of the script editor with the code below.
- Press
Ctrl+Sto save.
extends Node3D

func _ready():
	var player: AnimationPlayer = $windmill/AnimationPlayer
	player.get_animation("Spin").loop_mode = Animation.LOOP_LINEAR
	player.play("Spin")
_ready() runs once when the scene first starts. The second line finds the AnimationPlayer inside windmill, the third makes Spin repeat forever, and the fourth starts playback. The animation name matches the Blender action name. If it differs, select the AnimationPlayer in the Animation tab at the bottom of the screen to check the name.
7. Running it
Follow along: Click the ▶ (Run Project) button at the top right or press F5. The first time, a window asks you to choose a main scene. Click Select Current to make the current scene the main scene.
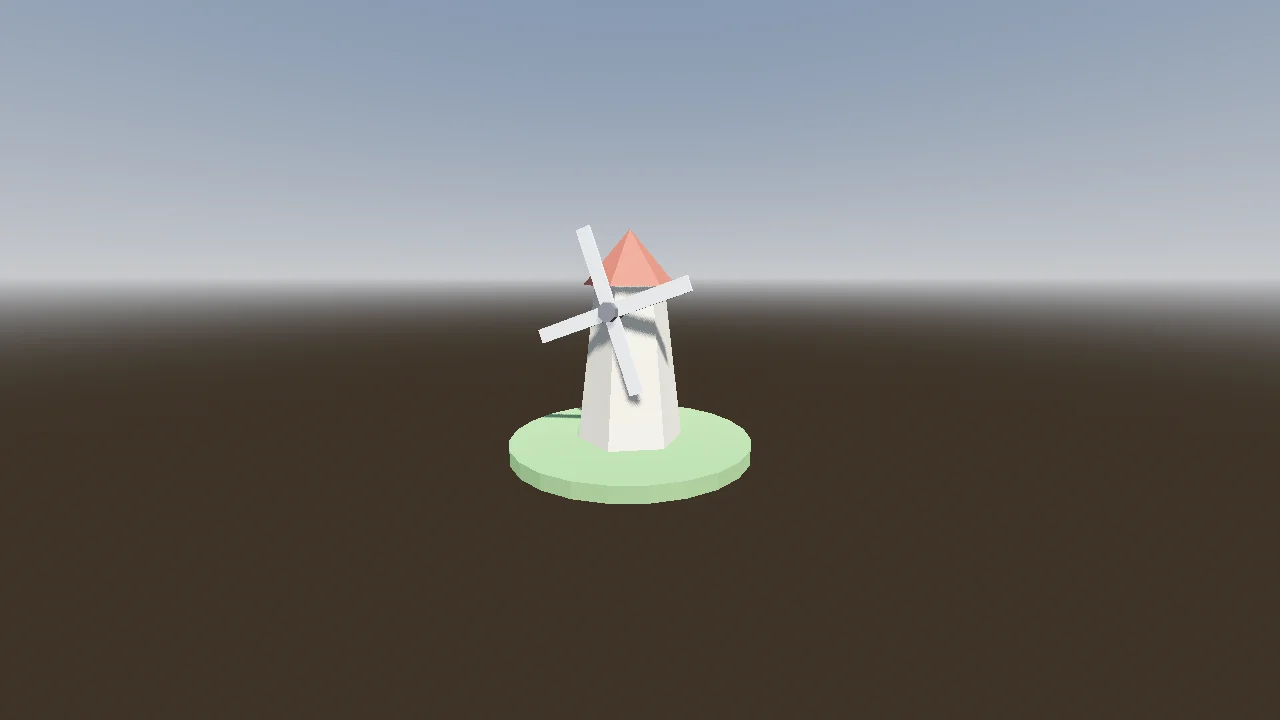 Figure 7. The screen about 1.5 seconds after starting. The blades have turned from their starting position and sit at an angle (Godot run screenshot)
A new window opens and the windmill's blades turn. The brown ground is the default ground color of ProceduralSkyMaterial. Close the window or click the ■ button in the editor to stop.
8. A common mistake: the model is 100 times too big
The most common problem is size. If you scale an object up in Object Mode in Blender and do not apply it (Ctrl+A), that scale goes straight into Godot. We exported a version with the root objects' Scale set to 100 on purpose and ran it with the same camera.
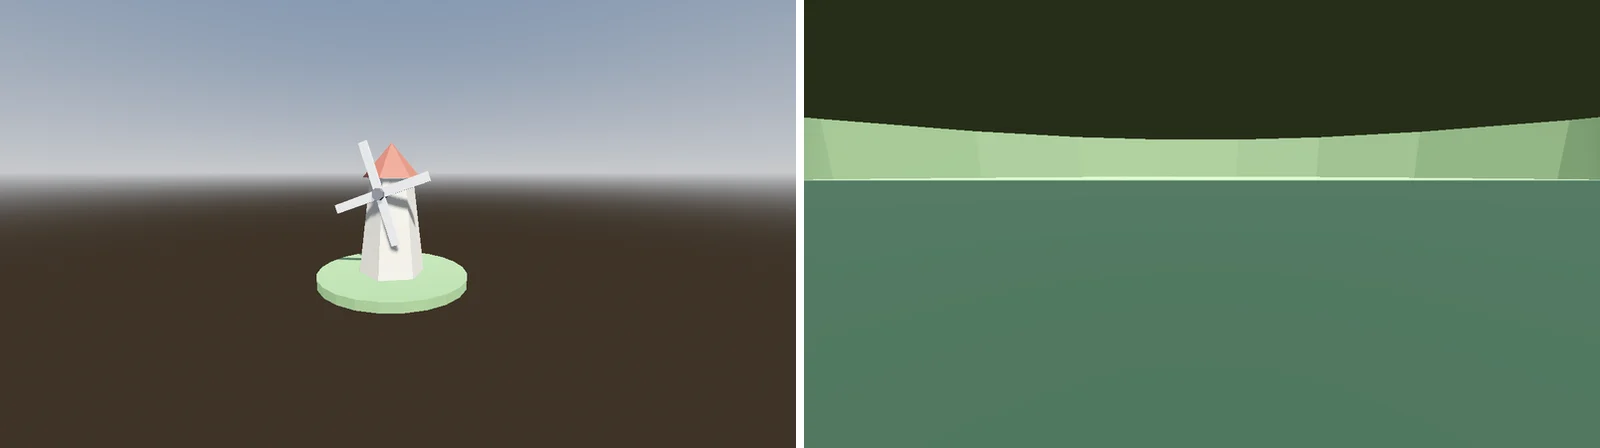 Figure 8. Left: the correctly sized windmill. Right: the 100-times version seen from the same camera. The camera is inside the giant base, so the windmill is not visible (Godot run screenshot)
How to read it: The right side looks broken, but you are actually looking at the inside wall of the windmill's base. In the editor's 3D view, the grid stretches and shrinks with distance, so the size difference is hard to notice. If a model is missing, suspect size first. To fix it, press Ctrl+A → All Transforms in Blender, check that Dimensions show the real size (for example 2 m), and export again.
9. Common mistakes and fixes
| Symptom | Cause | Fix |
|---|---|---|
| When run, the model is missing or the screen is covered in one color | The size is wrong, for example 100 times | Apply with Ctrl+A → All Transforms in Blender, check Dimensions, export again (section 8) |
| The model faces backward | Its front points to +Y in Blender | Rotate it so its front shows in Blender's front view (numpad 1), then apply |
| The model is lying down | +Y Up was turned off on export | Turn on Transform > +Y Up and export again |
| Colors or textures are missing and it looks gray | The material uses nodes other than Principled BSDF, or a texture file was left behind when moving .gltf files | Switch to Principled BSDF, and use glTF Binary (.glb) as the format |
| A shape you made smooth comes out with its original hard edges | Apply Modifiers is off | Turn on Data > Mesh > Apply Modifiers and export again |
| The AnimationPlayer has no animation | Animation was turned off on export | Turn on Animation and export again |
| The script cannot find the AnimationPlayer | The node name is different | Check the model's node name in the Scene panel and change it to $name/AnimationPlayer |
| Inside faces are drawn too | With Backface Culling off in the Blender material, it is saved to glTF as a double-sided (DoubleSided) material (Blender manual) | Turn on Backface Culling in Blender's Material tab and export again |
10. In one line
Blender to Godot: apply scale, front is -Y, glTF Binary (.glb) with +Y Up, lights in Godot, animation through AnimationPlayer. For more on the Blender side, continue with Blender beginner chapter 12: first animation and 3D file formats compared.
References
- Godot 4.7 docs: Available 3D formats
- Godot 4.7 docs: Model export considerations
- Godot 4.7 release page
- Blender 5.2 manual: glTF 2.0
- Keymaps: Blender 5.2 default keymap, Godot 4.7 default shortcuts
- Images: all Blender and Godot screenshots are our own.