Snapping in Blender: move by grid steps, line up vertices and place objects on a surface
How to use snapping when you want to place objects exactly in Blender. Turn it on with the magnet icon, choose Snap Base (which point) and Snap Target (where) in the Snapping popover, hold Ctrl to snap for a moment, press B while moving to pick the base point, and practice grid steps, vertex-to-vertex and surface placement.
한국어English
ON THIS PAGE
- 011. Turn snapping on and off: the magnet icon and `Ctrl`
- 022. Reading the Snapping popover: which point, and where
- 033. Move in grid steps: Increment and Grid
- 044. Line up vertices: Vertex and `B`
- 055. Place on another object's surface: Face and Align Rotation to Target
- 066. Do not confuse it with the Snap menu `Shift`+`S`
- 077. Practice
- 088. Common mistakes and fixes
- 09Summary
- 10References
Based on: Blender 5.2 LTS (English interface, default shortcuts). Checked in November 2026. The pictures are a real Blender 5.2.1 screenshot already used in another Blender guide on this site, pictures from the Blender manual, and diagrams drawn for this guide. The steps follow the official Blender 5.2 manual and the default keymap. The red numbers and boxes were added to explain them.
When you move objects with the mouse, they often end up "almost right but slightly off". A box placed on the floor floats a little, or two boards you lined up still have a gap. This is where snapping helps.
Snapping makes the object you move jump to a set place, like a magnet. Bring a magnet close to a fridge door and it clicks into place at the last moment. Beginner chapter 3 introduced the magnet icon in one line. This guide opens up its settings one by one.
After this guide you can:
- Turn snapping on and off with the magnet icon, and hold
Ctrlto snap only for a moment. - Choose Snap Base (which point) and Snap Target (where) in the Snapping popover.
- Tell Increment and Grid apart when moving in grid steps.
- Line up the vertices of two objects, and pick the base point with
Bwhile moving. - Place an object on another object's surface and align it to the surface.
Before you start: Moving with
Gand locking to an axis withX,YandZare covered in Beginner chapter 3. Every step in this guide adds snapping on top of those moves.
1. Turn snapping on and off: the magnet icon and Ctrl
Starting point: Start from the default cube in a new file (File > New > General).
The snapping buttons are in the middle of the 3D Viewport header (③ in Figure 1). The magnet icon on the left is the on/off switch, and the small icon and down arrow on the right open the Snapping popover. In a new file the right icon is a ruler shape (Increment).
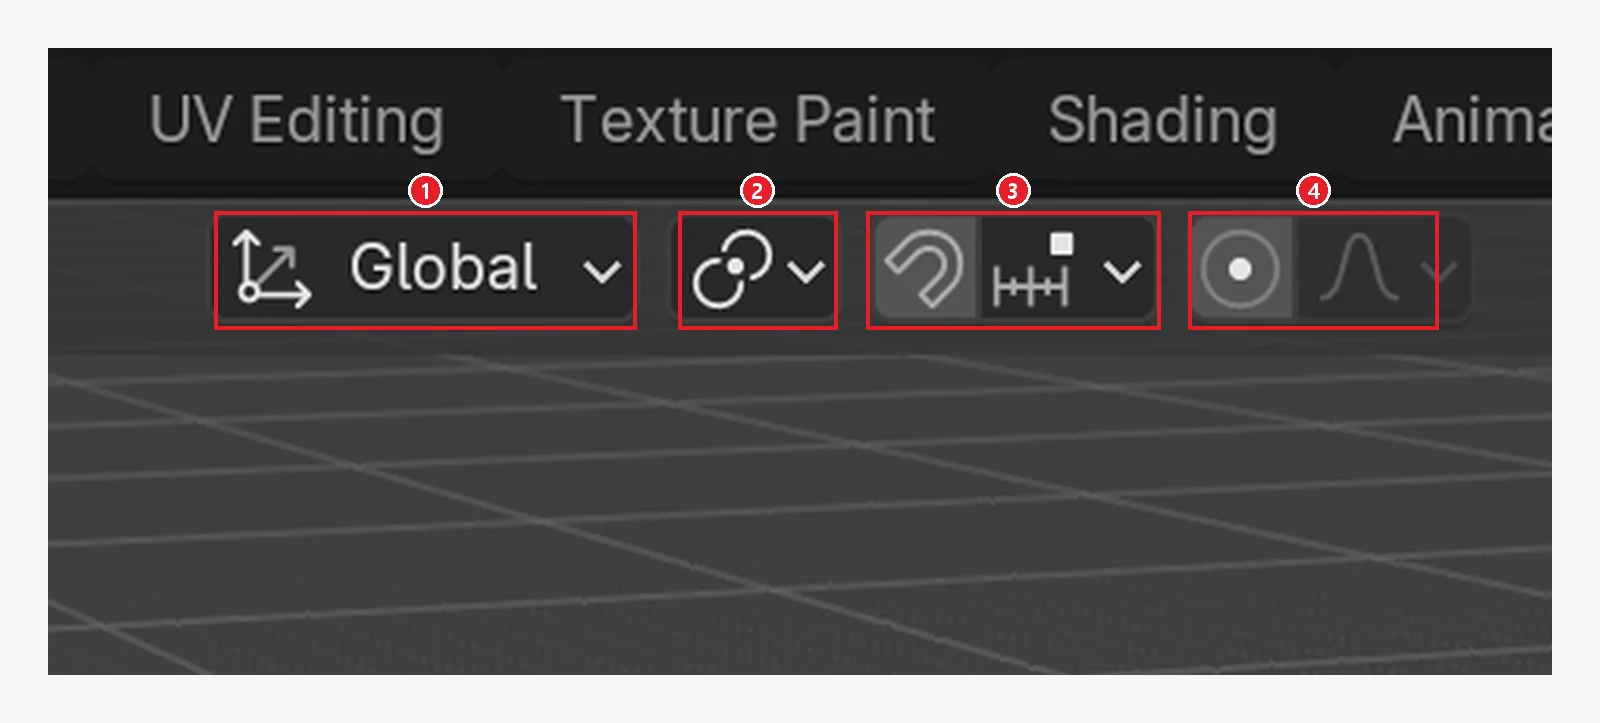 Figure 1. Middle of the header. ① Transform orientation ② Pivot point ③ Snapping (the magnet on the left turns it on and off, the right part opens the Snapping popover) ④ Proportional editing. The picture is a new file with snapping off (Blender screenshot)
Steps:
- Click the magnet icon. It turns blue and snapping is on. Click again to turn it off. The shortcut is
Shift+Tab. - With the magnet off, select the cube, press
Gand move the mouse. The cube follows smoothly. - While moving the mouse, hold
Ctrl. Snapping is on only while you hold it, and the cube moves in steps. Let go ofCtrland it moves smoothly again. - Left-click to finish where you want, or press
Escto cancel.
Ctrl inverts snapping. If the magnet is off, it turns snapping on for a moment; if the magnet is on, it turns it off for a moment. If you only line things up now and then, keeping the magnet off and using Ctrl is easier.
2. Reading the Snapping popover: which point, and where
Snapping settings come down to two questions: which point of the moving object (Snap Base) and where to attach it (Snap Target). It is like fitting a puzzle piece: which corner of this piece goes into which slot on the board.
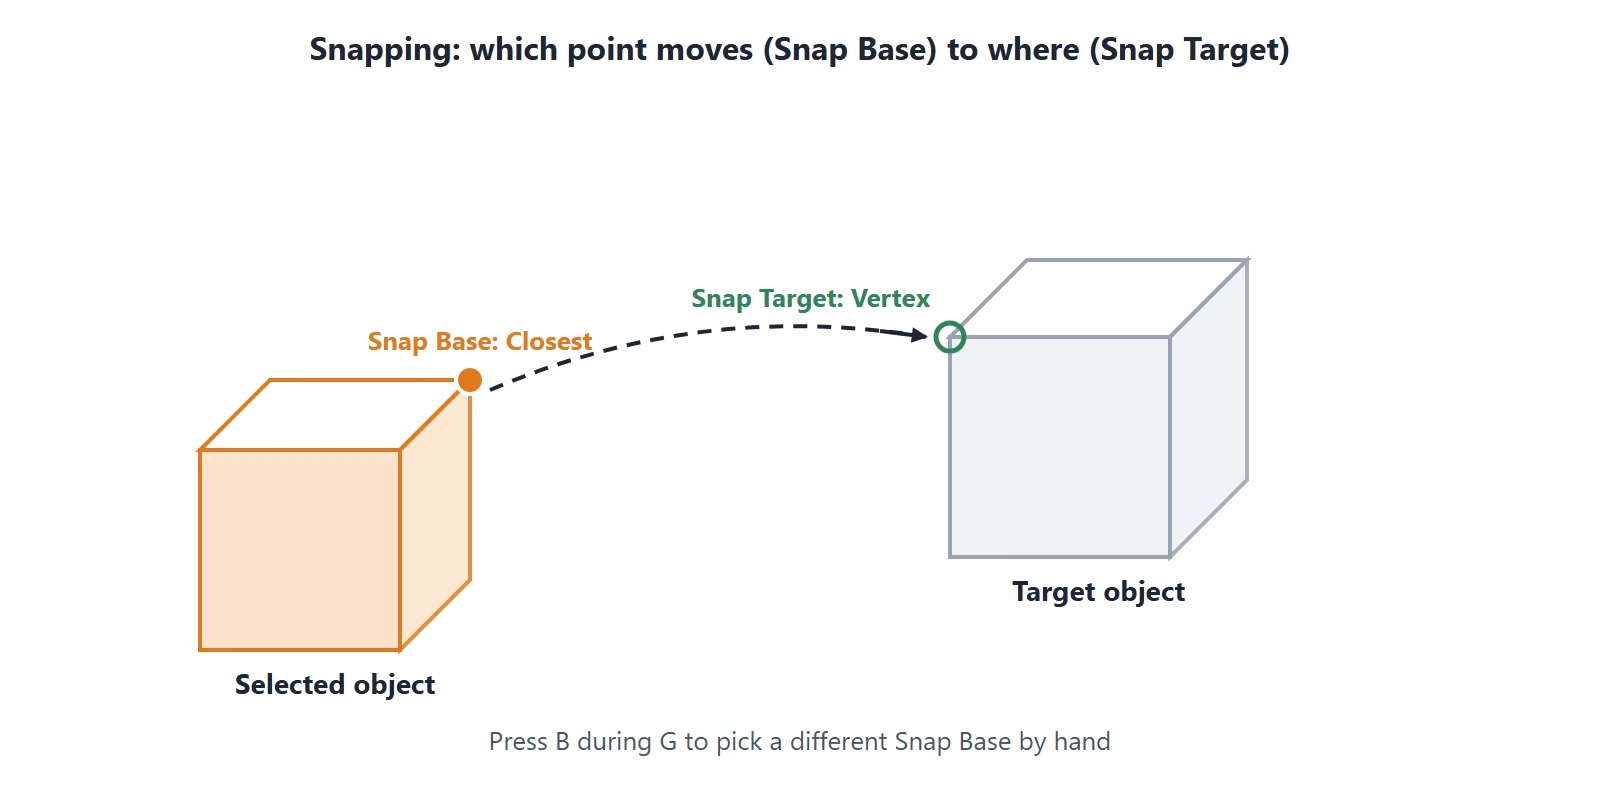 Figure 2. Snap Base is the point on the moving object, Snap Target is where it attaches (diagram)
Starting point: Continue with the cube from section 1.
Steps:
- Click the down arrow on the right of the snapping button in the header. The shortcut is
Ctrl+Shift+Tab. - In the Snapping popover, look at Snap Base at the top and the Snap Target list below it.
- Move the mouse out of the popover to close it.
The popover from step 2 looks like Figure 3. At the top are the four Snap Base buttons, and below them is the Snap Target list. In the picture, Snap Base is set to Closest and Snap Target to Increment.
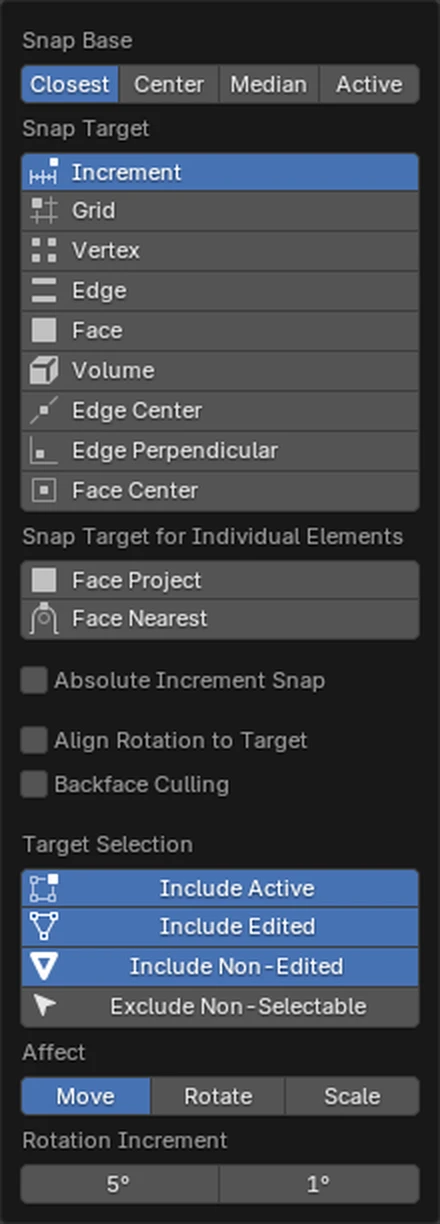 Figure 3. The Snapping popover. From the top: Snap Base, Snap Target, checkboxes, Affect (picture from the Blender 5.2 manual, CC BY-SA 4.0, enlarged 2x)
The popover fields, from the top:
| Field | Choices | Meaning |
|---|---|---|
| Snap Base | Closest, Center, Median, Active | Which point of the moving object attaches |
| Snap Target | Increment, Grid, Vertex, Edge, Face, Volume, Edge Center, Edge Perpendicular, Face Center | Where it attaches. Shift+click turns on several at once |
| Snap Target for Individual Elements | Face Project, Face Nearest | Attaches each selected object (or point) to a surface on its own |
| Align Rotation to Target | Checkbox | Rotates the object to match the direction of the surface it attaches to |
| Backface Culling | Checkbox | Does not attach to faces pointing away |
| Target Selection | A few checkboxes | Narrows down which objects can be targets |
| Affect | Move, Rotate, Scale | Whether snapping also applies to rotating and scaling |
The four Snap Base choices:
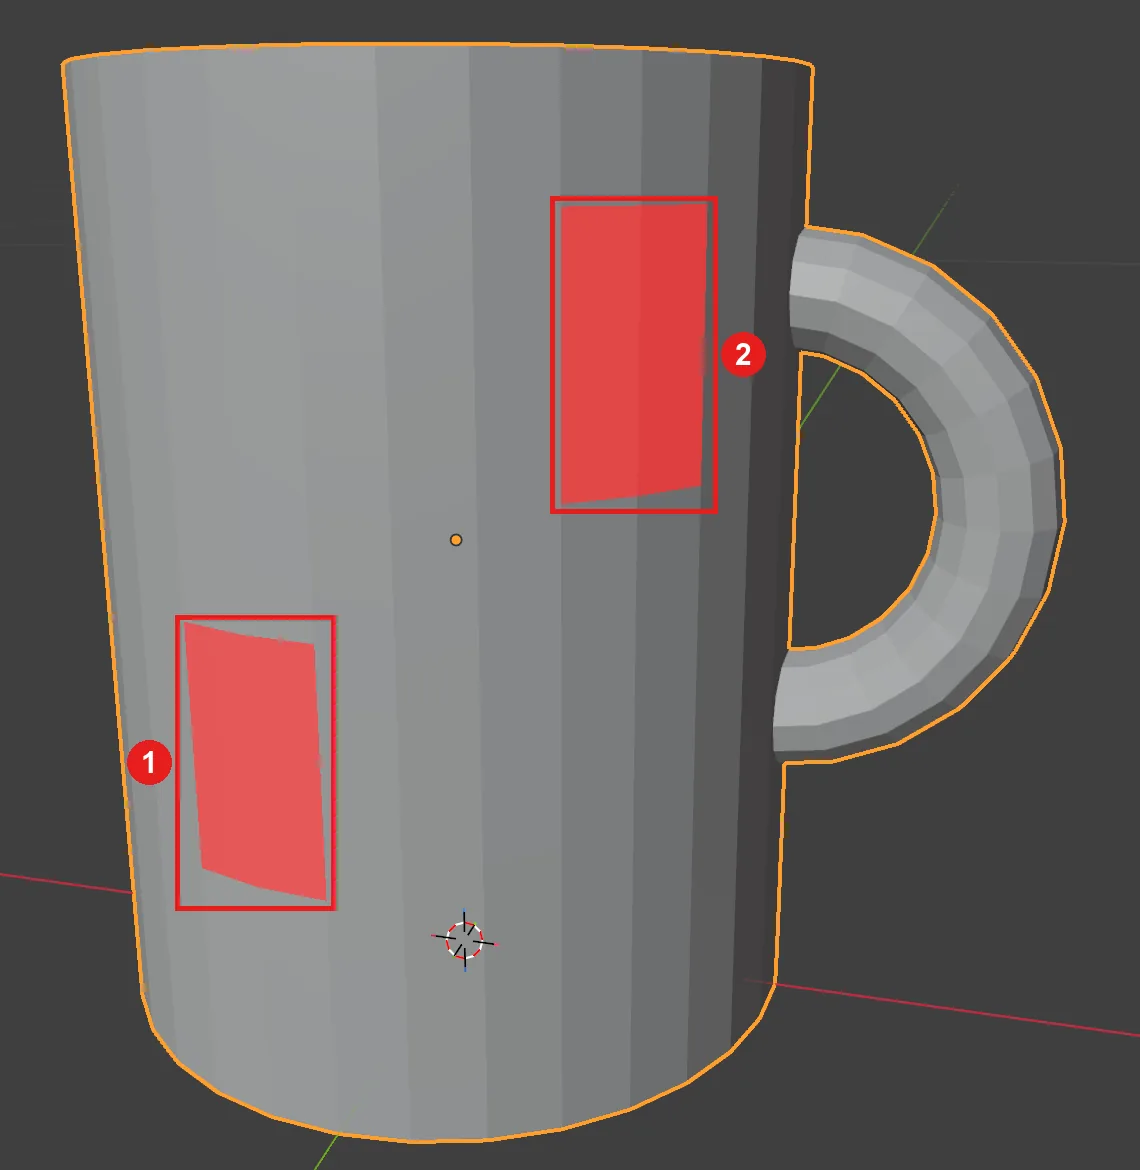
- Closest: The point closest to the target. In Object Mode it is a corner of the box around the object (the bounding box); in Edit Mode it is the closest vertex (Figure 4).
- Center: The current transform center, that is, the pivot point. Combined with the 3D cursor, it lets you choose the snapping point by hand.
- Median: The average position of the selected objects' origins (in Edit Mode, of the selected vertices).
- Active: The origin of the active object (in Edit Mode, the center of the active element).
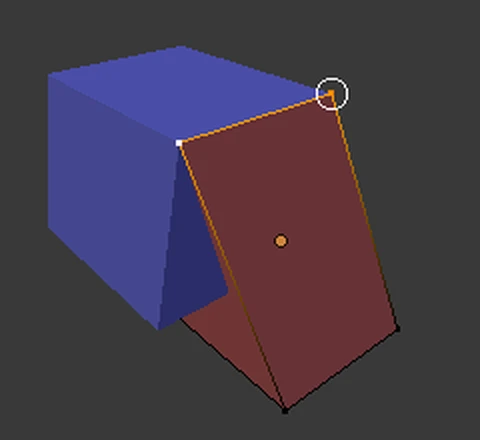 Figure 4. Snap Base set to Closest. The closest corner of the moving board snaps to the box's vertex (white circle) (picture from the Blender 5.2 manual, CC BY-SA 4.0, enlarged 2x)
3. Move in grid steps: Increment and Grid
The most common use is moving neatly in grid steps. There are two similar choices for that.
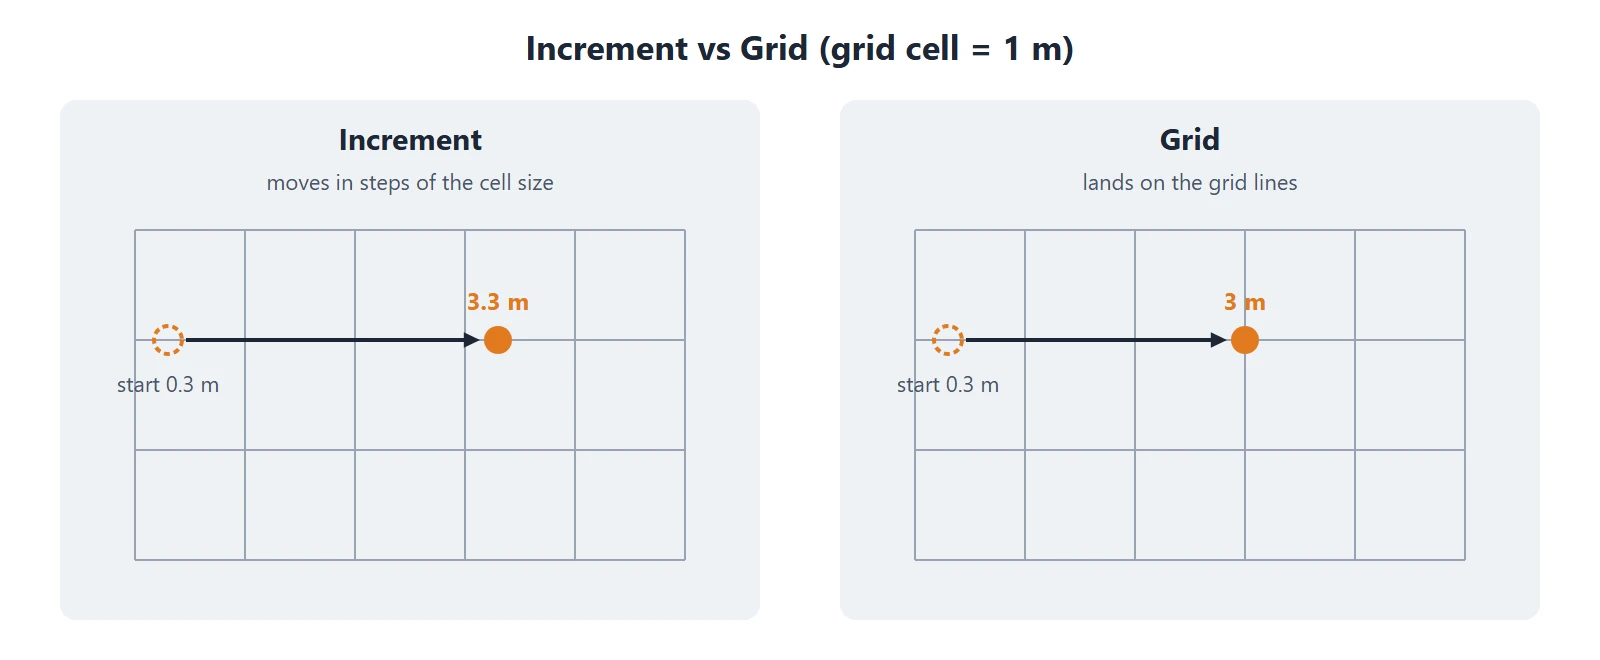 Figure 5. An object starting at 0.3 m with a 1 m grid cell. Increment moves by the cell size from the start, Grid lands on the grid lines (diagram)
- Increment: Moves by one grid cell at a time from where it started. Starting at 0.3 m, it goes 1.3, 2.3, 3.3 m, keeping the .3. The cell size changes with how far you zoom in (the same spacing as the viewport grid).
- Grid: Attaches to the grid lines you see. Even when starting at 0.3 m, it lands on 1, 2, 3 m.
When you choose Increment, an Absolute Increment Snap field appears lower in the popover. Turn it on and Increment also lands on the grid. It is similar to Grid, except that Grid goes to the grid point closest to the mouse.
Starting point: Close the Snapping popover from section 2 and continue with the cube.
Steps:
- In the sidebar (
N), on the Item tab, type0.3into the cube's Location X. This step moves the starting point off the grid on purpose. - In the Snapping popover, set Snap Target to Increment (the default in a new file).
- Select the cube, press
G→X, then holdCtrland move the mouse to the right. - Check that Location X in the sidebar grows by 1 and keeps the .3. Left-click to finish.
- Change Snap Target to Grid and repeat step 3. This time check that Location X lands on whole numbers (1, 2, 3).
4. Line up vertices: Vertex and B
To join the edges of two objects with no gap, set Snap Target to Vertex. The object attaches to the vertex (point) closest to the mouse.
Starting point: Set the cube from section 3 back to Location X 0. Duplicate it with Shift+D and move the copy about 4 m along X (duplicating is in Beginner chapter 4).
Steps:
- In the Snapping popover, set Snap Target to Vertex and Snap Base to Closest.
- Select the right cube and press
G. - Hold
Ctrland bring the mouse close to the top right front vertex of the left cube. When a snap marker appears on that point, it has attached. - The corner of the right cube closest to that point follows and attaches. Left-click to finish.
Pick the point yourself: B. Closest picks the point nearest the target automatically, but sometimes it is not the one you want. Then press B while moving (Set Snap Base). Point the mouse at the point on the moving object you want to attach and left-click. That point becomes the new base, and then you choose where it goes.
- Select the right cube and press
G. - Press
B, move the mouse to the bottom left front vertex of the right cube and left-click. - Hold
Ctrl, move to the bottom right front vertex of the left cube and left-click.
While moving, if a snap marker is shown, press A to mark that spot (Add Snap Point). If you mark several spots, the selection snaps to their average position. Use it to place something exactly halfway between two points.
5. Place on another object's surface: Face and Align Rotation to Target
To put a box on a floor plate or a sloped roof, set Snap Target to Face. The object attaches to the surface of the face under the mouse.
Starting point: Delete the two cubes from section 4 (X). Add a floor with Shift+A → Mesh → Plane and scale it with S → 5 → Enter. Add a Cube again with Shift+A → Mesh → Cube and raise it with G → Z → 3 → Enter.
Steps:
- In the Snapping popover, set Snap Target to Face and Snap Base to Closest.
- Select the cube and press
G→Z. This locks the move to up and down only. - Hold
Ctrland put the mouse over the floor plate. The cube comes down until its lowest corner touches the surface of the plate. - Left-click to finish. When the cube touches the floor plane, Location Z in the sidebar ends up near
1(half of the cube's 2 m height).
Standing on a slope: Tilt the floor plate with R → X → 30 → Enter and turn on Align Rotation to Target in the Snapping popover. With it on, the object's up direction (Z axis) turns to match the direction the target face points. It is like a flag pushed into a hillside standing straight out of the slope. Move the cube with G, hold Ctrl and put the mouse over the tilted plate, and the cube tilts to match it.
For several objects, use Face Project under Snap Target for Individual Elements. It attaches each selected object on its own to the surface it hits along your current view direction. It suits placing many trees on bumpy ground at once. To do something similar to a whole shape, see Shrinkwrap in Displace and Shrinkwrap modifiers.
6. Do not confuse it with the Snap menu Shift+S
There is a separate Snap menu (Shift+S) with a similar name. Press it with the mouse over the 3D Viewport and a round pie menu opens. This menu does not attach things while moving; it is a set of commands that move things in one go.
| Item | What it does |
|---|---|
| Selection to Cursor | Moves the selected objects to the 3D cursor |
| Selection to Active | Moves the selected objects to the active object |
| Selection to Grid | Moves the selected objects to the nearest grid point |
| Cursor to Selected | Moves the 3D cursor to the middle of the selection |
| Cursor to World Origin | Moves the 3D cursor to the center of the scene (0, 0, 0) |
For "put this object exactly where that one is", this menu is quicker. The 3D cursor marks where new objects appear (section 1 of Beginner chapter 4). It works well together with moving the origin, which is covered in Moving the origin in Blender.
7. Practice
- Put the cube at Location X
0.5and move it withG→X→Ctrlusing Increment and then Grid. Write down the final X value for each. - Use Vertex snapping to join two cubes corner to corner into a long bar. This time use
Bto pick the point yourself. - Snap a cube onto a plate tilted 30 degrees with Align Rotation to Target on. Write down what changes compared to when it is off.
8. Common mistakes and fixes
| Symptom | Cause | Fix |
|---|---|---|
| The object moves in jerky steps | The magnet icon is on | Turn it off with Shift+Tab, or hold Ctrl while moving |
Holding Ctrl and pressing G opened another menu | Ctrl+G is a different shortcut | Press G first to start moving, then hold Ctrl |
| It snaps to a vertex but the wrong corner attaches | Snap Base is Closest, so it picks the nearest point | Press B while moving and pick the point yourself |
| After snapping to the floor it is half buried | Snap Base is Center or Active, so the origin (middle) attaches | Set Snap Base to Closest |
| After snapping to a surface it lies tilted | Align Rotation to Target is on | Turn that field off |
| Rotating and scaling also move in steps | Rotate and Scale are on under Affect | Turn on only Move under Affect |
| It attaches to back faces or inside faces | Faces you cannot see are targets too | Turn on Backface Culling |
Summary
Snapping is two things: which point (Snap Base) and where (Snap Target). Use Ctrl for a moment, and B when the wrong point attaches. The next guide covers what to check when an object disappears or looks cut off.
Previous: Join and Separate · Next: When an object disappears or looks cut off
References
- Blender 5.2 Manual: Snapping
- Blender 5.2 Manual: Transform Modal Map (Snap Invert, Set Snap Base, Add Snap Point)
- Blender 5.2 Manual: Snap Menu
- Shortcuts: default (Blender) keymap of Blender 5.2.
- Pictures: a screenshot made in Blender 5.2.1 for a Blender guide on this site, diagrams drawn in code for this guide, and Figures 3 and 4 from the Snapping page of the Blender 5.2 manual (CC BY-SA 4.0, Blender Documentation Team, enlarged 2x).