Rendering like a product photo: infinite background, softbox lighting and camera focus
Build an infinite background where the floor curves into the wall, use a large Area light as a softbox for soft shadows and long reflections, add fill and top lights, then use the camera's Depth of Field to focus only on the front product. Each step is checked with side-by-side renders.
한국어English
Based on: Blender 5.2 LTS (screenshots from 5.2.1, English interface, default shortcuts), EEVEE render engine. Checked in November 2026. All pictures are real Blender screenshots and renders. The red numbers, boxes and red labels on the renders were added to explain them.
Think of cosmetics photos in an online shop. There is no line where the floor meets the wall behind the product, the shadows are light and soft, and a long white reflection runs down the bottle. Photo studios use three tools for this: a curved paper backdrop, a large light covered with cloth (a softbox), and a camera focused on the front product. You can build the same three in Blender.
This guide adapts the three-point lighting from the first guide of the series to product photos. Three-point lighting is the basic skill of showing one subject clearly. This guide adds "clean and expensive-looking" on top.
After this guide you can:
- Extend and bend one plane into an infinite background where the floor curves into the wall.
- Tell the shadow difference between a small light and a large light in a render.
- Turn an Area light into a rectangular softbox to put a long reflection on a bottle.
- Tidy up the dark side and the top of the cap with a fill light and a top light.
- Focus only on the front product with the camera's Depth of Field.
Before you start: The jobs of key and fill lights are covered in Three-point lighting in Blender. Selecting edges and
E(extrude) in Edit Mode are in Blender beginner chapter 6: Edit Mode, and working with the camera is in Blender beginner chapter 10: camera.
1. Build an infinite background
A studio backdrop is a large sheet of paper hung from above that curves smoothly onto the floor. With no sharp line between floor and wall, the background seems to go on forever through the camera. That is why it is called an infinite background (a cyclorama, or cyc for short).
Start: Begin with the default cube of a new file (File > New > General).
Steps:
- Select the cube and the point light (Light) and delete them with
X> Delete. Keep the camera. - Choose
Shift+A> Mesh > Plane and set Size to10in the Add Plane panel at the lower left. - Press
Tabto enter Edit Mode and press2to switch to edge select. Left-click only the back edge of the plane (the side with larger Y). - Press
E→Z→5→Enterin turn. The back edge is extruded 5 m upward and becomes a wall. - Select only the bent edge where floor and wall meet, press
Ctrl+B, move the mouse a little and left-click. In the Bevel panel at the lower left, set Width to2and Segments to16. The bend becomes a smooth curve. - Press
Tabto go back to Object Mode and, with the mouse over the 3D Viewport, right-click > Shade Smooth. - On the sidebar (
N) Item tab, set Location Y to1. The whole backdrop moves 1 m back. - On the Material tab, click New and set Base Color to a light gray (the picture uses R, G, B 0.8) and Roughness to
0.6.
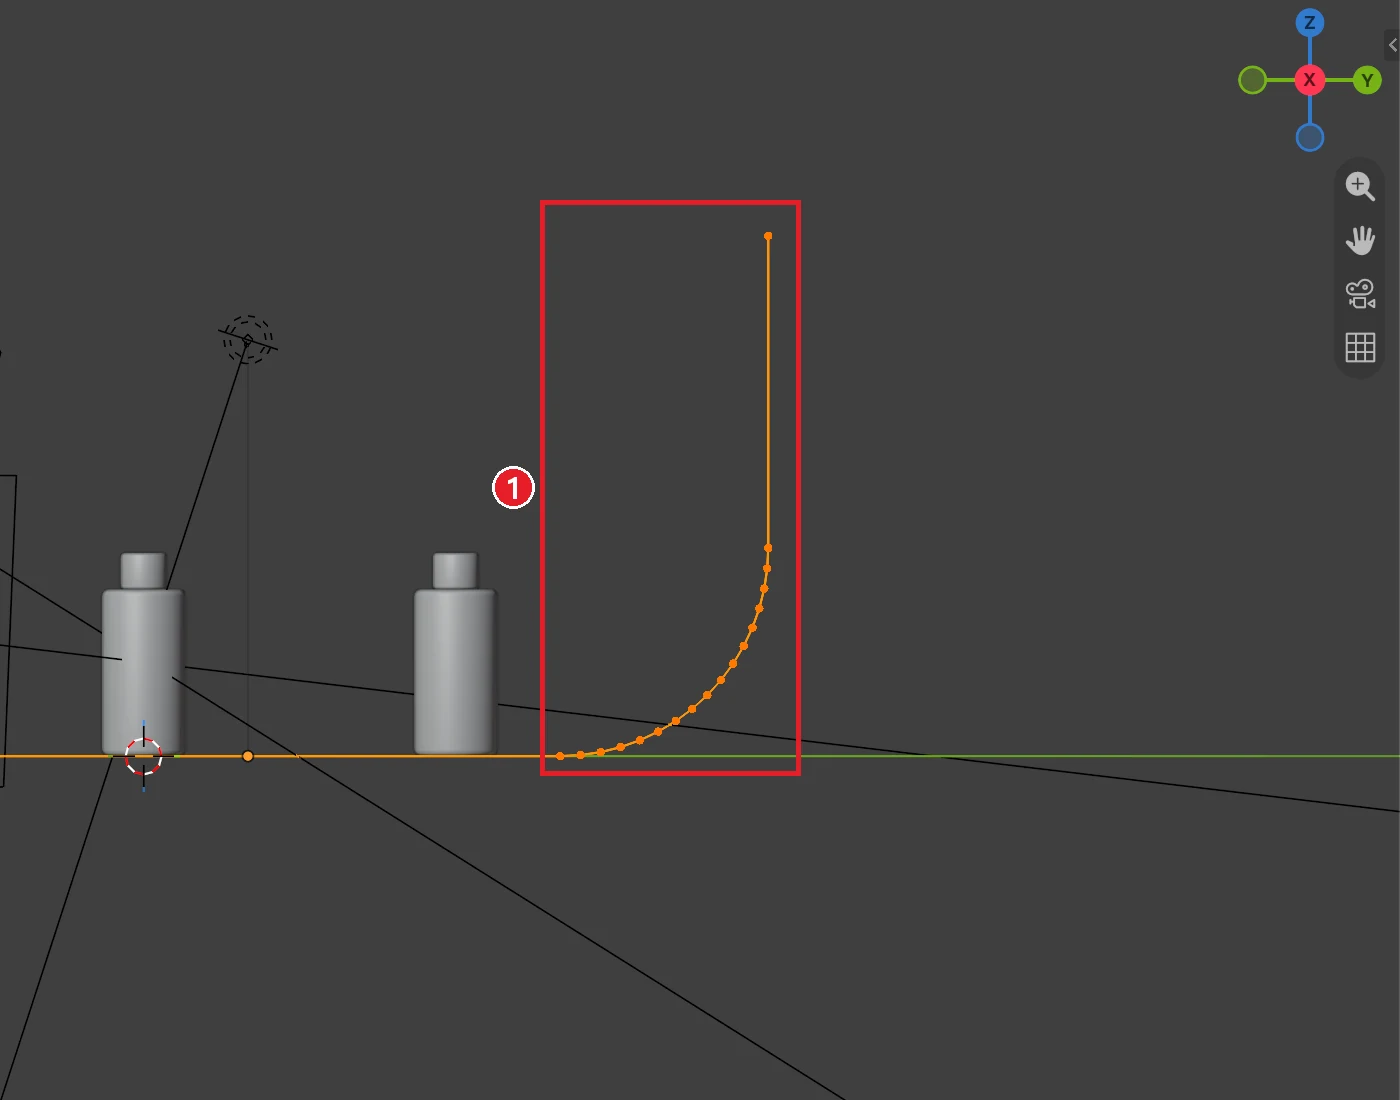 Figure 1. ① Where floor and wall join in a curve. The picture shows Edit Mode from the side (the X axis side) after finishing section 2 (Blender screenshot)
The bigger the radius of the curve (Width), the more smoothly the line disappears. Too small and the camera sees a bent line. Too big and the wall moves far away, so you have to make the backdrop larger.
2. Place the products and the camera
The example product is a bottle made from two cylinders. A white bottle goes in front and a teal bottle behind. The back bottle is there to show the out-of-focus blur in section 5.
Start: Continue from the backdrop in section 1.
Steps:
- Choose
Shift+A> Mesh > Cylinder, and in the Add Cylinder panel set Vertices64, Radius0.4, Depth1.6and Location Z0.8. Rename it toBottle. - On the Modifier tab, add Add Modifier > Generate > Bevel with Amount
0.06and Segments4. Right-click > Shade Smooth. Rounded edges let reflections flow smoothly around the corners. - Make a new material and set Base Color to an almost-white gray (the picture uses 0.85) and Roughness to
0.15. Low roughness lets the lights reflect on the bottle surface. - Cap: add another cylinder with Vertices
64, Radius0.22, Depth0.35and Location Z1.775, then add a Bevel modifier (Amount0.03, Segments3) and Shade Smooth. Its material is Metallic1, Roughness0.25and a gold Base Color (the picture uses R 0.9, G 0.62, B 0.28). - Select the bottle and the cap together, duplicate them with
Shift+D, pressEsc, and on the sidebar move them to Location X0.9, Y3. For the duplicated bottle's material, click the number button on the right to make a separate copy, then change Base Color to teal (the picture uses R 0.12, G 0.45, B 0.5). - Select the camera and set Location X
0, Y-8, Z1and Rotation X90, Y0, Z0. On the Camera tab, change Focal Length to70.
Why a long focal length: Product photos are usually taken from a distance with a telephoto lens. A short lens (wide angle) up close makes near parts look larger, so the bottle looks stretched. This guide shoots at 70 mm from 8 m away.
3. Small light versus large light
The key to product lighting is the size of the light. At the same strength, a larger emitting surface makes shadow edges softer, and the reflection on a shiny surface becomes larger and softer too. On a sunny day shadows are sharp as a knife, but on a cloudy day the whole sky acts as one huge light and there are almost no shadows.
Start: Continue from the scene in section 2. There are no lights yet.
Steps:
- Add
Shift+A> Light > Point and move it to Location X-3, Y-2.5, Z3. On the Light tab, set Power to400and Radius to0. - Render with
F12(left of Figure 2). - In the Outliner, turn off the camera icon on the Point row to remove it from the render.
- Add
Shift+A> Light > Area and rename it toSoftbox. Set Location X-3, Y-2.5, Z2.5and Rotation X68, Y0, Z-50. - On the Light tab, set Power to
500, change Shape to Rectangle, and type Size X2and Y3(Figure 3). - Render with
F12(right of Figure 2).
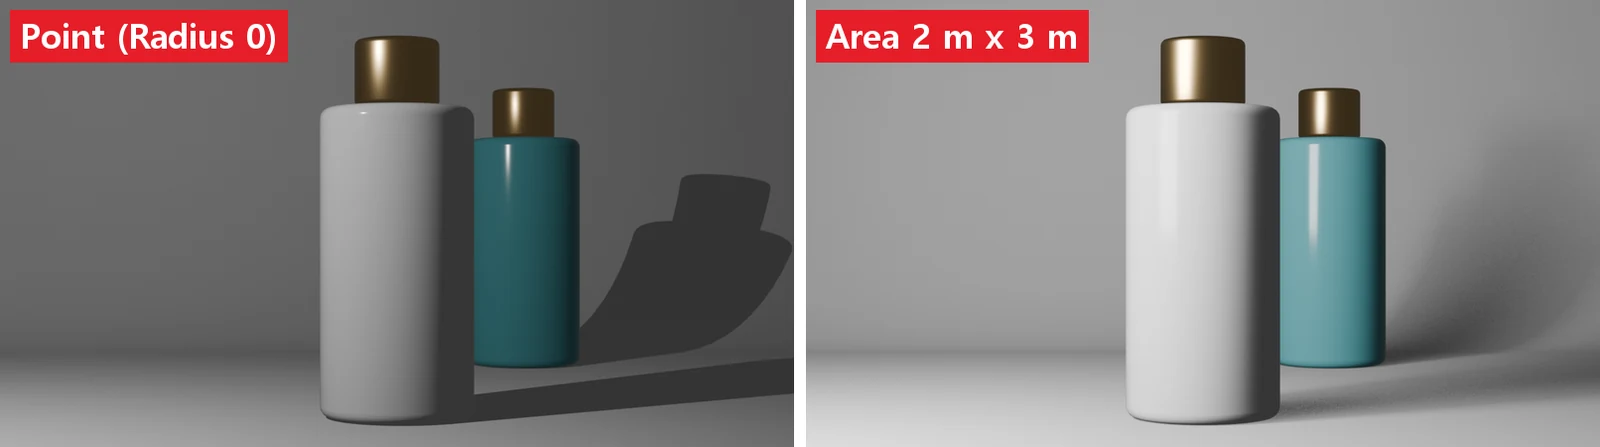 Figure 2. Left: Point (Radius 0). Right: Area 2 m × 3 m (Blender render)
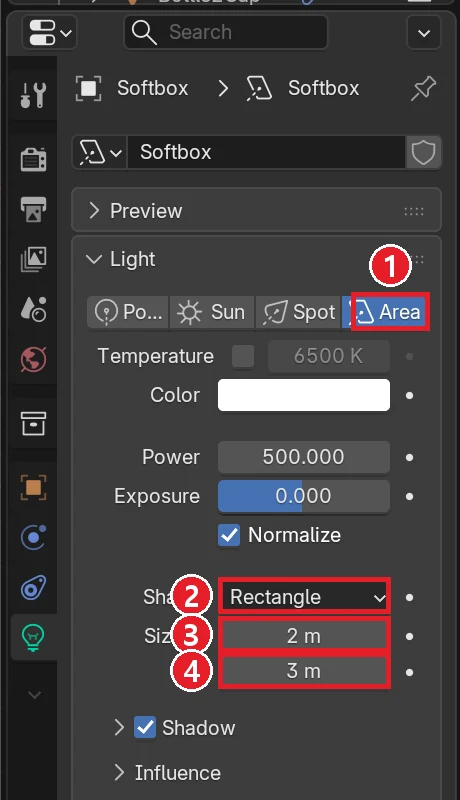 Figure 3. ① Area ② Shape: Rectangle ③ Size X 2 m ④ Size Y 3 m (Blender screenshot)
On the left of Figure 2, light comes from a point of size 0, so the shadow on the backdrop is dark and sharp. On the right, light comes from a 2 m × 3 m panel, so the shadow is light and spreads, and a tall reflection appears on the left of the white bottle. This long reflection is the signal that tells a viewer "smooth material" in a product photo. Stand a rectangular light upright and the reflection becomes tall.
4. Add a fill light and a top light
One softbox already looks clean, but the right side of the bottle is dark and the top of the cap looks dull. Add two more lights.
- Fill light: shines weakly from the opposite side to lift the dark side a little. It does the same job as a white reflector board in a studio.
- Top light: shines from above and slightly behind to put a shine on the top and rim of the metal cap. It plays the role of the rim light in three-point lighting.
Start: Continue from the scene in section 3 (Point off for rendering, Softbox on).
Steps:
- Add another Area light and rename it to
Fill. Set Location X3.5, Y-2.5, Z1.2, Rotation X86, Y0, Z54, Power60, Shape Square and Size3. - Add another Area light and rename it to
Top. Set Location X0, Y1, Z4, Rotation X18, Y0, Z180, Power300, Shape Rectangle, Size X3and Y0.6. - Render with
F12and compare with the Softbox-only result.
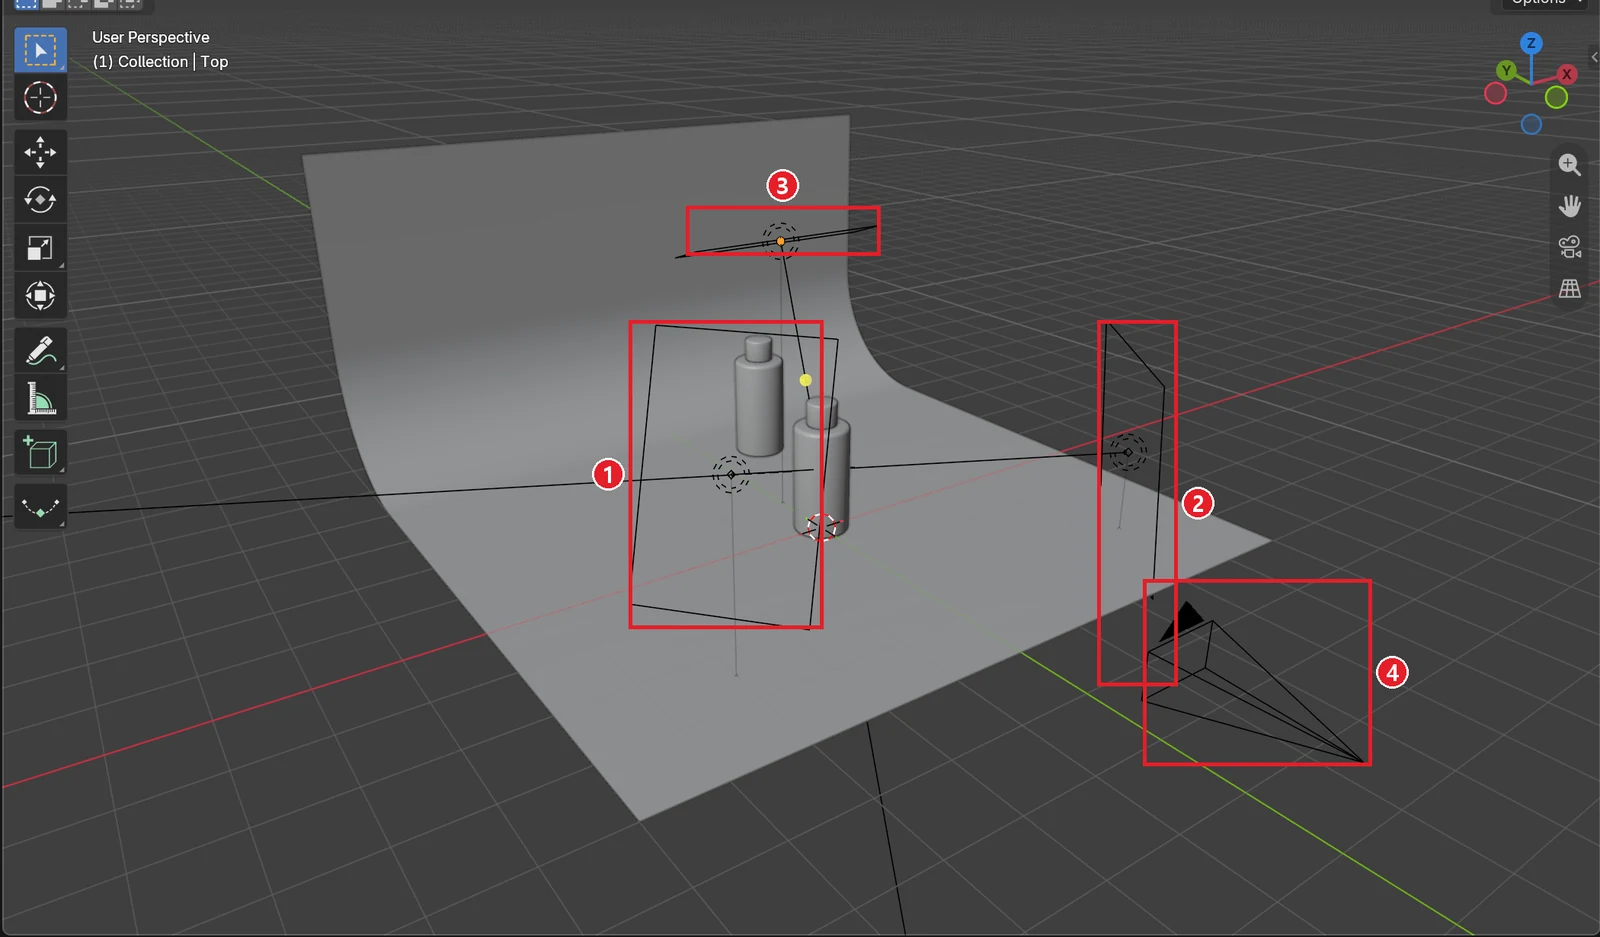 Figure 4. Where the lights and camera are. ① Softbox ② Fill ③ Top ④ Camera. The Point from section 3 is hidden in this view (Blender screenshot)
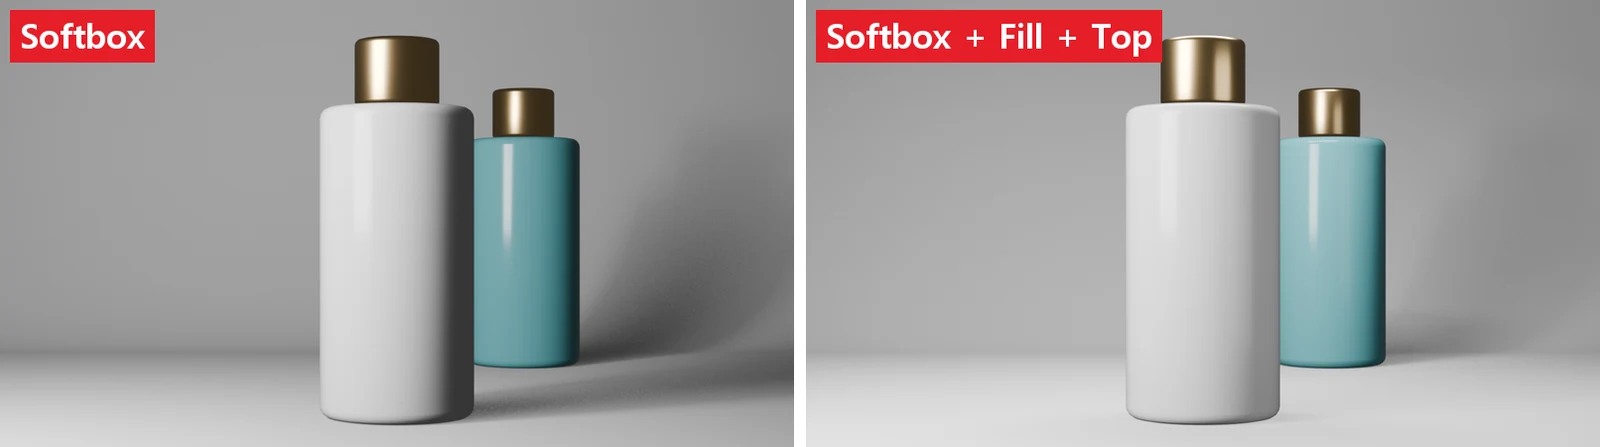 Figure 5. Left: Softbox only. Right: Softbox + Fill + Top (Blender render)
On the right of Figure 5, the dark side of the bottle is lifted so the whole bottle looks bright and clean, and a bright line appears on the rim of the cap top. In exchange, the shadows are weaker and the bottle looks a little less round. As in Figure 5 of the three-point lighting guide, choose the balance with Fill's Power. For a bright, clean online-shop look, raise Fill. For a richer, high-end look, lower it.
5. Camera focus: Depth of Field
Finally, focus only on the front bottle and blur the back bottle. People look first at the part that is in focus, so you can guide the viewer's eye to the main product. The range in front of and behind the focus point that stays sharp is called depth of field (DOF).
Start: Continue from the scene in section 4 (Softbox, Fill and Top on).
Steps:
- Select the camera and open the Camera tab (green camera icon) of the Properties editor.
- Turn on the checkbox to the left of the Depth of Field panel title and expand the panel (Figure 6).
- Click the Focus on Object field and choose
Bottle(the front bottle) from the list. Wherever the front bottle moves, the focus follows it. - Type
1.4into F-Stop under Aperture. - Render with
F12. Change F-Stop to5.6and render once more to compare.
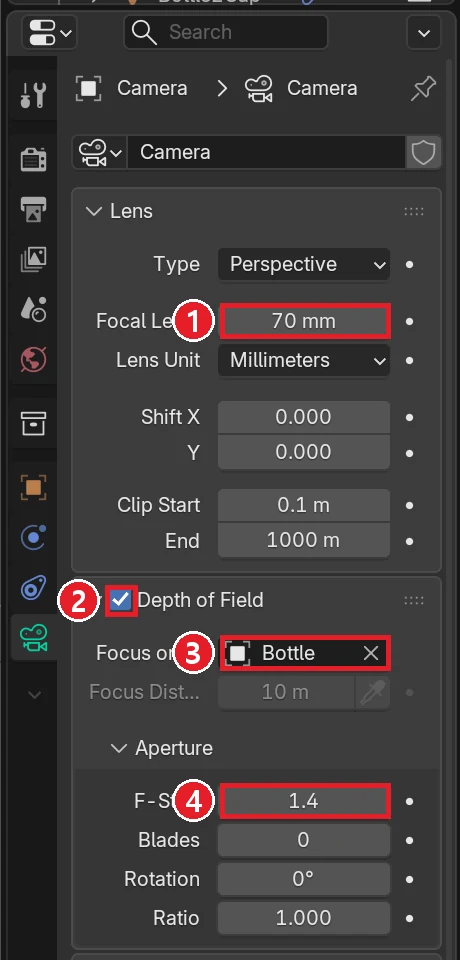 Figure 6. ① Focal Length 70 mm ② Turn on Depth of Field ③ Focus on Object: Bottle ④ F-Stop 1.4 (Blender screenshot)
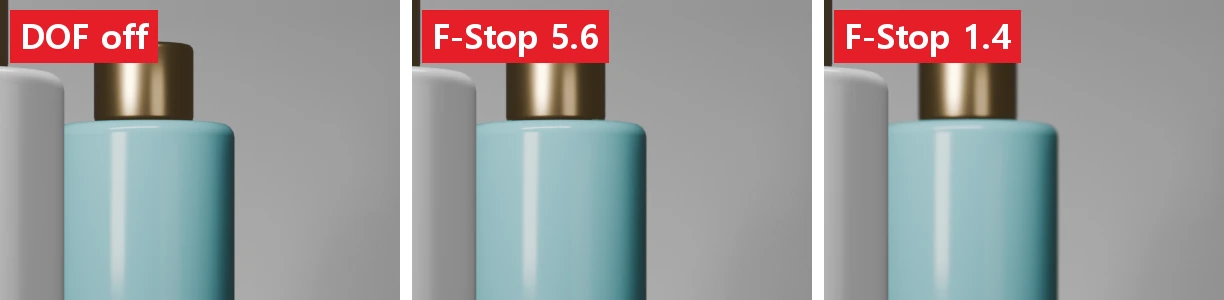 Figure 7. Enlarged crops around the back bottle. From left: DOF off, F-Stop 5.6, F-Stop 1.4. At this distance the difference is small (Blender render)
F-Stop is the aperture number of a camera. The smaller the number, the wider the aperture opens and the shallower the focus range, so out-of-focus areas get blurrier. In Figure 7, at 5.6 the back bottle is almost sharp, and at 1.4 the cap edge is clearly soft. In this scene the camera is 8 m away, so even at 1.4 the blur is not large. For more blur, move the back bottle farther back, or bring the camera closer and use a longer focal length.
The finished render is Figure 8.
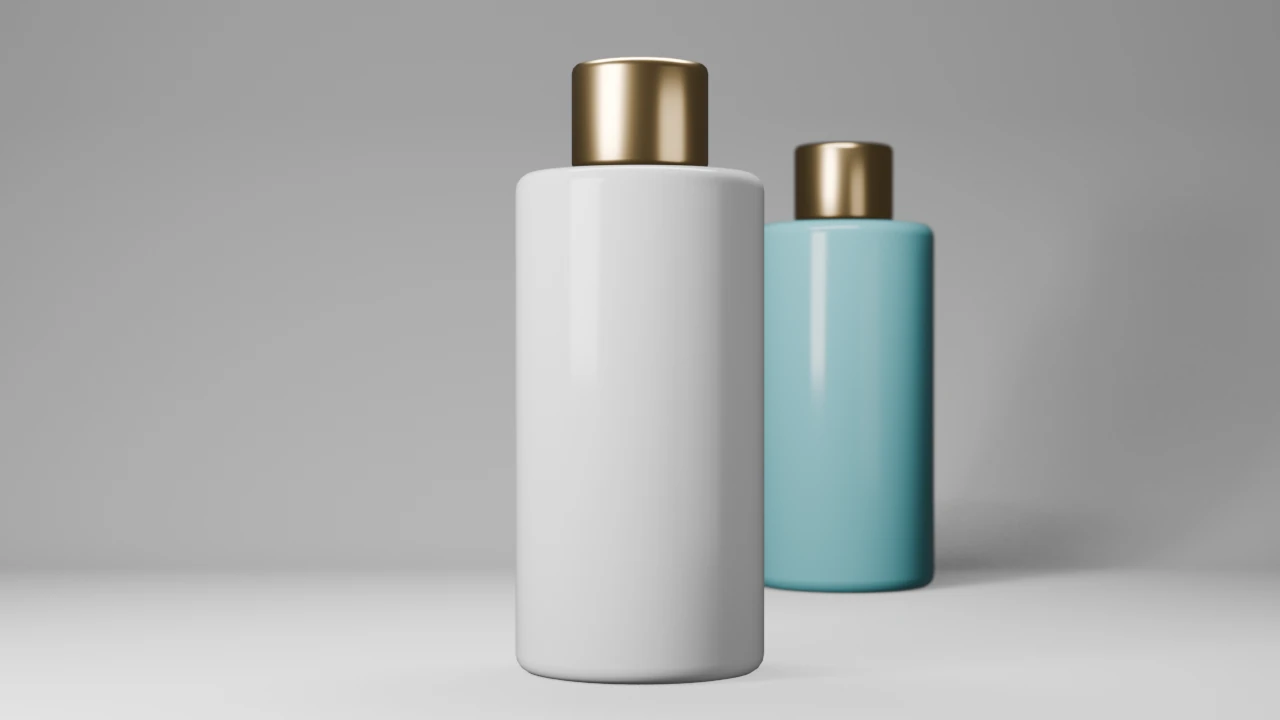 Figure 8. The infinite background, the Softbox, Fill and Top lights, and F-Stop 1.4 focused on the front bottle (Blender render)
6. Practice
- Reduce Softbox Size X and Y to
0.5and0.75and render. See how the shadow and the bottle reflection change. Set them back to2and3when you are done. - Change Softbox Shape to Disk and render. Check how the shape of the reflection on the bottle changes.
- Clear Focus on Object, type
11(the distance to the back bottle) into Focus Distance and render. See which bottle becomes sharp.
7. Common mistakes and fixes
| Symptom | Cause | Fix |
|---|---|---|
| I can see the line between floor and wall | The bent edge was not beveled, or Width is small | Select only the bent edge, press Ctrl+B and increase Width. Also check Shade Smooth |
| The top edge of the backdrop shows in the frame | The wall is too low, or the camera looks too far up | Extrude the wall higher, or set camera Rotation X close to 90 |
| No reflection shows on the bottle | The material's Roughness is high | Lower Roughness to 0.1 to 0.2 |
| The bottle looks stretched | Shot close with a short lens | Increase Focal Length and move the camera farther away |
| DOF is on but nothing blurs | F-Stop is high, or Focus on Object is empty so the focus distance is off | Lower F-Stop and set a focus object |
| The front bottle is blurred too | The back bottle was chosen as the focus object | Set Focus on Object to the front bottle |
| Shadows look doubled | Fill is small and strong | Make Fill's Size bigger and its Power lower |
Summary
A curved background, a large light for soft shadows and long reflections, and a small F-Stop to focus only on the hero product. The next guide covers how to fix a render that is too dark or blown out.
Previous: HDRI lighting · Next: When a render is too dark or blown out · Series start: Three-point lighting in Blender
References
- Blender 5.2 Manual: Light Objects (Area Shape and Size)
- Blender 5.2 Manual: Cameras (Depth of Field, F-Stop)
- Blender 5.2 Manual: Bevel Edges
- Shortcuts: default (Blender) keymap of Blender 5.2.1.
- Pictures: screenshots and renders made in Blender 5.2.1 for this guide.