Subdivision Surface modifier: smooth a blocky model and keep its shape with support loops and creases
Add Subdivision Surface with Ctrl+1, 2 and 3 and see faces grow four times per level, learn Levels Viewport versus Render and Catmull-Clark versus Simple, and keep a box shape by adding loops near the edges (support loops) or an Edge Crease.
한국어English
Based on: Blender 5.2 LTS (screenshots from 5.2.1, English interface, default shortcuts). Checked in November 2026. All pictures are real Blender screenshots. The red numbers and boxes were added to explain them. The Properties editor was dragged wider.
A character's cheek, a car's rounded roof, a smooth bar of soap. You don't place thousands of points one by one for shapes like these. You block out a rough shape with a few dozen points, and the Subdivision Surface modifier splits the faces into smaller ones to smooth it.
It is like rolling clay in your hands. The more you roll a blocky lump, the more its corners wear down. Each roll (one level) makes the surface finer, but roll too much and every corner wears away into a ball. The second half of this post is about smoothing while keeping corners.
After this post you can:
- Add Subdivision Surface and change its level with
Ctrl+1to3. - Check in the status bar how much the faces grow per level.
- Tell Levels Viewport from Render, and Catmull-Clark from Simple.
- Keep a box shape with support loops.
- Keep only chosen edges sharp with Edge Crease.
Before you start: Start from the default cube in a new file (File ‣ New ‣ General). Select the cube and open the Modifiers tab (wrench icon) in the Properties editor. A first try of Subdivision Surface and Shade Smooth is in section 2 of Blender beginner chapter 7. How points, edges and faces connect (topology) is in Polygons and topology. Other modifiers are in Every Blender modifier in one list.
1. Raise the level: Ctrl+1, Ctrl+2, Ctrl+3
You can use the menu (Add Modifier ‣ Generate ‣ Subdivision Surface), but the shortcut is faster. In Object Mode, Ctrl+a number adds a Subdivision Surface at that level. If one is already there, only its level changes.
Starting point: The default cube in a new file (Object Mode).
Follow along:
- With the mouse over the 3D Viewport, press
Ctrl+1. - Then press
Ctrl+2andCtrl+3and watch the shape. - Each time, look at the Faces number in the status bar at the bottom right.
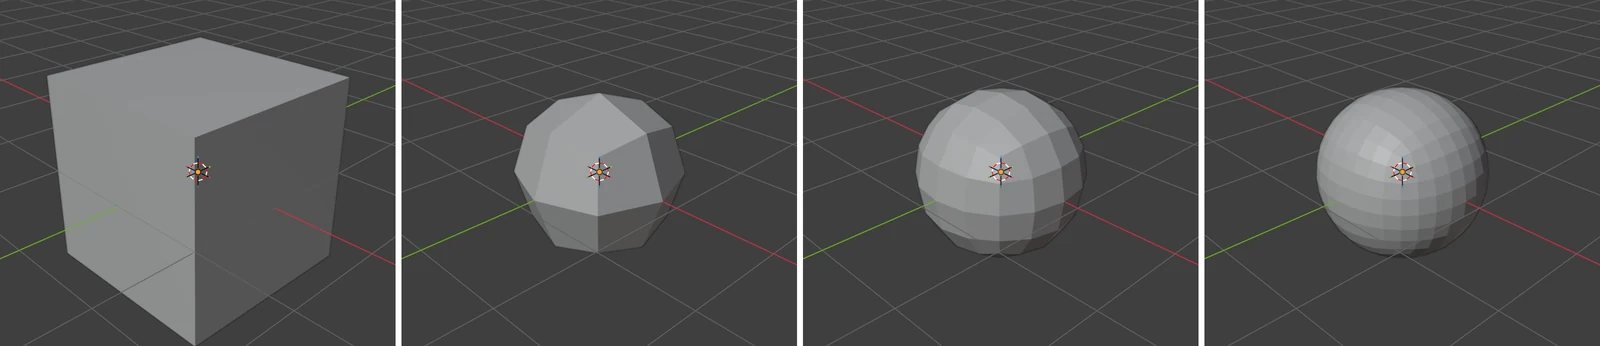 Figure 1. From the left: level 0 (default cube), 1, 2, 3. Each level gets closer to a ball (Blender screenshot)
| Level | Faces | Verts |
|---|---|---|
| 0 (default cube) | 6 | 8 |
| 1 | 24 | 26 |
| 2 | 96 | 98 |
| 3 | 384 | 386 |
Each level makes four times as many faces, because every quad splits into four. 384 sounds small, but a model with 10,000 faces becomes 640,000 at level 3. Higher levels use more memory (RAM and graphics memory), and Blender can freeze or close if it runs out. Don't jump to a high number in one go.
2. Read the panel: Viewport and Render
Starting point: The cube from the previous section. Press Ctrl+2 to go back to level 2.
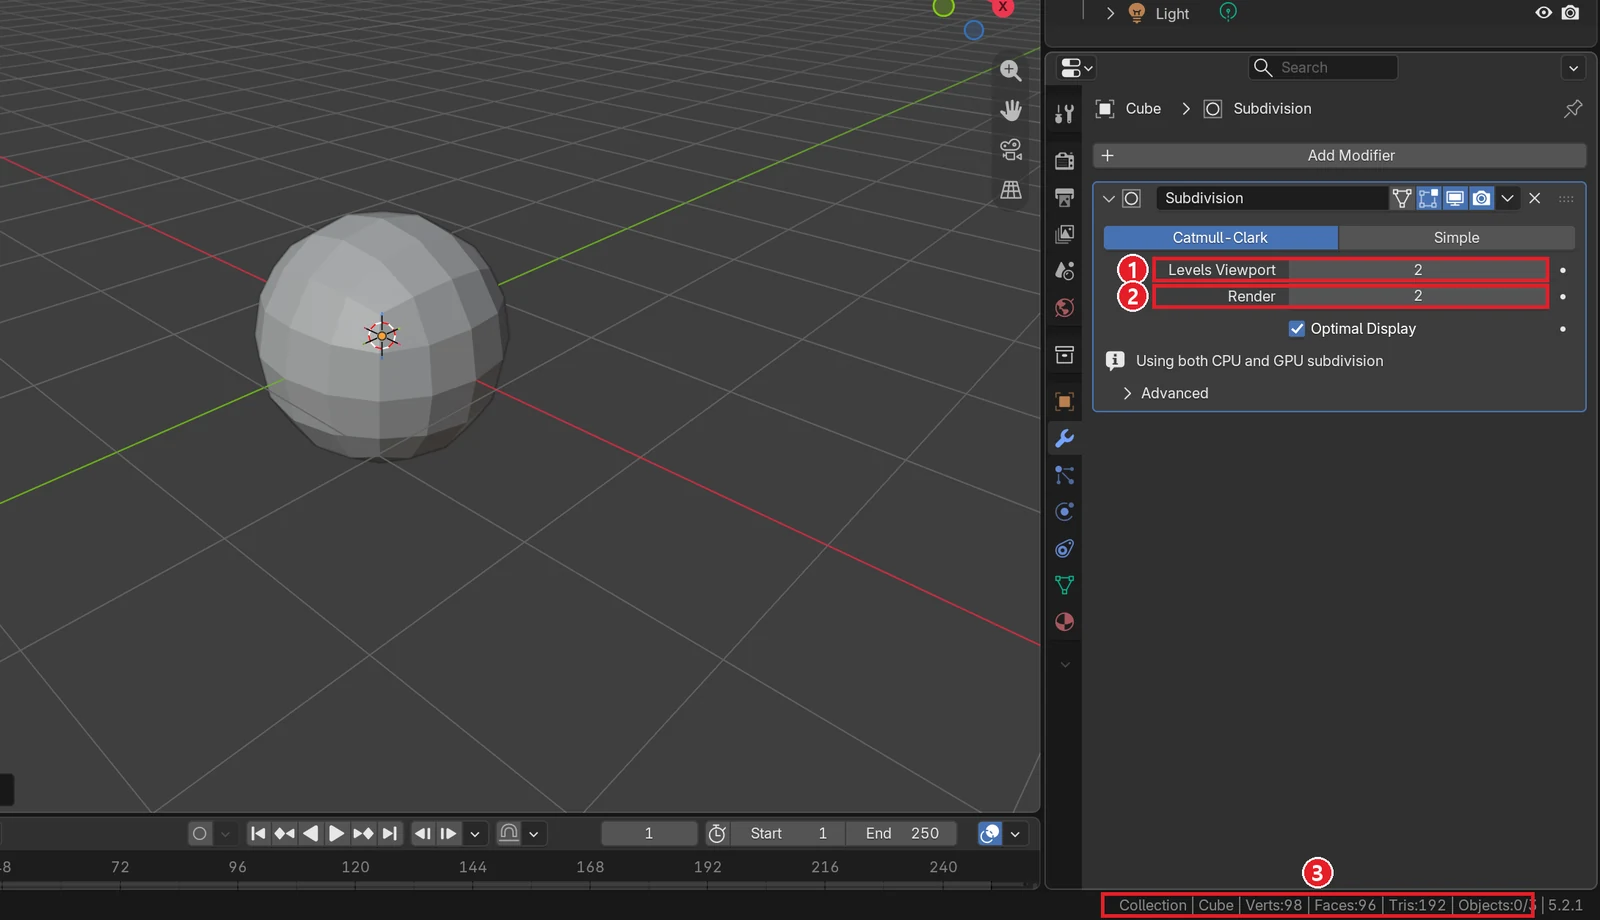 Figure 2. The panel is labeled Subdivision. ① Levels Viewport 2 ② Render 2 ③ Faces 96 in the status bar (Blender screenshot)
| Field | What it does | Default |
|---|---|---|
| Catmull-Clark / Simple | Split and round (Catmull-Clark), or split only (Simple) | Catmull-Clark |
| Levels Viewport | The level used in the 3D Viewport | The number you pressed with Ctrl |
| Render | The level used in the final render | 2 |
| Optimal Display | In wireframe, hide the new split edges and show only the original ones | On |
| Advanced | Use Limit Surface, UV smoothing and other details | Collapsed |
While you work, the view should be light; when you render, the result should be fine. So keep Viewport low and Render high. If Viewport is higher than Render, the work view looks smoother than the render and you will wonder why the render is rougher. Ctrl+number changes only the Viewport level; it doesn't touch Render.
3. Catmull-Clark and Simple
Starting point: The level 2 cube from the previous section.
Follow along: Click Simple at the top of the panel.
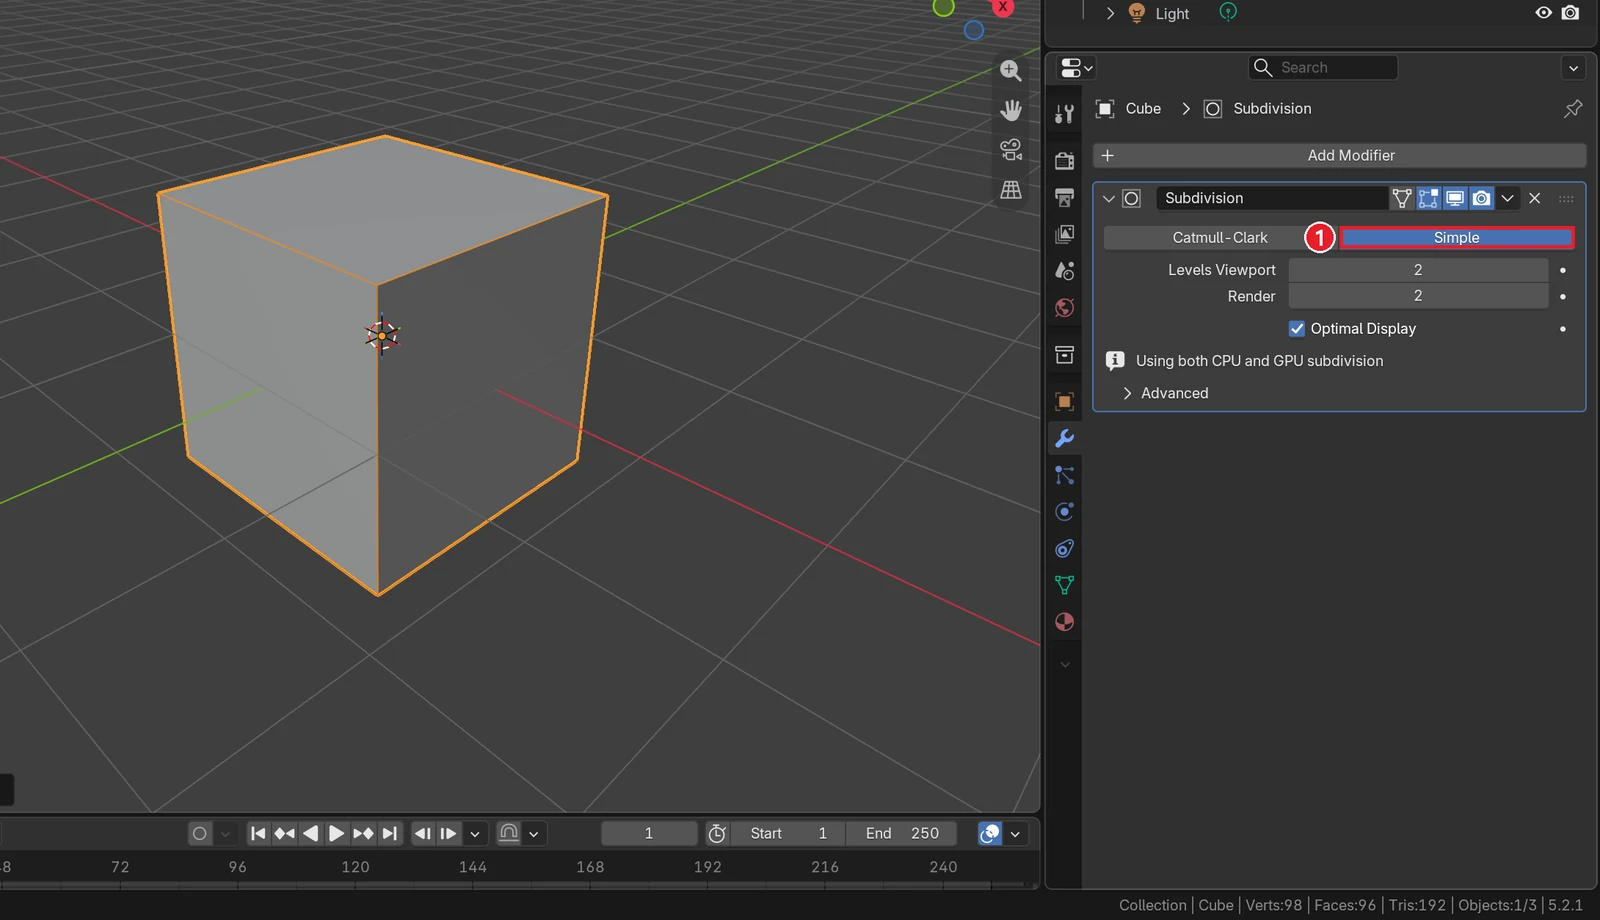 Figure 3. ① Simple: the shape stays a box, but the status bar still shows 96 faces, the same as level 2 (Blender screenshot)
Simple only splits faces; it doesn't round them. The shape stays the same while the faces increase. When you later push the surface out with the Displace modifier and need more points, Simple adds points without changing the shape. Displace is covered in Displace and Shrinkwrap.
When you are done, click Catmull-Clark again.
4. Support loops: add loops near the edges
The level 2 cube is almost a ball. To make "a box with slightly rounded edges" instead, add support loops: an extra ring of edges close to each edge.
Think of a tent. If the poles are far apart, the fabric sags into curves. Put another pole right next to a corner and the corner stands up tight. Support loops are those poles. The closer the loop is to the edge, the sharper the edge.
Starting point: The level 2 cube (Catmull-Clark) from the previous section.
Follow along: Do steps 1 to 5 once for each direction, X, Y and Z, three times in total.
- With the mouse over the 3D Viewport, press
Tabto enter Edit Mode, then press the number key2for edge select mode. - Press
Ctrl+R(Loop Cut and Slide) and move the mouse over an edge of the cube. A yellow ring preview appears across that edge. For the first one, hover over an edge that runs along X (the red line). - Scroll the mouse wheel one notch to make 2 yellow rings, then left-click.
- When the rings start sliding with the mouse, right-click. The two rings stay in their middle positions (a third of the way in from each side).
- With both rings still selected, press
S→X→2.4→Enter. The two rings spread outward to 0.2 m from the edges.
The second time, do steps 2 to 4 over an edge that runs along Y (the green line) and press S → Y → 2.4 in step 5. The third time, use an upright (Z) edge and press S → Z → 2.4.
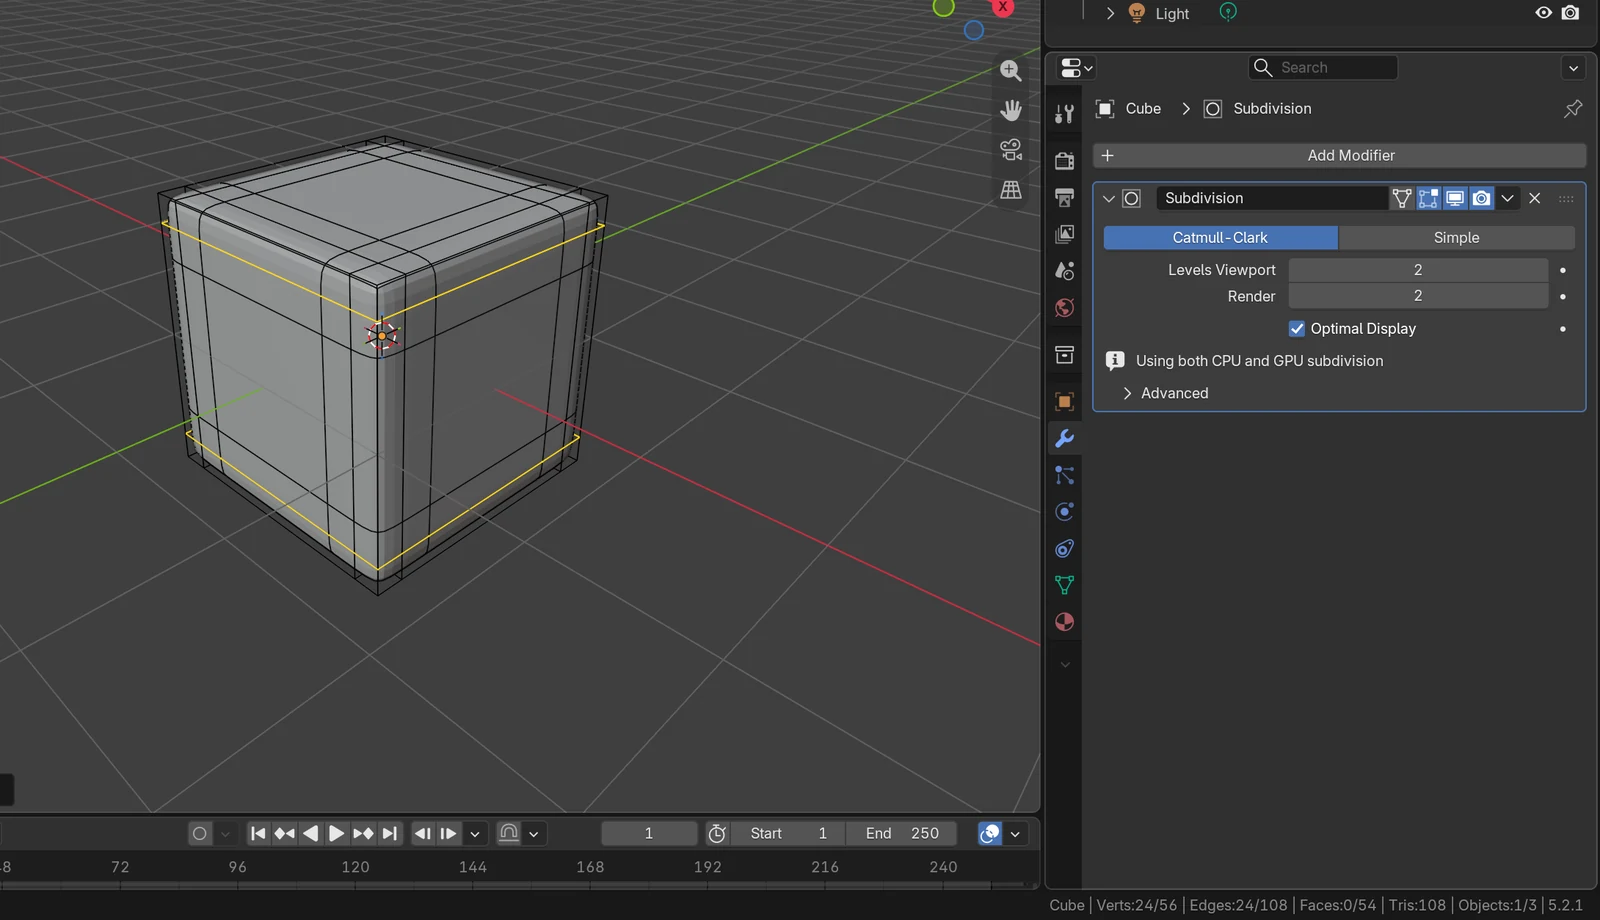 Figure 4. Edit Mode after adding support loops in three directions. The black outer lines are the real points and edges (the original shape); the gray shape inside is the Subdivision result (Blender screenshot)
- Press
Tabto go back to Object Mode.
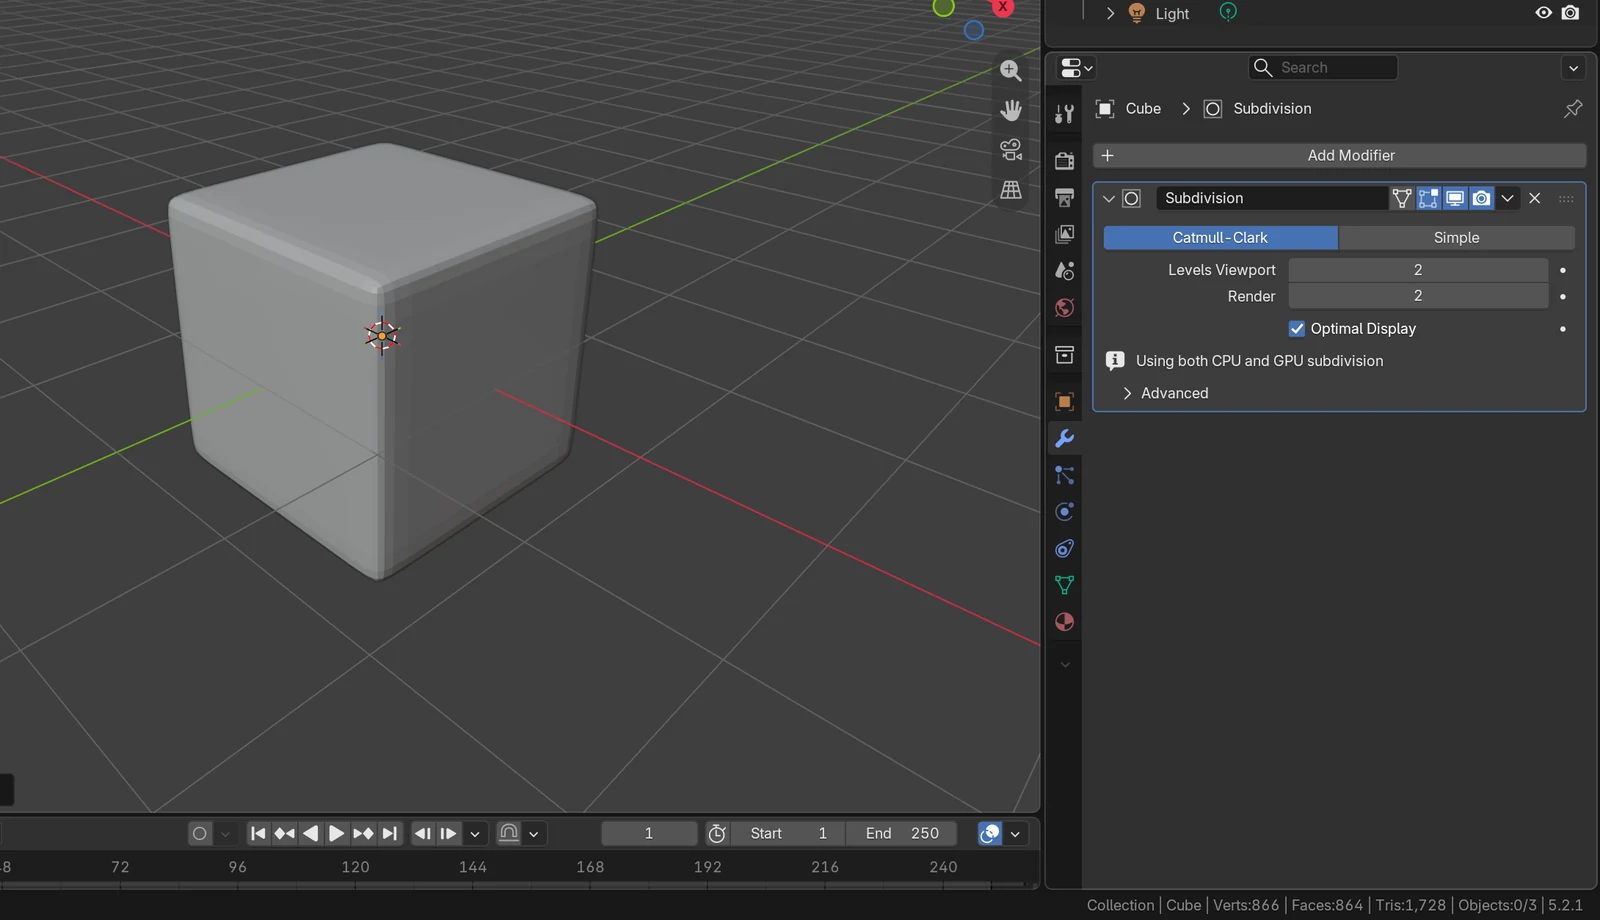 Figure 5. The level 2 result after support loops. It is a box with rounded edges, not a ball. The original mesh now has 56 points, and the result has 864 faces (Blender screenshot)
A larger number than 2.4 in step 5 moves the loops closer to the edges and makes them sharper. A smaller one makes them rounder. The two rings start at ±1/3 m, so 2.4 times puts them at ±0.8 m.
5. Edge Crease: sharp edges without extra loops
Support loops add points. To keep certain edges sharp without adding points, use a crease. It marks an edge as "folded here", and Subdivision rounds that edge less.
Starting point: The default cube in a new file (File ‣ New ‣ General). With the mouse over the 3D Viewport, press Ctrl+2.
Follow along:
- Press
Tabto enter Edit Mode. - Press the number key
3(face select) and left-click the top face, then press the number key2for edge select mode. The 4 edges around the top stay selected. - Press
Shift+E(Edge Crease) and move the mouse away from the cube. The Crease value appears at the top of the view.
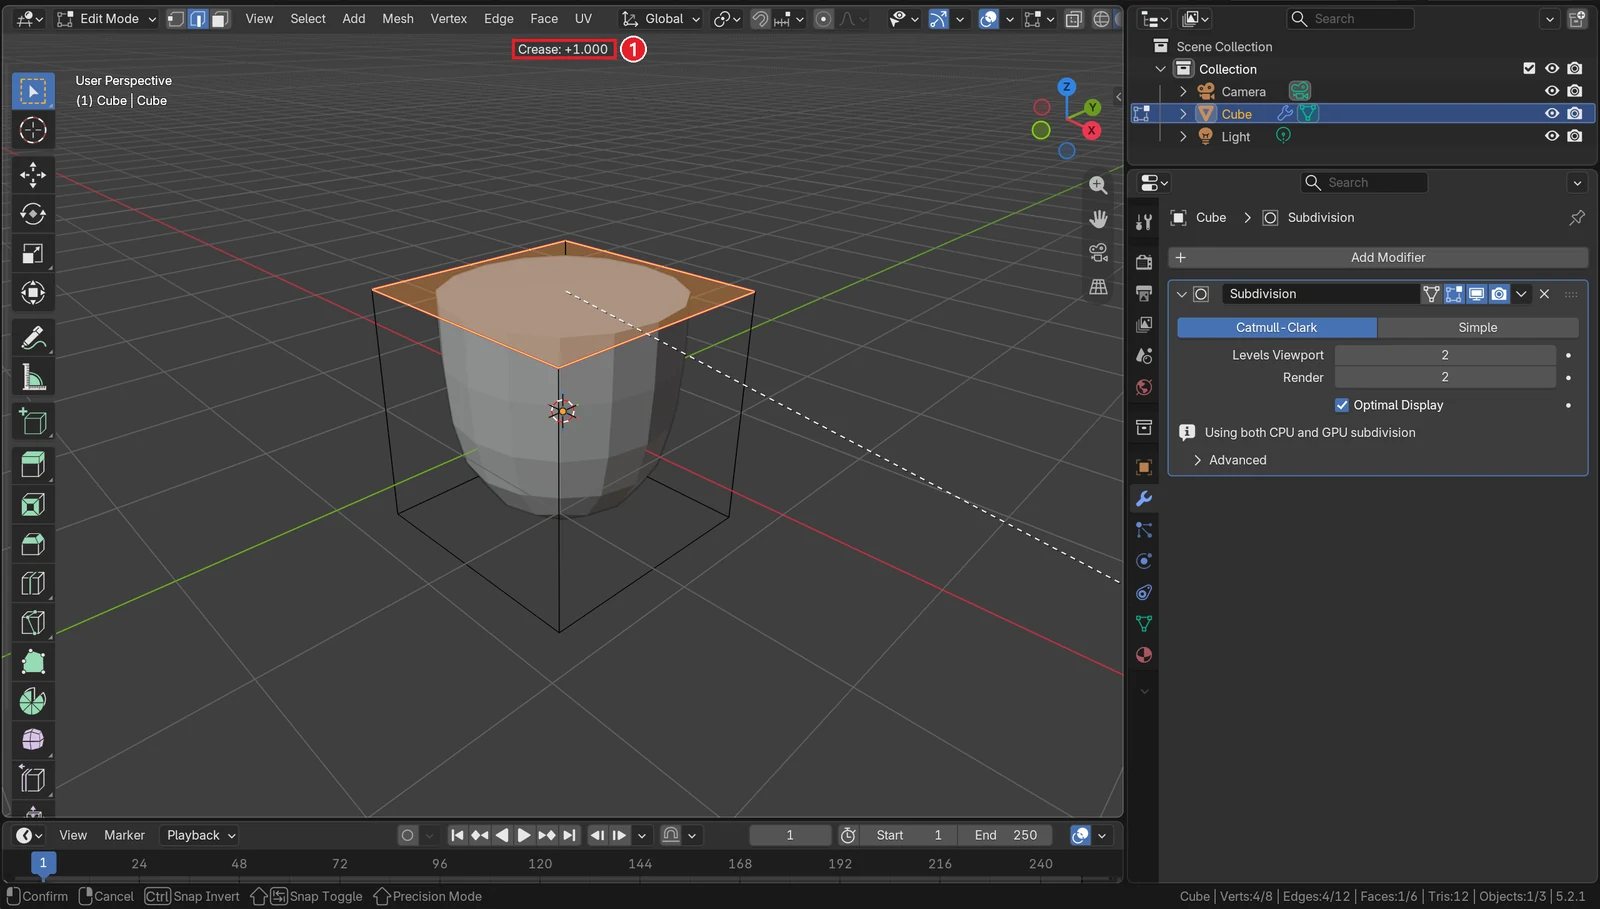 Figure 6. ① The Crease value shows at the top of the view. The white dotted line joins the mouse and the center point; the farther away, the larger the value (Blender screenshot)
- To set an exact value, type
1and pressEnter. - Press
Tabto go back to Object Mode.
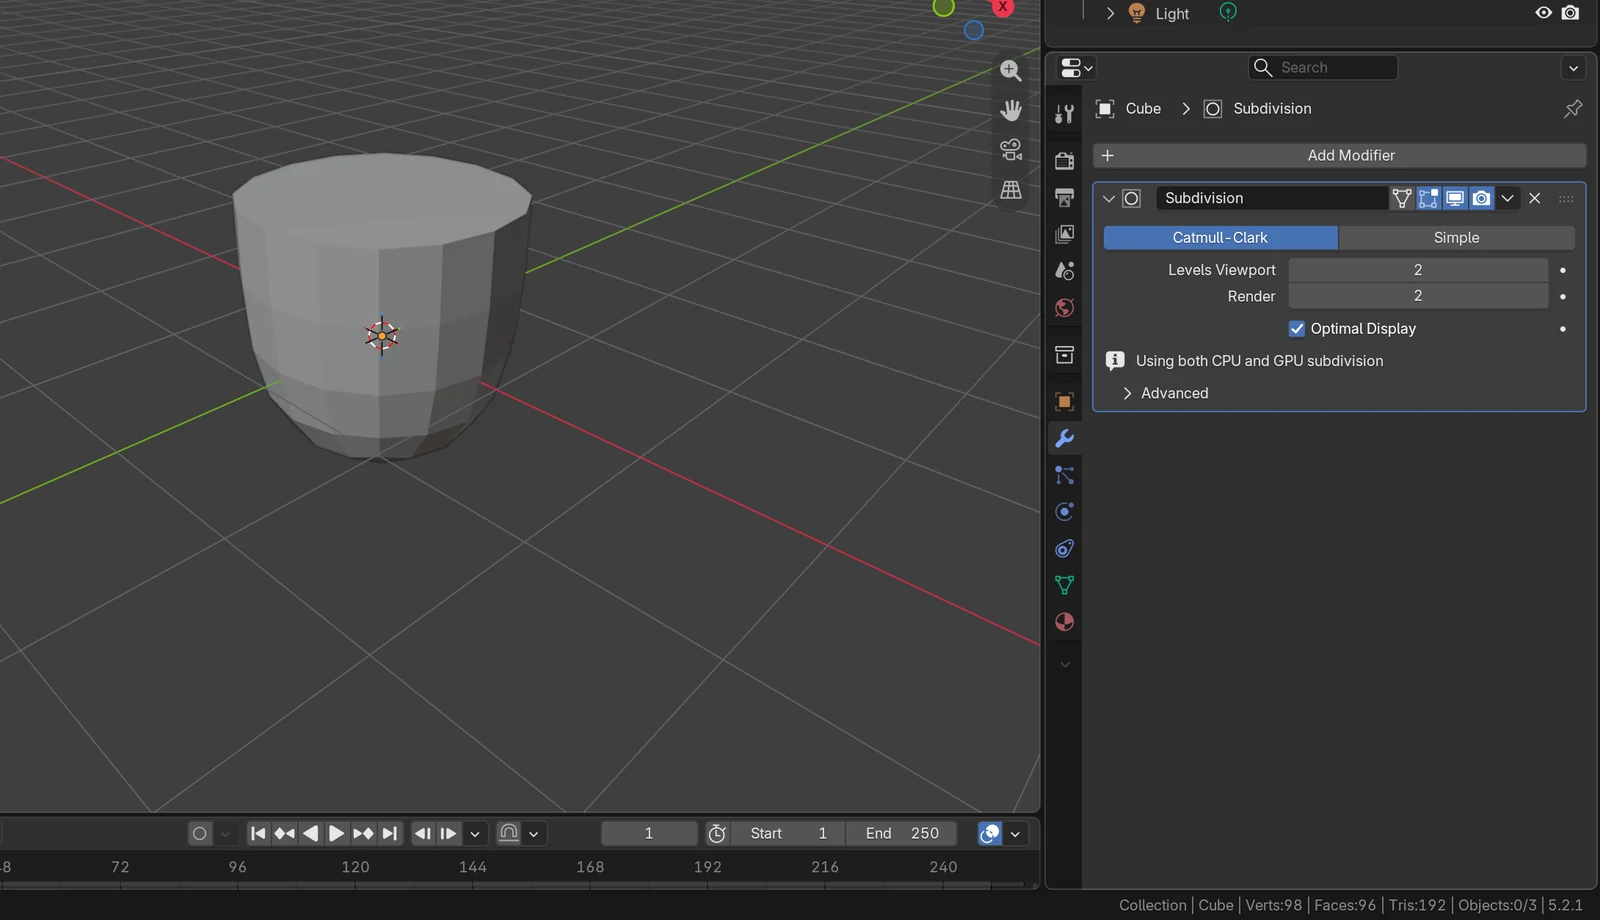 Figure 7. A crease of 1 on the top rim only. The top rim stays sharp, the rest is rounded, and it looks like a cup (Blender screenshot)
Crease values go from 0 to 1. At 1 the edge is sharpest; around 0.5 it rounds slightly. To remove a crease, select the same edges, press Shift+E and type -1, because a typed number is added to the current value. Edge Crease in the header's Edge menu does the same thing.
| Method | Strengths | Downsides |
|---|---|---|
| Support loops | Fine control of roundness by loop position; the shape comes from points and edges alone, so it is easy to predict | More points and edges make editing busier |
| Edge Crease | No extra points; one value controls it | The value is invisible, so it is easy to forget which edges have it (check in Edit Mode with N → Item tab) |
6. Practice
- On the level 2 cube, set Render to
3and render withF12. Compare how smooth the view (Viewport 2) and the render look. - In step 5 of section 4, type
1.8instead of2.4. Check that the edges get rounder. - On the cube from section 5, change the top rim crease to
0.5(remove it first with-1, then add0.5). See how it differs from Figure 7. - Add
Ctrl+2to a default cube and click Object ‣ Shade Smooth. The face count stays the same; write down how the look changes.
7. Common mistakes and fixes
| Symptom | Cause | Fix |
|---|---|---|
| The cube turns into a ball | Catmull-Clark rounds every edge | Support loops (section 4) or Edge Crease (section 5) |
| Blender suddenly got very slow | The level is too high (four times the faces each level) | Set Levels Viewport to 1 or 2; raise Render only for rendering |
| The render is rougher than the work view | Viewport is higher than Render | Set Render equal to or higher than Viewport |
| Square patterns show on the surface | Shade Flat | Object ‣ Shade Smooth |
Ctrl+2 does nothing | You are in Edit Mode or the mouse is outside the 3D Viewport | Press it in Object Mode with the mouse over the 3D Viewport |
| The support loops ended up on one side | You confirmed the slide with a left-click in step 4 | Undo with Ctrl+Z and right-click in step 4 |
| Part of the surface looks dark or blotchy | Faces there point the wrong way (flipped normals) | In Edit Mode select all and press Shift+N (Recalculate Outside) |
Summary in one line
Ctrl+number for the level (four times the faces per level), keep Viewport low and Render high, and keep corners with support loops or Edge Crease (Shift+E). The next post covers the Boolean modifier, which cuts holes with another object.
Previous: Bevel modifier · Next: Boolean modifier · Whole series: Every Blender modifier in one list
References
- Blender 5.2 Manual: Subdivision Surface Modifier
- Blender 5.2 Manual: Loop Cut and Slide
- Blender 5.2 Manual: Edge Data (Edge Crease)
- Shortcuts: Blender 5.2.1 default (Blender) keymap
- Image license: screenshots of Blender taken by AZTechnology. Blender license: blender.org/about/license