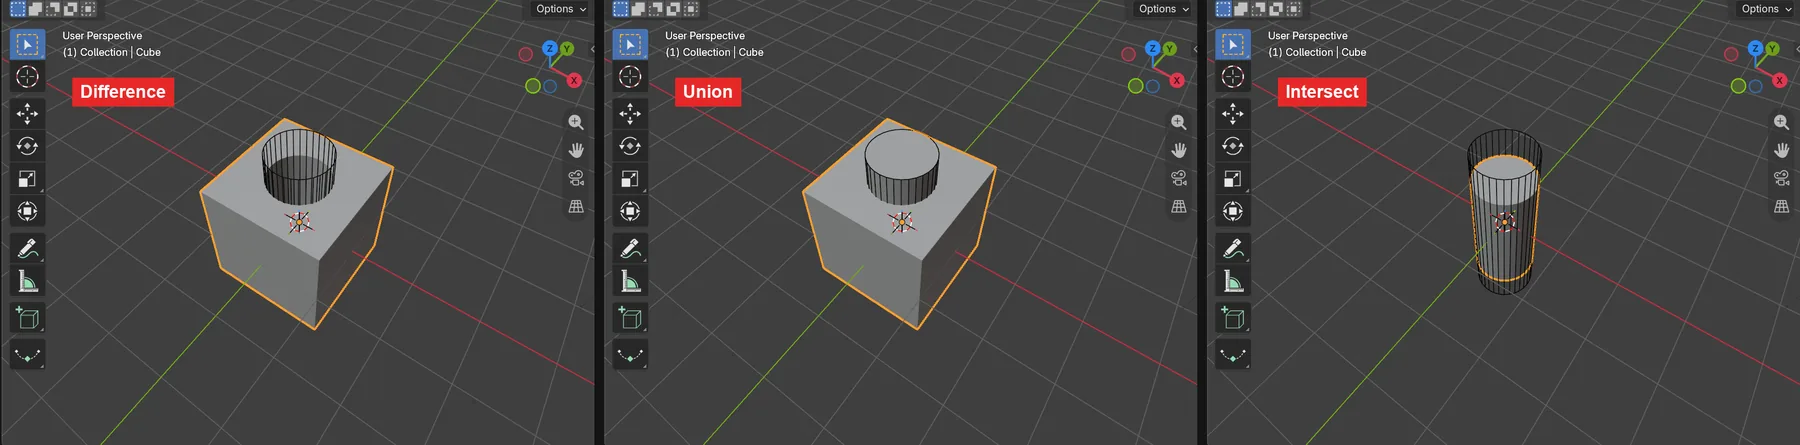
Array modifier: rows, stairs and circles from a single object
Use the new Array modifier (new since Blender 5.0) to line up the default cube, set spacing and build stairs with Offset, and arrange copies in a circle with Shape Circle. Also see how the Array (Legacy) panel from older tutorials maps to the new one.
한국어English
ON THIS PAGE
- 011. Add Array: there are two in the menu
- 022. Space them out: like fence posts
- 033. Build stairs: add an upward offset
- 044. Circle layout: set Shape to Circle
- 055. When old tutorials look different: Array (Legacy)
- 066. Good to know when using arrays
- 077. Practice
- 088. Common mistakes and fixes
- 09Summary in one line
- 10References
Based on: Blender 5.2 LTS (screenshots from 5.2.1, English interface, default shortcuts). Checked in November 2026. All pictures are real Blender screenshots. The red numbers and boxes were added to explain them. The Properties editor was dragged wider.
Twenty fence posts, ten stairs, twelve pillars in a ring. If you copy each one by hand, changing the post shape later means changing it twenty times. With the Array modifier you keep one original and the modifier lines up the rest. Change the original and every copy changes.
Think of a rubber stamp. Stamping one stamp at an even spacing is an array. Change the stamp and every print changes; change the spacing and the whole row is stamped again.
After this post you can:
- Tell the new Array from Array (Legacy) and add the right one.
- Set the number and spacing with Count and Offset.
- Build stairs by adding an upward offset.
- Arrange copies in a circle with Shape Circle.
- Read the Array panel in an old tutorial and find the matching field in the new one.
Before you start: Start from the default cube in a new file (File ‣ New ‣ General). Select the cube and open the Modifiers tab (wrench icon) in the Properties editor. The cube is 2 m on each side. The whole modifier menu is in Every Blender modifier in one list.
1. Add Array: there are two in the menu
The Generate menu in Blender 5.2 has two arrays. This changed in 5.0. Array at the top is the new one; Array (Legacy) right below it is the old one. This post uses the new Array.
Follow along: In the Modifiers tab, click Add Modifier → Generate → Array at the top.
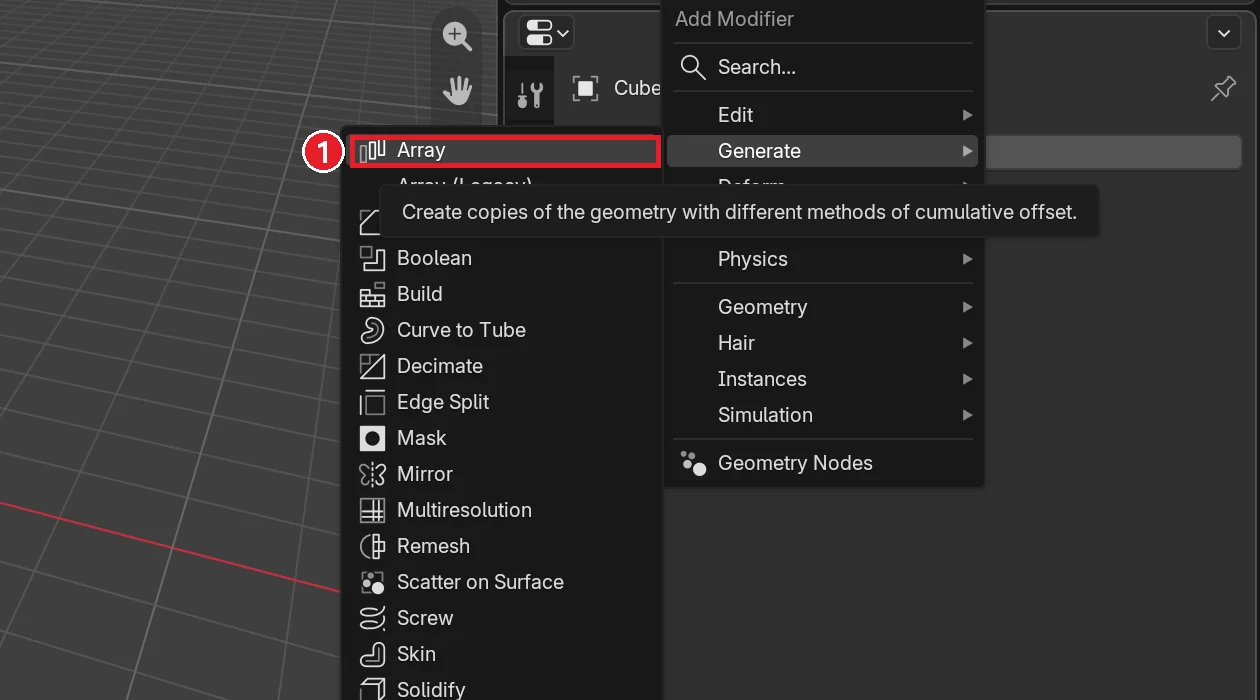 Figure 1. ① Array at the top of Generate. The line right below it (under the tooltip) is Array (Legacy) (Blender screenshot)
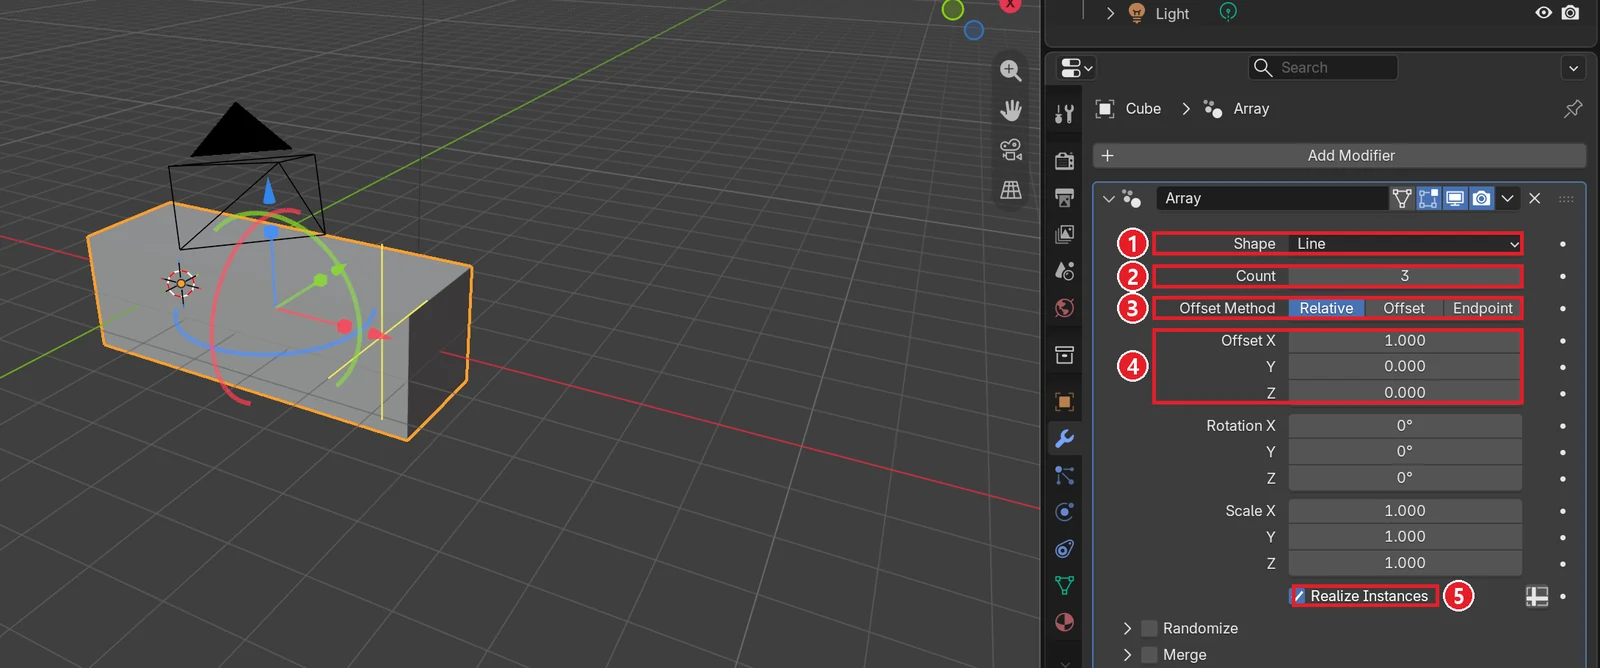 Figure 2. Right after adding the new Array: ① Shape Line ② Count 3 ③ Offset Method Relative ④ Offset X 1.000 ⑤ Realize Instances on (Blender screenshot)
Three cubes touch and look like one long box. The default is 3 copies, each moved by the cube's own size. The colored arrows and rings on the cube are handles the new Array shows. You can drag them to change the spacing, but this post types exact numbers.
The panel header icon of the new Array is different from other modifiers because it is a modifier built with Geometry Nodes. You use it the same way.
1-1. Fields in the panel
| Field | What it does | Default |
|---|---|---|
| Shape | The layout: Line, Circle, Curve (follow a curve), Transform (add up move, rotation and scale) | Line |
| Count | Total number including the original | 3 |
| Offset Method | How spacing is measured: Relative (multiples of the object's size), Offset (fixed meters), Endpoint (set the start and end, spread evenly between) | Relative |
| Offset X, Y, Z | How far to move each next copy | X 1, Y 0, Z 0 |
| Rotation, Scale | Rotation and scale added for each next copy | 0°, 1 |
| Realize Instances | Turn copies into real mesh. Needed for Merge or Boolean | On |
| Randomize | Scatter position, rotation and scale a little at random | Off |
| Merge | Join touching points into one piece (needs Realize Instances on) | Off |
Relative means "this many times my own size". The cube is 2 m, so Offset X 1 moves 2 m and 1.5 moves 3 m. If you make the original shape bigger in Edit Mode, Relative spacing follows the shape, while spacing set with Offset (meters) stays the same. S in Object Mode scales the whole row at once, whichever method you use.
2. Space them out: like fence posts
Starting point: The cube with Array from the previous section.
Follow along:
- Set Count to
6. - Set Offset X to
1.5.
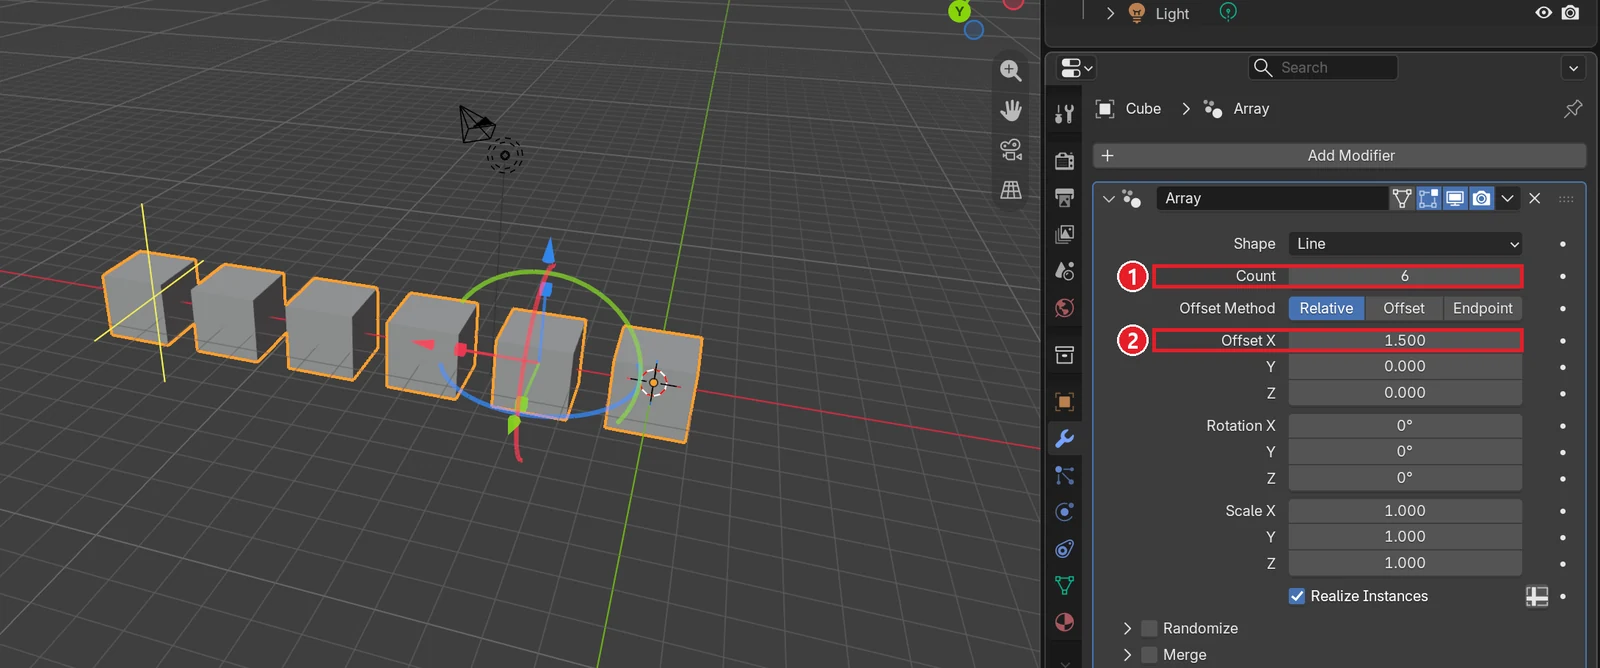 Figure 3. ① Count 6 ② Offset X 1.5. A cube every 3 m leaves a 1 m gap between cubes (Blender screenshot)
To change a field, double-click it, type the number and press Enter. Dragging left and right on the field also works. Make the cube thin and tall and you have fence posts. Do that in Edit Mode. Stretching with S in Object Mode stretches the whole row, not just the post, and leaves the object's Scale at a value other than 1, which gets confusing with other modifiers.
3. Build stairs: add an upward offset
Put a Z value in Offset and each copy moves sideways and up. That is a staircase.
Starting point: The six cubes from the previous section.
Follow along:
- Set Count to
8. - Set Offset X to
1and Offset Z to0.5.
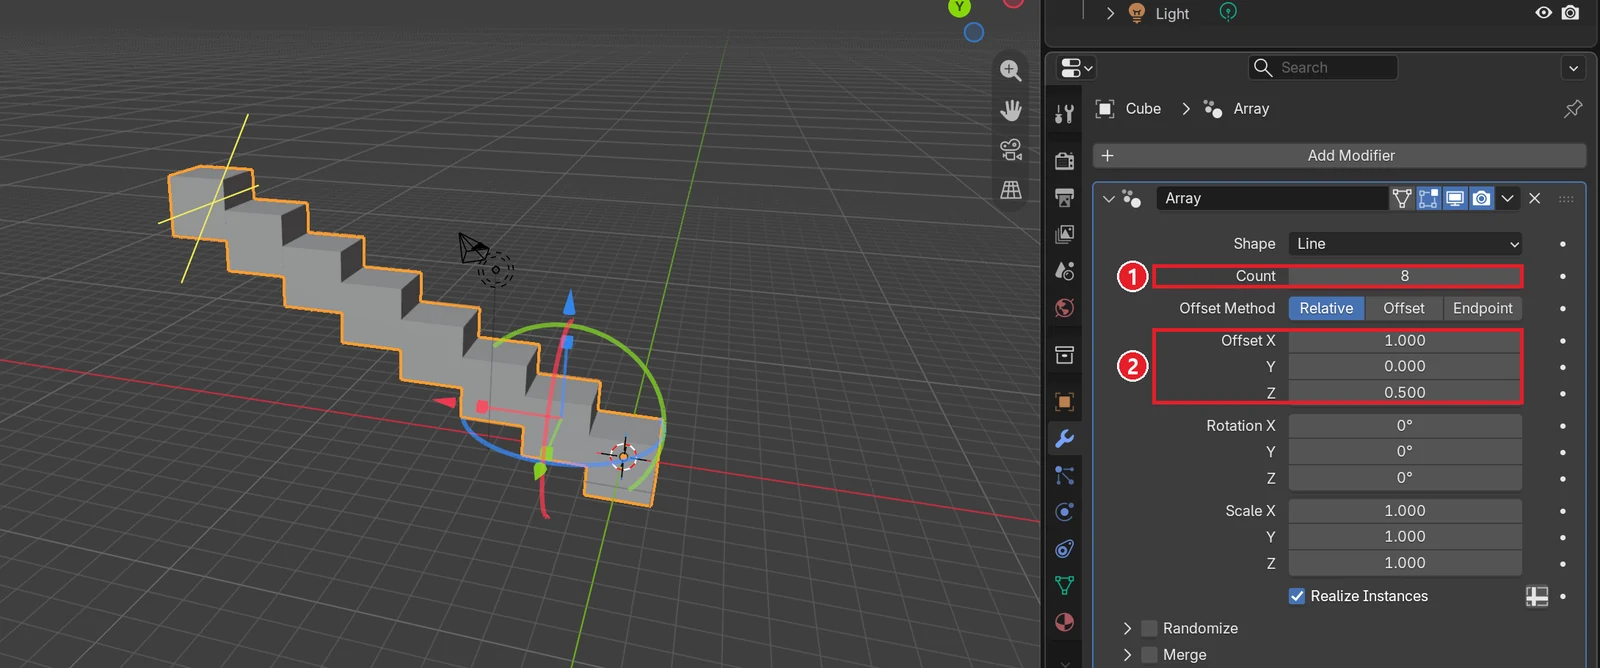 Figure 4. ① Count 8 ② Offset X 1, Z 0.5. Each step goes 2 m sideways and 1 m up (Blender screenshot)
Because the method is Relative, Z 0.5 means half the cube's height, 1 m. Lower Z for shorter steps; raise X for deeper treads. For thin steps like real stairs, flatten the original cube in Edit Mode. All eight steps change as soon as you edit the shape.
4. Circle layout: set Shape to Circle
For a ring of pillars or clock marks, set Shape to Circle. The old Array needed a trick with a rotated Empty; the new one needs only a few fields.
Starting point: The stairs from the previous section.
Follow along:
- Set Shape to Circle. The fields change to circle options.
- Set Count to
12. - Set Radius to
6.
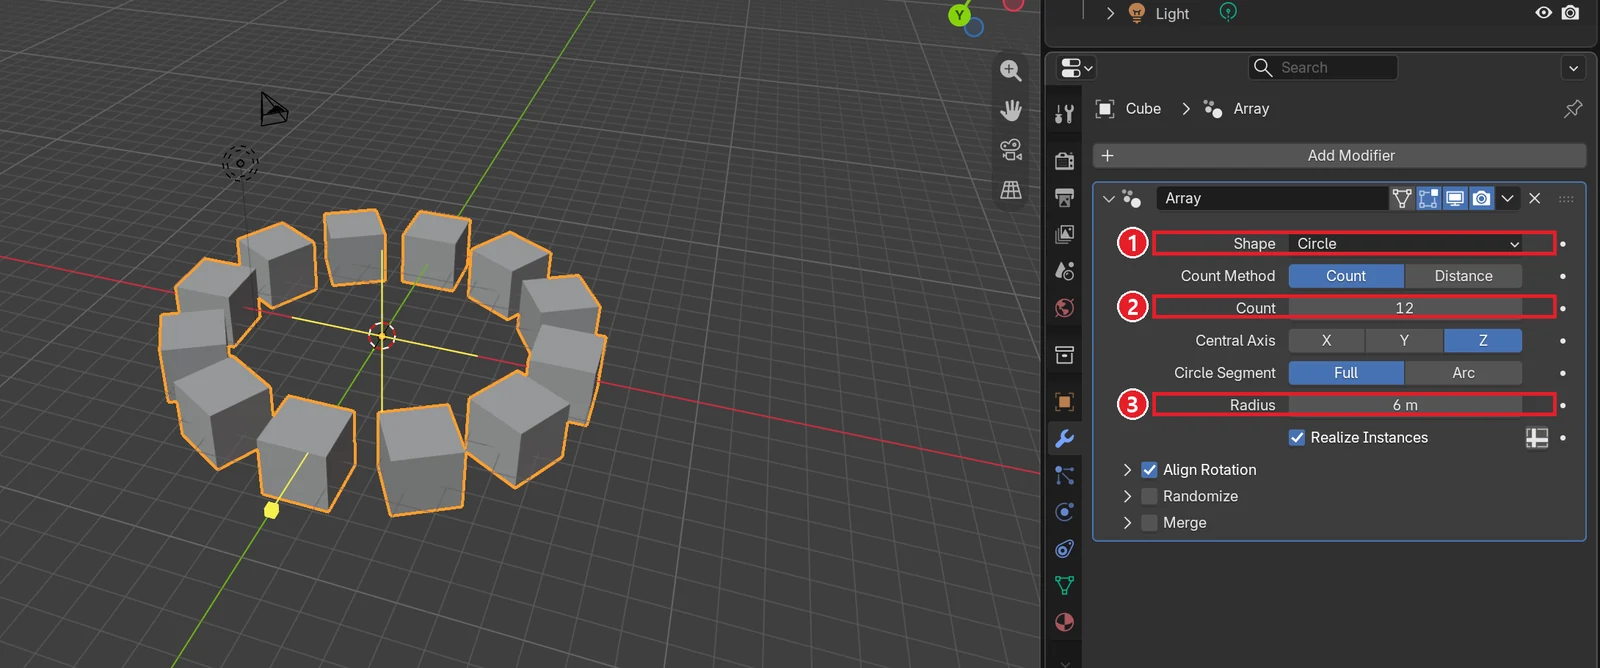 Figure 5. ① Shape Circle ② Count 12 ③ Radius 6 m. The cubes stand around the circle, each turned to follow the circle's direction (Blender screenshot)
With Circle, these fields appear.
| Field | What it does |
|---|---|
| Count Method | Count (set the number) or Distance (set the angle between copies) |
| Count | How many copies on the circle |
| Central Axis | Which axis the circle goes around. Z means a circle lying flat |
| Circle Segment | Full (a whole turn) or Arc (only part, like a fan) |
| Radius | Circle radius. Default is 0, so at first everything overlaps |
| Align Rotation | When on, each copy turns to follow the circle's direction |
The Radius default is 0, so if you only switch Shape to Circle, all cubes sit on top of each other and nothing seems to change. Always set Radius. Turn off Align Rotation and every cube faces the same way while still sitting on the circle.
5. When old tutorials look different: Array (Legacy)
Tutorials made for 4.x and earlier show the old Array screen. Since 5.0, that screen lives on under the name Array (Legacy). Add one to compare.
Starting point: The default cube in a new file (File ‣ New ‣ General). Open the Modifiers tab (wrench icon) again.
Follow along: Click Add Modifier → Generate → Array (Legacy).
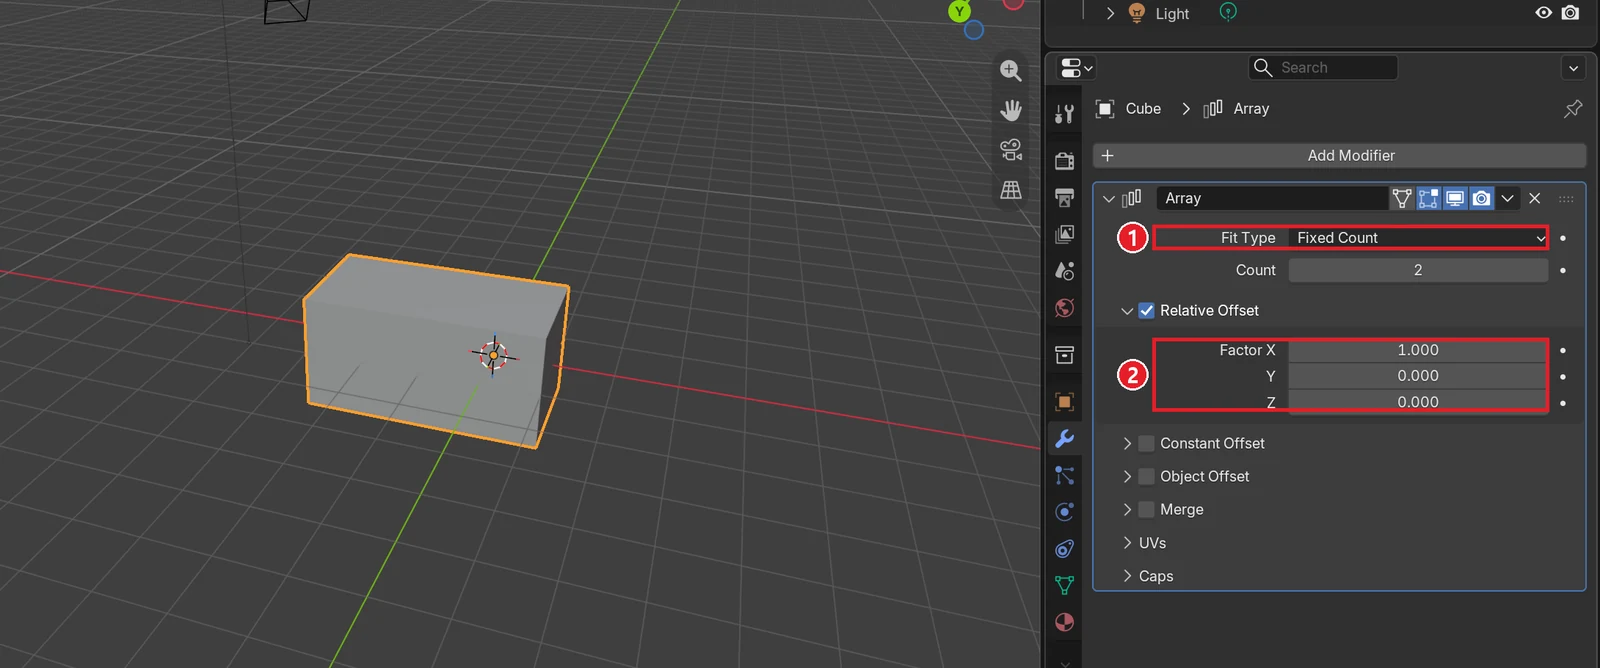 Figure 6. Array (Legacy): ① Fit Type (how the count is set) ② Factor under Relative Offset. The default count is 2. The panel is also labeled just Array (Blender screenshot)
| Field in old tutorials (Legacy) | Similar field in the new Array |
|---|---|
| Fit Type: Fixed Count, Count | Count |
| Fit Type: Fit Length / Fit Curve | Count Method Distance, Shape Curve |
| Relative Offset ‣ Factor | Offset Method Relative ‣ Offset |
| Constant Offset ‣ Distance | Offset Method Offset ‣ Offset |
| Object Offset (circle layout with an Empty) | Shape Circle or Transform |
| Merge | Merge (needs Realize Instances) |
Arrays in older files open as Legacy. Use Legacy when you follow an old tutorial step by step, and the new Array at the top for new work. Both panels are labeled Array, so look inside: a Shape field means the new one, a Fit Type field means Legacy.
6. Good to know when using arrays
- Along a curve: For chains or rails along a bent path, use the Curve modifier or Shape Curve. See Curve modifier.
- Half + array: For symmetric shapes, combine with the Mirror modifier. The stack runs top to bottom, so the order changes the result.
- One piece: To join touching copies, turn on Merge. Realize Instances must be on.
- When it gets slow: Hundreds of copies can slow the view. Keep Count low while working and raise it at the end.
7. Practice
- From the state in Figure 3, change Offset Method to Offset and set Offset X to
3. Check that the spacing matches Figure 3. - On the stairs (Figure 4), set Offset Y to
0.3. Write down which way the stairs turn. - On the circle (Figure 5), change Circle Segment to Arc and set the Sweep Angle that appears to
180. Check whether you get a half circle. - On the circle, turn off Align Rotation and see how the cubes change.
8. Common mistakes and fixes
| Symptom | Cause | Fix |
|---|---|---|
| The Fit Type field from an old tutorial is missing | You added the new Array | Add Array (Legacy) when following an old tutorial (section 5) |
| I switched to Circle and nothing changed | Radius defaults to 0, so all copies overlap | Set Radius |
| The spacing is wider than expected, or I want spacing in exact meters | Relative is a multiple of the shape's size | Switch Offset Method to Offset and type meters |
| I wanted to resize one post but the whole row grew | S in Object Mode scales the whole row | Change the shape in Edit Mode |
| Merge is on but copies don't join | Realize Instances is off, or points are farther apart than the Merge distance | Turn on Realize Instances; make copies touch (Relative 1) |
| Blender suddenly got slow | Count is too high | Lower Count while working, or turn off the monitor icon in the panel header for a moment |
Summary in one line
Array at the top of Generate (the new one) → Count for the number, Offset for spacing (Relative = multiples of the object's size), add Z for stairs, Shape Circle + Radius for a ring. Old tutorial screens are Array (Legacy). The next post covers the Bevel modifier, which rounds edges.
Previous: Mirror modifier · Next: Bevel modifier · Whole series: Every Blender modifier in one list
References
- Blender 5.2 Manual: Array Modifier
- Blender 5.2 Manual: Array (Legacy) Modifier
- Blender 5.2 Manual: Modifiers Introduction
- Shortcuts: Blender 5.2.1 default (Blender) keymap
- Image license: screenshots of Blender taken by AZTechnology. Blender license: blender.org/about/license