Mirror modifier: build half, finish the other side, and keep the center seam closed
Move the default cube to one side, add a Mirror modifier, delete the face left on the mirror plane, close an opened seam by setting Median X to 0, stop it from opening again with Clipping, and finish with Subdivision Surface as one smooth piece.
한국어English
ON THIS PAGE
- 011. Build half: move only the shape
- 022. Add Mirror and read the panel
- 033. Delete the face left in the middle
- 044. When the seam opens: set Median X to 0
- 055. Clipping: keep it from opening again
- 066. Finish: one piece with Subdivision Surface
- 077. Practice
- 088. Common mistakes and fixes
- 09Summary in one line
- 10References
Based on: Blender 5.2 LTS (screenshots from 5.2.1, English interface, default shortcuts). Checked in November 2026. All pictures are real Blender screenshots. The red numbers and boxes were added to explain them. The Properties editor was dragged wider, and the add-on tab row of the sidebar is blurred.
Faces, cars, chairs and robots have matching left and right sides. You only need to build half. The Mirror modifier fills in the other half like a mirror. Change one side and the other side changes with it, so you do half the work and the sides never drift apart.
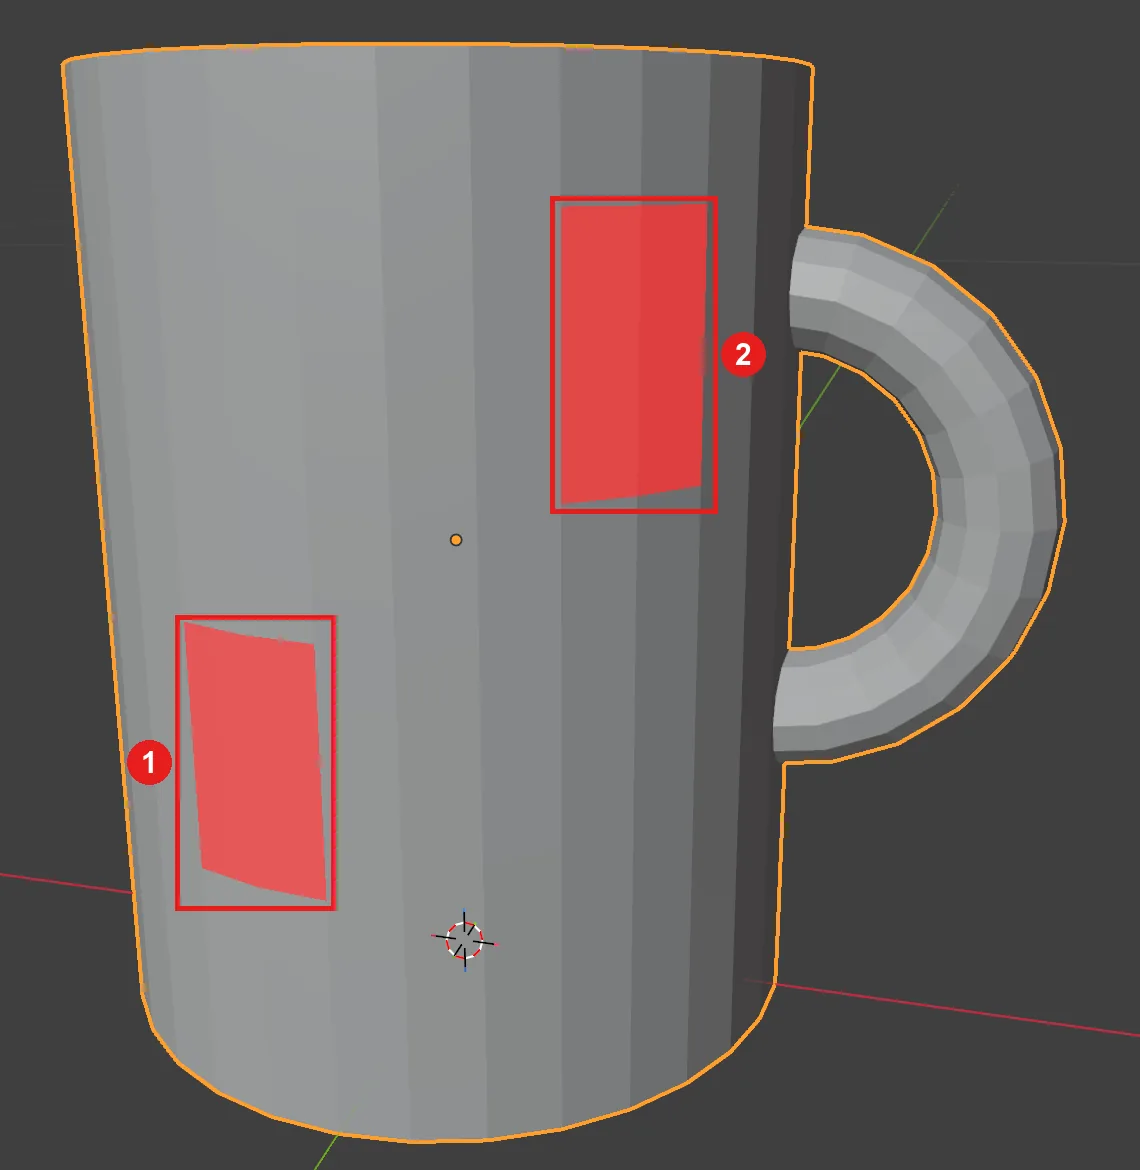
Picture holding half a mask against a mirror. The mask and its reflection must touch in the middle to look like one face. Pull the mask away from the glass and a gap opens. Most mirror problems come from this center seam.
After this post you can:
- Build a half shape around the origin and add Mirror.
- Tell what Axis, Clipping and Merge do in the Mirror panel.
- Delete the face left on the mirror plane.
- Close an opened seam with one number.
- Stop the seam from opening again with Clipping.
Before you start: Start from the default cube in a new file (File ‣ New ‣ General). Select the cube and open the Modifiers tab (wrench icon) in the Properties editor. Edit Mode basics (selecting points, edges and faces, moving with
G) are in Blender beginner chapter 6: Edit Mode. The whole modifier menu is in Every Blender modifier in one list.
1. Build half: move only the shape
The Mirror's glass passes through the object's origin. The origin is the small orange dot every object has; it is the object's reference position. The default cube has its origin in the middle, so a Mirror on it puts the reflection exactly on top of the original and nothing seems to change.
So first move only the shape, not the origin. G in Object Mode moves the origin too, so do this in Edit Mode.
Starting point: The default cube in a new file (File ‣ New ‣ General).
Follow along:
- With the mouse over the 3D Viewport, press
Tabto enter Edit Mode. - Press
Ato select everything. - Press
G→X→1→Enter. The shape moves 1 m along X (the red line). - Press
Tabto go back to Object Mode.
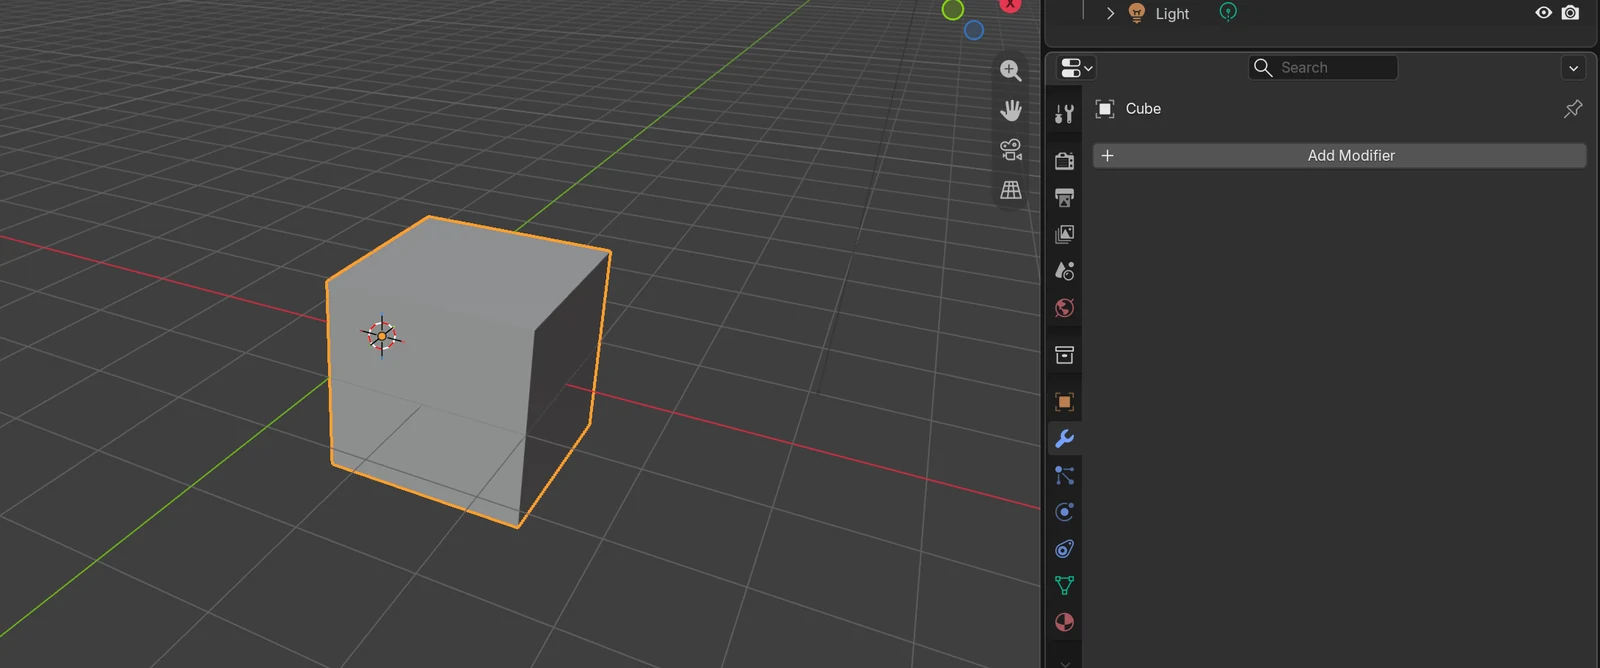 Figure 1. Only the shape moved 1 m along X. The origin (orange dot) stayed put and is now in the middle of the cube's left face (Blender screenshot)
The cube's left face now sits exactly where the origin is (X 0). This face is the mirror plane from now on.
2. Add Mirror and read the panel
Follow along: In the Modifiers tab, click Add Modifier → Generate → Mirror.
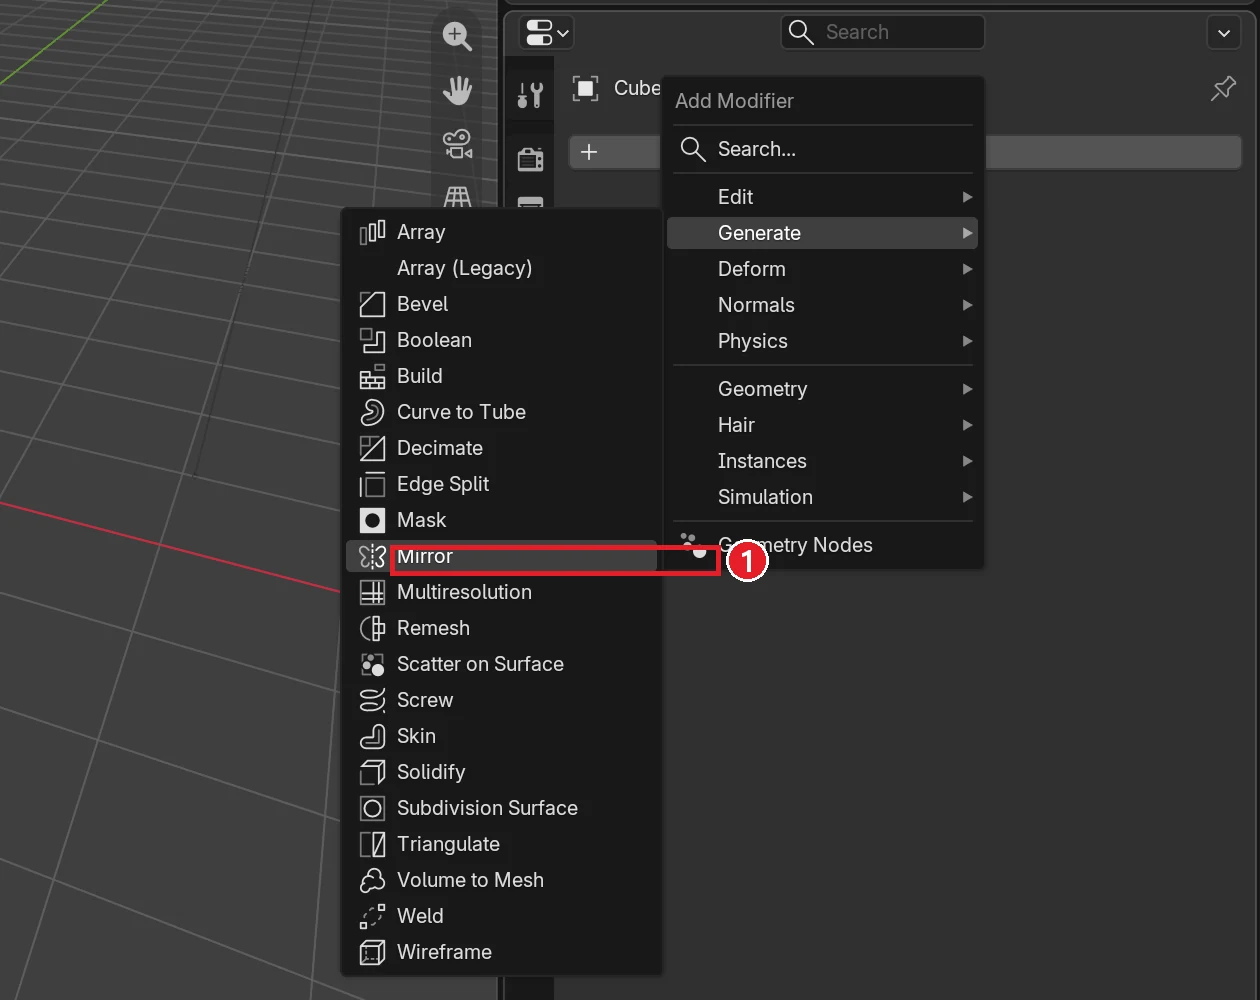 Figure 2. ① Mirror in the Generate list (Blender screenshot)
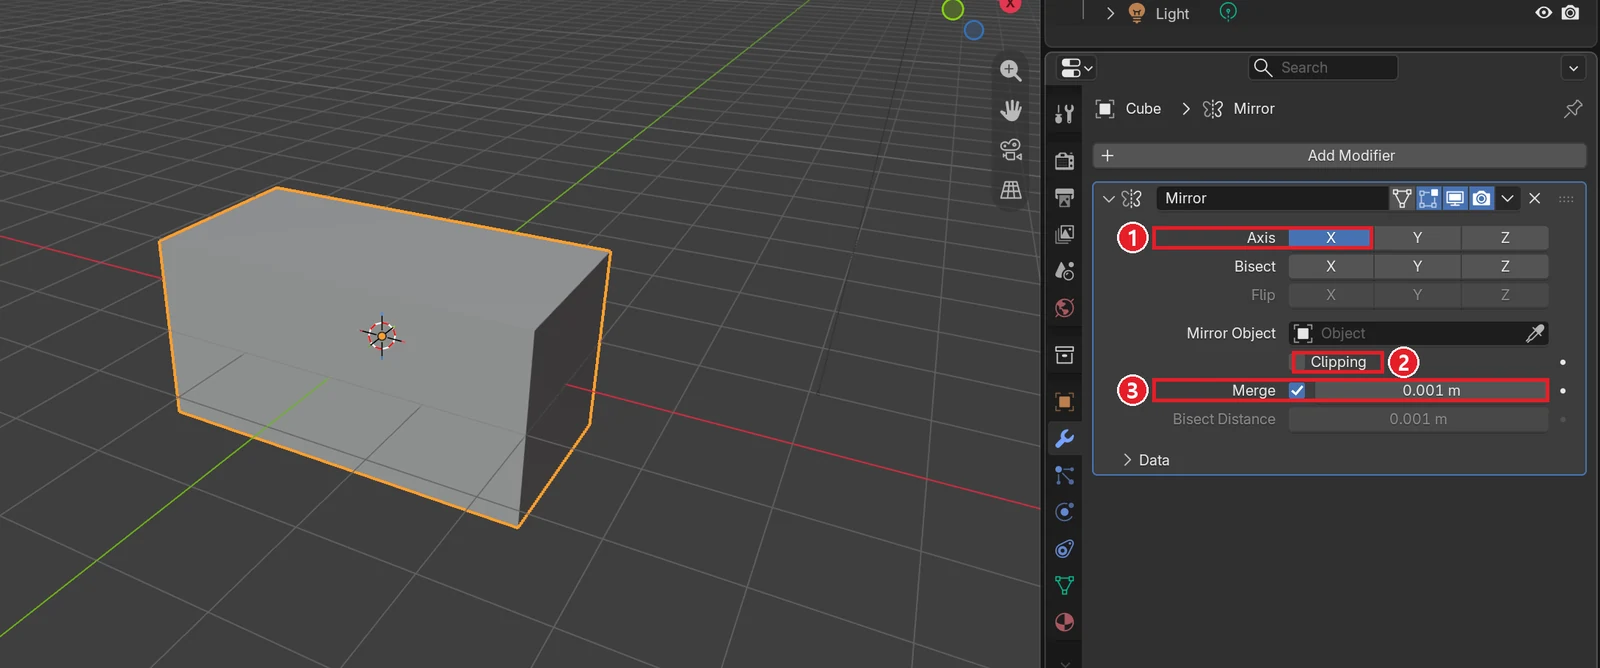 Figure 3. After adding Mirror, a mirrored copy appears to the left of the origin and the box is twice as long. ① Axis X (on by default) ② Clipping (off by default) ③ Merge (on by default, 0.001 m) (Blender screenshot)
From top to bottom, the panel looks like this.
| Field | What it does | Default |
|---|---|---|
| Axis X / Y / Z | Which axis to mirror across. With X on, the +X shape appears on the −X side. Two axes give 4 copies, three give 8 | X only |
| Bisect | If the shape crosses the mirror plane, cut it there and keep one side before mirroring | Off |
| Flip | Keep the other side when using Bisect | Off |
| Mirror Object | Use another object (usually an Empty) as the mirror instead of the origin | Empty |
| Clipping | Stop points from crossing the mirror plane in Edit Mode (section 5) | Off |
| Merge | Join points that come within a set distance of their mirrored copies | On, 0.001 m |
| Bisect Distance | How close to the plane Bisect removes points | 0.001 m |
| Data | Extra options such as mirroring UVs and vertex groups named .L/.R | Collapsed |
3. Delete the face left in the middle
The long box in Figure 3 looks fine from outside. Inside, a face is stuck on the mirror plane: the cube's old left face. It is like a wall inside a box. It causes trouble later with Subdivision Surface or 3D printing. When you model half a shape, deleting faces on the mirror plane is a basic step.
Starting point: The cube with the Mirror from the previous section.
Follow along:
- With the mouse over the 3D Viewport, press
Tabto enter Edit Mode. - Press the number key
3for face select mode. - Press
Alt+Zto turn on X-ray so you can see inside. - Left-click the center dot of the face on the mirror plane (the upright face at the origin) to select it.
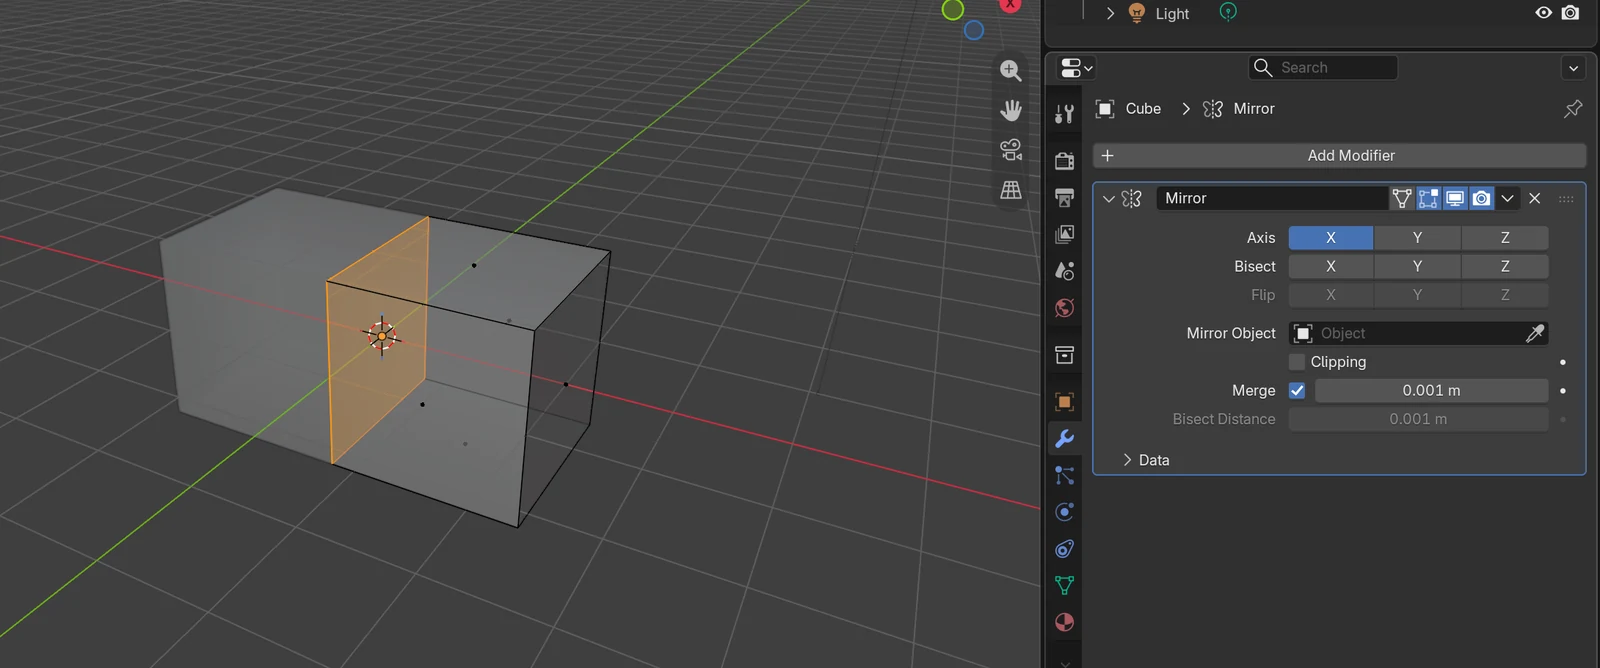 Figure 4. The face left on the mirror plane, selected. X-ray lets you see the face inside (Blender screenshot)
- Press
Xto open the Delete menu and click Faces.
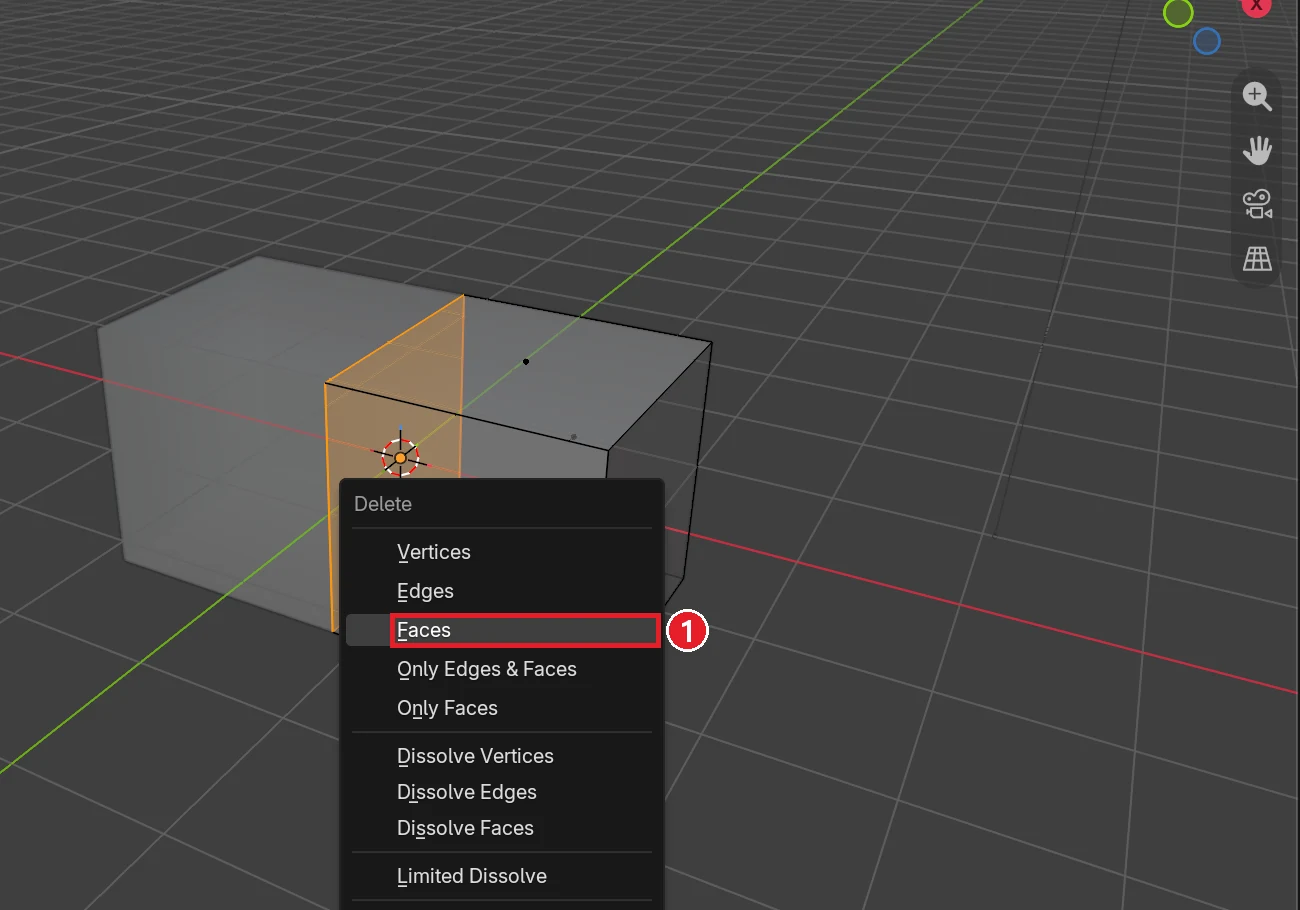 Figure 5. ① Faces in the Delete menu. It deletes only the face and keeps the points and edges around it (Blender screenshot)
The outside looks the same after the delete. The outer faces are still there; only the inner wall is gone.
4. When the seam opens: set Median X to 0
While shaping one half, it is easy to push a point on the mirror plane sideways by accident. The middle then opens, like a mask pulled away from the glass. Open it once on purpose and learn to close it.
Starting point: Edit Mode after deleting the middle face (X-ray still on).
Follow along:
- Press the number key
1for vertex select mode. - Drag a box around the 4 points on the mirror plane to select them. Then press
Alt+Zto turn X-ray off. - Press
G→X→0.3→Enter. The middle points move 0.3 m to the right. - Press
Nto open the sidebar on the right of the 3D Viewport. The Median X field on the Item tab shows the middle position of the selected points.
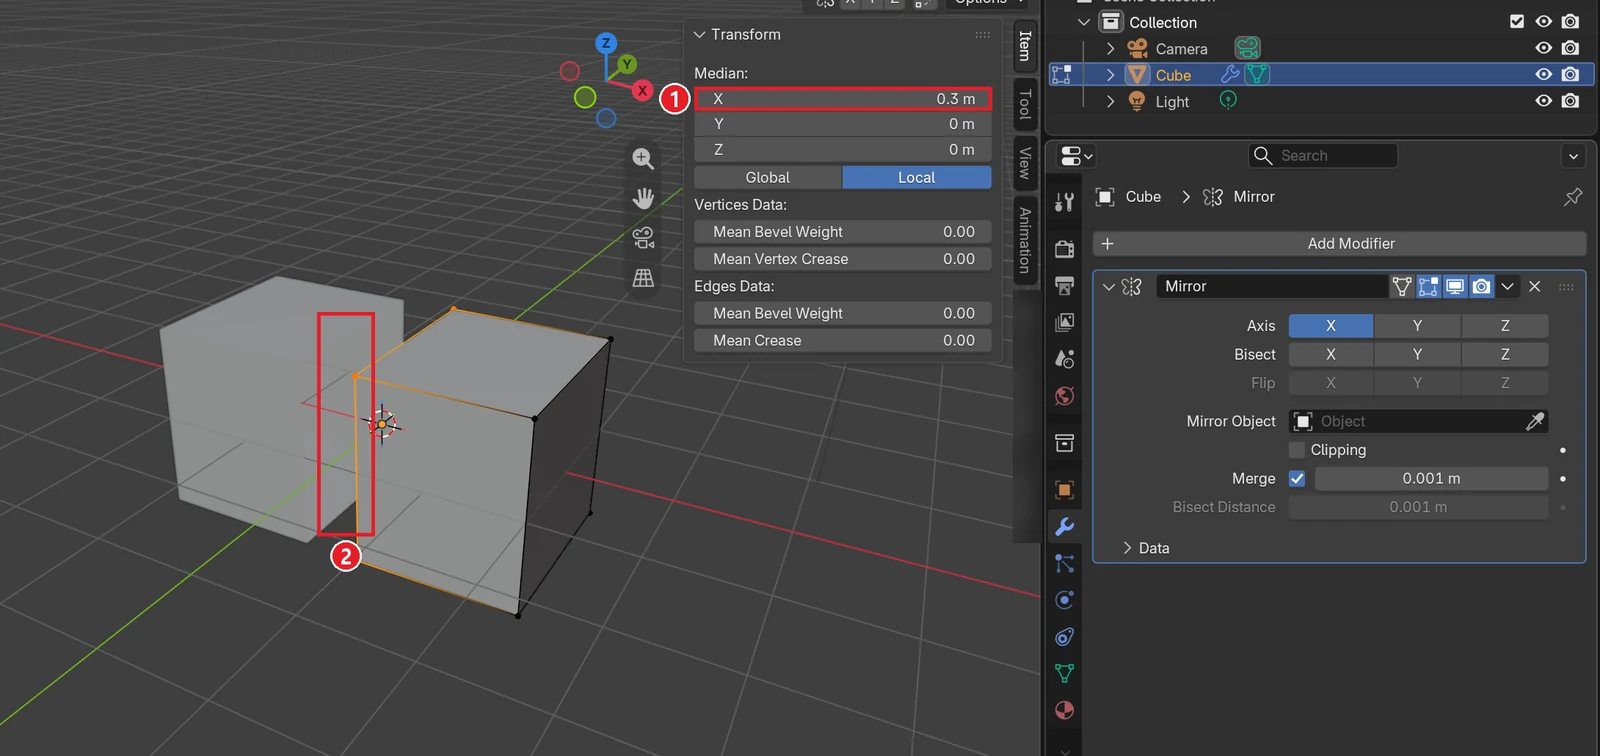 Figure 6. ① Median X 0.3 m ② points 0.3 m from the plane are 0.6 m from their mirrored copies, so they don't merge and a gap opens in the middle (Blender screenshot)
Merge only joins points within 0.001 m (the default) of their mirrored copies. Points 0.6 m from their copies are not merged, so the gap stays. Now close it.
- Double-click the Median X field to edit the text.
- Type
0and pressEnter.
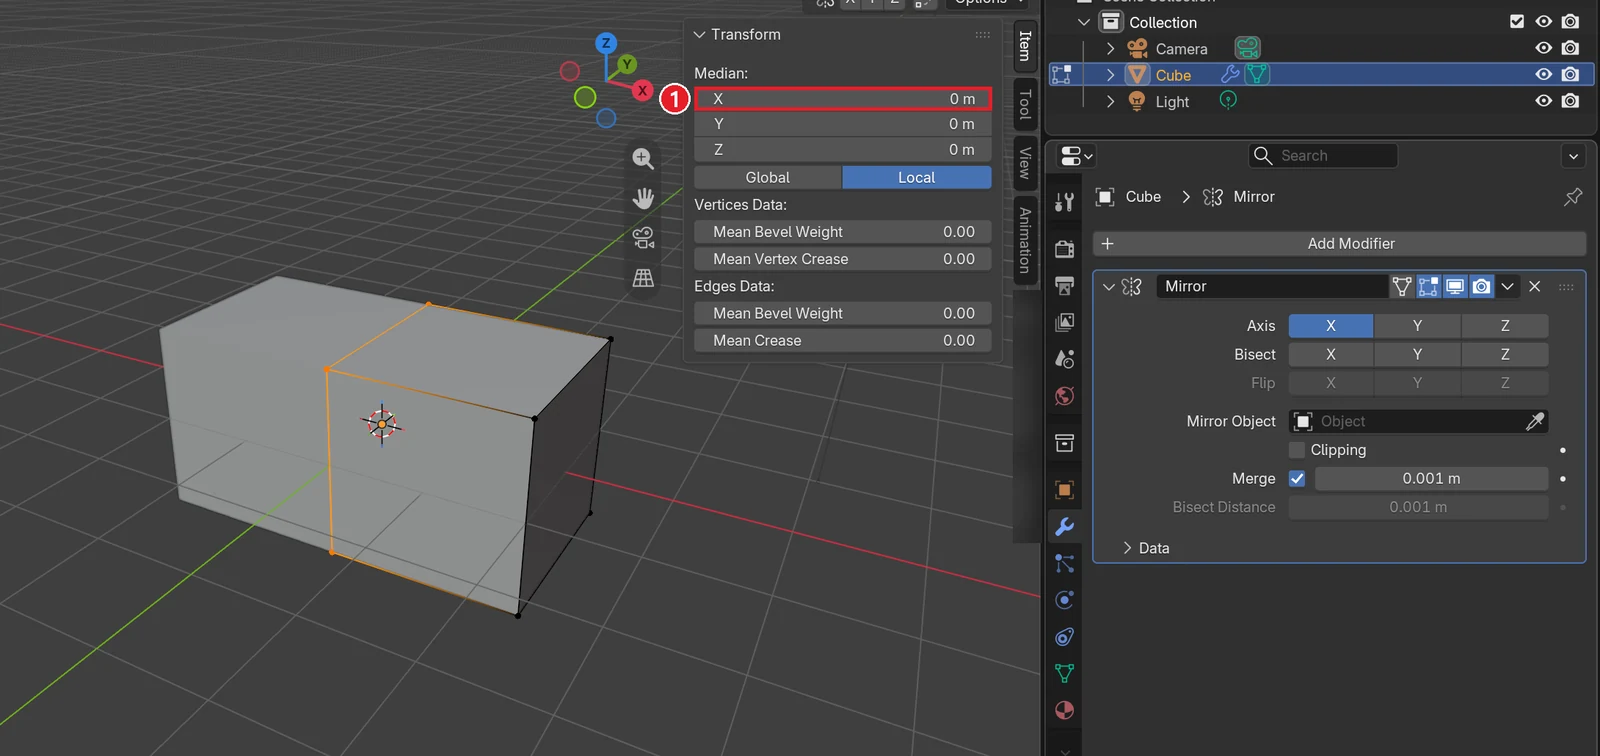 Figure 7. ① Median X 0 m. All selected points are back on the plane and Merge joins them again (Blender screenshot)
This also works when the points are scattered unevenly. Select every point that should be on the plane and press S → X → 0 → Enter to flatten them into one line in X. Then set Median X to 0 to put them all on the plane at once.
5. Clipping: keep it from opening again
Instead of fixing the gap by hand each time, you can stop points from leaving the plane. That is Clipping. It works like a magnetic wall on the plane: points stuck to it can slide up, down, forward and back along the wall, but cannot leave it.
Starting point: Edit Mode after setting Median X to 0. The 4 points on the plane are still selected.
Follow along:
- Turn on Clipping in the Mirror panel.
- Press
G→X→0.3→Enteragain.
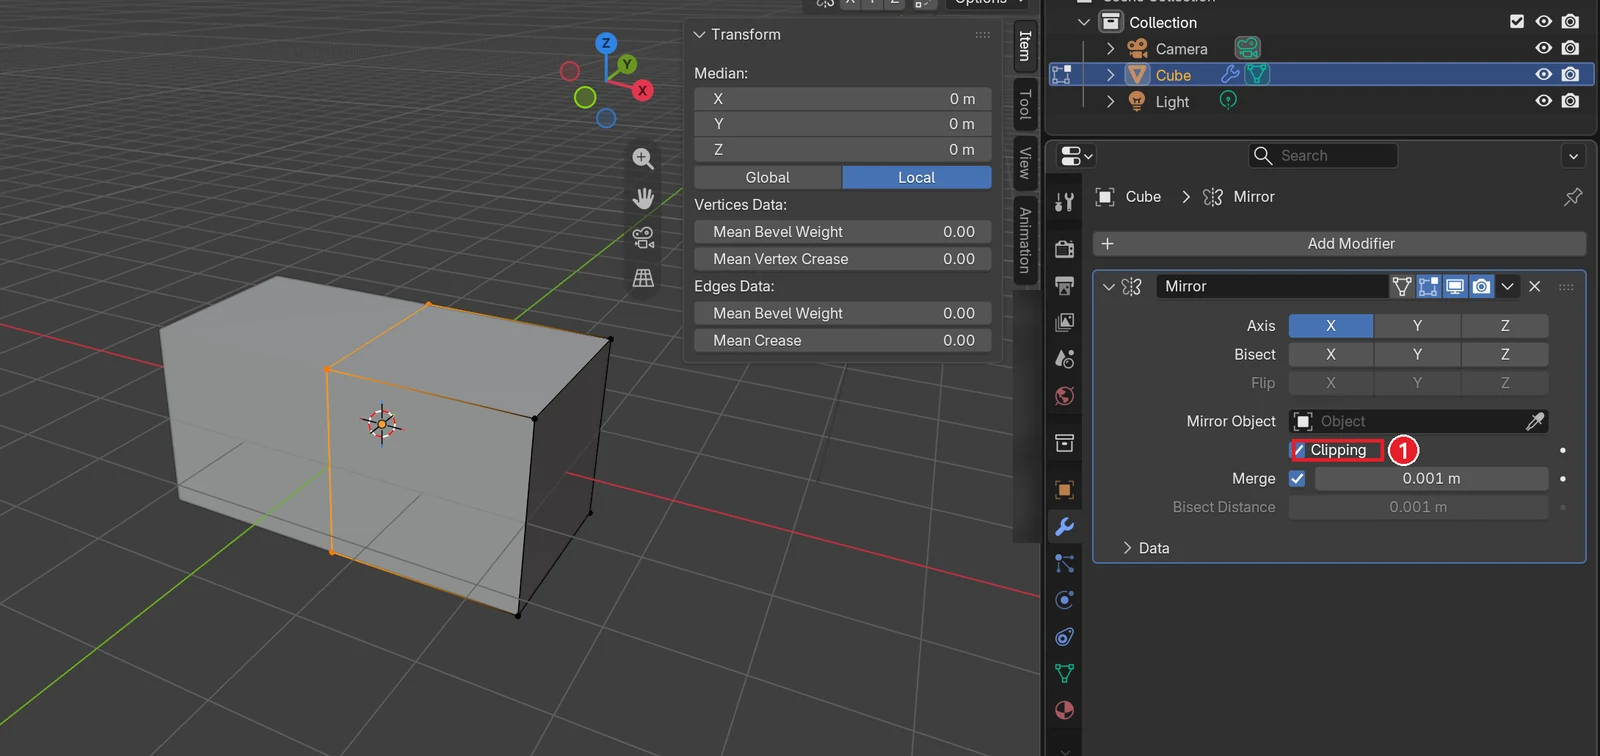 Figure 8. ① With Clipping on, points on the plane don't move in X, so the seam stays closed (Blender screenshot)
While Clipping is on, points on the mirror plane cannot leave it. To move them along the axis again, turn Clipping off. Keep it on while you build the half, and switch it off only when you need to move a middle point on purpose.
6. Finish: one piece with Subdivision Surface
Half-modeling usually goes with a Subdivision Surface on top of the Mirror. Since the seam is closed, the middle joins smoothly into one piece.
Starting point: Edit Mode from the previous section.
Follow along:
- Press
Nto close the sidebar, thenTabto go back to Object Mode. - With the mouse over the 3D Viewport, press
Ctrl+2. A level 2 Subdivision Surface goes in below the Mirror.
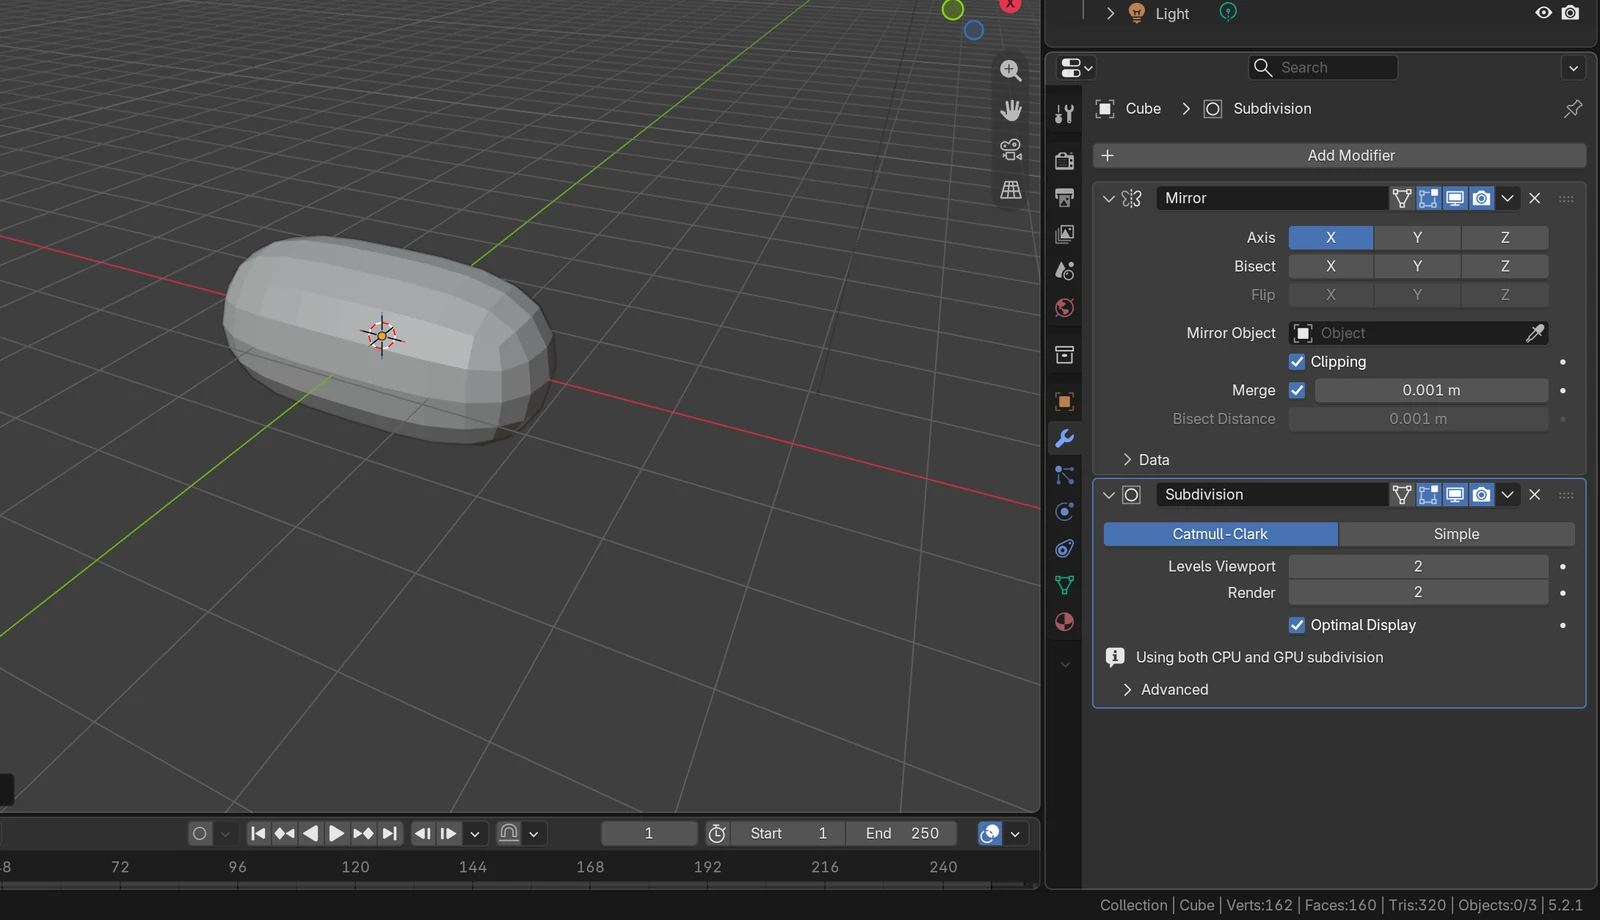 Figure 9. Subdivision below Mirror. The shape is smooth with no break in the middle. The panel is labeled Subdivision (Blender screenshot)
Order matters. The stack is calculated from top to bottom, so Mirror on top, Subdivision Surface below builds the full shape first and then smooths it. Stack order is covered in What is a modifier, and smoothing in Subdivision Surface.
7. Practice
- In this scene, turn on Axis Y too. Count how many boxes you see and check on which side of the origin they appear.
- With Clipping on, move a point on the plane up and down with
G→Z. Check whether it moves in Z. - Set the distance next to Merge to
0.5, then move the middle points 0.2 m in X as in section 4. Does a gap open? Write down why. - In a new file, add a monkey head (Add ‣ Mesh ‣ Monkey). In Edit Mode delete the points on the left half, then add Mirror. Turning on X-ray and using numpad
1(front view) makes selecting easier.
8. Common mistakes and fixes
| Symptom | Cause | Fix |
|---|---|---|
| I added Mirror and nothing changed | The shape is already symmetric around the origin (the plain default cube) | Move only the shape sideways in Edit Mode, as in section 1 |
| The mirrored copy appears in the wrong place | The origin, which is the mirror, is not on the plane you want | Select an edge on the plane, Shift+S → Cursor to Selected, then in Object Mode Object ‣ Set Origin ‣ Origin to 3D Cursor |
| Moving in Object Mode drags the copy along | G in Object Mode moves the origin too | Move only the shape in Edit Mode |
| A gap shows in the middle | Points on the plane were pushed sideways | Section 4: select them, set Median X to 0, then turn on Clipping |
| A middle point won't move sideways | Clipping is on | Turn Clipping off only when you need to move it |
| Subdivision makes the middle sharp or broken | Subdivision is above Mirror, or the middle face is still there | Move Mirror to the top (Move to First); delete the middle face as in section 3 |
| Only half is left after removing Mirror | Mirror was deleted with the X in its panel instead of applied | When the shape is final, use the down arrow in the Mirror panel header ‣ Apply. If it was a mistake, Ctrl+Z |
Summary in one line
Move only the shape in Edit Mode so the origin is on the mirror plane → Mirror → delete the middle face → if it opens, Median X 0 → turn on Clipping to keep it closed. The next post covers the Array modifier, which lines up copies of a shape.
Previous (whole series): Every Blender modifier in one list · Next: Array modifier
References
- Blender 5.2 Manual: Mirror Modifier
- Blender 5.2 Manual: Modifiers Introduction
- Blender 5.2 Manual: Origin (Set Origin)
- Shortcuts: Blender 5.2.1 default (Blender) keymap
- Image license: screenshots of Blender taken by AZTechnology. Blender license: blender.org/about/license