Curve modifier with Array: bending paths, chains, and rails along a curve
Fill a curve's length with copies of one plank using Fit Curve in Array (Legacy), then bend the row along a Bézier curve with the Curve modifier to make a wooden path. Real screens show what happens with the wrong axis, an object placed away from the curve, a swapped modifier order, or too few points, and how to fix each.
한국어English
Based on: Blender 5.2 LTS (screenshots from 5.2.1, English interface, default shortcuts). Checked in November 2026. All images are real Blender screens. Red numbers, boxes, and the labels on comparison images were added for explanation. The Properties editor was widened so the text is easier to read.
Stepping-stone paths in a garden, railway sleepers, a bent chain: the same piece repeated along a curve comes up more often than you might think. If you copy and rotate each piece by hand, you have to start over every time the curve changes. The pair to use here is the Array modifier + Curve modifier.
Think of a train. The Array modifier joins identical cars in a line. The Curve modifier puts that train on the rails. When the rails bend, the line of cars bends with them. Move a point on the rail (the curve) and the whole path follows at once.
When you finish this guide, you will be able to do the following.
- Add a Bézier curve and set its size.
- Fill the curve's length with copies using Fit Curve in Array (Legacy).
- Bend the row along the curve with the Curve modifier.
- Tell from the shape of the result whether the axis, object position, modifier order, or point count is wrong.
Before you start
- If the Array modifier is new to you, read Array modifier first. The Array (Legacy) fields used here are in section 5 of that post. Other modifiers are in Every Blender modifier in one list.
- In Blender 5.2, the Add Modifier > Generate menu has both Array and Array (Legacy). This guide uses Array (Legacy), because it has Fit Curve, which sets the count from the length of a curve. If you set the new Array's Shape to Curve, it lays copies along the curve and turns them to follow its direction. To bend each plank itself, use the method in this guide.
1. Prepare the plank and the curve
Starting point: the default cube in a new file (File > New > General).
Follow along (plank):
- Select the cube. In the Properties editor's Object tab (orange square icon), enter Scale X
0.1, Y0.6, Z0.05. You get a plank 0.2 m wide, 1.2 m long, and 0.1 m thick. - With the mouse over the 3D Viewport, press
Ctrl+A> Scale. The current size becomes the original size and all Scale fields become 1. If you skip this, the spacing of the array is easily thrown off.
Follow along (curve):
- Press
Shift+A> Curve > Bézier. If the 3D cursor is at the center (0, 0, 0), it appears in the same place as the plank. Its name isBézierCurve. - Press
Tabto enter Edit Mode, select all withA, scale it three times withS>3>Enter, then pressTabto leave.
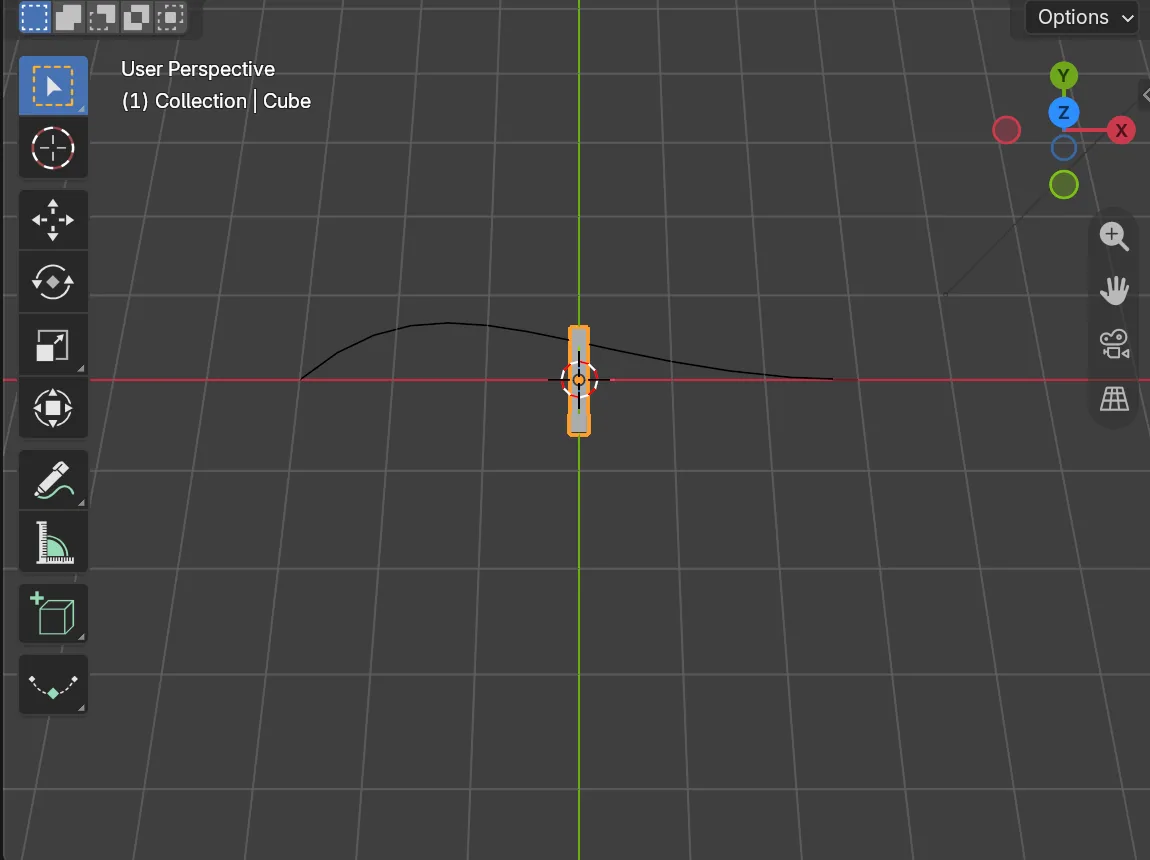 Figure 1. One plank at the origin and an S-shaped Bézier curve (Blender screenshot)
There is a reason to scale the curve in Edit Mode. If you scale it with S in Object Mode, the curve object's Scale field becomes 3, which makes length and bending harder to reason about. Scaling the points in Edit Mode keeps Scale at 1. It also matters that the plank and the curve share the same origin. If their origins differ, the row lands away from the curve, as in section 4-2.
2. Fill the curve's length with Array (Legacy)
Starting point: the plank and curve from the previous section. Click the plank to select it.
Follow along:
- In the Modifiers tab (wrench icon), choose Add Modifier > Generate > Array (Legacy).
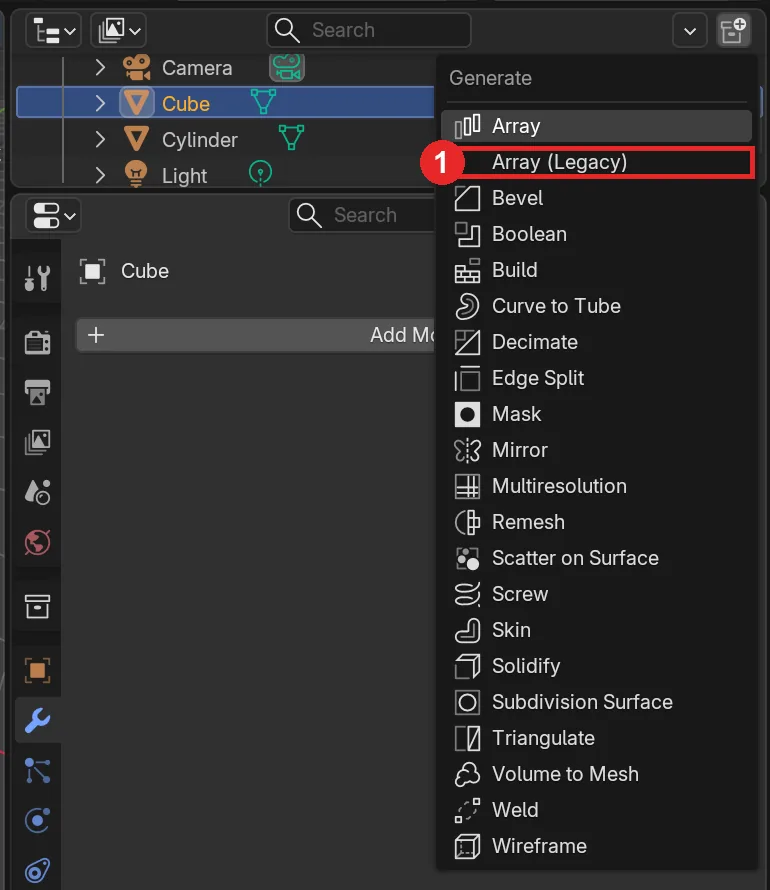 Figure 2. The Generate menu. 1: Array (Legacy) (Blender screenshot)
- Change Fit Type to
Fit Curve. When the Curve field appears below it, chooseBézierCurve. - Change Factor X under Relative Offset to
1.5. That is a step of 1.5 plank widths, which leaves a gap of half a plank between planks.
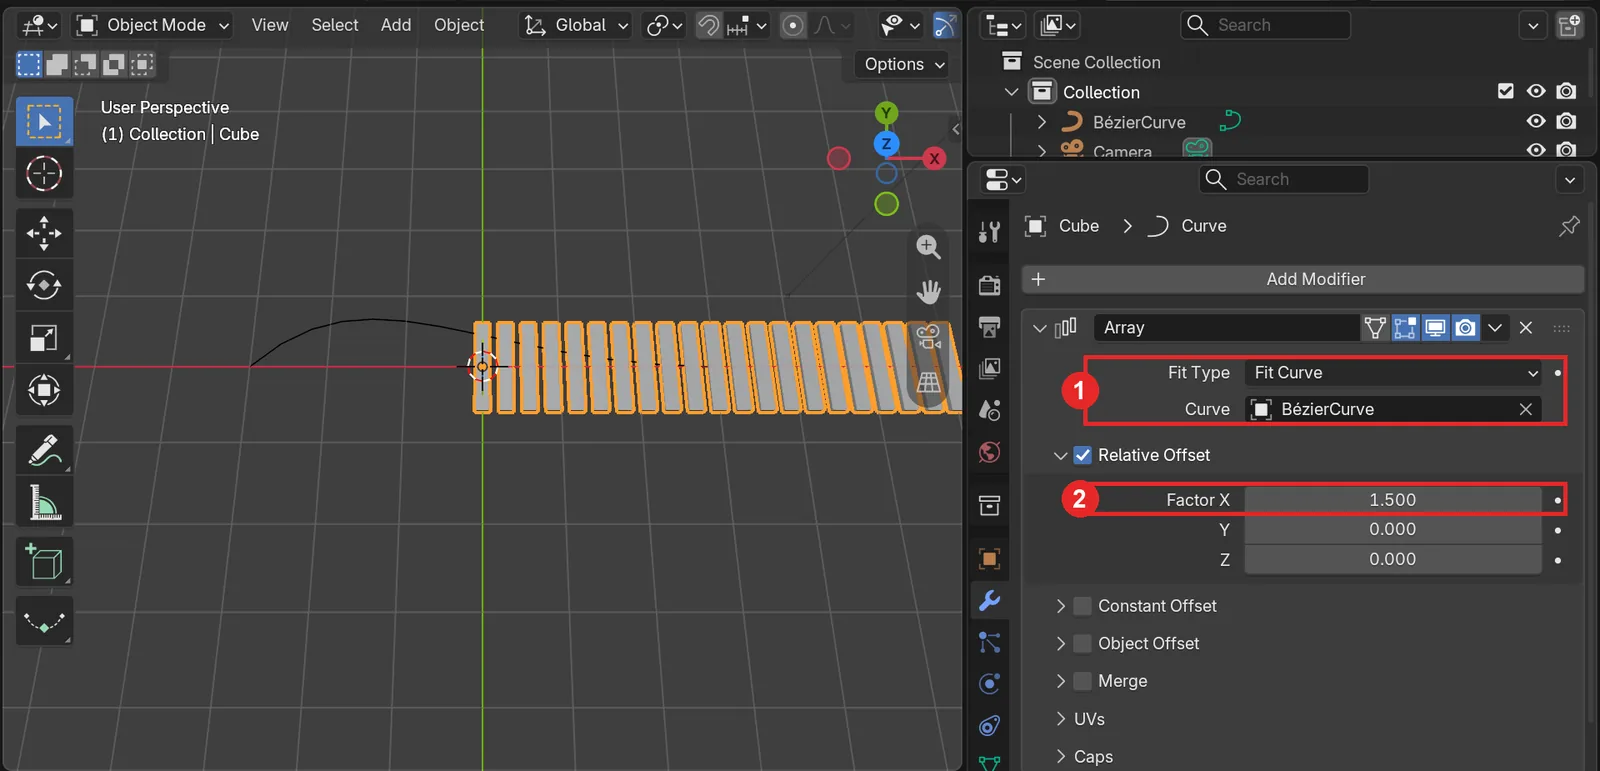 Figure 3. 1: Fit Type: Fit Curve, Curve: BézierCurve 2: Factor X 1.5 (Blender screenshot)
There are now enough planks to fill the curve's length (about 6.2 m). But they still run straight to the right from the origin, ignoring the curve. Fit Curve only decides "how many to make" from the curve's length. It does not bend anything. Make the curve longer and the plank count goes up. Make it shorter and the count goes down.
| Fit Type | What sets the count |
|---|---|
| Fixed Count (default) | The number in Count |
| Fit Length | The length in Length |
| Fit Curve | The length of the chosen curve |
3. Bend it with the Curve modifier
Starting point: the plank (Array (Legacy)) from the previous section.
Follow along:
- Choose Add Modifier > Deform > Curve. It is added below the Array panel.
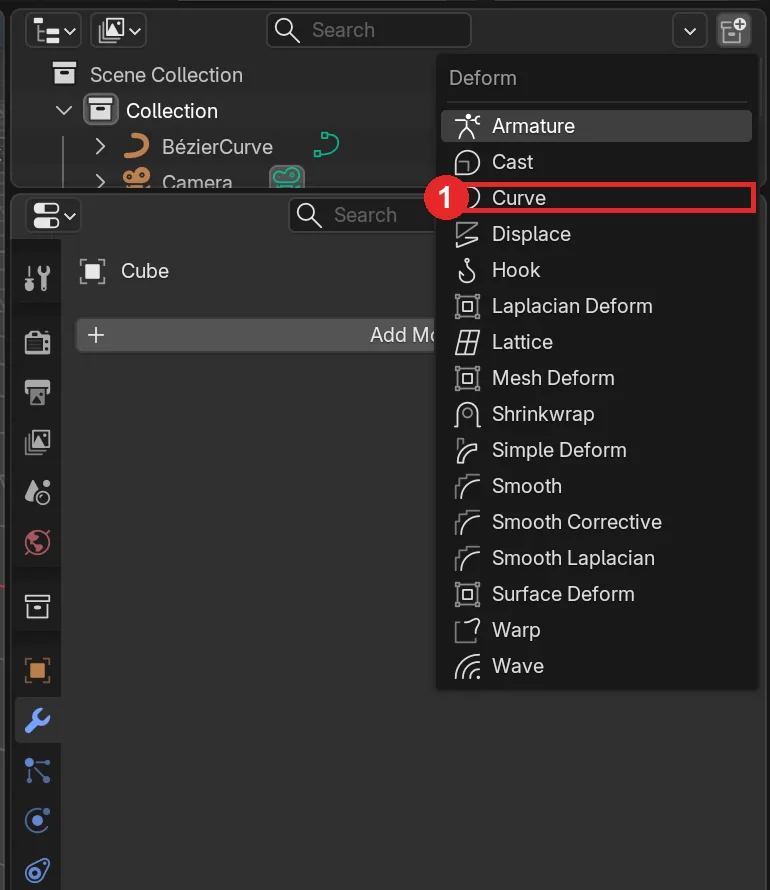 Figure 4. The Add Modifier > Deform menu. 1: Curve (Blender screenshot)
- In the Curve panel, choose
BézierCurvein the Curve Object field. Leave Deform Axis at the defaultX.
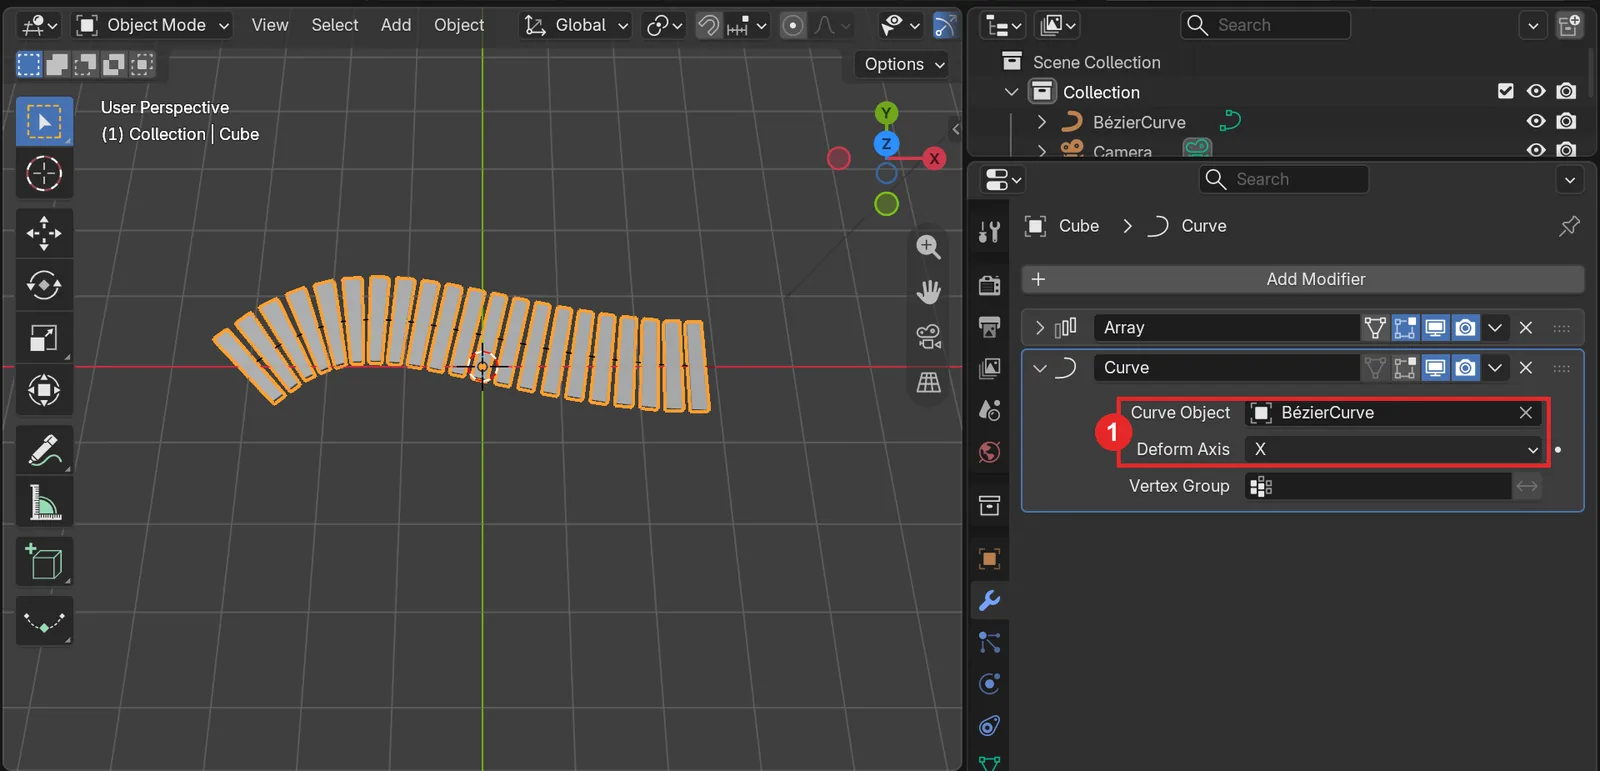 Figure 5. 1: Curve Object: BézierCurve, Deform Axis: X. The image shows the Array panel collapsed (Blender screenshot)
The straight row now bends along the curve from start to end. Each plank is also twisted to follow the curve. Now select the curve, press Tab to enter Edit Mode, and move a point or handle with G. The path changes along with the curve. If the curve gets longer, Fit Curve adds more planks.
The Curve panel has three fields.
| Field | Meaning |
|---|---|
| Curve Object | The curve object to follow |
| Deform Axis | Which axis of the object follows the curve. X, Y, Z, and the opposite directions -X, -Y, -Z |
| Vertex Group | If set, only that group of points bends |
4. When the result looks wrong: find the cause from the shape
4-1. The row heads off in the wrong direction: Deform Axis
Starting point: the bent row of planks from the previous section.
Follow along: change Deform Axis in the Curve panel to Y. After checking, set it back to X.
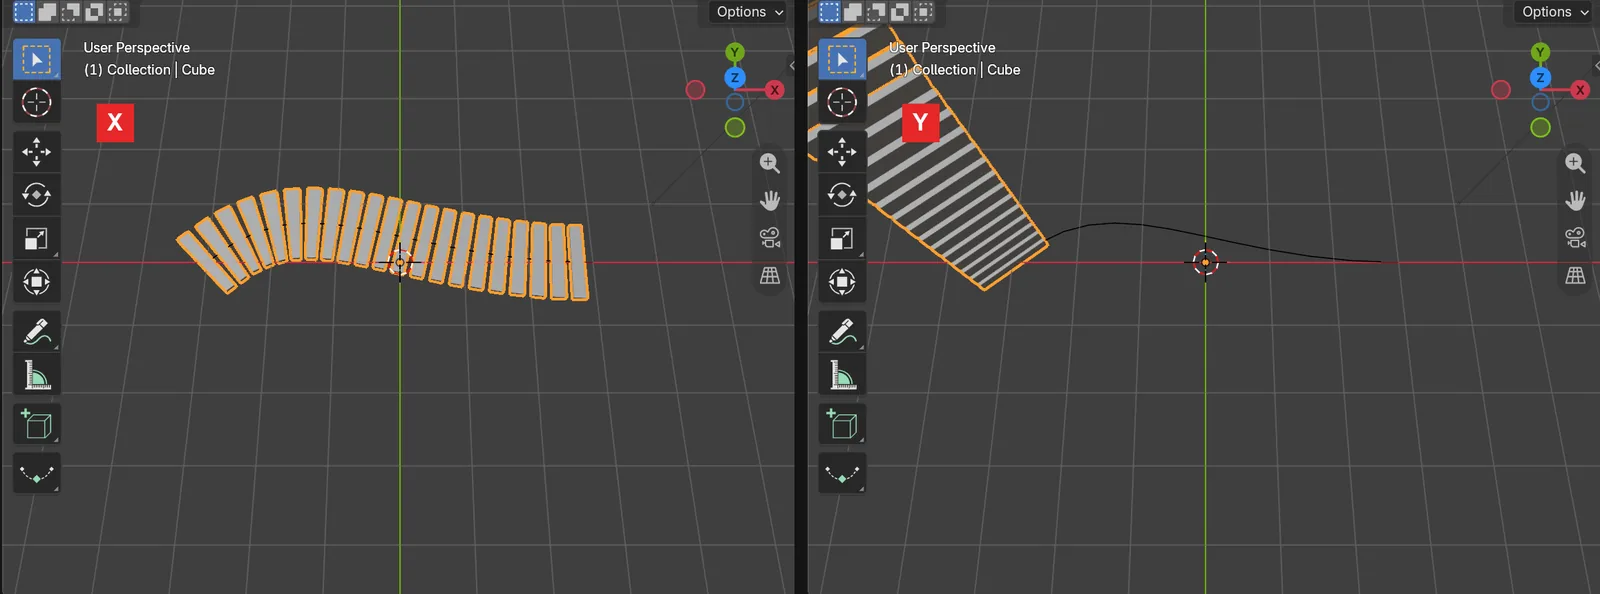 Figure 6. Deform Axis. Left X, right Y (Blender screenshot)
Deform Axis must match the direction the array runs in. In section 2 we used Factor X, so it is X. If you laid the array out along Y, choose Y. If you want the row to start from the other end of the curve, choose -X.
4-2. The row bends but sits away from the curve: object position
Starting point: the bent row from the previous section (Deform Axis X).
Follow along: select the plank and move it with G > Y > 1.5 > Enter.
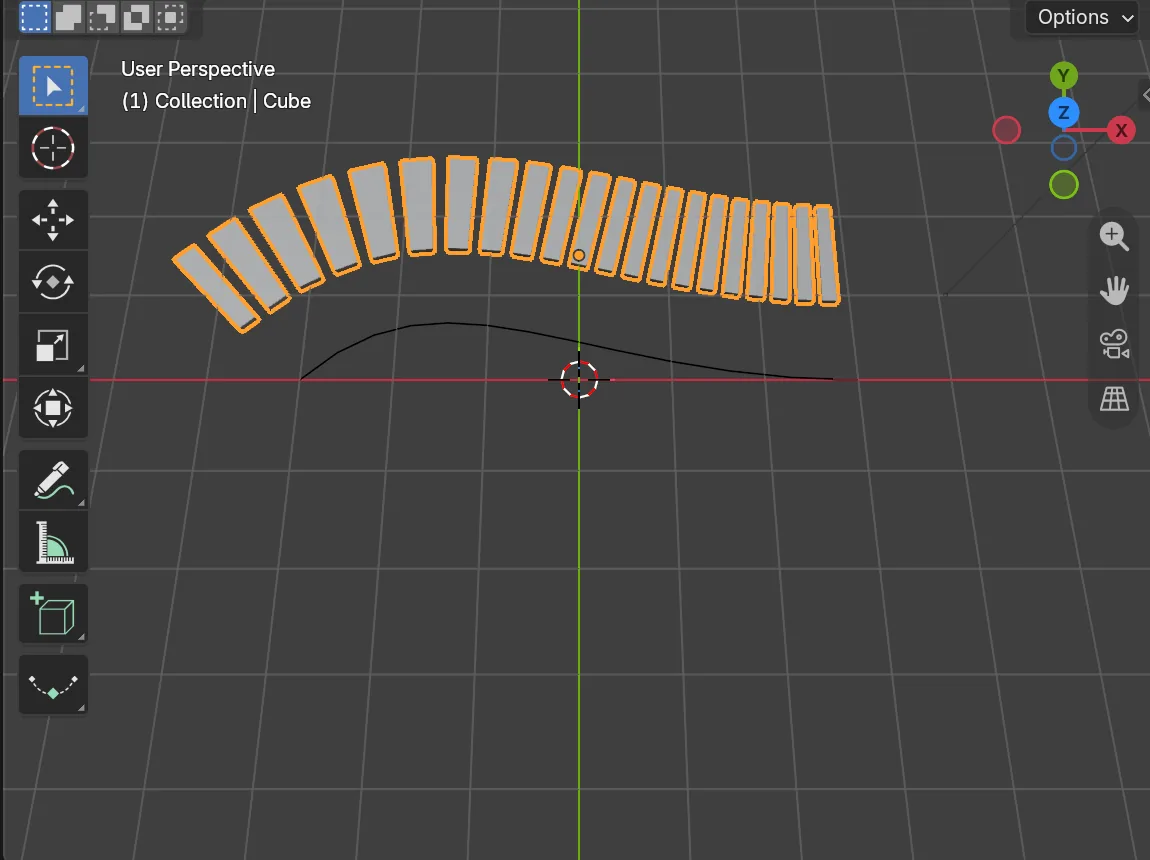 Figure 7. The plank moved 1.5 m on Y. The bend is the same, but the row sits away from the curve (Blender screenshot)
The Curve modifier uses where the object sits relative to the curve as is. If the object is offset sideways from the curve, it bends in parallel at that distance. Sometimes you want this, like a fence beside a railway. But if the path should sit right on the rail, put the plank's origin at the curve's origin. Press Alt+G to reset the plank's position to 0.
4-3. Planks scattered and tilted: modifier order
Starting point: the plank with its position reset in the previous section.
Follow along: click the down arrow at the top right of the Curve panel > Move to First to move Curve above Array. After checking, use Move to Last in the same menu to put it back.
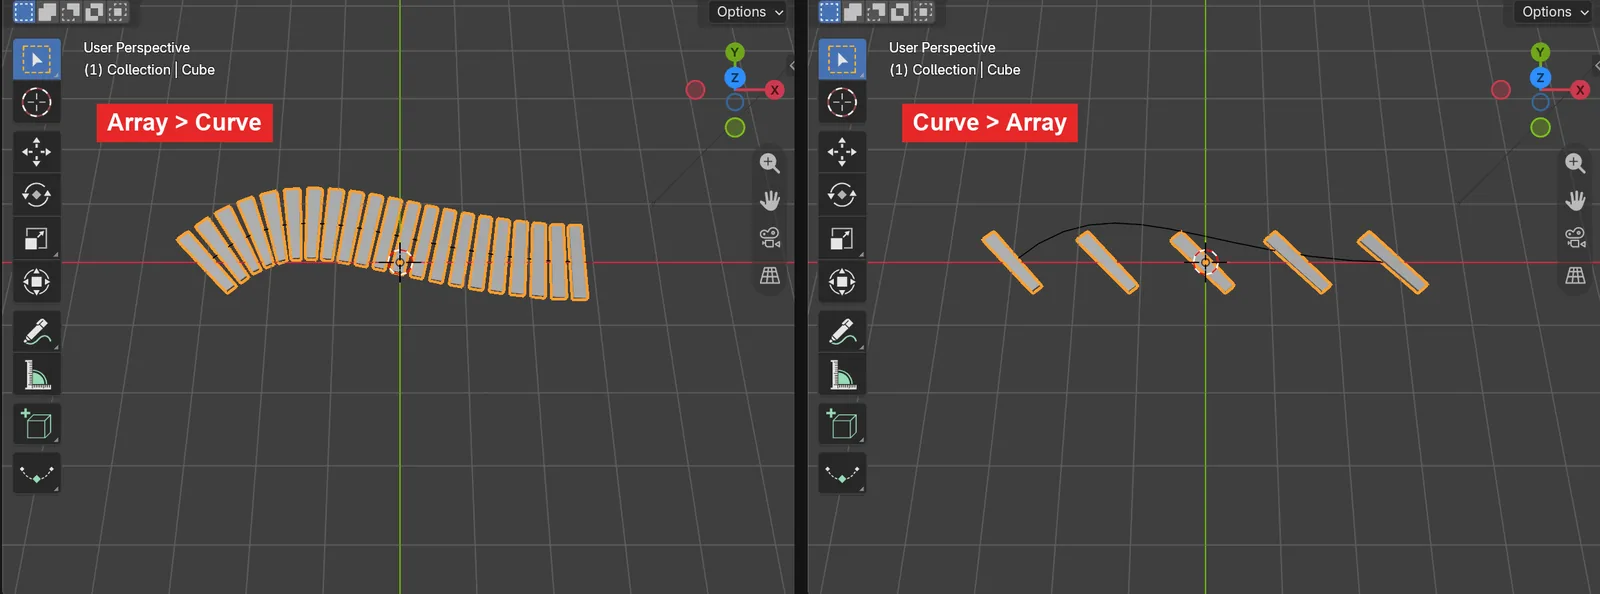 Figure 8. Modifier order. Left Array then Curve, right Curve then Array (Blender screenshot)
Modifiers are calculated from top to bottom. If Curve comes first, a single plank is bent to the curve, and then Array copies that bent plank at fixed steps. So the copies do not follow the curve. They sit scattered with the same tilt. Array first, Curve second makes "the whole row" follow the curve.
4-4. A long object does not bend: point count
Starting point: select the plank from the previous section and hide it with H. Keep the curve.
The plank path bent well because it is made of many short pieces. One long object, like a rail, is different.
Follow along:
- Press
Shift+A> Mesh > Cube, and set Size to1 min the Add Cube panel. - Press
Tab>A, then make it long withS>X>6.2>Enter,S>Y>0.1>Enter, andS>Z>0.1>Enter. - Move it with
G>X>3.1>Enterso the origin is at the rail's left end, then pressTabto leave. This is the same place where the plank row started at the origin and went right. - Add Add Modifier > Deform > Curve and choose
BézierCurveas the Curve Object. - Click the arrow next to Viewport Overlays (the two overlapping circles icon) and turn on Wireframe to see the points and edges.
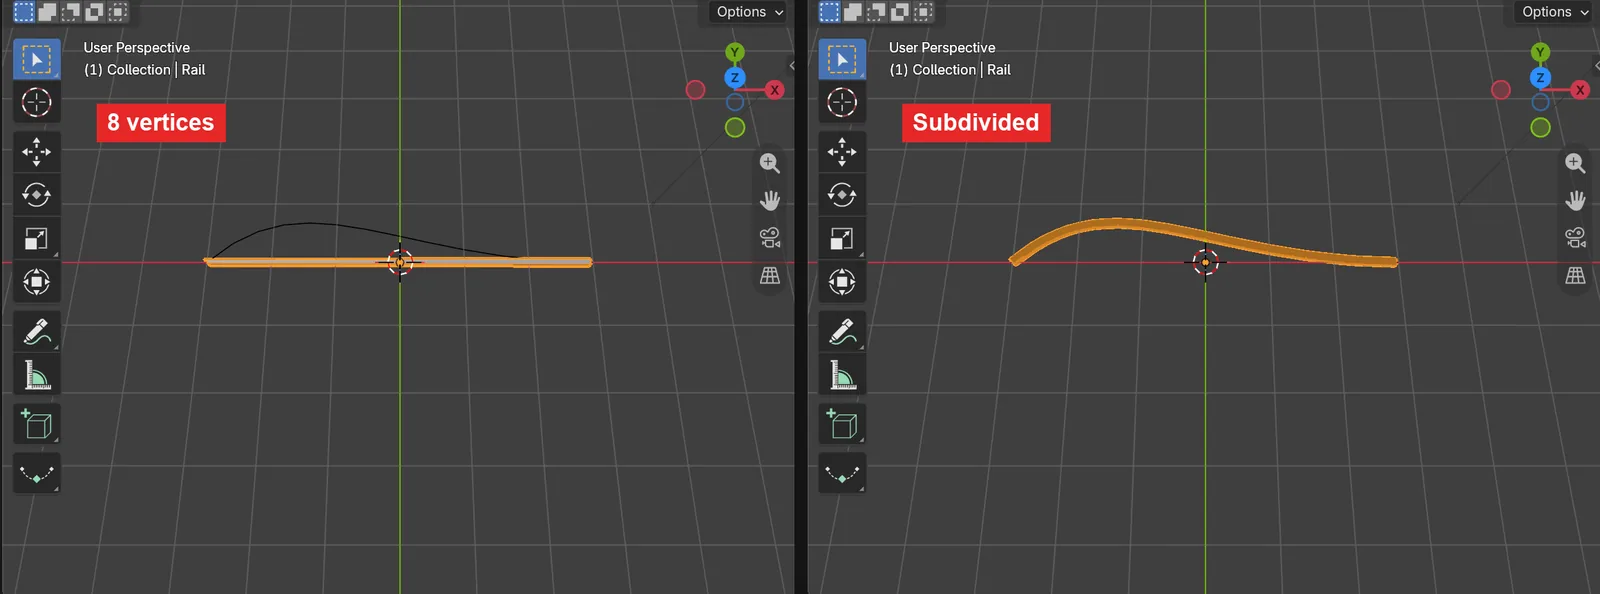 Figure 9. Left, a rail with 8 points. Right, the rail split into small pieces (Blender screenshot)
A bar with points only at its ends stays straight, as on the left of Figure 9. The Curve modifier moves points. The faces between points are flat panels and cannot bend. To bend, an object needs many points along the direction of the bend.
- Select the rail, press
Tab>A, and choose Edge > Subdivide. In the Subdivide panel at the bottom left, set Number of Cuts to30, then pressTabto leave.
Now it bends smoothly, as on the right of Figure 9. But Subdivide splits in every direction, so the point count grows a lot (this rail has more than 5,000). To split only along the length, adding loops on the long side with Ctrl+R (Loop Cut) is lighter. For a chain made of link pieces, joining short pieces with Array as in section 2 is easier, because the points are even from the start.
Practice
- Select the curve, and in Edit Mode drag one end point far away with
G. Check whether the number of planks goes up. - Instead of a plank, add
Shift+A> Mesh > Torus and make a chain the same way. With Relative Offset Factor X below 1, the links overlap. - Change Deform Axis to
-Xand see which end of the curve the row starts from.
Common mistakes and fixes
| Symptom | Cause | Fix |
|---|---|---|
| Planks line up straight and do not bend | No Curve modifier (Fit Curve only sets the count) | Add Deform > Curve (section 3) |
| The row leaves the curve and heads off | Deform Axis does not match the array direction | If the array runs along X, use X (section 4-1) |
| The row sits beside the curve | The object is in a different place from the curve | Put the origins together, Alt+G (section 4-2) |
| Copies are scattered with the same tilt | Curve is above Array | Array first, Curve second (section 4-3) |
| A long object does not bend along the curve | No points along the bend | Add points with Subdivide or Loop Cut (section 4-4) |
| Fit Type has no Fit Curve | The new Array was added | Add Generate > Array (Legacy) |
| Plank spacing looks wrong | The plank's scale was not applied | Ctrl+A > Scale on the plank, then check again |
Summary
Plank and curve share the same origin, apply scale, fill the count with Array (Legacy) Fit Curve, add Curve below it, set Deform Axis to the array direction, and add points to long objects first.
In the next guide, Displace and Shrinkwrap modifiers, you make bumpy ground and stick a path onto it.
Previous: Screw modifier · Next: Displace and Shrinkwrap modifiers · Whole series: Every Blender modifier in one list
References
- Blender 5.2 Manual: Curve Modifier
- Blender 5.2 Manual: Array (Legacy) Modifier
- Blender 5.2 Manual: Array Modifier (new)
- Blender 5.2 Manual: Subdivide
- Read next: Array modifier, What is a modifier?, Screw modifier
- Shortcuts: Blender 5.2.1 default (Blender) keymap
- Image license: screenshots of Blender taken by AZTechnology. Blender license: blender.org/about/license