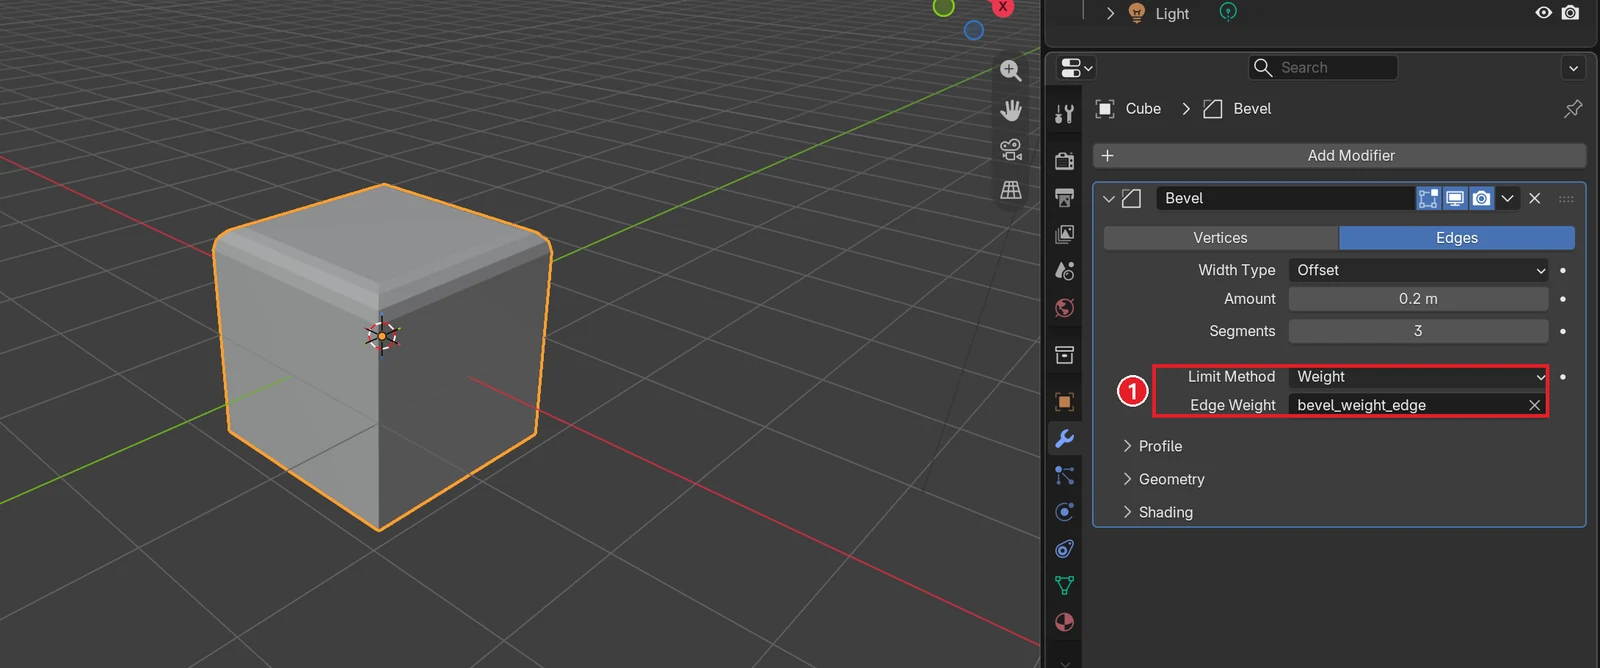
Screw modifier: making cups, vases, and springs from one side-view line
Draw the side view of a vase as a line of six points, spin it once with the Screw modifier to make the vase, then clean it up with Steps, Flip, and Merge. With the same modifier's Screw and Iterations values, you also turn a small ring into a spring.
한국어English
ON THIS PAGE
- 011. Draw the side-view line
- 022. Add Screw and spin once
- 033. Steps: how many pieces per turn
- 044. Fix the face direction: Flip
- 055. Merge the center of the bottom: Merge
- 066. Give the vase walls thickness with Solidify
- 077. From ring to spring: Screw and Iterations
- 08Practice
- 09Common mistakes and fixes
- 10Summary
- 11References
Based on: Blender 5.2 LTS (screenshots from 5.2.1, English interface, default shortcuts). Checked in November 2026. All images are real Blender screens. Red numbers, boxes, and the labels on comparison images were added for explanation. The Properties editor was widened so the text is easier to read.
Cups, vases, bottles, and wine glasses are all round around a center axis. To make them, you only need half of the side view. Think of a potter's wheel. You hold your hand against the clay and spin the wheel, and the clay becomes a round pot with the shape your hand traced. The Screw modifier is that wheel. It spins one line around an axis to make a surface. Other modifiers are in Every Blender modifier in one list.
There is a reason it is called "screw". If you raise the line a little while it spins, you get a spiral, like a spring or a screw thread. In this guide you make one vase and one spring.
When you finish this guide, you will be able to do the following.
- Draw a side-view line (a profile), starting from a single point.
- Spin the profile once with the Screw modifier to make a vase.
- Clean up smoothness with Steps, face direction with Flip, and the center of the bottom with Merge.
- Add Solidify after it to give the vase walls thickness.
- Turn a ring into a spring with the Screw and Iterations values.
1. Draw the side-view line
Starting point: a new file (File > New > General). Select the default cube and delete it with X > Delete.
A profile is a mesh with only points and lines, no faces. Blender has no built-in "single point" object, so we add a plane and merge its four points into one.
Follow along:
- With the mouse over the 3D Viewport, press
Shift+A> Mesh > Plane. Make sure the 3D cursor is at the center (0, 0, 0). - Press
Tabto enter Edit Mode, press1(vertex select), and pressAto select all four points. - Press
M> At Center. The four points become one point at the center. - Press numpad
1to look from the front. Now the red X axis runs across and the Z axis runs up. - Press the keys in the table below, in order.
Eextrudes a new point from the selected one.Gmoves the new point sideways. Rows 2 to 5 have anEpart and aGpart: pressEnterat the end of theEpart, then pressEnteragain at the end of theGpart.
| Step | Keys | New point (X, Z) |
|---|---|---|
| 1 | E > X > 0.5 | (0.5, 0) edge of the bottom |
| 2 | E > Z > 0.15, then G > X > 0.1 | (0.6, 0.15) rounded bottom |
| 3 | E > Z > 0.85, then G > X > -0.15 | (0.45, 1.0) waist |
| 4 | E > Z > 0.5, then G > X > 0.05 | (0.5, 1.5) neck |
| 5 | E > Z > 0.4, then G > X > 0.2 | (0.7, 1.9) opening |
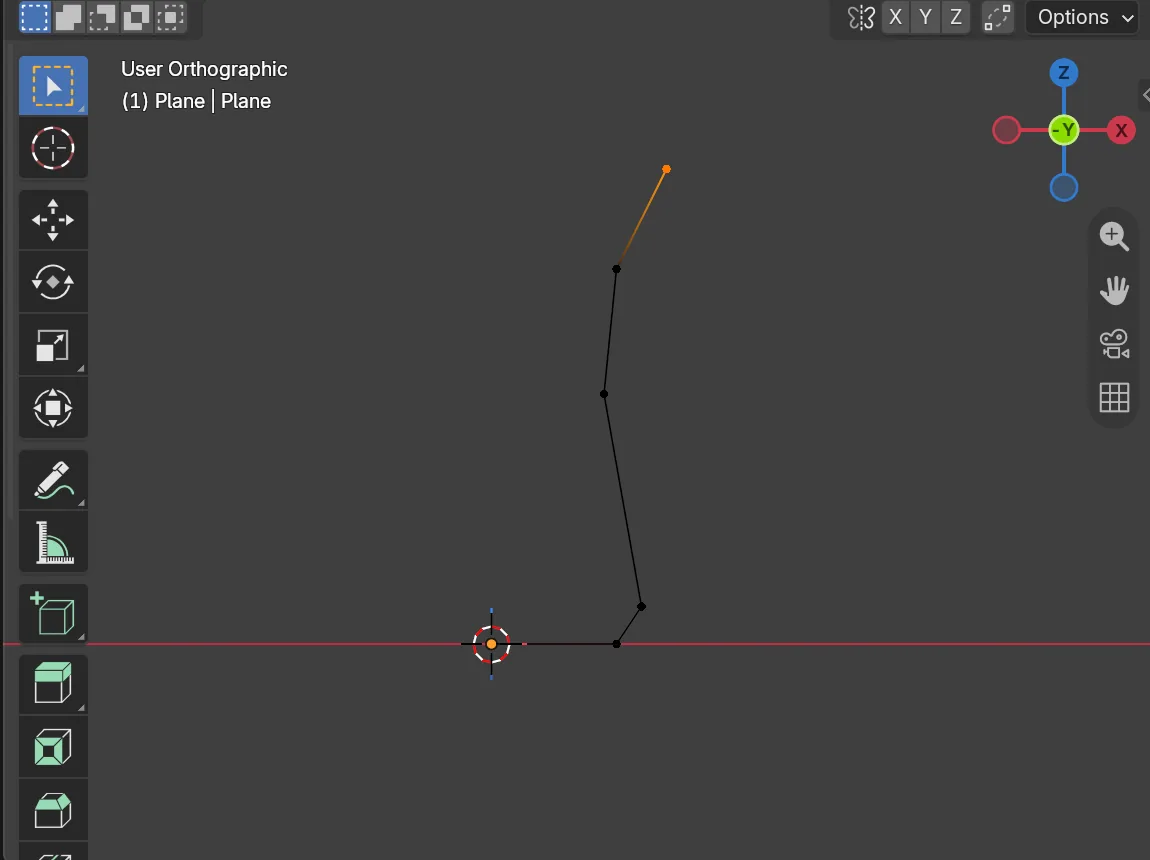 Figure 1. The vase profile from the front. A broken line of six points starting at the origin (Blender screenshot)
You want a broken line like Figure 1 that goes right from the origin and then up. It matters that the first point is exactly at the origin, that is, on the axis you will spin around. A point on the axis stays in place when spun, so the center of the vase bottom is closed. Draw the profile along the object's axes (here X and Z). If you draw it at an angle, the spun result will be crooked too.
- Press
Tabto return to Object Mode.
2. Add Screw and spin once
Starting point: the profile from the previous section (object name Plane), selected in Object Mode.
Follow along: in the Properties editor, open the Modifiers tab (wrench icon) and choose Add Modifier > Generate > Screw.
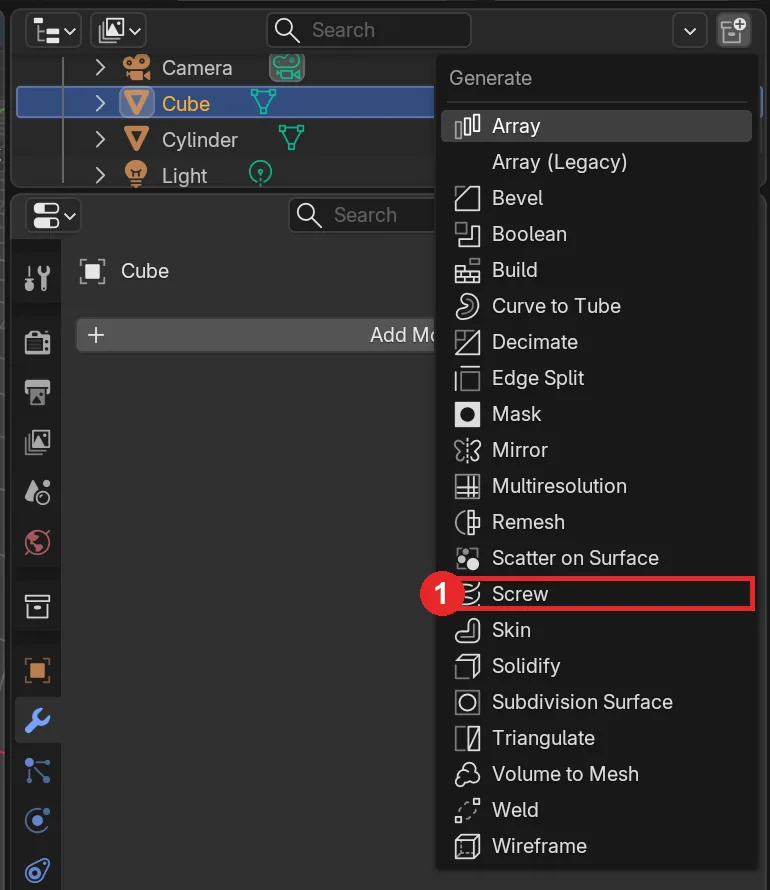 Figure 2. The Add Modifier > Generate menu. 1: Screw (Blender screenshot)
Drag with the middle mouse button to tilt the view.
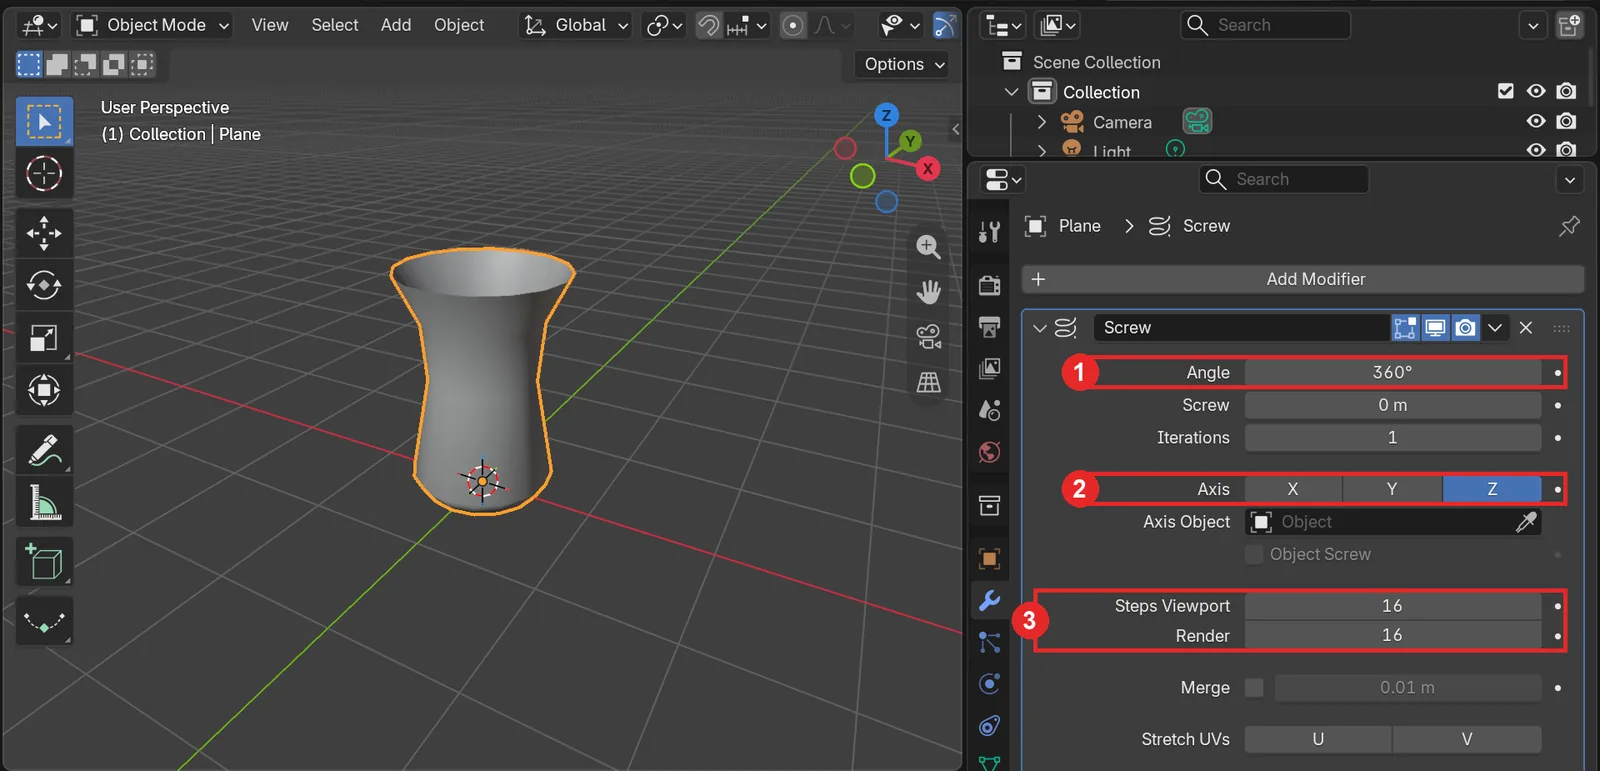 Figure 3. The vase spun with default values. 1: Angle 360° 2: Axis Z 3: Steps Viewport and Render 16. The image is from before Steps was changed in section 3 (Blender screenshot)
One line has become a vase. The default values work because of the following.
| Field | Default | Meaning |
|---|---|---|
| Angle | 360° | How far it spins. 180° gives half a vase |
| Screw | 0 m | How far it rises in one turn. 0 means it spins in place |
| Iterations | 1 | How many turns |
| Axis | Z | Which axis it spins around, using the object's axes |
| Axis Object | Empty | Use another object (usually an empty) as the axis |
| Steps Viewport / Render | 16 / 16 | How many pieces one turn is split into (viewport / render) |
| Merge | Off | Merges points on the axis (section 5) |
The profile is drawn on the X-Z plane, so spinning around Z makes an upright vase. If you drew the profile on the X-Y plane, you would need Axis Y.
3. Steps: how many pieces per turn
Starting point: the vase from the previous section.
Follow along:
- At the top right of the 3D Viewport, click the arrow next to Viewport Overlays (the two overlapping circles icon) and turn on Wireframe. Lines are drawn over the faces.
- Press numpad
7to look from above. - Change Steps Viewport from
16to64. Set Render to64as well.
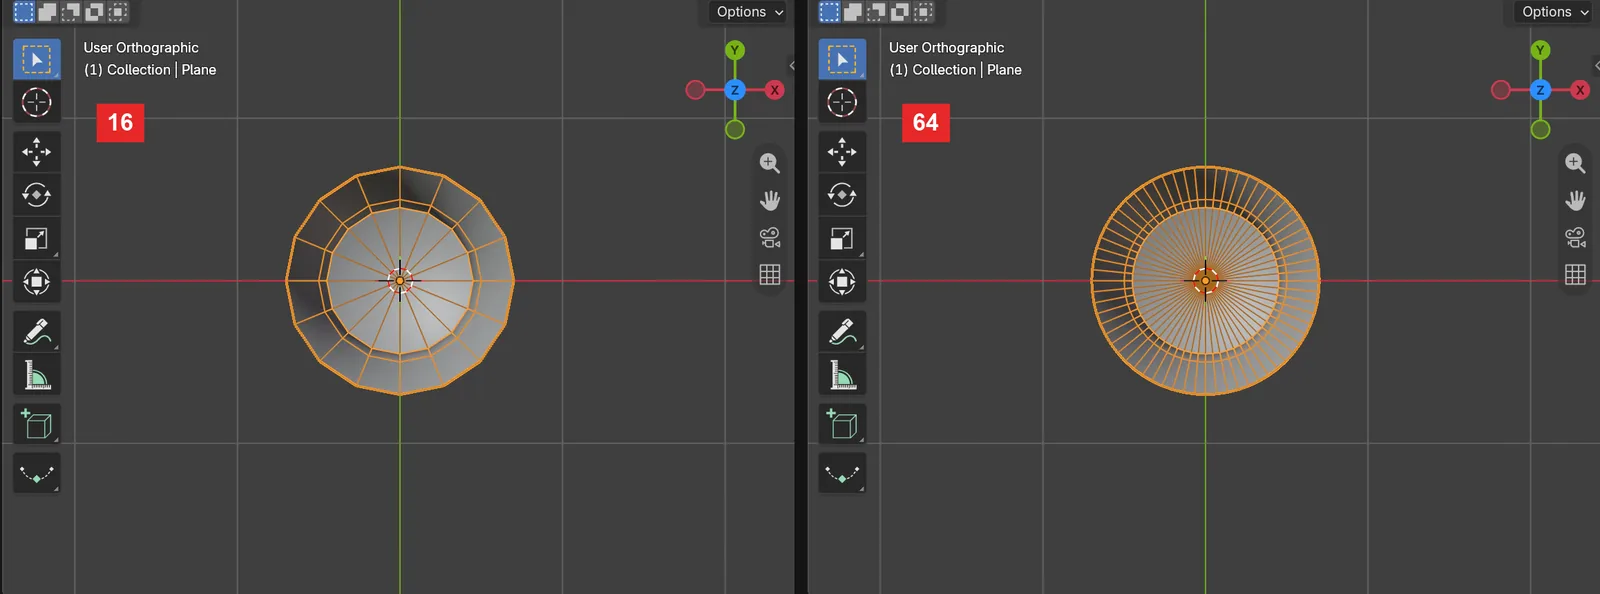 Figure 4. The vase from above. Left Steps 16, right 64 (Blender screenshot)
At 16, you see a 16-sided shape from above. At 64 it is almost round. But the point count grows four times too. This vase went from 96 points to 384. In scenes with many objects, keep the viewport value low and only the render value high, so the viewport stays responsive while you work.
When you are done, turn off Wireframe in Overlays.
4. Fix the face direction: Flip
Starting point: the vase from the previous section (Steps 64). Drag with the middle mouse button to view it at an angle again.
Follow along:
- Click the arrow next to Viewport Overlays and turn on Face Orientation.
- If the outside of the vase is red, expand Normals at the bottom of the Screw panel and turn on Flip.
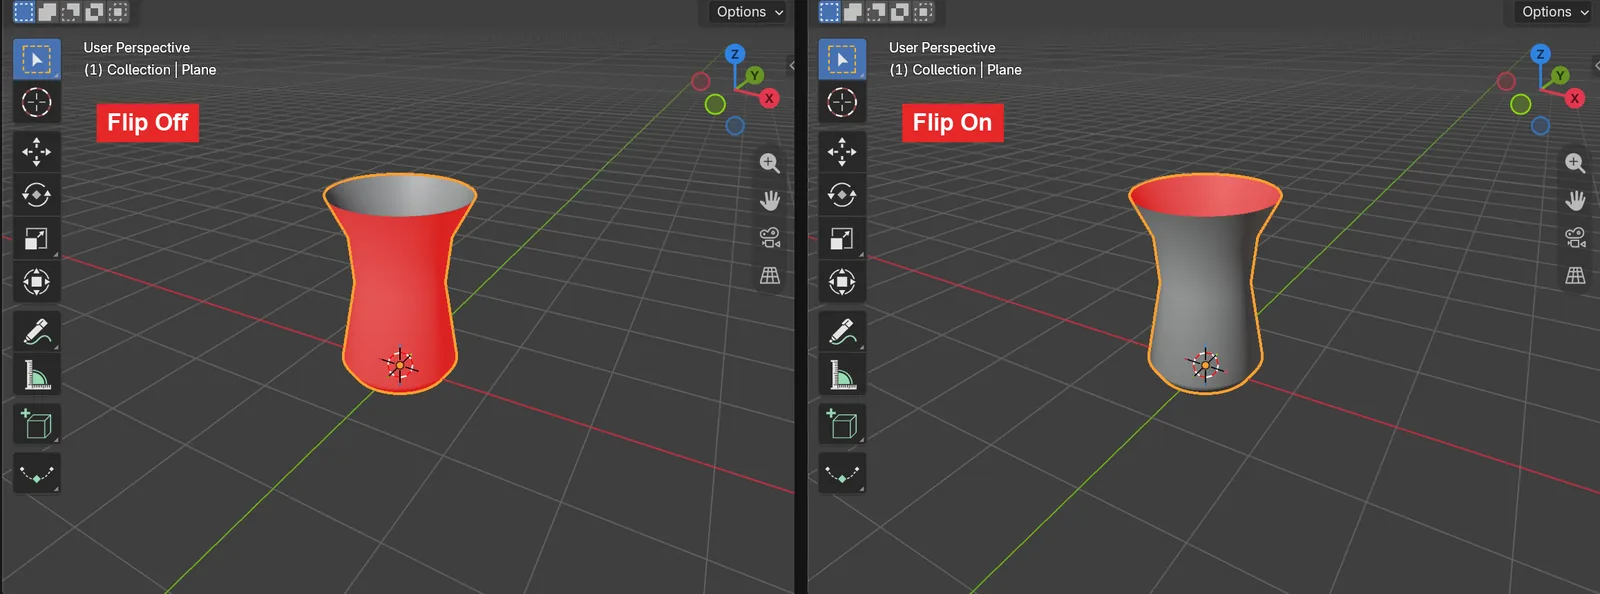 Figure 5. The vase with Face Orientation on. Left Flip off, right on (Blender screenshot)
Face Orientation paints the back of faces red. The front color is transparent by default, so fronts stay gray. The front and back of a face are set by its normal. For a spun surface, the normal direction depends on the order you drew the profile and the direction it spins. Drawn in the order of this guide, the outside becomes the back, as on the left of Figure 5. Left like this, lighting can look odd, and Solidify in the next section adds thickness on the outside. Turn on Flip and the outside becomes the front. On the right of Figure 5, the inside of the opening is red because you are looking at the back of the inner wall. That is normal for a wall with no thickness.
In the same Normals panel, Smooth Shading is on by default, so the faces look smooth. Calculate Order recalculates the order of the profile's edges to reduce face direction and shading problems for mesh profiles. Profiles drawn as curves do not need it.
When you are done, turn off Face Orientation.
5. Merge the center of the bottom: Merge
Starting point: the vase from the previous section (Steps 64, Flip on).
The first point of the profile sits on the axis, so spinning it 64 times stacks 64 points in the same place. It looks the same, but extra points pile up inside.
Follow along:
- Click the arrow next to Viewport Overlays and turn on Statistics. The number of points (Vertices) and faces appears at the top left of the viewport.
- Turn on Merge in the Screw panel.
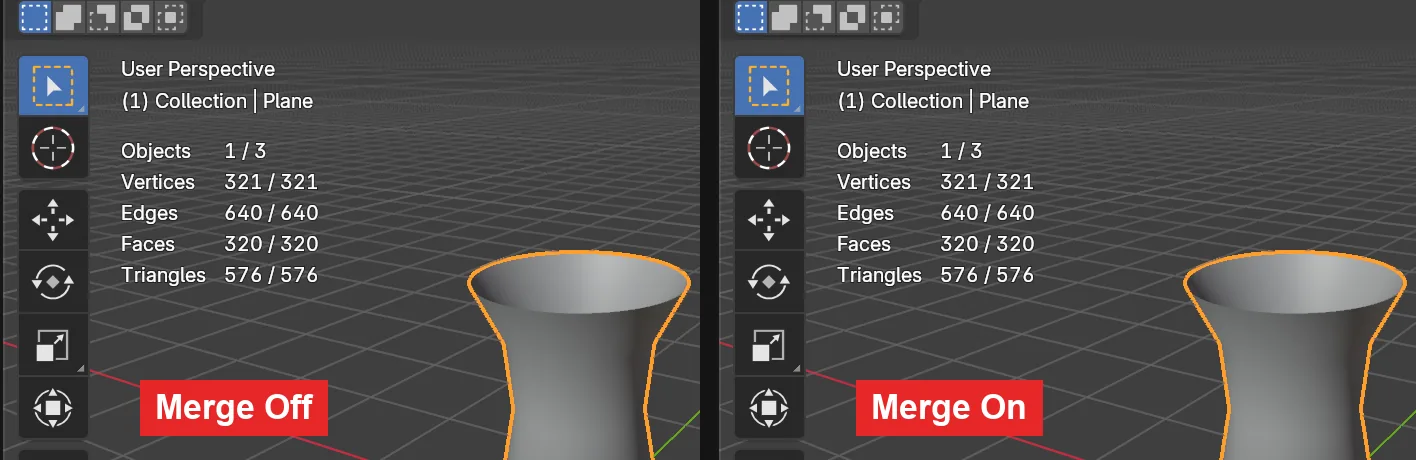 Figure 6. Scene statistics. Left Merge off (384 points), right on (321 points) (Blender screenshot)
The points dropped from 384 to 321. The 64 stacked points on the axis became one (384 − 64 + 1 = 321). Points closer to the axis than the distance next to Merge (default 0.01 m) are merged. A clean bottom avoids trouble with Solidify in the next section and with 3D printing, so keep it on for profiles that touch the axis. When you are done, you can turn Statistics off.
6. Give the vase walls thickness with Solidify
Starting point: the vase from the previous section (Merge on).
The vase walls are still paper with no thickness. Add the Solidify modifier after it.
Follow along:
- Choose Add Modifier > Generate > Solidify. It is added below the Screw panel.
- Change Solidify's Thickness to
0.04.
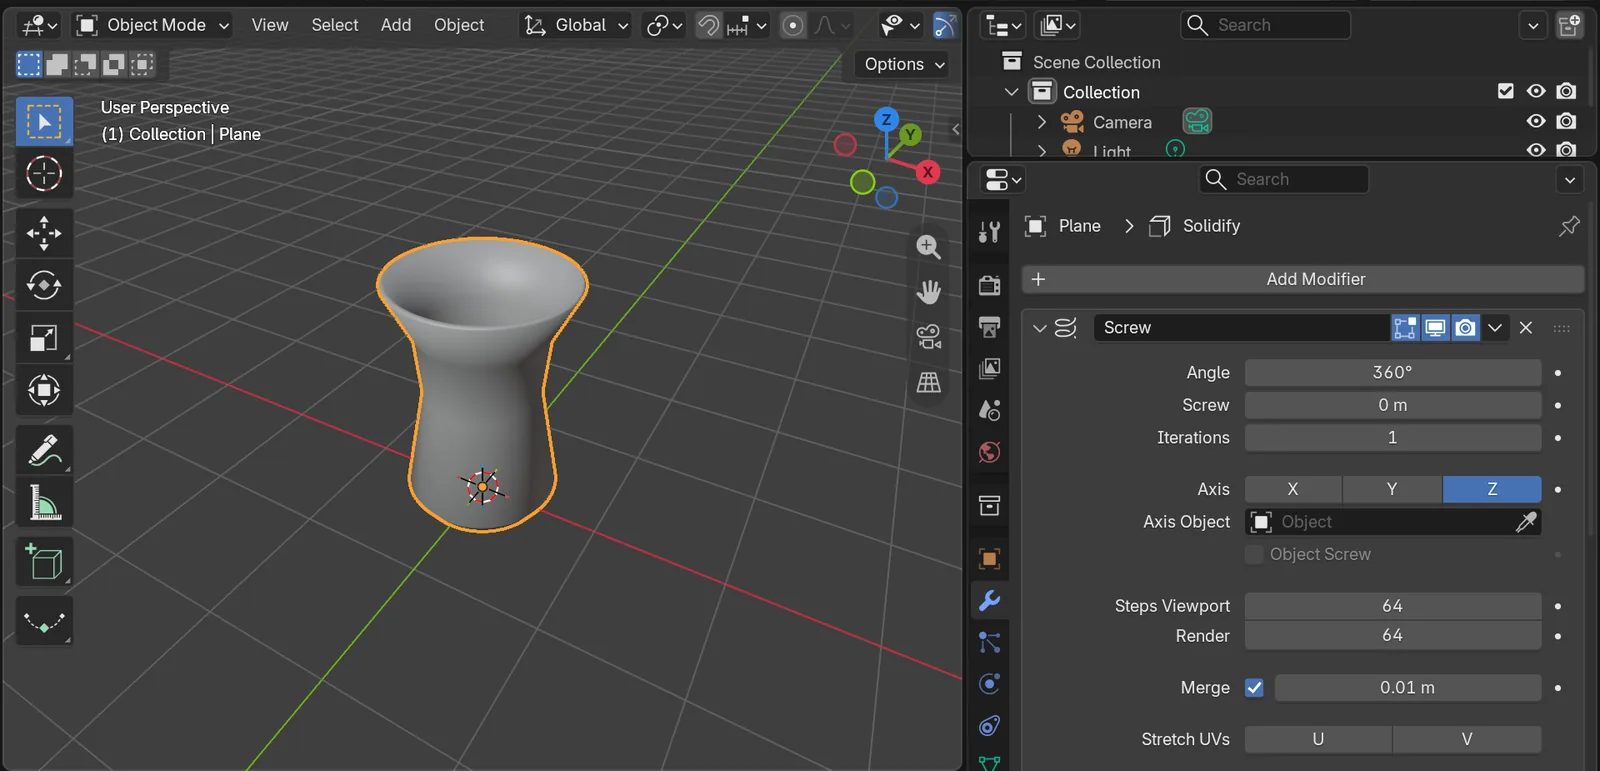 Figure 7. The vase with Solidify below Screw (Blender screenshot)
The order matters. Modifiers are calculated from top to bottom. Screw makes the faces first, then Solidify gives those faces thickness. If you move Solidify above Screw, it tries to thicken a line that has no faces yet, and the result changes. With this vase, the faces that close the rim of the opening (64 of them) are not created. Change the order with the down arrow at the top right of a panel > Move to First / Move to Last, or drag the six-dot handle at the right end of the panel.
7. From ring to spring: Screw and Iterations
Starting point: select the vase and hide it with H. Start fresh in the empty view.
Follow along:
- Press
Shift+A> Mesh > Circle. In the Add Circle panel set Vertices to12and Radius to0.15 m. A small circle lies flat on the floor. - Press
Tabto enter Edit Mode, select all withA, and stand it up withR>X>90>Enter. - Move it 1 m away from the axis with
G>X>1>Enter, then pressTabto leave. - Add Add Modifier > Generate > Screw.
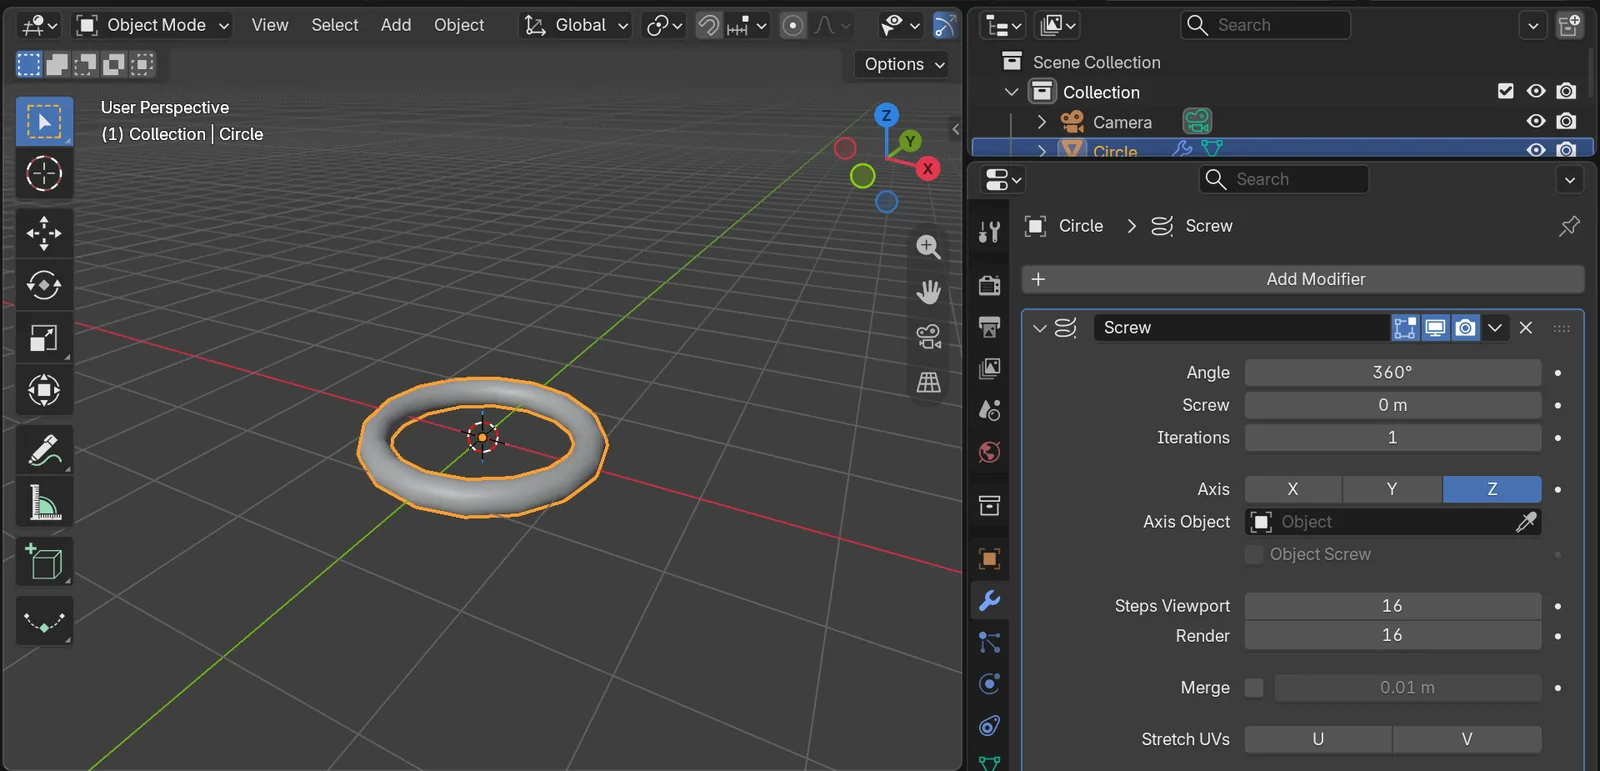 Figure 8. A ring made by spinning the circle once (Blender screenshot)
- Change Screw to
0.5and Iterations to5. If the coils look jagged, raise Steps Viewport to32.
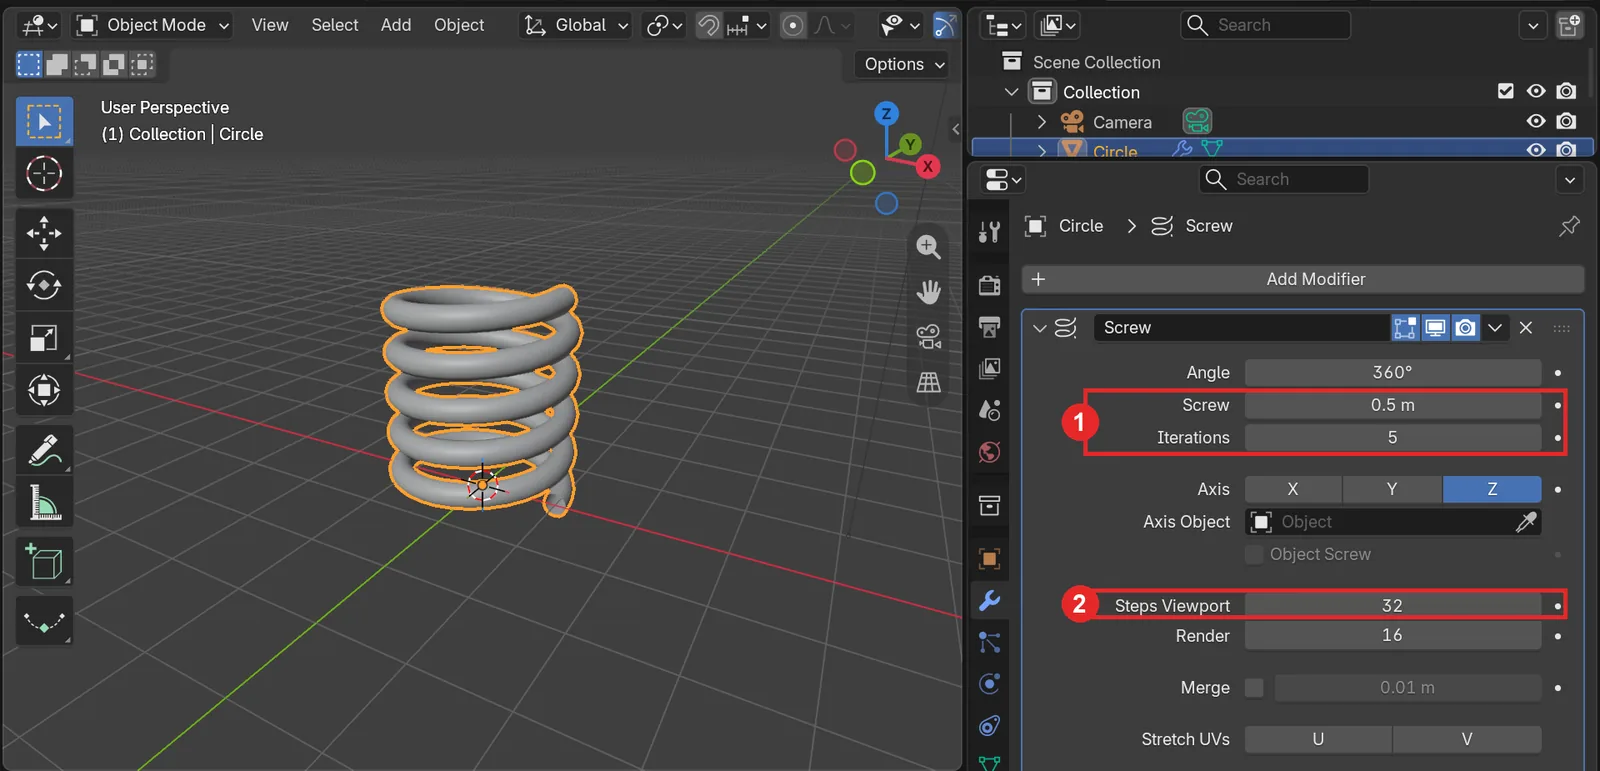 Figure 9. A spring. 1: Screw 0.5 m, Iterations 5 2: Steps Viewport 32. Render is still 16 in the image (Blender screenshot)
It rises 0.5 m per turn for five turns, making a spring 2.5 m tall. A smaller Screw value makes a tighter spring, and a larger one makes a looser spring. Use a triangle cross-section (Vertices 3) instead of a circle and you get something closer to a screw thread. Steps is the number of pieces per turn, so more Iterations also means more points overall.
Practice
- Change step 5 in the table in section 1 to
G>X>-0.2to make a jar with a narrow opening. - Change the vase's Angle to
180°to see it cut in half. Check how the wall thickness looks. - Set the spring's Screw to
0.2and Iterations to10. Work out the height first, then check it on screen.
Common mistakes and fixes
| Symptom | Cause | Fix |
|---|---|---|
| Spinning gives a disk or a flat shape | The profile's plane and Axis do not match | Drawn on X-Z: Axis Z. Drawn on X-Y: Axis Y |
| There is a hole in the center | The first point is not on the axis | Move the first point to X 0 (set it with G > X) |
| The result looks faceted | Steps is too low | Raise Steps Viewport and Render (section 3) |
| Faces look dark or blotchy | Faces point inward | Check with Face Orientation, then Flip (section 4) |
| Solidify thickness goes outside | Faces point inward, or Solidify is above Screw | Turn on Flip, and put Solidify below Screw |
| The spring got very heavy | Steps is per turn, so it multiplies with the turns | Lower Steps Viewport and keep only Render high |
Summary
A side-view line that starts on the axis, Axis that matches the plane you drew on, Steps low in the viewport and high in renders, Flip if the outside is red, Merge for the bottom, and Solidify below for thickness.
In the next guide, Curve modifier with Array, you bend objects along a curve.
Previous: Solidify modifier · Next: Curve modifier with Array · Whole series: Every Blender modifier in one list
References
- Blender 5.2 Manual: Screw Modifier
- Blender 5.2 Manual: Viewport Overlays (Wireframe, Face Orientation, Statistics)
- Read next: Solidify modifier, Blender beginner chapter 6: Edit Mode basics, What is a modifier?
- Shortcuts: Blender 5.2.1 default (Blender) keymap
- Image license: screenshots of Blender taken by AZTechnology. Blender license: blender.org/about/license