Turning a Blender blockout into live-action-style video with Higgsfield: the steps and the failures
Follow the steps for turning a simple box scene (blockout) made in Blender into live-action-style video with Seedance 2.5 on Higgsfield: blockout rules, a 720p 24 fps source, a style frame, the prompt, quoting and submitting, and checking the result. Then see our real failures, such as backgrounds that changed and guide graphics that were copied, and how we fixed them.
한국어English
ON THIS PAGE
- 011. The whole process at a glance
- 022. Building the blockout: box scenes that convert well
- 033. Exporting the conversion source: 720p, 24 fps, the blockout as it is
- 044. The style frame: one live-action picture of the opening shot
- 055. Writing the conversion prompt, in order
- 066. Check the quote and submit one job at a time
- 077. Checking the result and fixing it without credits
- 088. Failures where we wasted credits
- 099. Get 1080p by upscaling
- 10Practice
- 11Common mistakes and fixes
- 12In one line
- 13Read next
- 14References
Based on: Seedance 2.5 (video edit) and GPT Image 2.5 on Higgsfield, and Blender 5.2. Our work log from October 2026 and the Higgsfield help center as checked on November 4, 2026. Images are Blender blockout renders and stills from the Higgsfield results made from them. All scenes are fictional. AZTechnology was once paid by Higgsfield to make a sponsored video. That sponsorship has ended, and this post was written without any request or review from Higgsfield. The result stills here are scenes we generated for that sponsored video.
A blockout is a video that sets up the positions, motion and camera of a scene with boxes and simple shapes only. In theatre terms, it is a rehearsal where the actors walk through their moves without costumes or sets. Feed this rehearsal video to a video edit model on Higgsfield, and you get a video that keeps the camera and motion but changes the look to live action.
The big advantage is that you can fix things for free before the expensive step. If you do not like the camera or the motion, fix it in Blender and render again. No credits are spent. This post covers the steps we used to make five scenes for a sponsored video, and the failures where we wasted credits.
After this post you can:
- Write down what makes a blockout easy to turn into live action.
- Export a conversion source at 720p and 24 fps.
- Prepare a style frame and a prompt with a timeline.
- Find and fix background changes and frozen frames in the result.
Before you start: You need Blender 5.2 and a Higgsfield account. You can build the blockout by hand or have an AI such as Claude Code build it with a script. An example made with AI is in Five low-poly war animations made with Claude Code. Check credit prices first in Reading Higgsfield pricing and credits.
1. The whole process at a glance
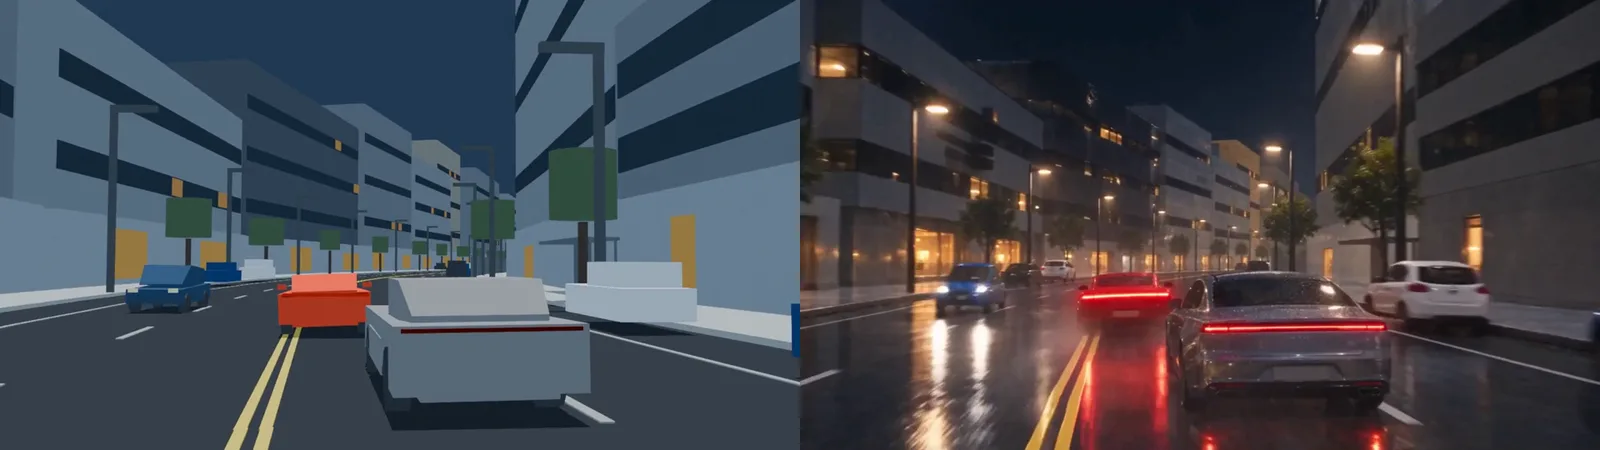
 ① Blender blockout still (1.5 s) ② style frame, the same scene redrawn as a live-action picture ③ the same moment in the converted result (Blender render; middle and right are Higgsfield results)
| Step | What you do | Tool | Credits (our records) |
|---|---|---|---|
| 1 Blockout | Set positions, motion and camera with boxes | Blender | 0 |
| 2 Conversion source | Render at 1280x720, 24 fps | Blender | 0 |
| 3 Style frame | Turn one source still into a live-action picture | GPT Image 2.5 (high) | 1.5 |
| 4 Prompt | State that the source is the reference and write a timeline in seconds | Text | 0 |
| 5 Quote and submit | Check the cost first, submit one job | Seedance 2.5 video edit, 720p | 76 for 10 s |
| 6 Check | Background changes, frozen frames, event timing | Eyes + ffmpeg | 0 |
| 7 Fix and upscale | Fill frozen frames, upscale to 1080p | Editing + Higgsfield upscale | Upscale about 1 per 5 s |
Only steps 3, 5 and 7 cost credits. The more you repeat steps 1 and 2, the fewer times you redo step 5.
2. Building the blockout: box scenes that convert well
Simpler is better. But not any box will do. The conversion model follows the outline and motion of the boxes closely.
Do this: As you build the scene in Blender, go through the table below one row at a time.
| Rule | Why (our cases) |
|---|---|
| Keep the background as large boxes. Stay under 10,000 points | The model draws terrain and building detail. A heavy blockout only slows down your fixes |
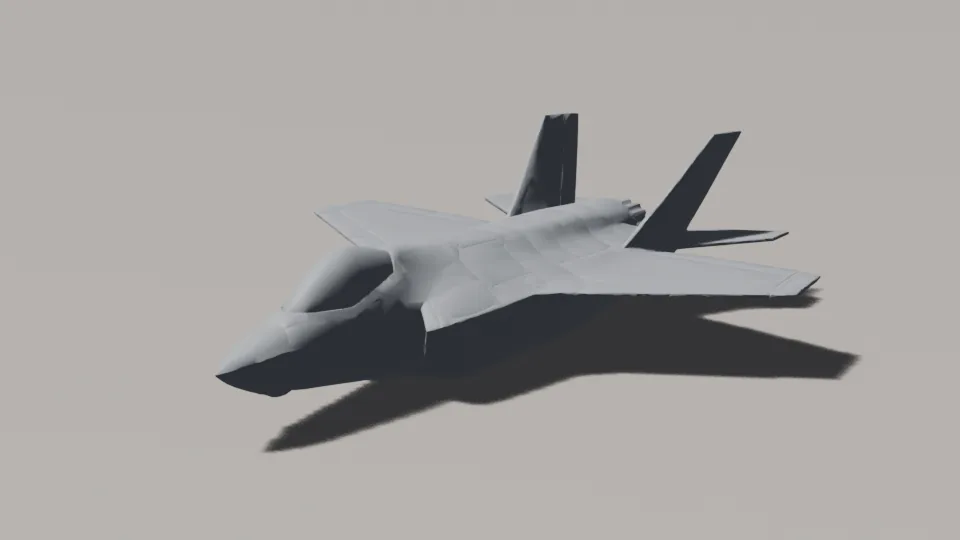
| Give the main subject a realistic outline | A plane built from flat board wings and a box tail came out as a model plane with board wings |
| Enlarge anything smaller than 5 pixels on screen (at 720p) | A drone that looked tiny in the distance was drawn as some other object |
| Keep key colour areas and ground outlines | A plain white field was drawn as snow |
| Keep camera speed steady and the lens (focal length) almost fixed | Slowdowns and zooms that looked smooth in the blockout read as "the camera stutters" in live action |
| Leave out effects such as explosions and smoke | Bead-like smoke and sphere explosions stayed in that exact shape |
 Versions 7, 18 and 37 of the blockout for the same car chase scene (Blender render)
The image above shows how one blockout changed. We revised this scene up to version 37. Partway through, the brief changed to "twice as fast, a rainy night", so we rebuilt it at 24 fps. We moved on to conversion only after version 37 passed every check we had set in advance (camera speed, event timing, overlaps). Those 37 versions cost zero Higgsfield credits.
3. Exporting the conversion source: 720p, 24 fps, the blockout as it is
We will call the video you feed to the model the conversion source. Export it with the blockout look unchanged, only at a higher resolution.
Do this:
- In the Output tab, set Resolution X to
1280and Y to720. - Choose
24 fpsfor Frame Rate. - Keep the scene under 12 seconds. Our source was 241 frames (about 10 seconds).
- In the Output panel of the same Output tab, change File Format to FFmpeg Video, and under Encoding set Container to MPEG-4. With the default (PNG) you get a set of image files, not a video.
- Export an MP4 with Render Animation from the Render menu.
Why 24 fps: fps is the number of still images shown per second (Frame rate basics). Seedance returns 24 fps, so we matched the source to 24 fps. If you need 30 fps, change it in editing after the video is finished.
Frame count: The Seedance results we received always had a frame count of a multiple of 8 plus 1 (89, 145, 241 and so on). When we fed a 160-frame source, it came back squeezed to 153 frames, with 4 frozen frames and 11 places where the motion skipped two steps. After that we exported sources as 8n+1 frames, such as 161, 193 or 241. This is something we saw in our results, not a rule we confirmed in official documentation.
Why the blockout goes in as it is: At first we made a separate grey clay version with the colours removed. We converted the same 5-second section once from clay and once from the blockout. The review scores were 7 for clay and 8 for the blockout, a difference within chance. The blue wall colour of the blockout did not leak into the result. After that we dropped the clay step and fed the blockout directly.
4. The style frame: one live-action picture of the opening shot
A style frame is a reference picture that shows what the result should look like. It is like the concept art a film's art team paints before the shoot. You make it by turning one still from the source into a live-action picture with an image model.
Do this:
- Pick one still from the source where the subject and background are clear and nothing is hidden. We picked the 1.5-second mark.
- Put that still into a Higgsfield image model (we used GPT Image 2.5 at high quality) and edit it with a prompt like the one below.
- Lay the result over the source still. Cars, buildings and the horizon must sit in the same places. If they drift, throw the picture away.
Edit Image 1, the Blender blockout frame, into one photoreal cinematic film frame.
Image 1 is the exact composition and geometry target: preserve the camera viewpoint,
perspective, vanishing point, ... and the position, size and pose of every vehicle.
Do not crop, move, enlarge or add anything.
(descriptions of the cars, buildings and light follow)
Every plate blank, every body panel plain, pavements empty.
Output one 16:9 landscape frame, composition identical to Image 1.
- Explain in words what each blockout object is. For example, "the orange panels are lit shop windows, the green blocks on poles are street trees."
- Ask for blank plates and plain body panels. Do not put real car names, logos or brands in the prompt either.
- One style frame is the safe choice. If you use several, they must all show the same place, down to the rock texture and the top line of the walls (failures 1 and 2 in section 8).
5. Writing the conversion prompt, in order
The conversion prompt is the order form that says what to change and what to keep. The prompt we submitted for the car chase scene was about 3,600 characters of English, written in this order.
| Order | What to write | Actual sentence (shortened) |
|---|---|---|
| 1 | State that the source is the reference | "The source video is the authority for camera motion, framing, driving lines, vehicle count, screen direction and event timing." |
| 2 | Fix the number and colours of moving objects | "Exactly five moving vehicles, each one fixed colour." |
| 3 | The role of the reference picture | "Image 1 (the source frame at 1.5 seconds): … preserve source camera and vehicle positions." |
| 4 | Place, weather, light, lens | "A rain-soaked downtown avenue after midnight … a fixed 35mm lens, constant speed" |
| 5 | Timeline in seconds | "[2.24–3.70 seconds] At 2.24 seconds the red coupe flicks back to the right …" |
| 6 | Materials to replace, and what not to copy | "Replace the flat blockout surfaces with glossy wet car paint, glass … Do not copy the blockout faceting" |
| 7 | What to leave out | "Every plate stays blank, every body panel plain, and the pavements stay empty." |
| 8 | Keep the length | "Deliver the full source duration; do not change playback speed." |
- Copy the timeline from the real times in the source. Take when a car changes lanes and when an oncoming car passes straight from the blockout's event list.
- Say "do this" rather than "don't do that". When we wrote "NO rocket flame", a flame appeared. Describing what you want works better.
- To turn sound on, add one sound paragraph at the end. We wrote the location sounds and event times, as in "Sound: natural location recording only, only rain, engines, tyres and car horns. …". Turning sound on took no extra credits.
6. Check the quote and submit one job at a time
We ran this step through the Higgsfield MCP connected to Claude Code, not the Higgsfield website. We did not follow the website menus ourselves, so the steps below are the values we passed through MCP. On the website, choose the same values, and check the menu names on the official screens.
Do this (the values we passed through MCP):
- Set the model to Seedance 2.5 and the job type to video edit (
video_edit). - Upload the source MP4 and the style frame, and add the prompt.
- Set the resolution to
720pand turn draft off (draft: false). Turn sound on if you need it. In our records, sound did not change the price. - Get a quote (the credits it will take) before you submit. In our records, 10 seconds at 720p cost 76 credits.
- Submit one job, and submit the next only after you have reviewed the result.
Our first two jobs used draft mode. Draft cost the same as normal 480p (42 credits for 12 seconds), and the results were redrawn exactly every 24 frames (1 second), so colour and texture changed in a single frame. That made it impossible to judge from a draft whether the background stays the same, so we stopped using it.
How to have Claude Code do the same thing through MCP is in Using the Higgsfield MCP in Claude Code. We set a limit of three paid videos per scene. That keeps credits from pouring into a single scene without end.
7. Checking the result and fixing it without credits
When a result arrives, check these three things in order.
- Check whether the background changes. Pick one fixed thing, such as a cliff, a building or a tree, and follow it at 0.1-second steps. If it blends into a different cliff for even one frame, do not use that result. A background that changes slowly by blending does not show up in scene-change scores, so we had to follow it by eye.
- Count the frozen frames. When a frame nearly identical to the one before it slips in, the picture hitches for a moment. If you have ffmpeg, the command below counts them.
ffmpeg -i result.mp4 -vf mpdecimate -loglevel debug -f null - 2>&1 | grep -c " drop "
Run on the car chase result, this command returns 4. The fixed version, where the gaps were filled from neighbouring frames, returns 0. The 720p result of the canyon scene had 22 such frames. 3. Compare event timing with the source. Check that the moment cars pass each other, or the moment of launch, is within 0.2 seconds of the source.
We filled frozen frames in editing instead of generating again. New in-between frames are built from the frames on either side, so no credits are needed. A background change cannot be fixed in editing, so we fixed the cause (the style frame or the source) and submitted again.
Four of the five scenes made this way are below. The blockout is on the left and the result on the right.
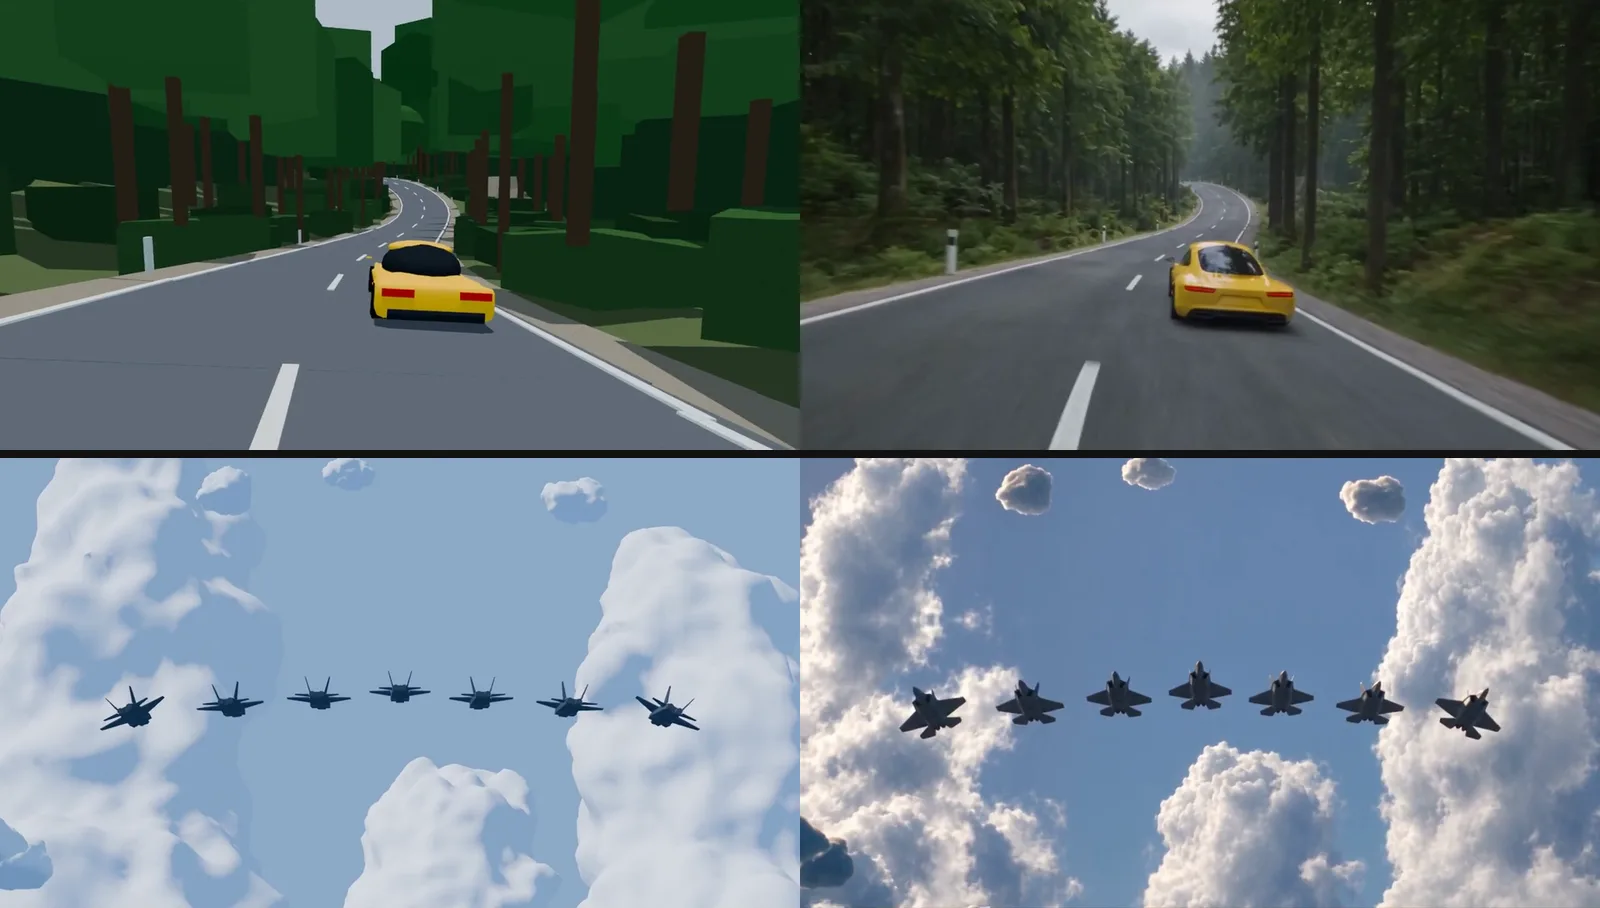 ① Forest road ② Sky formation. In each row, left is the Blender blockout and right is a still from the Higgsfield result (sponsored video material)
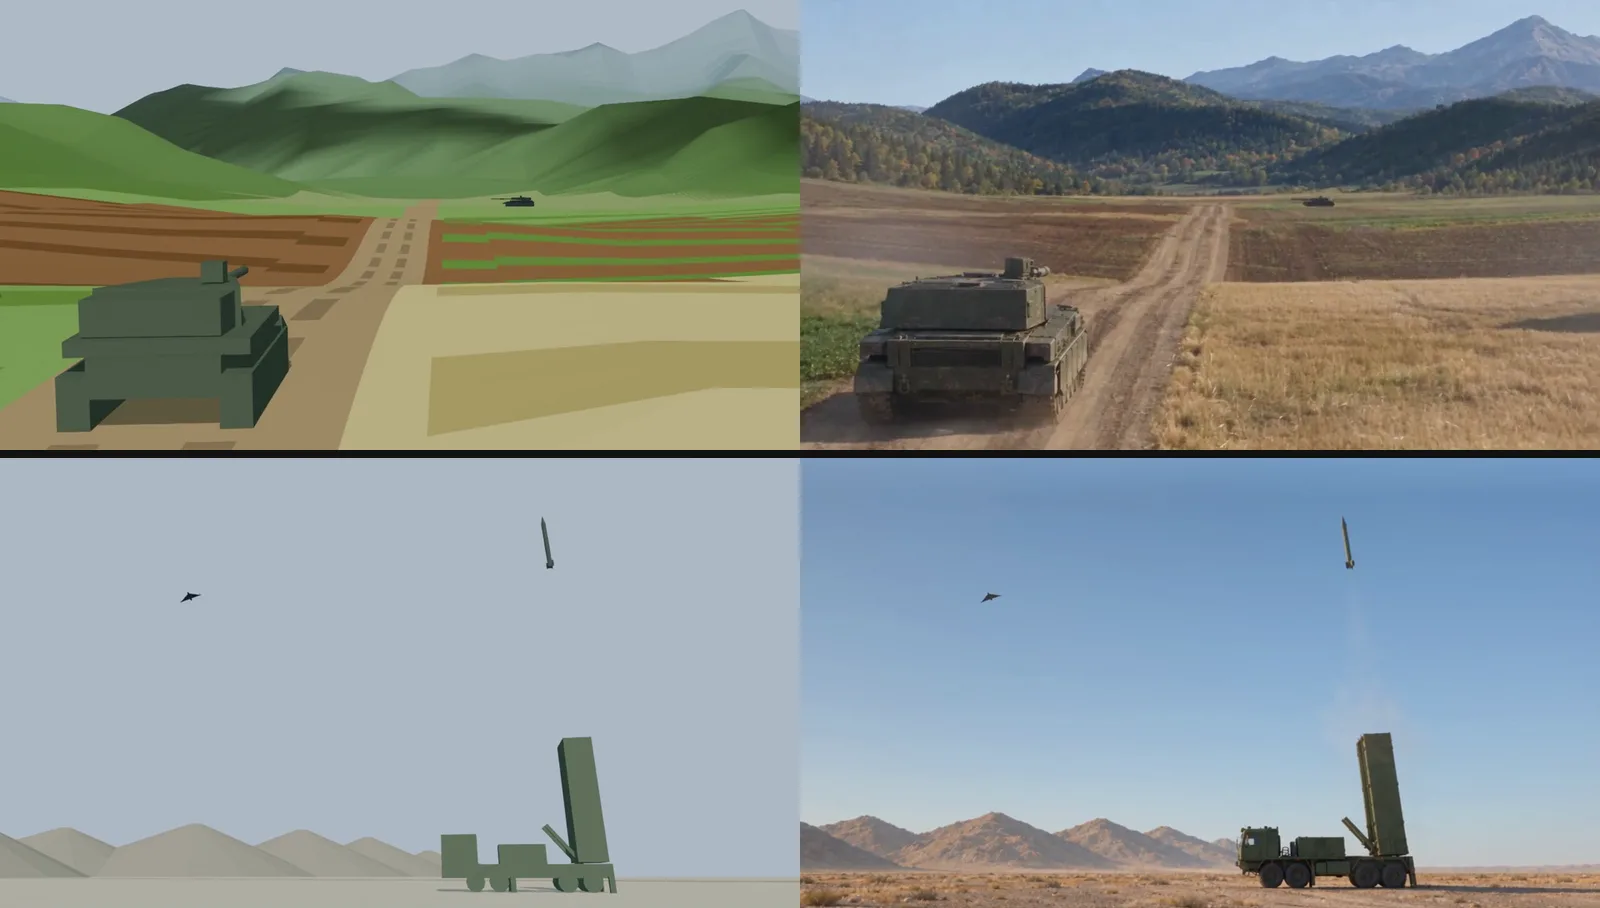 ① Ground battle ② Air defense. In each row, left is the Blender blockout and right is a still from the Higgsfield result (sponsored video material)
8. Failures where we wasted credits
| # | What happened | Cause | Fix |
|---|---|---|---|
| 1 | The canyon background changed to different cliffs at 2 s and 9 s (480p, 42 credits) | The three style frames were drawn as three different canyons | From the second frame on, feed the previous frame as a reference so they match the same canyon |
| 2 | Second try of the same scene, a wall changed again at 9 s (42 credits) | Only the third style frame had a different rock texture | Drop the frame with a different texture and use one |
| 3 | The wide ground above the end wall was drawn as a dust cloud | A large plain top surface filled much of the frame | Did not appear in the third try, with a single style frame |
| 4 | A missile trail line was drawn from the first frame, like a guide graphic (60 credits) | The source had a yellow line growing for 3 seconds, and the prompt called "yellow line" four times | Remove the growing line and keep only a short bar attached to the tail |
| 5 | In the same result, ignition came 1.96 s late | The reference picture and the first timeline row showed a still scene | Do not make the reference picture or the first timeline row a still scene |
| 6 | A plane with board wings | The subject's blockout outline was board-shaped | Taper the wing tips and slim the body |
| 7 | "The camera hitches slightly" | The camera design changed speed and zoom a lot | Steady speed and a fixed lens during the converted section |
| 8 | Draft colours changed every second | A property of draft mode (used twice, same price as normal 480p) | Stopped using draft and checked with normal 480p and 720p |
Failures 1 and 2 are both background changes. It is the problem people notice most, so we decided to redo any result where the background changes for even one frame, whatever its score. Failure 4 is a case where a guide marker in the blockout was copied straight into the result. Assume anything in the source can be drawn, and keep any markers that signal event timing short and small.
9. Get 1080p by upscaling
When we needed 1080p, we upscaled the approved 720p result instead of generating again. Generating again at 1080p changes the result. In earlier work, an interception moment came 0.15 seconds late and in the wrong place. Upscaling all five scenes cost 8.45 credits. That is about 1 credit for a little over 5 seconds, and the outlines and textures of cars and buildings became sharper.
Practice
- Check a Blender scene you already have against the table in section 2. Write down any objects smaller than 5 pixels on screen and any camera move that suddenly slows down.
- Set 24 fps and 241 frames in the Output tab, then work out how many seconds that is.
- Following the order in the section 5 table, write the first paragraph (the source is the reference) and two timeline rows of a prompt for your scene in English.
Common mistakes and fixes
| Symptom | Cause | Fix |
|---|---|---|
| The background changes to another place partway through | Several style frames show different places or textures | Use one style frame, or make them show the same place |
| Blockout box shapes stay in the result | The subject's outline is far from real, or effects were added as boxes | Make the subject's outline realistic and leave effects out |
| The result hitches here and there | Frozen frames slipped in, or the source was 30 fps | Count them with mpdecimate and fill them in editing; use a 24 fps source |
| The camera moves differently from the blockout | The prompt does not make the source the reference | Put the "source video is the authority" sentence in the first paragraph |
| Something you said to leave out appeared | Negative phrasing | Describe what you want in positive terms |
| A guide line or marker gets drawn | A long-lasting graphic was left in the source | Keep only short, small markers |
| Timing changed after generating again at 1080p | A new generation changes the result | Upscale the approved 720p result |
In one line
Fix everything for free in the blockout → 720p, 24 fps source → one style frame → a prompt with a timeline → check the quote and submit one at a time → check backgrounds and frozen frames. The next post covers handing this process to Claude Code through MCP.
Higgsfield posts: Higgsfield introduction · Reading pricing and credits · Using the Higgsfield MCP in Claude Code
Read next
- AI video generation basics
- Five low-poly war animations made with Claude Code
- Animation shot planning
References
- Higgsfield help: How do I write a good prompt?
- Higgsfield help: How do credits work?
- Blender 5.2 Manual: Format (Output Properties)
- FFmpeg Filters: mpdecimate
- Image license: the blockouts are Blender renders made by AZTechnology. The result stills are sponsored video material made by converting those blockouts with Higgsfield.