Making a 3D character that matches its art: measuring a turnaround, silhouette overlap, automatic checks, and where it did not match
Starting from a chibi witch built with a Claude Code script that did not look like its art, this post covers making and measuring a turnaround, putting likeness into numbers with silhouette overlap (IoU) and face ratios, filtering with seven automatic checks, and the shapes that numbers never fixed.
한국어English
ON THIS PAGE
- 011. The turnaround: front, side and back on one sheet
- 022. Why the first version did not match
- 033. Measuring likeness with silhouette overlap (IoU)
- 044. Measuring face ratios the same way
- 055. Seven automatic checks
- 066. Rebuilding with numbers: v01 → v02
- 077. What numbers did not fix: shapes the template does not have
- 088. The order to follow when you try it
- 09Practice
- 10Common mistakes and fixes
- 11In one line
- 12Read next
- 13References
Based on: Claude Code + Blender 5.2, and the October 2026 work log of our character template. Images are Blender renders, sheets comparing the art with the model, and measurement screens. The turnaround is an AI-generated illustration made with Higgsfield from a front view made with Meshy AI.
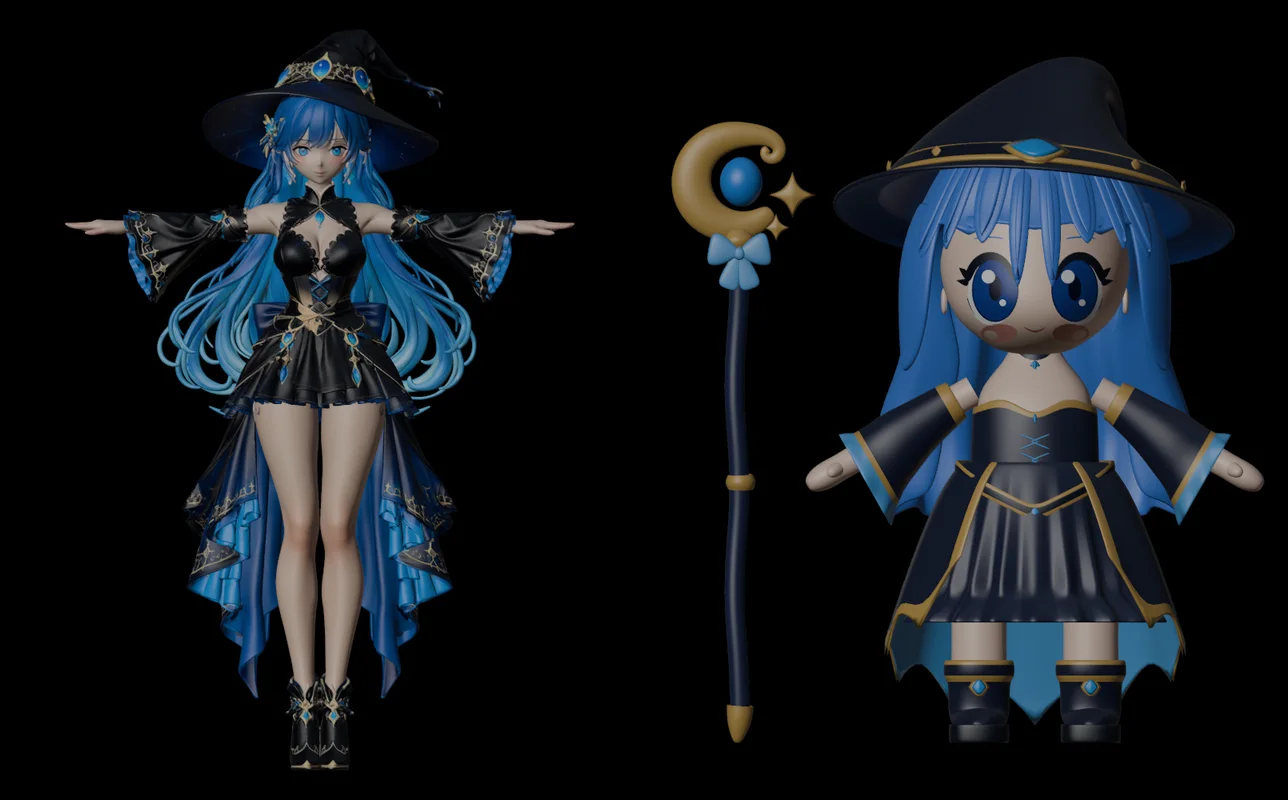
When you give an AI a picture and ask it to build a 3D character, you often get a model that is "close, but not that character." That is what happened with the blue-haired chibi witch we newly built with a Claude Code script. Her art has long hair falling to the left front and a tall hat with a bent tip, but the first version had perfectly symmetric hair and a plain hat. The reaction to the first version was "really not good."
Instead of saying "make it look more like the picture" over and over, we built a way to measure likeness in numbers. This post is the record of one rebuild with it. The numbers improved, but some parts never got fixed, and the reason is the most useful conclusion here.
After this post you can:
- Prepare a turnaround to compare with the model.
- Read silhouette overlap (IoU) numbers and find where things differ.
- Measure face ratios the same way on the art and the model.
- Find "shapes the template does not have" before you build.
Before you start: The basic flow of building a character with a script is in Making a 3D character with Claude Code, part 1. For a comparison of the three ways to build one, read Three ways to make a 3D character with AI first.
1. The turnaround: front, side and back on one sheet
A turnaround is a drawing of a character's front, side and back side by side at the same size. It is like photos of a shop mannequin from three directions. Render the model from the same three directions and you can compare what differs right away.
The original art for our witch was a single front view made with Meshy AI. So we used it as a reference and made one turnaround with GPT Image 2.5 on Higgsfield. It cost about 0.25 credits.
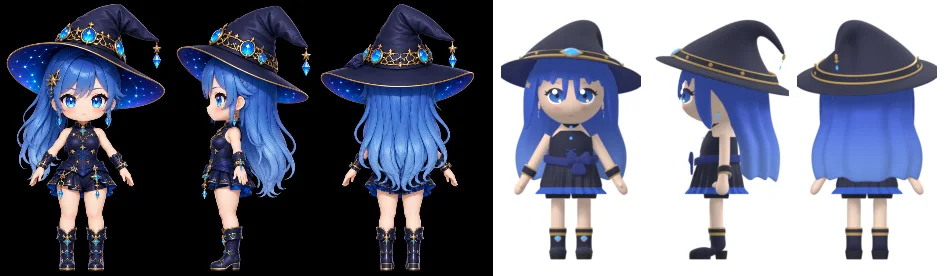 Left, the turnaround (AI-generated illustration, Higgsfield. The front view it was based on is Made with Meshy). Right, the front, side and back of the rebuilt model (v02) (Blender render)
Do this: When you make a turnaround, include the conditions below. This request is written from the conditions we used; the result differs each time.
Using this front view as a reference, make one turnaround sheet of the same character.
Front, side and back, no perspective (orthographic), A-pose, plain background, no text, 16:9.
Keep the height and foot level the same in all three views.
- No perspective (orthographic): nearer parts must not look bigger, so the sheet can be overlaid on the model's orthographic render.
- A-pose: arms held out at an angle from the body. The armpits do not touch, so the outline is easy to measure.
- Plain background: it is easy to separate the character from the background by colour and extract only the outline.
2. Why the first version did not match
The first version (v01) was built once by copying the number file (character.json) of another chibi witch we had made earlier and changing only the colours, hair, clothes and hat. The body proportions and bones stayed the same. The result was as follows.
| Compare | Art | First version |
|---|---|---|
| Hair | A long lock falling to the left front | Symmetric left and right |
| Inside of the hat brim | A starry night pattern | No pattern |
| Star ornaments and earrings | Easy to see | Too small to see |
| Front silhouette overlap | 65.9% | |
| Overlap at leg height | 48.6% |
It was "someone else's body in new clothes", so even the proportions were off. At leg height, the overlap was under half.
3. Measuring likeness with silhouette overlap (IoU)
A silhouette is the outline left when an object is filled with one colour. Lay two silhouettes over each other and compute overlapping area ÷ combined area × 100 to get IoU (the overlap ratio). It is like stacking two cookie cutters to see how well they line up. 100% means identical; the lower it is, the more they differ.
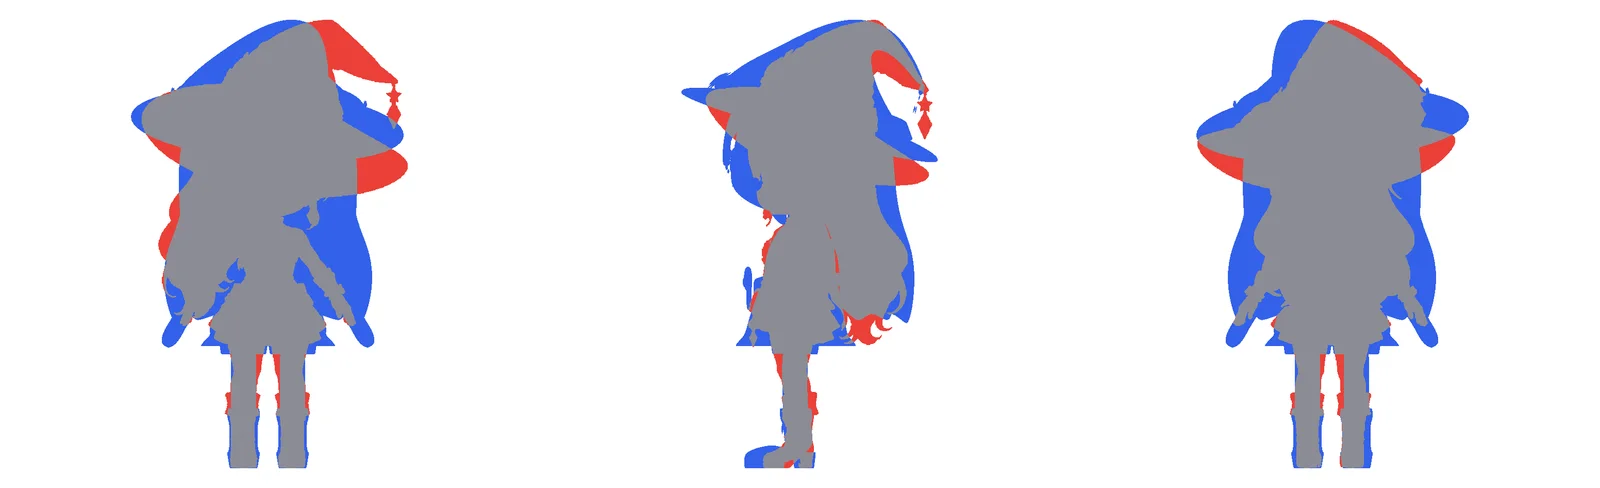 ① Front ② Side ③ Back. Grey is the overlap, red is only in the art, blue is only in the model (overlap sheet made from the art and a Blender render)
The colours are what to read in this image. Red means "in the art but missing from the model." The bent hat tip and the hanging star charm stayed red. Blue means "only in the model." The model's hair spreads wider on both sides than in the art. On the front silhouette, the area only in the art was 10.3%, and the area only in the model was 20.85%. In other words, the model is bulkier than the art.
A single overall number hides where the problem is. So we split the height into bands and measured each one.
| Height band | Front IoU (rebuilt version) | Target |
|---|---|---|
| Legs | 78.3% | |
| Skirt | 69.2% | |
| Head | 76.0% | |
| Hat | 63.3% | |
| Whole front | 72.6% | 80% or more |
| Whole side | 76.6% | 75% or more |
| Whole back | 75.3% | 80% or more |
The hat band is the lowest. That means the hat is the part of this character that matches least.
4. Measuring face ratios the same way
A silhouette cannot see inside the face. So the face is measured separately. The key is to measure the art and the model the same way. If you change the ruler, you cannot tell whether a difference comes from the ruler or the shape.
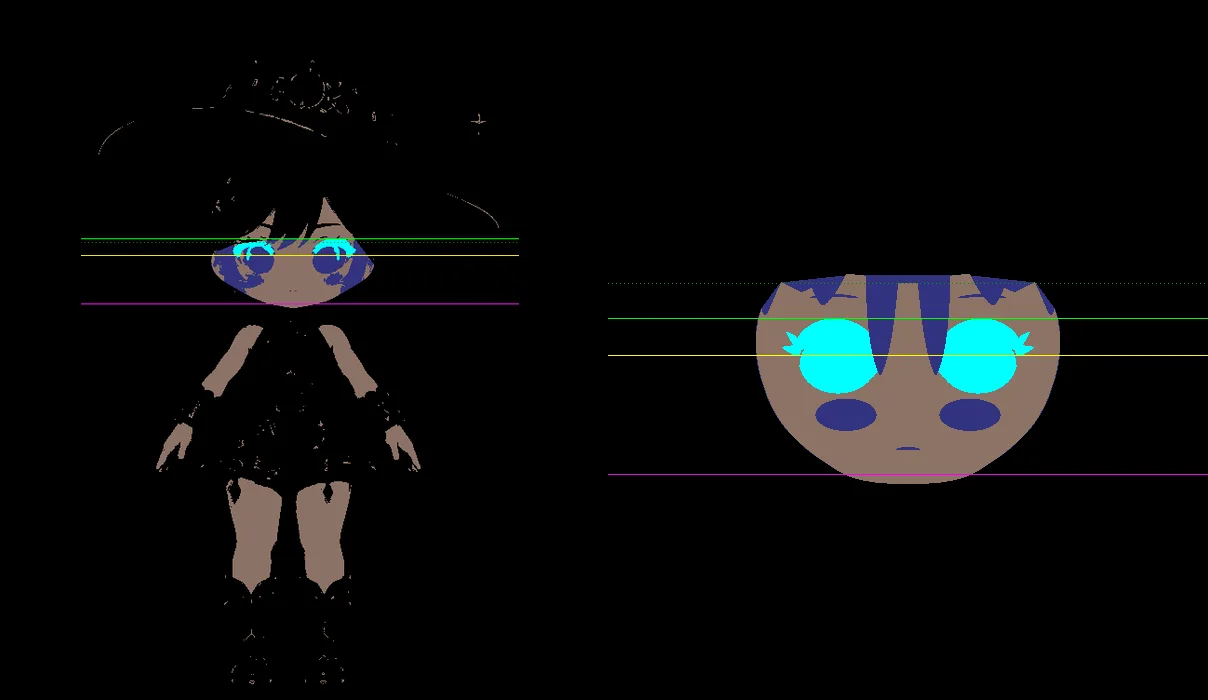 Left, the face measured from the art. Right, the face measured from the model. The horizontal lines mark the top of the eyes, the eye centre and the chin (measurement screen)
The model is measured by rendering only the face, large, with a fixed flat colour for each part: green skin, blue eyes, magenta lashes and red blush on the cheeks. The colours do not mix, so you only need to count pixels.
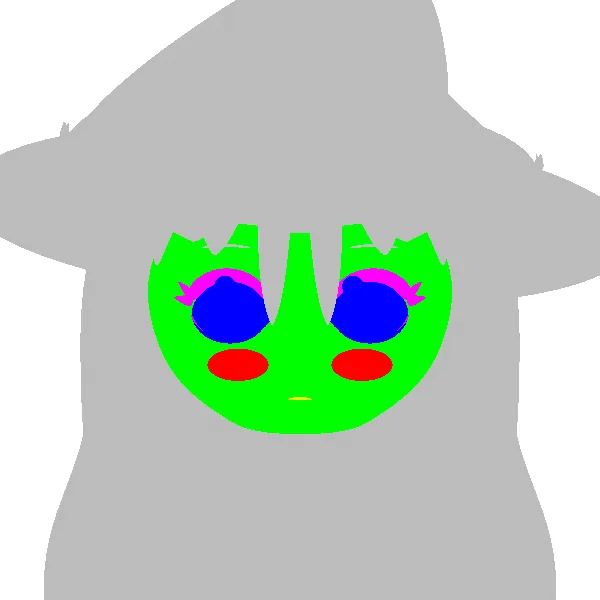 Flat-colour render for face measurement. Green skin, blue eyes, magenta lashes, red blush (Blender render)
The face values of the rebuilt version were as follows.
| Measured | Art | Model | Difference | Allowed range | Result |
|---|---|---|---|---|---|
| Face width ÷ eye width | 2.95 | 3.167 | +7.4% | ±5% | Failed |
| Eye height ÷ face height | 0.492 | 0.484 | −1.6% | ±25% | Passed |
| Eye height within the face | 0.722 | 0.758 | +5.0% | ±10% | Passed |
Face width ÷ eye width is larger than in the art. The face is wide compared with the eyes. To a viewer, this difference reads as "the face looks broad."
5. Seven automatic checks
The allowed ranges came from past review records. While building two earlier characters, we collected 19 rounds of comments from a separate review agent, and almost all of them were measurable: "the eyes are bigger than in the art", "the blush spills over the hair", "the gem is too small". We fixed these into a table of standards and had the script measure seven things automatically every time it builds a model.
| Check | What it measures | Rebuilt version |
|---|---|---|
| Face ratio | The table in section 4 | Failed (face width ÷ eye width) |
| Blush position | Blush pixels spilling outside the face skin | Failed (162 pixels from the three-quarter view) |
| Lash gap | Skin pixels between the top of the eye white and the lashes | Failed (5 pixels; the standard is 1) |
| Floating pieces | Pieces floating away from other parts | Failed (5, the enlarged earrings and hairpin) |
| Poking through | Pixels of an inner part showing through outer clothes | Passed |
| Ornament size | Gold, gems and stars at least 8 pixels on their short side on screen | Failed (chest gem, earrings) |
| Silhouette | The table in section 3 | Failed (hat band 63.3%) |
All seven checks took under 10 seconds. Before trusting them, we tested them on another character that a person had already approved. That character passed all seven.
6. Rebuilding with numbers: v01 → v02
Do this (the order we followed):
- Measure the proportions and face values from the turnaround.
- Recalculate numbers such as height, leg length, head size and eye size from the measurements and put them in
character.json. This time, 59 values changed. - Write a parts list first and have a person skim it for a minute (section 7).
- Build once, then look at the automatic check results and the overlap sheet.
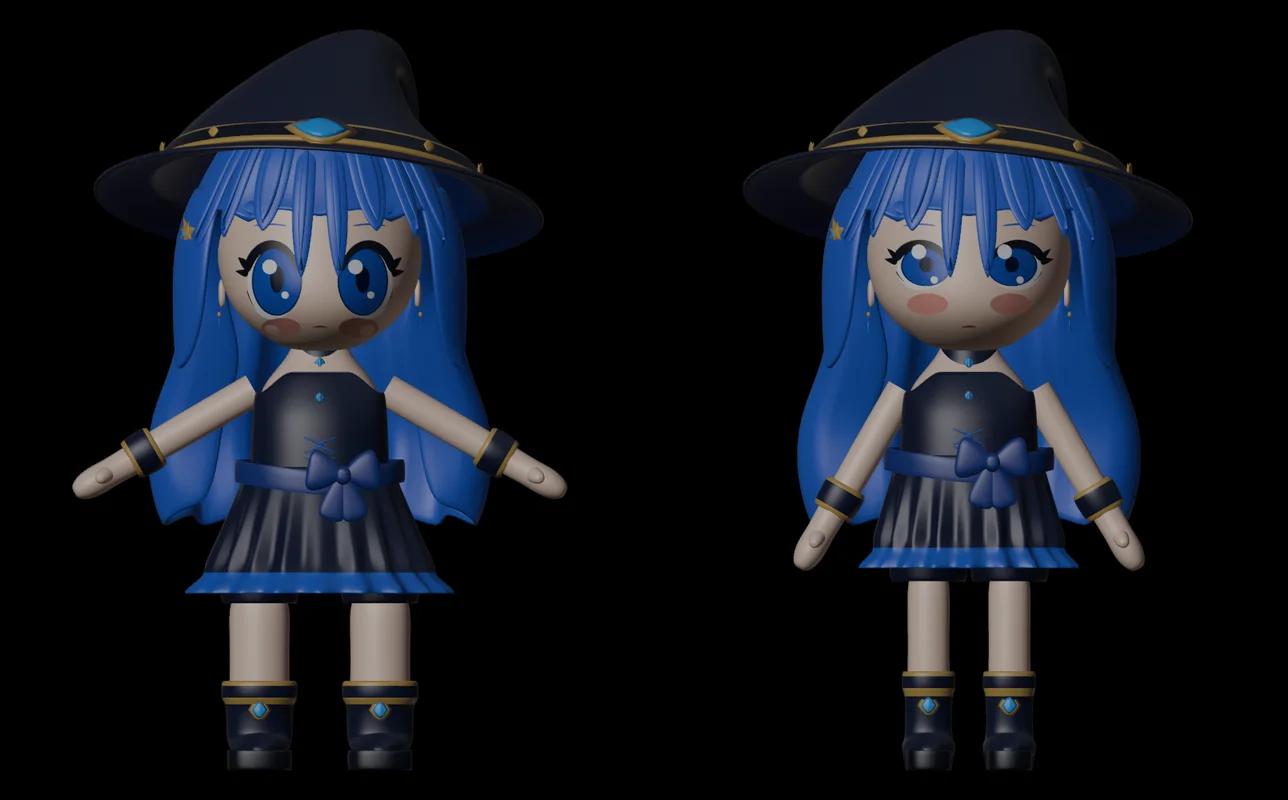 Left, the first version (v01). Right, the version rebuilt from numbers (v02). Both have 2,114 points (Blender render)
| Number | First version | Rebuilt version |
|---|---|---|
| Front silhouette overlap | 65.9% | 72.6% |
| Leg band overlap | 48.6% | 78.3% |
| Hat band overlap | 63.3% | 63.3% |
| Automatic checks passed | 1 of 7 |
The legs and body proportions improved a lot. But the hat band did not move at all.
7. What numbers did not fix: shapes the template does not have
The hat did not match for a reason that had nothing to do with numbers. Our script template had no code for a tall hat with its tip bent to one side. All it had were numbers that change the height and brim width of a cone hat. However you change the numbers, a cone stays a cone.
Writing a parts list turned up more of these. The art had 42 parts, and several were not in the template.
| Part in the art | In the template? | What it needs |
|---|---|---|
| Tall hat with a bent tip | No | New shape code |
| Long lock of hair falling to the left front | No (Mirror keeps both sides the same) | A hair lock part with Mirror turned off |
| Waist ornaments (chain, hanging gems) | No | New parts |
| Six patterns, including the starry brim lining and the gold hat band filigree | No | A projected texture, where pieces of the art are cut out and projected onto the model |
| Earrings | Yes | Only the size number changes |
What we learned: proportions and face numbers can be matched by measuring the art. But shapes missing from the template, such as the hat and hair, cannot be fixed with numbers. So for a new character, write the parts list before building and check first for "shapes the template does not have." If there are any, have those parts built new, or model just those parts by hand. This witch is paused just before that step.
8. The order to follow when you try it
- If you only have a front view, make a turnaround first (the conditions in section 1).
- Have Claude Code write a parts list as a table, with the columns "part, size on screen, colour, in the template?".
- If some parts are not in the template, decide first whether to have them built or to model them yourself.
- Build the model and render it from the same directions as the turnaround, with an orthographic camera.
- Have the silhouette overlap and face ratios measured the same way.
- Fix the height bands with low numbers and the areas with large red or blue first.
A request to Claude Code could look like this. It is rewritten from our work; we did not run this exact text.
Overlay the turnaround and the model at the same size and measure the silhouette overlap (IoU) for the front, side and back.
Also measure each height band (legs, skirt, head, hat) separately, and make a sheet with areas only in the art in red and areas only in the model in blue.
Practice
- List at least ten parts of your character's art, and mark whether each can be built from a basic shape such as a cone, cylinder or box.
- In the image in section 3, find where the red and the blue are on the side silhouette and write them down.
- If face width ÷ eye width is 2.95 in the art and 3.167 in the model, work out by what percentage the face width must shrink to match the art if the model's eye width stays the same.
Common mistakes and fixes
| Symptom | Cause | Fix |
|---|---|---|
| The model looks bulkier than the art | Another character's proportions were copied | Measure the proportions again from the turnaround and put them in the numbers |
| The overlap number is strangely low | The turnaround has perspective, or the model was rendered with a perspective camera | Make both orthographic |
| The overall overlap is fine, but something is off | A difference in one part is hidden in the overall number | Measure by height band |
| Changing numbers does not change the hat | The template has no code for that shape | Have a new part built, or model it by hand |
| The hair is always symmetric | The part has a Mirror modifier on | Make asymmetric locks a separate part with Mirror off |
| Ornaments cannot be seen on screen | The real size is right but too small on screen | Measure in screen pixels and enlarge, or paint them on as a pattern |
In one line
Measure likeness in numbers: turnaround → silhouette overlap (by band) → face ratios → automatic checks. And find "shapes the template does not have" in the parts list before you build, because numbers cannot fix them.
Read next
- Three ways to make a 3D character with AI
- Making a 3D character with Claude Code, part 1: from one drawing to an easy-to-edit model
- Making a 3D character with Claude Code, part 2: IK rig, actions, and separate scoring
- Mirror modifier
References
- Blender 5.2 Manual: Cameras (orthographic camera)
- Blender 5.2 Manual: Mirror Modifier
- Blender 5.2 Manual: Workbench render (Color)
- Image license: the turnaround is an AI-generated illustration (Higgsfield), and the front view it was based on was made with Meshy AI (Made with Meshy). The model renders, overlap sheet and measurement screens are Blender renders by AZTechnology and their analysis screens.