Ten first prompts for Blender MCP: from reading the scene to rendering, seen through the real answers
After connecting the official Blender MCP to an AI app, we sent ten first prompts in order: read, create, edit, render, and review. This guide shows what the AI did for each one and what a person still needs to check, with screenshots.
한국어English
ON THIS PAGE
- 01The ten prompts at a glance
- 021. Three read-only prompts: check the connection
- 032. Two prompts that create: a floor and a monkey head
- 043. Two prompts that edit: material and smoothing
- 054. Camera and render: getting a file out
- 065. The review prompt: undoing changes and the AI's mistake
- 076. Tips for writing prompts
- 08Practice
- 09Common mistakes and fixes
- 10In one line
- 11Read next
- 12References
Based on: Blender 5.2 LTS (screenshots from 5.2.1, English UI, default keymap), Blender Lab MCP add-on and server 1.0.3, Claude Code 2.1.318. Checked in November 2026. All figures are real Blender screens and renders. The ten prompts were sent one after another in a single conversation.
Once Blender MCP is connected, it is hard to know what to ask first. This guide is a record of ten first prompts that we actually sent. For each one, it shows which tool the AI used, how the Blender screen changed, and what a person should check.
The prompts go from easy to harder. The first three only read the scene. Then we create objects, edit them, render, and finally review the changes. Think of a first driving lesson: start the engine, read the dashboard, then drive slowly around the parking lot.
After this guide you will be able to:
- Check the connection with read-only prompts that do not change the scene. (Section 1)
- Send prompts that create and edit objects, then check the result with numbers and the screen. (Sections 2–3)
- Have the AI set up the camera and save a render to a file. (Section 4)
- Ask the AI to list its changes, and spot mistakes in its answer. (Section 5)
Before you start:
- Install the official MCP add-on in Blender and start its server. See Installing the official Blender MCP.
- Connect the MCP server to your AI app. For Claude Code, follow Adding the official Blender MCP to Claude Code. To pick another app, see Choosing an AI tool for Blender MCP.
- In Blender, open a new file with File > New > General. Every prompt here starts from this default scene (Cube, Camera, Light).
- Do not practice on a file you are working on. Code that the AI runs really changes the file. See Safety check before handing Blender to AI.
The ten prompts at a glance
| No. | Prompt | Type | Changes the scene |
|---|---|---|---|
| 1 | Tell me which objects are in the open Blender scene. Don't change anything. | Read | No |
| 2 | Tell me the location, size, and rotation of Cube. | Read | No |
| 3 | Capture the Blender window and describe what is on screen. | Read | No |
| 4 | Lay down a 10 m by 10 m floor plane. Name it Floor. | Create | Yes |
| 5 | Put a monkey head (Suzanne) on top of Cube, touching its top face. | Create | Yes |
| 6 | Make a red material and put it on Cube. | Edit | Yes |
| 7 | Add a Subdivision Surface modifier with 2 levels to Suzanne and make it smooth with Shade Smooth. | Edit | Yes |
| 8 | Aim the camera so it frames all the objects on Floor, and switch the 3D Viewport to the camera view. | Camera | Yes |
| 9 | Render one 960x540 image with EEVEE and save it as E:\mcp_demo\render_01.png. | Render | Creates a file |
| 10 | List what was changed in the scene during this conversation, and tell me what to delete or change to get back to the start. | Review | No |
For prompt 9, use a folder that exists on your PC. Create it first if needed.
1. Three read-only prompts: check the connection
Starting point: a new file (File > New > General) with the default cube.
Read-only prompts do not change the scene, so they are the safest way to check the connection. "Don't change anything" at the end of prompt 1 draws a clear line for the AI.
Steps:
- Send prompt 1 to your AI app.
- Check that the answer lists Camera, Cube, and Light.
- Send prompts 2 and 3 in turn.
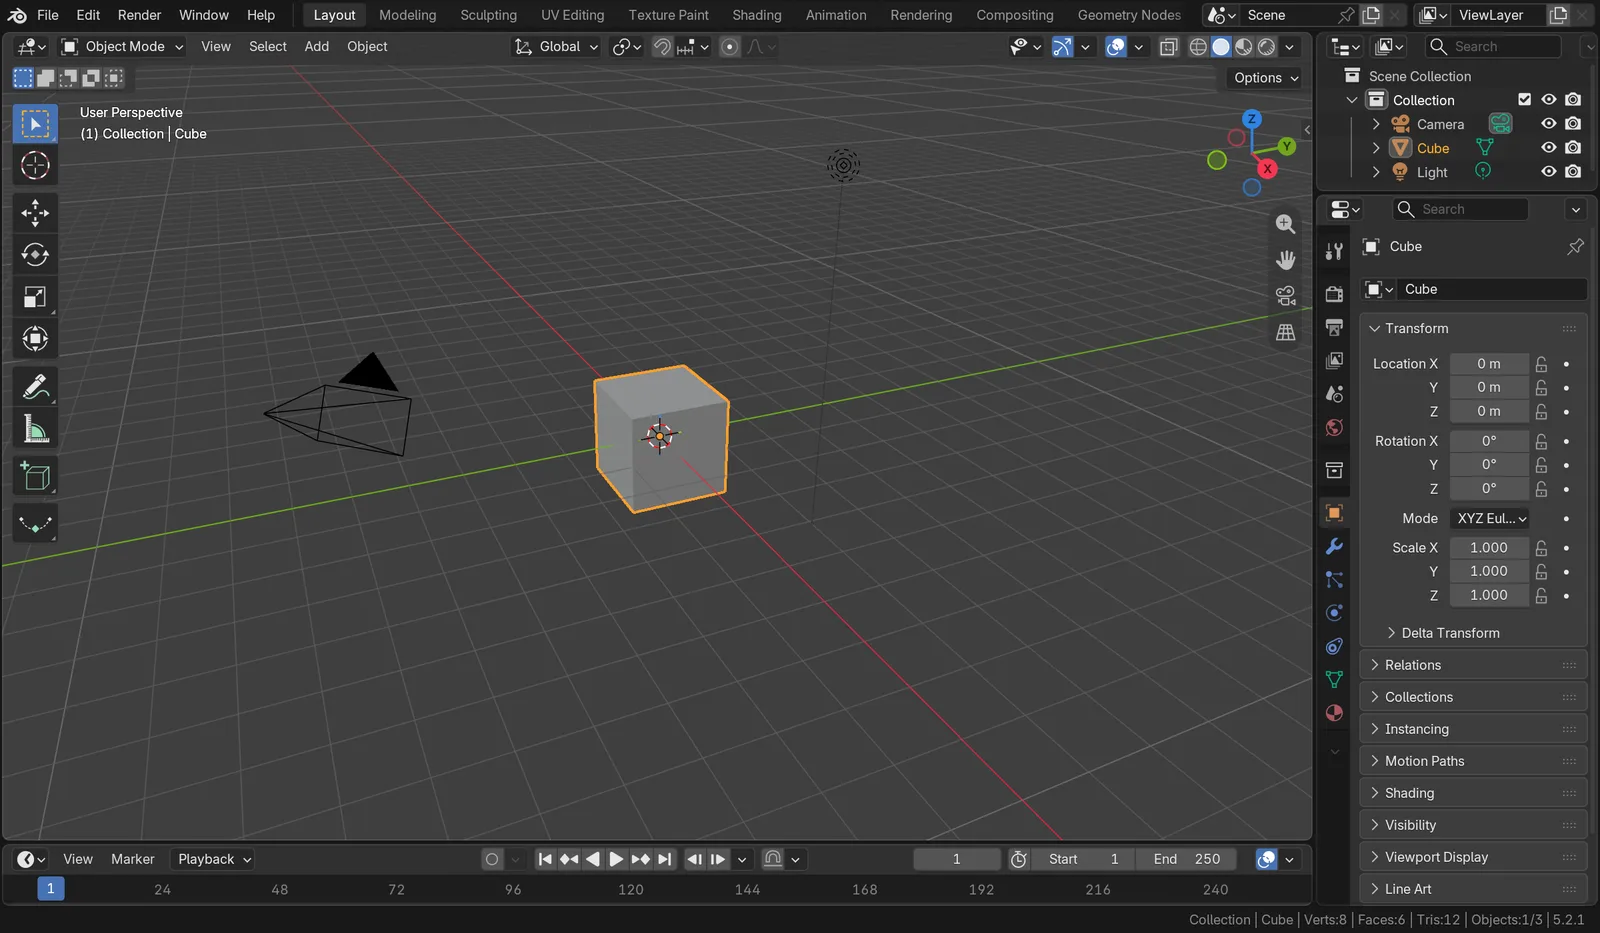 Figure 1. The default scene before any prompt. Cube in the middle, Camera on the left, Light at the top right, three objects in the Outliner (Blender screenshot)
The tools the AI used and its answers:
| No. | Tool used | Main points of the answer |
|---|---|---|
| 1 | Objects summary (get_objects_summary) | 3 objects (Camera, Cube, Light), all in Collection, Cube is the selected active object, same as the default scene |
| 2 | One object in detail (get_object_detail_summary) | Location 0, rotation 0, scale 1, a 2 m cube, one material named Material |
| 3 | Window capture (get_screenshot_of_window_as_image) | A description of each screen area (3D Viewport, Outliner, Properties editor, Timeline), 8 vertices and 6 faces in the status bar, version 5.2.1 |
All three answers ended with a line saying the AI only read the scene and changed nothing. Even when that line is there, get into the habit of checking the Outliner and Properties editor yourself.
In answer 2, Scale and Dimensions are different values. Scale 1 means "original size", and the default cube is 2 m on each side. A photo at 100% zoom still shows an object with its own real size.
When you ask for a screen capture, as in prompt 3, the AI sees the Blender window as an image. Answer 3 went through what is visible in Figure 1, area by area. When the number-based answers (1 and 2) agree with the image-based answer (3), the connection is working.
2. Two prompts that create: a floor and a monkey head
Starting point: continue from the scene in Section 1. Nothing has changed yet.
Steps:
- Send prompt 4.
- Check that Floor appears in the Outliner.
- Send prompt 5.
- Check in the 3D Viewport that the monkey head sits on the cube.
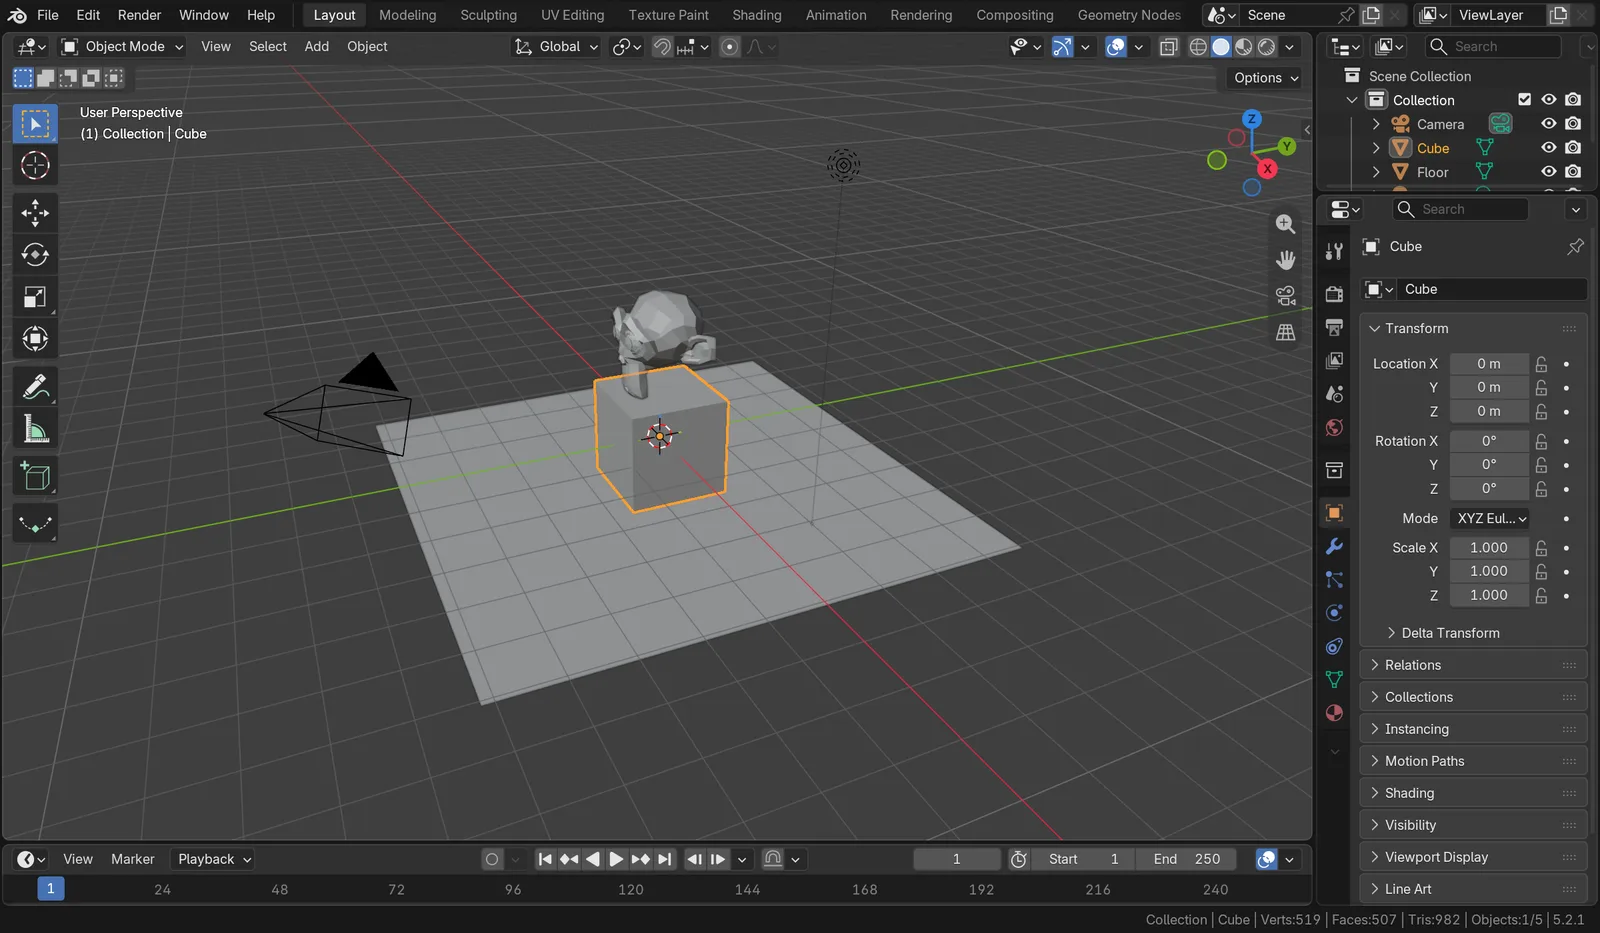 Figure 2. The scene after prompts 4 and 5. Floor laid at the height of the cube's bottom, Suzanne touching the top face with the tip of its chin, five objects in the status bar (Blender screenshot)
For both prompts the AI created the objects with the code execution tool (execute_blender_code). Before running code, it read the scene units and checked whether an object with the same name already existed. Afterwards it captured the screen to check the result.
The AI made some decisions on its own. They were not in the prompt, so a person needs to check them.
| Prompt | What the AI chose | Reason it gave | Where to check |
|---|---|---|---|
| 4 | Put the floor at Z = −1 m | The cube's bottom is at −1 m, so at 0 the cube would be half buried | Floor's Location Z in the Properties editor |
| 5 | Matched Suzanne's lowest point (the chin tip) to the cube's top (Z = 1 m) | Read "touching the top face" as the lowest point touching it | Only the chin tip touches, as in Figure 2 |
| 5 | Kept the default size | Said the distance between the ear tips is 2.73 m, wider than the 2 m cube | Both ears stick out past the cube |
When a word is open to more than one reading, such as "touching", the AI picks one. This time it made only the chin tip touch, and said so in its answer. If you wanted the head standing upright, you would need to describe the pose: "stand it upright facing forward, with the bottom of the head on the top face."
Answer 4 also asked back: "Tell me if z = 0 is better." When the AI tells you the values it chose, you can fix them in the next prompt.
3. Two prompts that edit: material and smoothing
Starting point: continue from the scene in Section 2 (with Floor and Suzanne).
Steps:
- Send prompt 6.
- Check that the cube looks red. Figure 3 is in Solid view; the AI also changed the viewport display color, so the cube looks red even in Solid view.
- Send prompt 7.
- Check that the faceted faces of the monkey head became round.
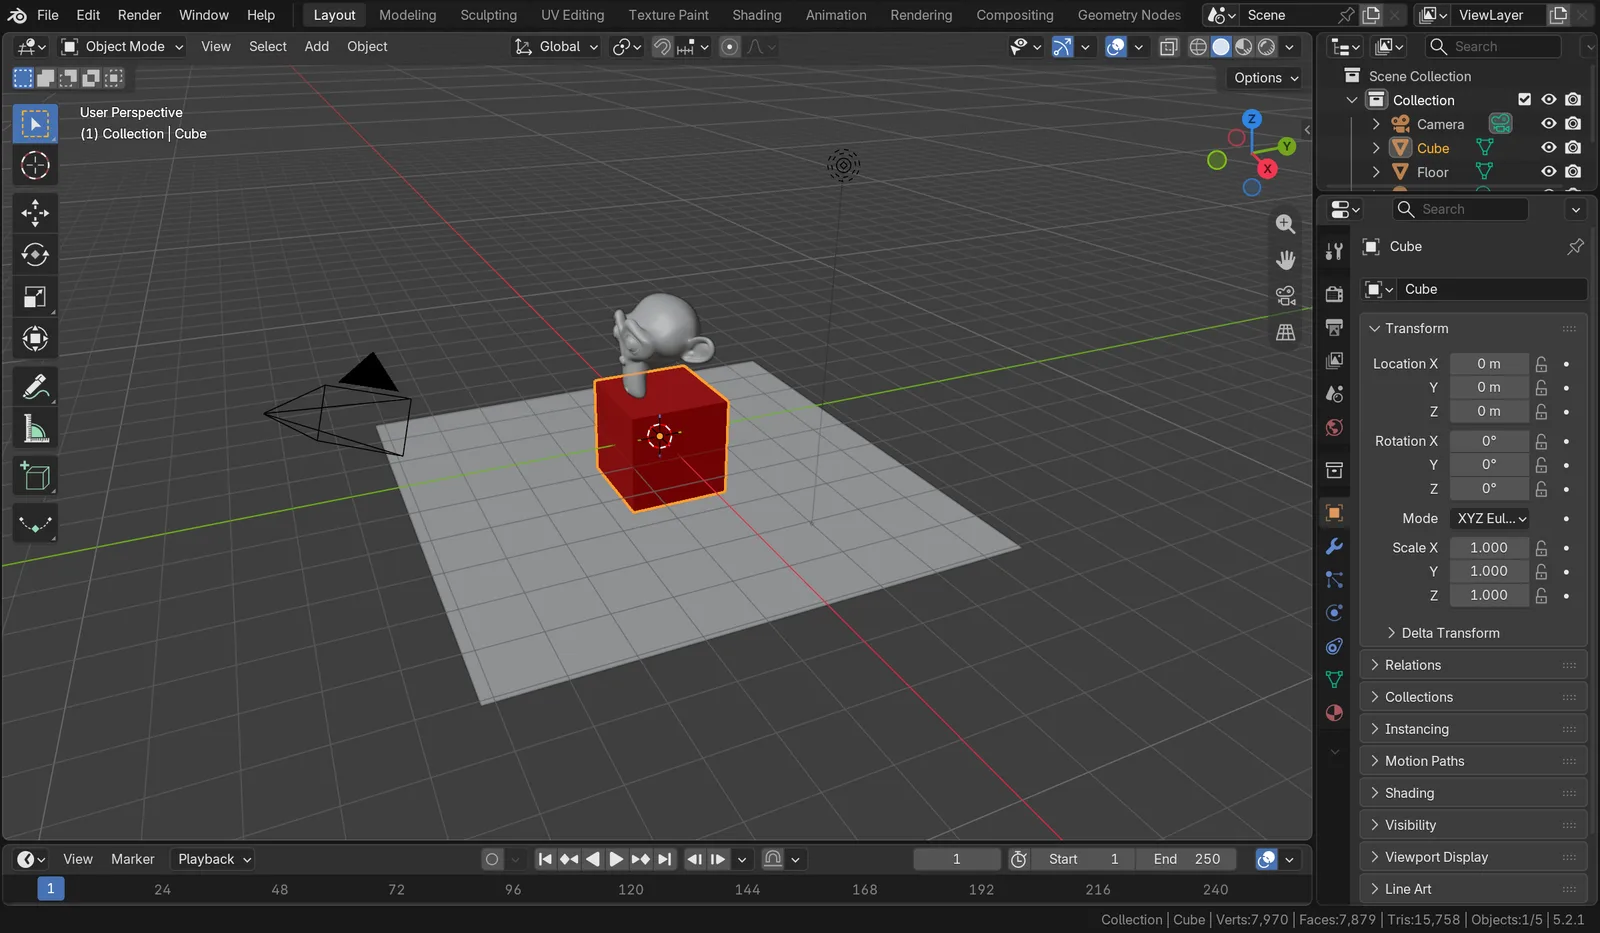 Figure 3. The scene after prompts 6 and 7. The red Cube, the rounded Suzanne, and much larger vertex and face counts in the status bar (Blender screenshot)
| No. | What the AI did | What it told us |
|---|---|---|
| 6 | Made a new material Red and put it in Cube's material slot 0. Set both Base Color and the viewport display color to red (0.8, 0, 0) | A warning that the old material Material is no longer used by any object, so it will disappear after saving and reopening |
| 7 | Added Subdivision Surface at 2 levels for viewport and render and applied Shade Smooth. Did not apply the modifier | The rounded chin tip had lifted about 1.26 cm, so it lowered Suzanne by that much (Z 1.984 → 1.972 m) |
The warning in answer 6 is worth knowing. Blender drops data that nothing uses when you save. It is like throwing out unlabeled food when you clean the fridge. To keep the old material, turn on its Fake User (the shield button next to the name).
In answer 7, the AI did one more thing we did not ask for. Since we had asked for "touching the top face" earlier, it moved the head again so it still touched after the shape changed. That is handy, but it also means values you did not mention can change. When an answer says "moved" or "changed", check that value in the Properties editor.
What Subdivision Surface does is explained in Blender modifiers.
4. Camera and render: getting a file out
Starting point: continue from the scene in Section 3 (red Cube and smooth Suzanne).
Steps:
- Send prompt 8.
- Check that the text at the top left of the 3D Viewport changed to Camera Perspective.
- Check that Cube and Suzanne fit inside the dashed rectangle (the camera frame).
- Send prompt 9, with a folder on your PC.
- Open the saved PNG file in File Explorer.
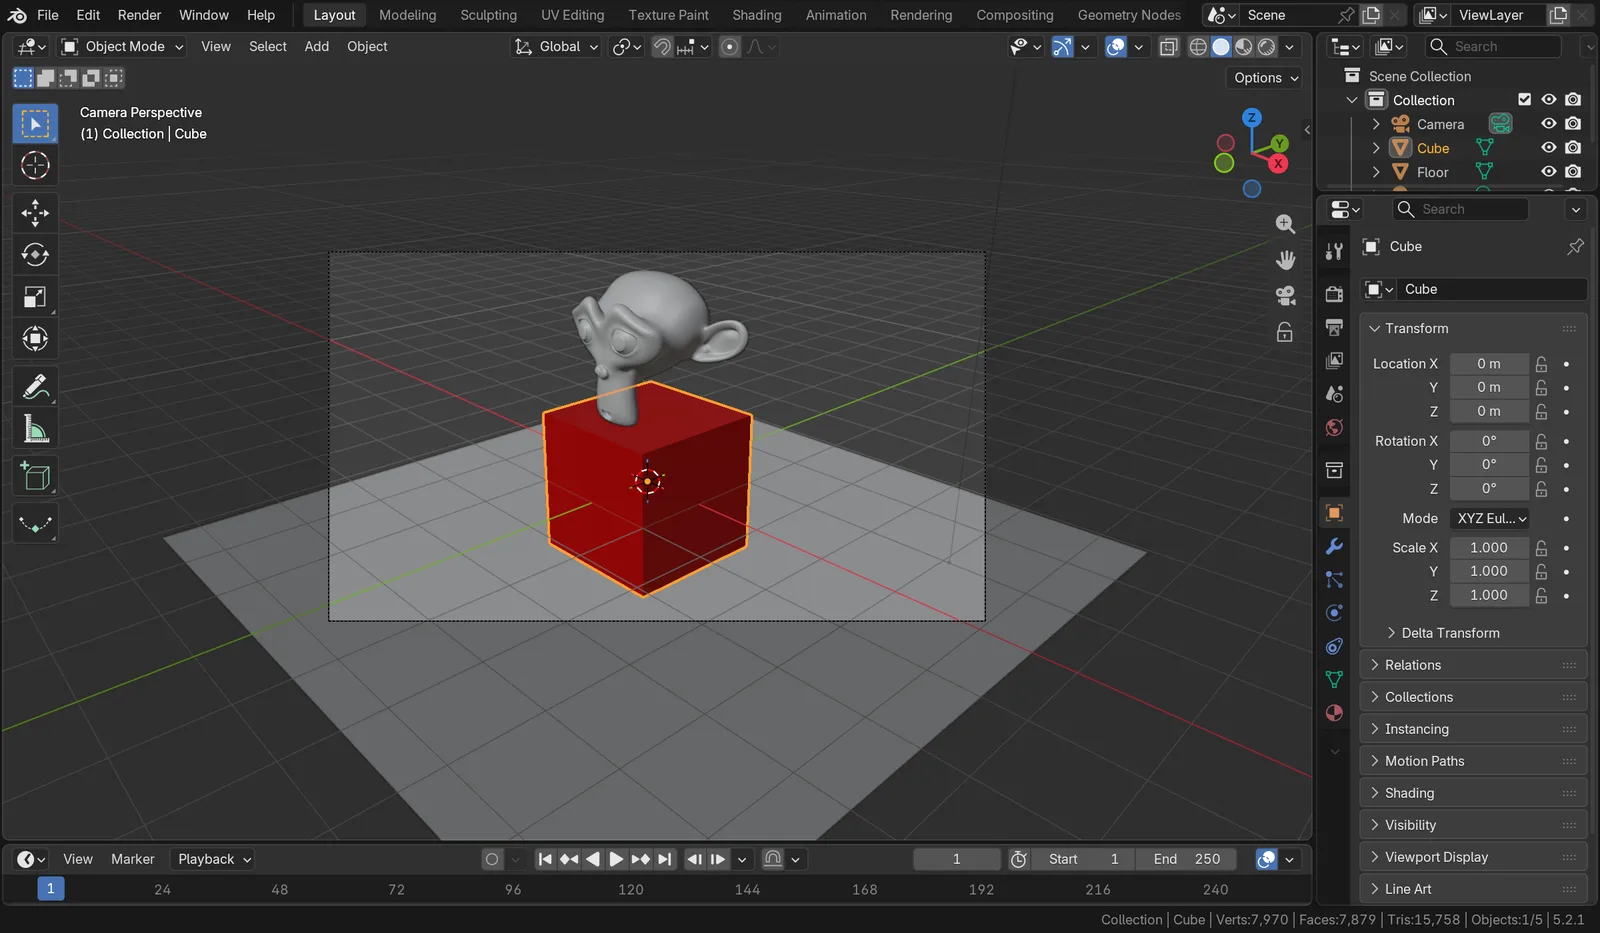 Figure 4. The camera view after prompt 8. Camera Perspective at the top left, Cube and Suzanne inside the dashed frame, floor edges outside it (Blender screenshot)
For prompt 8 the AI read "the objects on Floor" as Cube and Suzanne. It did not include the floor plane itself, so the floor edges go outside the frame. It kept the camera at its place looking down from the front right, aimed it at the middle of the two objects, and then moved it back until both fit. The changed values:
| Item | Before | After |
|---|---|---|
| Camera location (m) | 7.359, −6.926, 4.958 | 8.507, −7.818, 5.254 |
| Camera rotation | 63.6°, 0°, 46.7° | 68.4°, 0°, 46.7° |
| Lens, resolution | 50 mm, 1920×1080 | Unchanged |
For prompt 9, the AI said it set the resolution to 960×540 only while rendering and put it back to 1920×1080 afterwards. It also checked whether a file with the same name already existed before saving. On my PC the render took about 0.9 seconds and the file was about 355 KB.
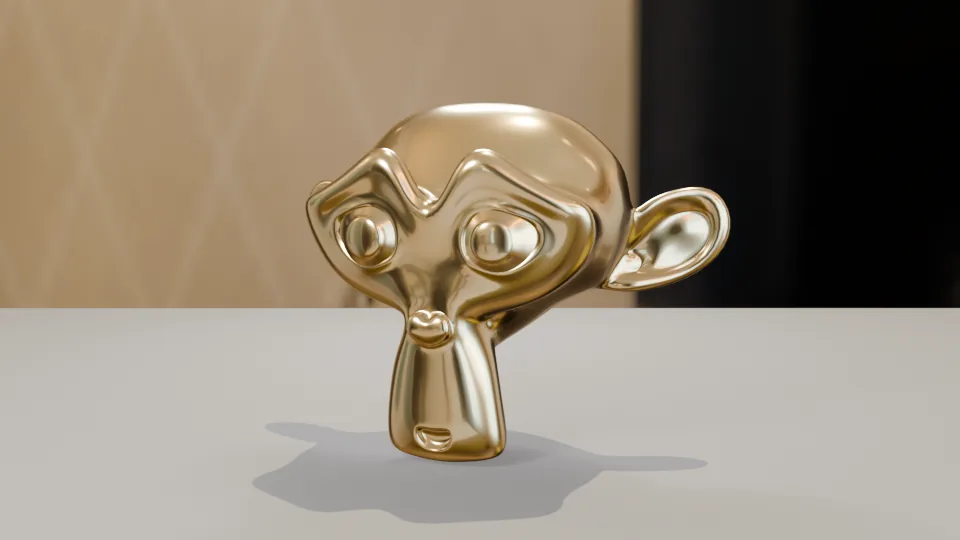
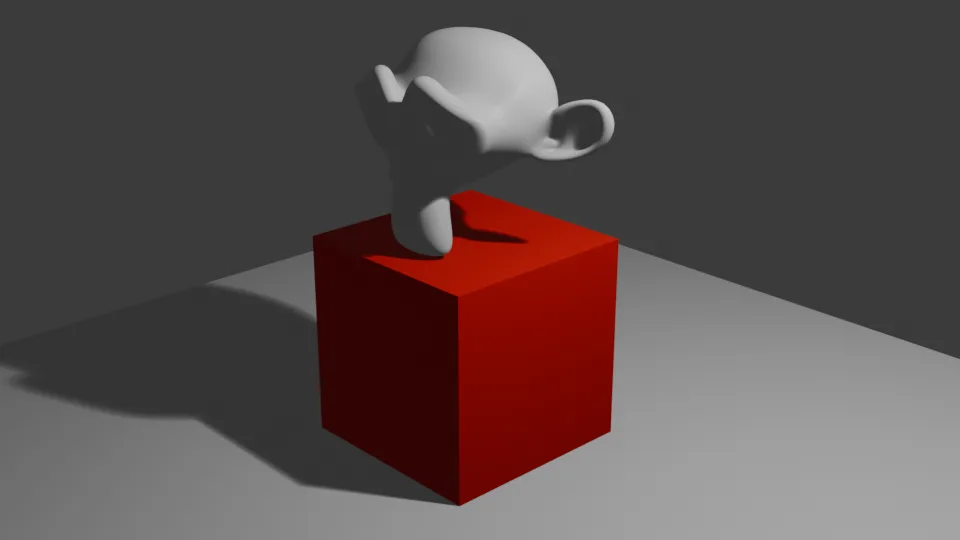 Figure 5. The render file saved by prompt 9. The red Cube, Suzanne touching the top face with its chin tip, and the shadow from the default light (Blender render)
Answer 9 also said: "I could not look at the rendered image itself. Please open the file and check the composition." The AI only checked that the file was a 960×540 PNG. Whether the picture looks good is for a person to judge. In Figure 5 the monkey head rests on a single point at its chin and seems to tip forward. This is how the reading of "touching" from Section 2 shows up in the render.
5. The review prompt: undoing changes and the AI's mistake
Starting point: continue from the scene in Section 4.
Steps:
- Send prompt 10.
- Compare the list in the answer with the Outliner.
Answer 10 listed eight changes in a table: the new Floor, Suzanne, and material Red, Suzanne's modifier and position, the camera's location and rotation, the switch to camera view, the render result inside Blender, and the PNG file on disk. It also gave a way to undo each one and the camera's original values.
But the last lines held a wrong suggestion: "Since the file was never saved, use File > Revert to go back to the last saved state." File > Revert reopens the saved file. A new file that was never saved has nothing to go back to, so the menu item is grayed out.
Two lessons from this mistake:
- An AI answer can sound right and still be wrong. Menu names and ways to undo are worth trying yourself before you trust them.
- If you save before sending prompts, File > Revert really can take you back. Pressing
Ctrl+Sonce before prompt 1 is the easiest undo you can set up.
6. Tips for writing prompts
Tips from sending these ten prompts:
| Tip | Example | Why |
|---|---|---|
| Use the object's exact name | "on Cube", "to Suzanne" | Matching the Outliner name keeps the AI from guessing |
| Add units | "10 m by 10 m", "960x540" | Without units the AI guesses them |
| Draw a line for read-only questions | "Don't change anything" | Keeps a read question from turning into an edit |
| Describe the pose | "standing upright, facing forward" | The AI picks one meaning for loose words like "touching" |
| Give the full save path | "E:\mcp_demo\render_01.png" | Without a path, files may land in a temp folder |
| Ask for one or two things at a time | Prompts 4 and 5 sent separately | Easier to check each result |
More general advice is in How to write good prompts.
Practice
- In a new file, send prompt 1 and check that the number of objects in the answer matches the Outliner.
- Change prompt 5 to "Put Suzanne on top of Cube standing upright and facing forward, with the bottom of the head touching the top face." Note what is different from Figure 2.
- Save with
Ctrl+Sbefore prompt 1, then send prompts 4 to 7. Afterwards, use File > Revert and check that you are back at the starting scene.
Common mistakes and fixes
| Symptom | Cause | Fix |
|---|---|---|
| The first prompt says it cannot connect to Blender | Blender is closed or the MCP server stopped | Go through When Blender MCP won't connect in order |
| I only asked to read, but the scene changed | The prompt could also be read as a change request | Add "Don't change anything". Undo with Ctrl+Z |
| An object appeared at the wrong height | No reference height was given | Say "on the floor plane" or "at Z = 0" |
| The render file is nowhere to be found | No save path was given, or the folder does not exist | Create the folder first and give the full path |
| The original material vanished | Materials used by no object are dropped on save | Turn on Fake User, or put it back in a slot |
| File > Revert is grayed out | The file was never saved | Save with Ctrl+S before sending prompts |
In one line
Three read prompts to check the connection → create and edit one or two things at a time → check every value the AI says it "changed" → save before you start. To use the same server from another AI app, compare the options in Choosing an AI tool for Blender MCP.
Read next
- Installing the official Blender MCP
- Adding the official Blender MCP to Claude Code
- Trying all 26 tools of the official Blender MCP
- Safety check before handing Blender to AI
- When Blender MCP won't connect
- How to write good prompts
- Choosing an AI tool for Blender MCP
- Letting AI build a modifier stack
- Letting AI set up lights and materials
- Building a low-poly room with Blender MCP
References
- Blender Lab, MCP Server: https://www.blender.org/lab/mcp-server/
- Blender 5.2 Manual, Subdivision Surface modifier: https://docs.blender.org/manual/en/5.2/modeling/modifiers/generate/subdivision_surface.html
- Blender 5.2 Manual, Opening and saving (Revert): https://docs.blender.org/manual/en/5.2/files/blend/open_save.html
- Claude Code MCP docs: https://code.claude.com/docs/en/mcp
- Shortcuts: save
Ctrl+S, undoCtrl+Z - Figures: all real Blender 5.2.1 screens and EEVEE renders