Letting AI build a modifier stack: Array, Mirror, and Bevel over MCP, then fixing it by hand
Through the official Blender MCP, ask AI to stack Array, Mirror, and Bevel modifiers on one fence picket, read the real result in the Modifiers tab, and fix the picket count the AI read differently with one number. Two common mistakes, unapplied scale and the Mirror origin, are covered too.
한국어English
ON THIS PAGE
- 01Before you start
- 021. The question sent to the AI
- 032. Reading the result: the count and the last lines of the answer
- 043. The fix: twelve pickets with one Count value
- 054. Two common mistakes: scale and the Mirror origin
- 065. Changing one number: the power of an unapplied stack
- 076. Writing a better question
- 08Practice
- 09Common mistakes and fixes
- 10Summary
- 11Further reading
- 12References
Based on: Blender 5.2 LTS (screenshots from 5.2.1, English interface, default shortcuts), the Blender Lab official MCP server and add-on 1.0.3, and Claude Code as the AI app. Checked in November 2026. All images are real Blender screens. Red numbers and boxes were added for explanation.
If you hand modifiers to AI, the stack is built in under a minute. But the AI may read your words differently from what you meant. In this guide, you ask AI to stack Array, Mirror, and Bevel modifiers on one fence picket through the official MCP, read the real result in the Modifiers tab, and fix it with one number.
A modifier is like a filter in a photo app. The original photo stays as it is, and the effect is shown on top. Filters stack and apply in order, and so do modifiers, from top to bottom. This list is called the stack. If modifiers are new to you, read What is a modifier? first.
When you finish this guide, you will be able to do the following.
- Write a question that asks AI to build a modifier stack.
- Read the stack in the Modifiers tab and count the result.
- Find in the answer where the AI read your question differently, and fix it with a number.
- Tell apart common mistakes such as unapplied scale and the Mirror origin.
- Change the shape with one number and see why an unapplied stack is useful.
Before you start
You need: an AI app connected to the official MCP (for example, Claude Code), and Blender 5.1 or later with the server running. If you have not connected yet, see Installing the official Blender MCP and Connecting the official Blender MCP to Claude Code. If you have not picked an AI app, Choosing an AI tool for Blender MCP compares them.
- In Blender, open a new file with File > New > General. It has one default cube.
- In the Properties editor on the right, open the Modifiers tab (wrench icon). The modifiers the AI adds show up here right away.
- If this is a file you care about, save it first. Changes the AI makes with code do not always undo in one
Ctrl+Z. For more checks, see Safety checks before handing Blender to AI.
1. The question sent to the AI
Starting point: the default cube in a new file (File > New > General).
Do this: send the following to your AI app as it is.
Turn the default cube into one fence picket, use Array to make 6 to the right, use Mirror to make the same on the left, and use Bevel to round the corners a little. Do not apply the modifiers; just stack them.
The last sentence, "do not apply, just stack," matters. Applying is like baking the filter into the photo. Once baked, you can no longer change the count or the roundness with a number. A stack lets you keep editing the AI's result in the panels.
The AI does this work with the code tool of the official MCP. When this question was sent to Claude Code, the AI did the following. It took about 50 seconds, and at the end the AI took a screenshot of the viewport to check the shape.
| Step | What the AI did | Values |
|---|---|---|
| 1 | Renamed the cube to Fence_Picket | |
| 2 | Moved the cube's points to make a picket shape | width 0.1 m, depth 0.04 m, height 1.2 m, bottom at height 0 |
| 3 | Shifted the picket to the right of the origin | 0.125 m (the object origin stays at the world origin) |
| 4 | Added Array | Count 7, Constant Offset X 0.25 m |
| 5 | Added Mirror | Axis X, merge off |
| 6 | Added Bevel | Amount 0.008 m, Segments 3, Limit Method Angle |
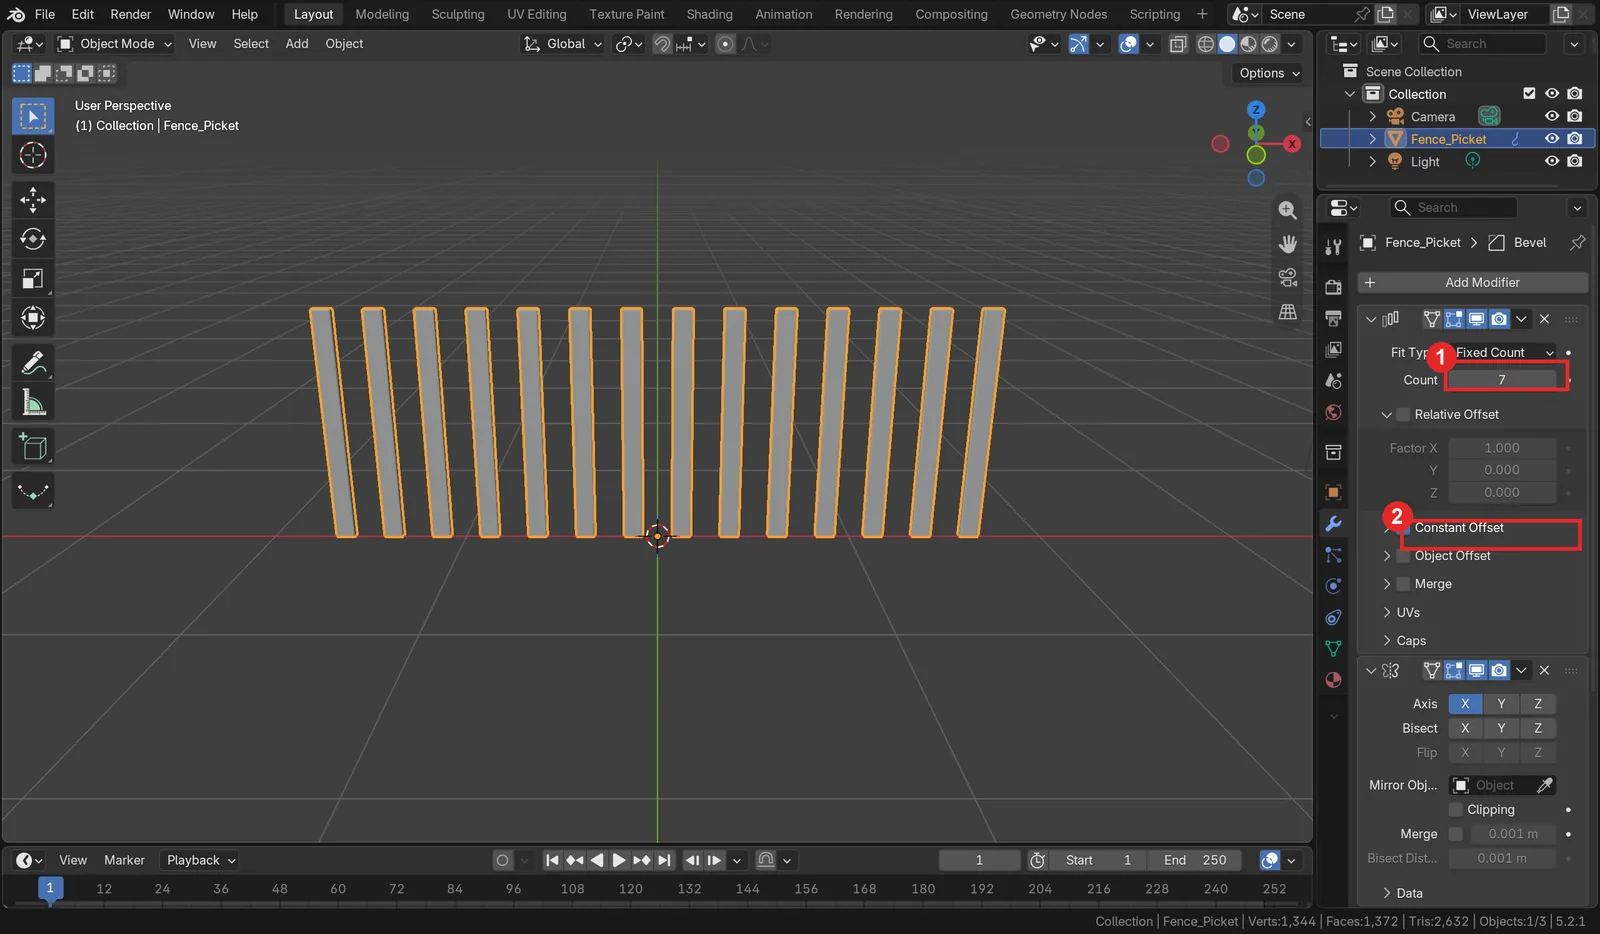 Figure 1. The AI's first stack: 1) Array Count 7, 2) Constant Offset turned on (Blender screenshot)
2. Reading the result: the count and the last lines of the answer
Starting point: continue from the Fence_Picket the AI made in section 1.
Do this:
- Click Fence_Picket in the Outliner to select it.
- In the Modifiers tab, check that the panels run Array, Mirror, Bevel from top to bottom. The icon in each panel header tells them apart.
- Read Count in the Array panel. In Figure 1 it is 7.
- Count the pickets in the viewport. Figure 1 has 14.
The question said "6 to the right, the same on the left," so if you expected 12, there are two extra. The reason was in the last lines of the AI's answer. The AI read "6 to the right" as the original picket plus 6 more and set Count to 7. It added that if you wanted only 6, you can change Count to 6.
Read the answer to the end: AI often settles an unclear word one way, finishes the job, and explains that choice in the last paragraph. Do not stop at the screen. Read paragraphs such as "things to check."
Also look at the offset next to Count. The AI turned off Relative Offset (a multiple of the object width) and turned on Constant Offset (a measured distance). Click the arrow left of Constant Offset to open it, and Distance X reads 0.25 m. The picket is 0.1 m wide, so there is a 0.15 m gap between pickets.
Do this: check the scale and the origin too.
- Open the Object tab (orange square icon).
- Read Location X, Y, Z and Scale X, Y, Z.
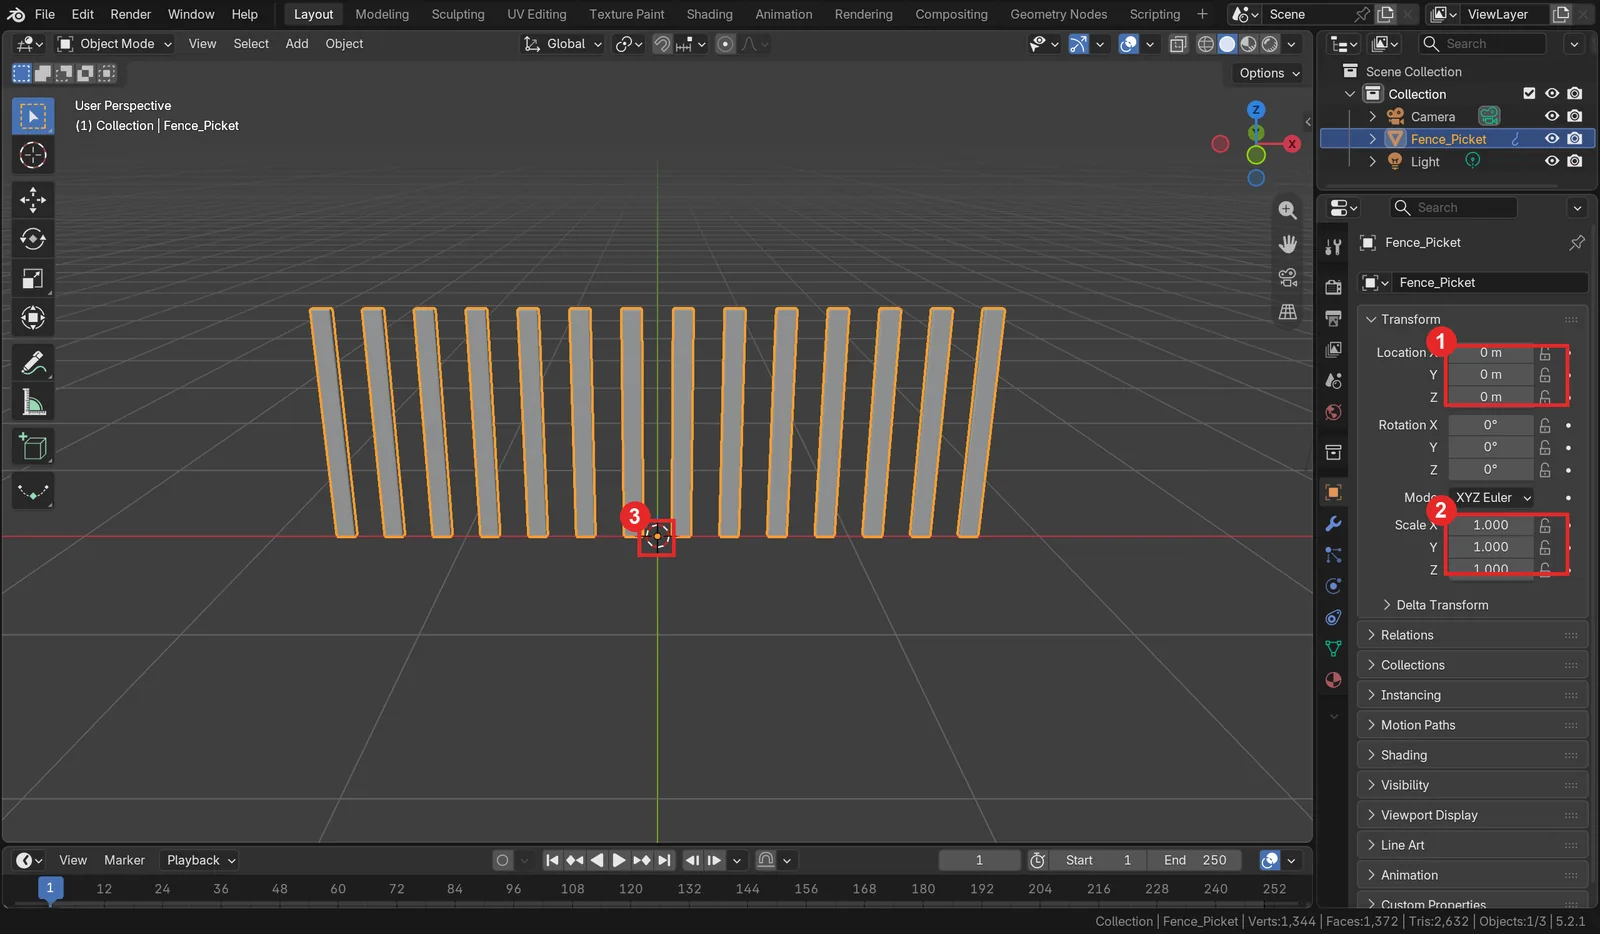 Figure 2. The Object tab of the AI's result: 1) Location 0, 2) Scale 1.000, 3) the object origin at the world origin (Blender screenshot)
Scale is 1.000 on all axes and the origin is at the world origin. The AI did not change the object's scale values; it moved the points directly to make the picket. Because of these two things, the two common mistakes in section 4 do not appear in this result.
3. The fix: twelve pickets with one Count value
Starting point: continue from the Fence_Picket in section 2.
Do this:
- Open the Modifiers tab.
- Double-click the Count field in the Array panel.
- Type
6and pressEnter.
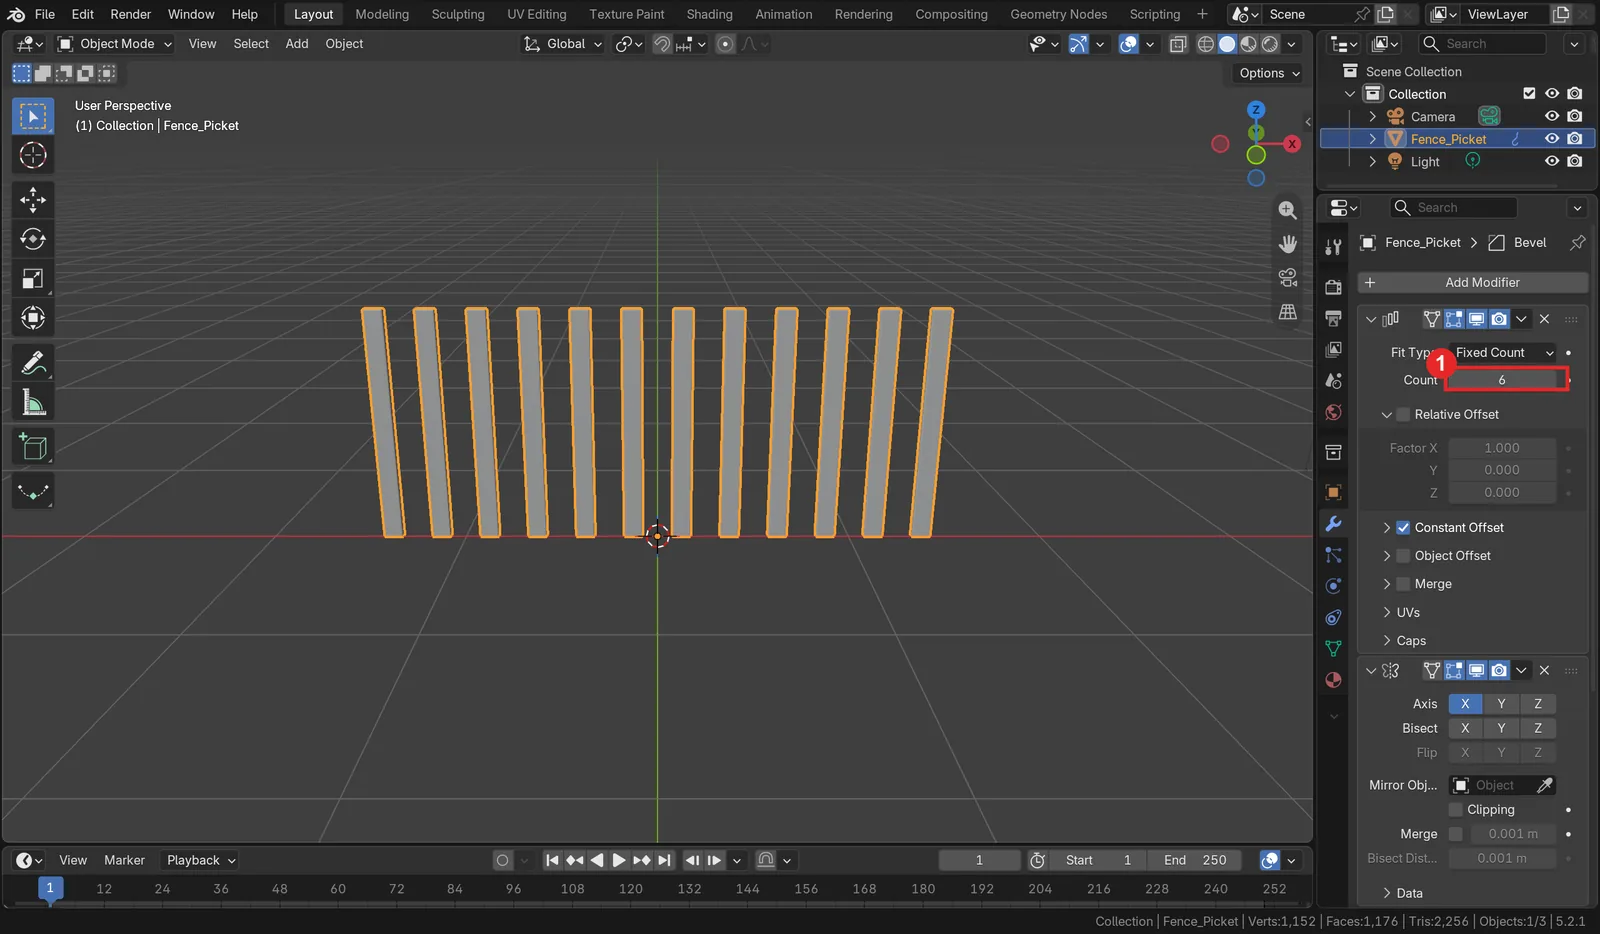 Figure 3. Count 6. Twelve pickets stand six on each side of the origin (Blender screenshot)
The pickets change to six on each side, twelve in all, right away. Verts (point count) in the status bar at the bottom drops from 1,344 to 1,152. One picket has 96 points, so 1,152 is twelve pickets. You do not need to ask the AI again or rerun any code. That is thanks to "do not apply" in section 1.
4. Two common mistakes: scale and the Mirror origin
Starting point: continue from the Fence_Picket in section 3. In this section you only read and check.
In this run, the AI avoided the two mistakes below. But they are common with other questions or other AI apps, and when they happen, the cause is hard to find from the screen alone. Knowing them in advance tells you what to look for when you read a result.
Mistake 1: the bevel is rounded on one side only because scale is not applied
If you make the picket by changing only the object's Scale values (for example X 0.1, Y 0.05, Z 1) instead of moving the points, modifiers work on the original cube (a 2 m box) before the scale is multiplied in. The corner cut on the original cube is then squashed to 0.1 times in X and 0.05 times in Y on screen. It is like stamping with a rubber stamp and then pressing the stamp flat from the side.
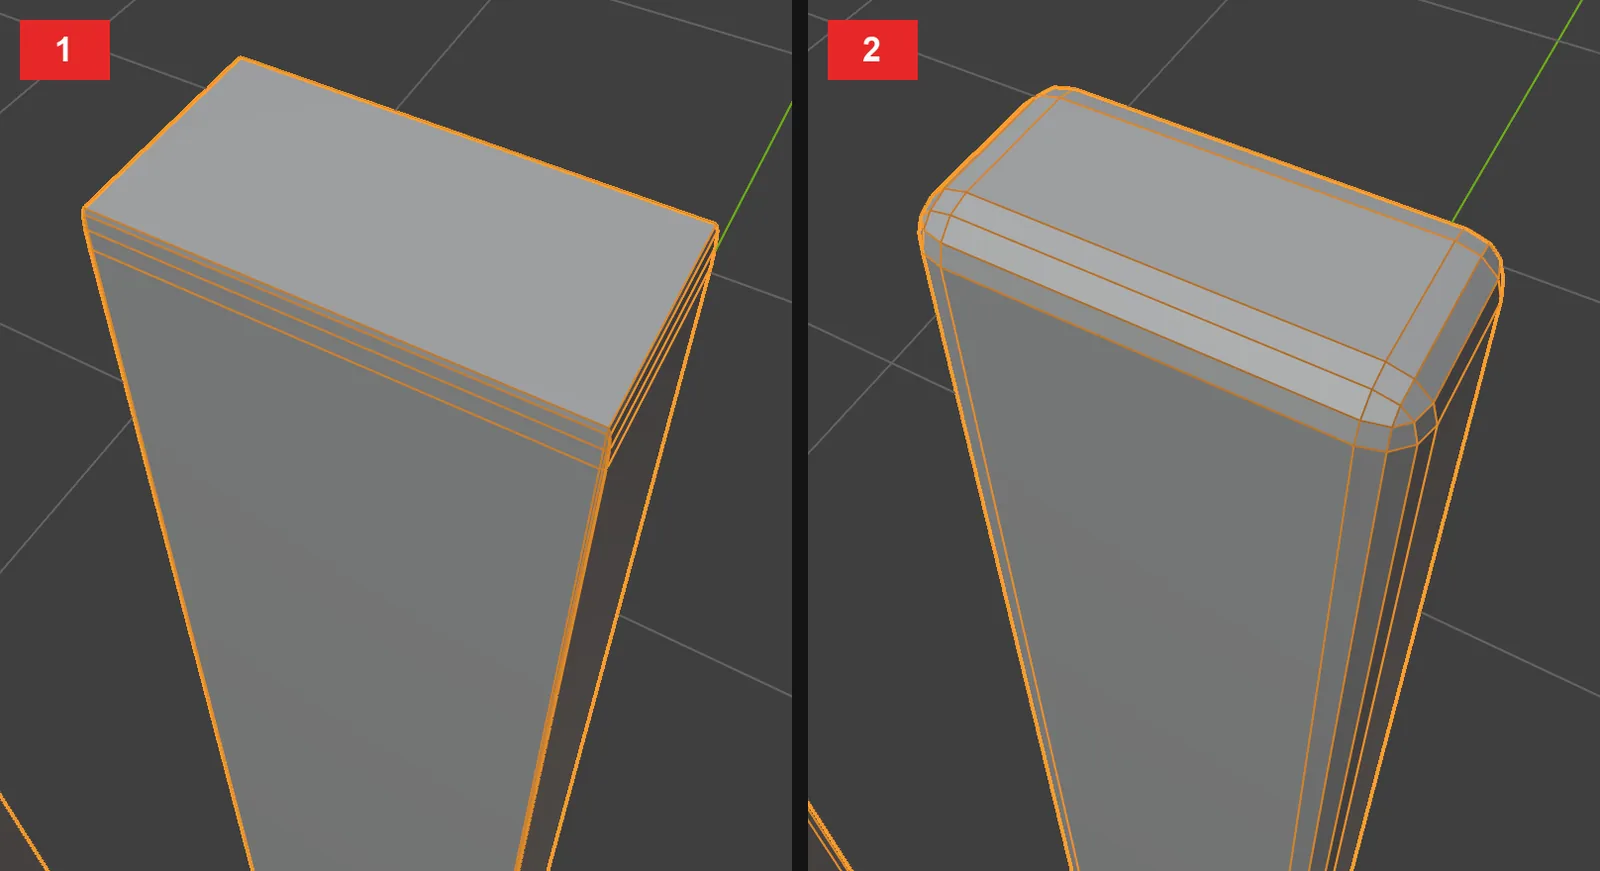 Figure 4. For comparison, the same bevel (Amount 0.02 m) on a picket flattened with Scale values: 1) before applying scale, only the vertical direction is cut, 2) after applying scale, all four corners are evenly rounded (Blender screenshot)
How to spot it: suspect this when Scale in the Object tab is not 1.000. To fix it, place the mouse over the 3D Viewport, press Ctrl+A, and choose Scale. The current size is baked into the point positions and Scale goes back to 1.
Mistake 2: the middle pickets overlap because the Mirror origin is in the middle of a picket
The Mirror modifier flips around the object origin. If the origin is in the middle of the first picket, the mirror line runs through the middle of that picket, and the picket and its mirror image sit in the same place. It is like a person standing right against a mirror and overlapping their reflection. Then even if twelve pickets are made, you see eleven.
How to spot it: if one picket seems to be missing but the point count in the status bar is for twelve, they overlap. In this result the origin is at the world origin and the picket is shifted 0.125 m, so nothing overlaps (box 3 in Figure 2). If they do overlap, move the origin to the world origin (Object > Set Origin > Origin to 3D Cursor), or put an empty at the world origin in the Mirror Object field of the Mirror panel.
5. Changing one number: the power of an unapplied stack
Starting point: continue from the Fence_Picket with Count 6 from section 3.
Do this:
- Double-click the Count field in the Array panel of the Modifiers tab.
- Type
4and pressEnter.
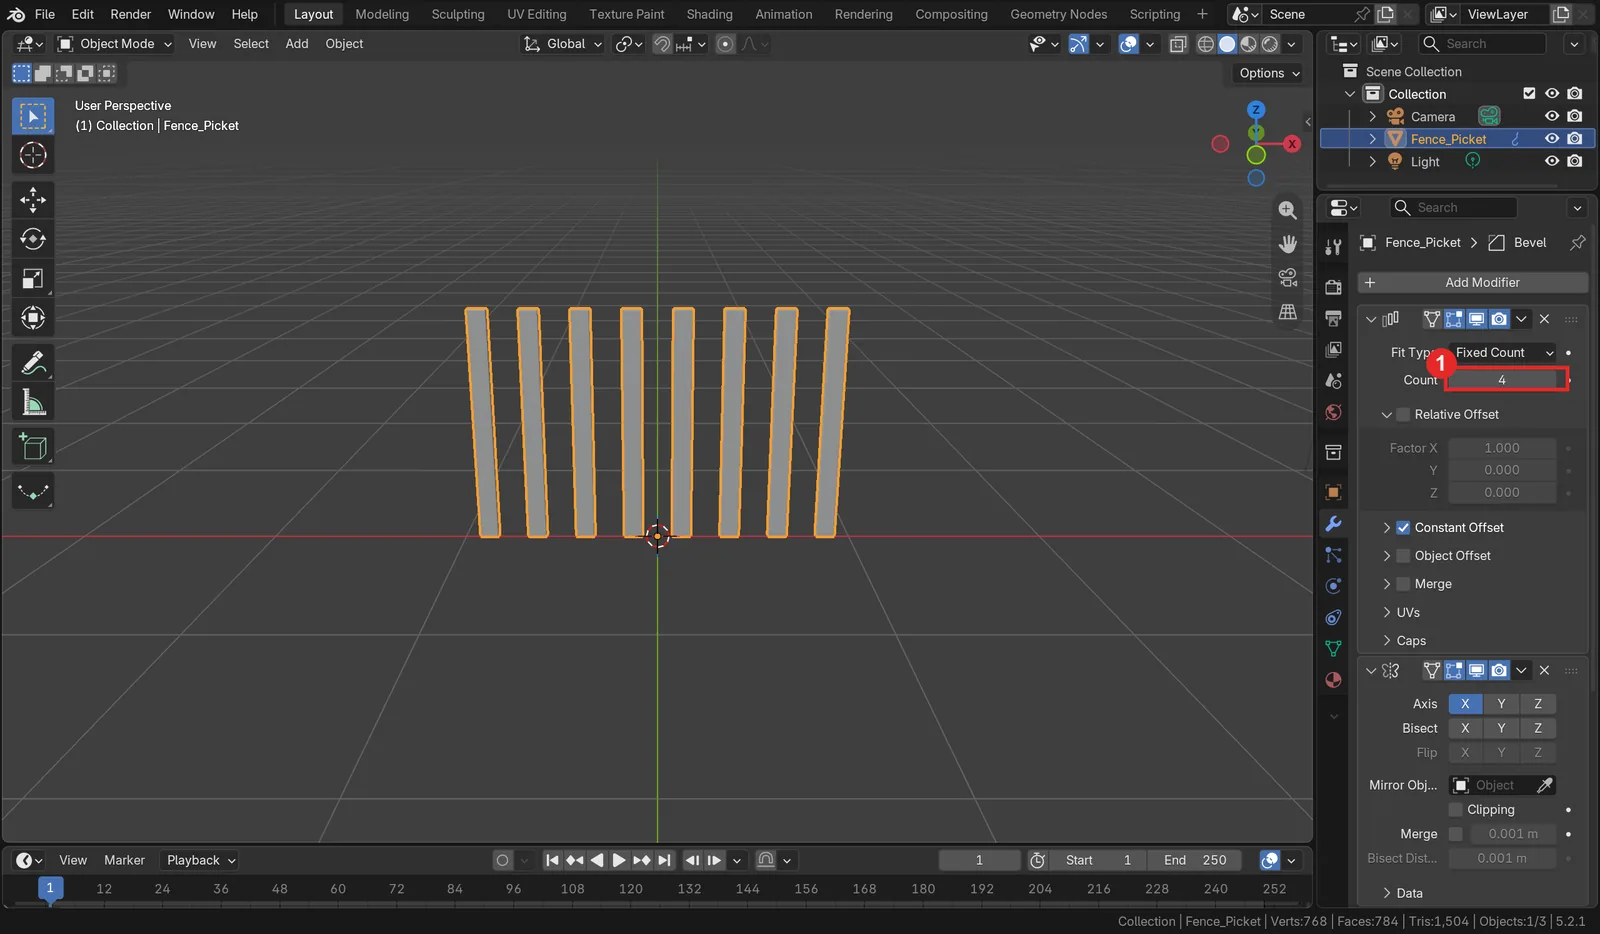 Figure 5. The result of Count 4. The pickets drop to eight right away (Blender screenshot)
The pickets change to four on each side, eight in all, right away. After checking, set Count back to 6.
Do this: look at the bevel values.
- Click the small arrows at the left of the Array and Mirror panel headers to fold them.
- In the Bevel panel below, read Amount, Segments, and Limit Method.
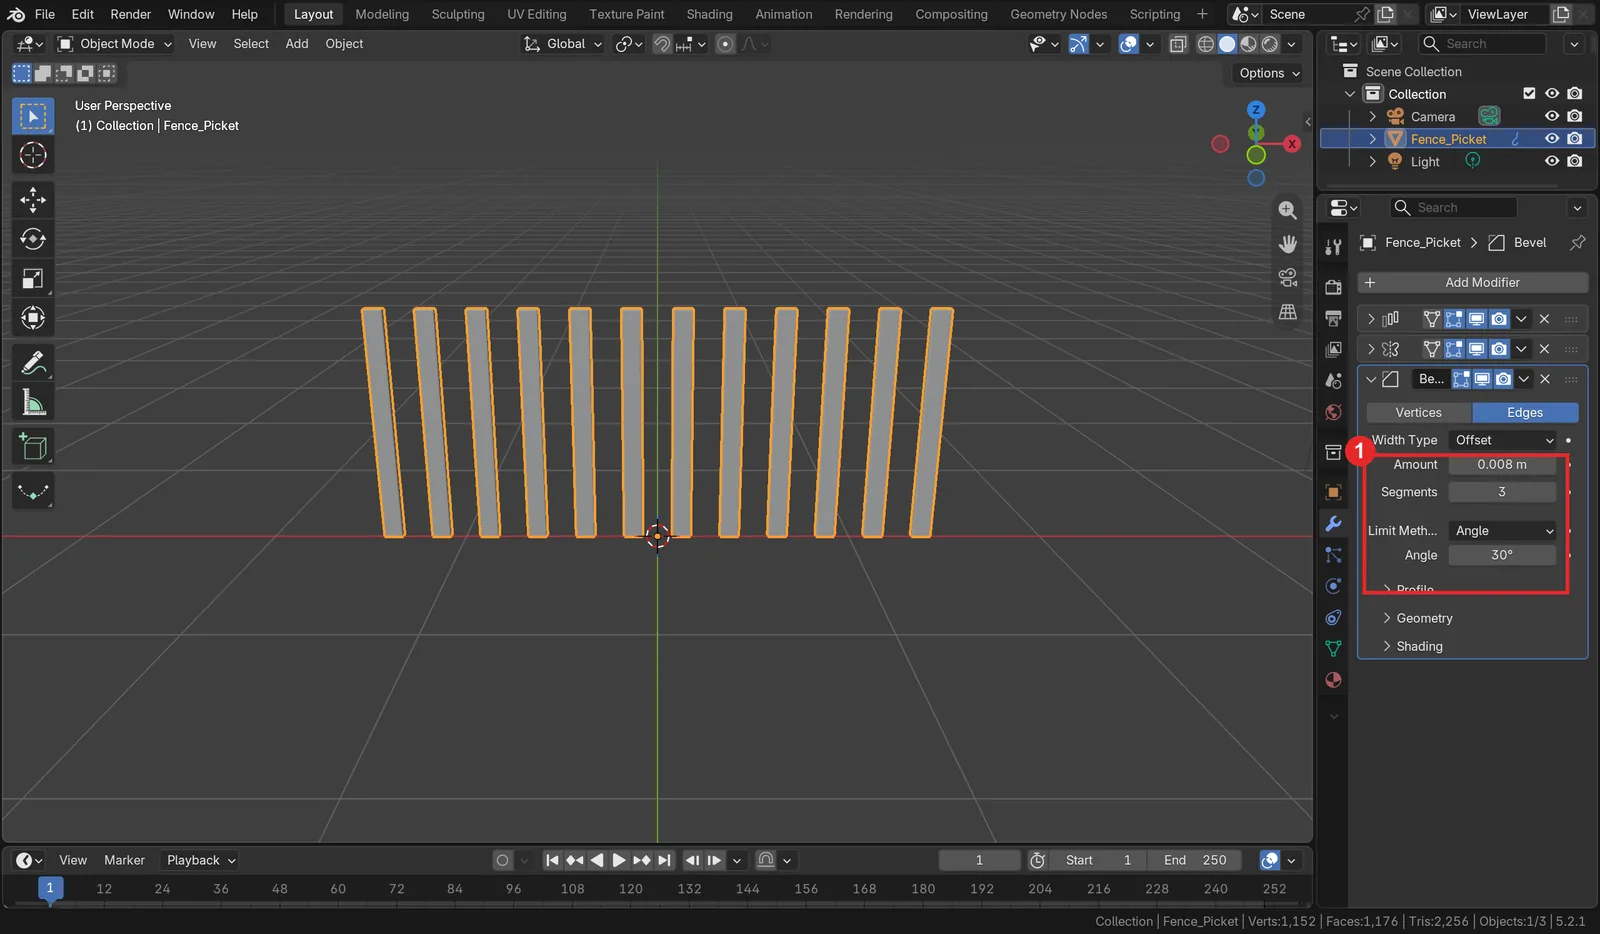 Figure 6. Folded Array and Mirror, open Bevel: 1) Amount 0.008 m, Segments 3, Limit Method Angle (Blender screenshot)
Amount is the width of the corner cut, and Segments is how many steps the rounded face has. With 1 segment you get one slanted face; with 3 it looks rounded. With Limit Method set to Angle, only edges bent more than 30° are cut. The picket is 0.1 m wide, so the AI kept Amount small at 0.008 m. From a distance the rounding is hard to see; if you want it rounder, try raising Amount to 0.02.
6. Writing a better question
The count difference in this run and the common mistakes in section 4 can be avoided from the start by adding one line to the question.
| Problem | What to add to the question (example) |
|---|---|
| The count is read differently | "6 to the right including the original, 12 in all" |
| The bevel is uneven | "Make the size by moving points, not with Scale, or apply the scale after changing it" |
| Mirror overlaps the middle | "Make the whole fence symmetric around the world origin" |
| You end up trusting words only | "When done, tell me the picket count and spacing as numbers" |
When menu names differ: the Add Modifier > Generate menu in Blender 5.2 has two Arrays. Array at the top is the new node-based array, and Array (Legacy) right below it is the older array the AI added in this guide. The two panels have different fields. When you add one by hand to follow along, choose Array (Legacy) to get the same panel as in Figure 1.
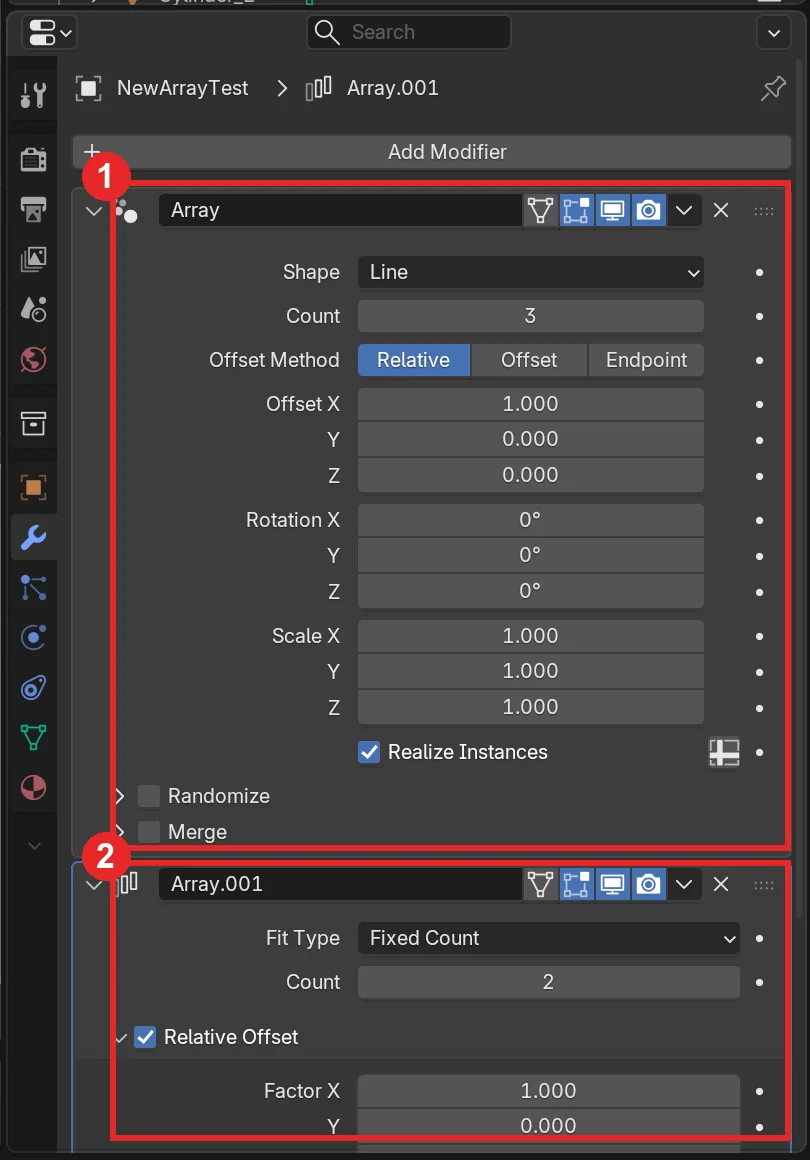 Figure 7. Two arrays added from the menu: 1) the new Array (nodes), 2) Array (Legacy). The image shows the second array named Array.001 because the names clashed (Blender screenshot)
When you ask AI, naming which one also avoids confusion. Example: "with the Array (Legacy) modifier".
Practice
- Change Count to
3and count how many pickets you get. - Open Constant Offset and change Distance X from
0.25to0.4. Write down how wide the gap between pickets becomes (a picket is 0.1 m wide). - Change Segments in Bevel to
1and look closely at how the corners change. - Press
Tabto enter Edit Mode, pressAto select all points, and move the picket toward the origin withG→X→-0.125→Enter. Check whether the middle pickets overlap as in mistake 2 of section 4, then undo withCtrl+Z.
Common mistakes and fixes
| Symptom | Cause | Fix |
|---|---|---|
| There are two more pickets than expected | "6 to the right" was read as the original plus 6 | Set Array Count to 6. Write the total, such as "12 in all," in the question |
| One picket seems to be missing | The Mirror origin is in the middle of a picket, so two overlap | Move the origin to the world origin or use Mirror Object |
| The bevel is round in one direction only | Scale is not applied | Ctrl+A > Scale |
| Changing Count does not change the shape | The AI applied the modifiers | Add "do not apply" to the question and ask again. Saving before makes it easy to go back |
| An Array panel added by hand looks different from the image | The new Array (nodes) was chosen | Add Modifier > Generate > Array (Legacy) |
| The rounded corners are hard to see | Bevel Amount is small for the picket size | Raise Amount a little at a time |
Summary
Ask "do not apply, just stack" → read the answer to the last line → check count, scale, and origin on screen and in numbers → refine with panel numbers. In the next guide, Letting AI set up lights and materials, you hand three-point lighting and PBR materials to AI the same way.
Further reading
- Choosing an AI tool for Blender MCP
- Ten first prompts for Blender MCP
- What is a modifier?
- Every Blender modifier in one list (series hub)
- Trying the 26 tools of the official Blender MCP
- Building a low-poly room with Blender MCP
References
- Blender 5.2 Manual, Modifiers Introduction: https://docs.blender.org/manual/en/5.2/modeling/modifiers/introduction.html
- Blender 5.2 Manual, Mirror Modifier: https://docs.blender.org/manual/en/5.2/modeling/modifiers/generate/mirror.html
- Blender 5.2 Manual, Bevel Modifier: https://docs.blender.org/manual/en/5.2/modeling/modifiers/generate/bevel.html
- Blender 5.2 Manual, Array (Legacy) Modifier: https://docs.blender.org/manual/en/5.2/modeling/modifiers/generate/array_legacy.html
- Blender Lab, MCP Server: https://www.blender.org/lab/mcp-server/
- Shortcuts: apply scale
Ctrl+A> Scale, Edit ModeTab, select allA, moveG - Images: real Blender 5.2.1 screens