Cleaning up an AI-generated 3D model in Blender: merge split points, set the size, reduce faces
Import a fighter-jet model GLB made with Meshy into Blender 5.2, read its state from the statistics, merge split points with Merge by Distance, tidy normals and smooth shading, set the size, and cut the face count to one tenth with Decimate.
한국어English
Based on: Blender 5.2 LTS (screenshots from 5.2.1, English interface, default shortcuts), EEVEE render engine. Checked in November 2026. The pictures are real Blender screenshots and EEVEE renders. Only the left side of Figure 1 is an AI-made input picture. The red numbers and boxes were added to explain them.
Give an AI 3D generator one picture and a 3D model comes out in a minute or two. But when you bring that file into Blender, it is often hard to use right away. It has hundreds of thousands of faces, the size is random, and what looks like one piece may be split into thousands of pieces inside.
In this guide you import a fighter-jet model made earlier with Meshy and clean it up in Blender. The input picture and the cleaned result are in Figure 1. How the model was made is in 3D printing from one picture with Meshy AI and Claude Code. This guide covers what to do after it is made.
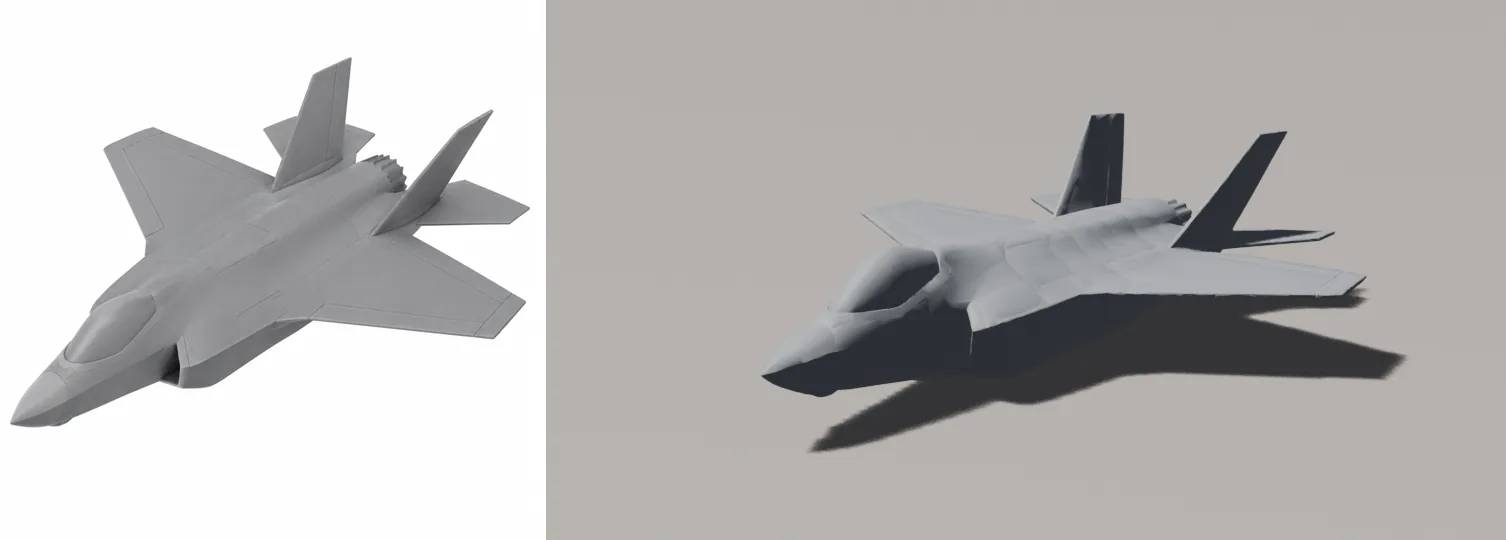 Figure 1. Left, the input picture given to Meshy. Right, the model cleaned up with the steps in this guide (left AI-generated image, right Blender render)
By the end of this guide you will be able to:
- Import a GLB file and read its state from the statistics and size.
- Merge split points with Merge by Distance.
- Clear custom normals and tidy shading with Shade Auto Smooth.
- Set the size and place the model on the floor.
- Reduce the face count with the Decimate modifier.
1. Import and read the state
Start state: Start from a new file (File > New > General) with the default cube deleted (X > Delete).
Steps:
- Choose File > Import > glTF 2.0 (.glb/.gltf) and open the
.glbfile from the AI tool. GLB is a 3D format that stores shape, materials and texture pictures in one file. - Click the arrow next to Viewport Overlays at the top right of the 3D Viewport and turn on Statistics. Point, edge and face counts appear at the top left.
- Select the imported object and press
Nto open the sidebar. Check the size under Dimensions in the Item tab.
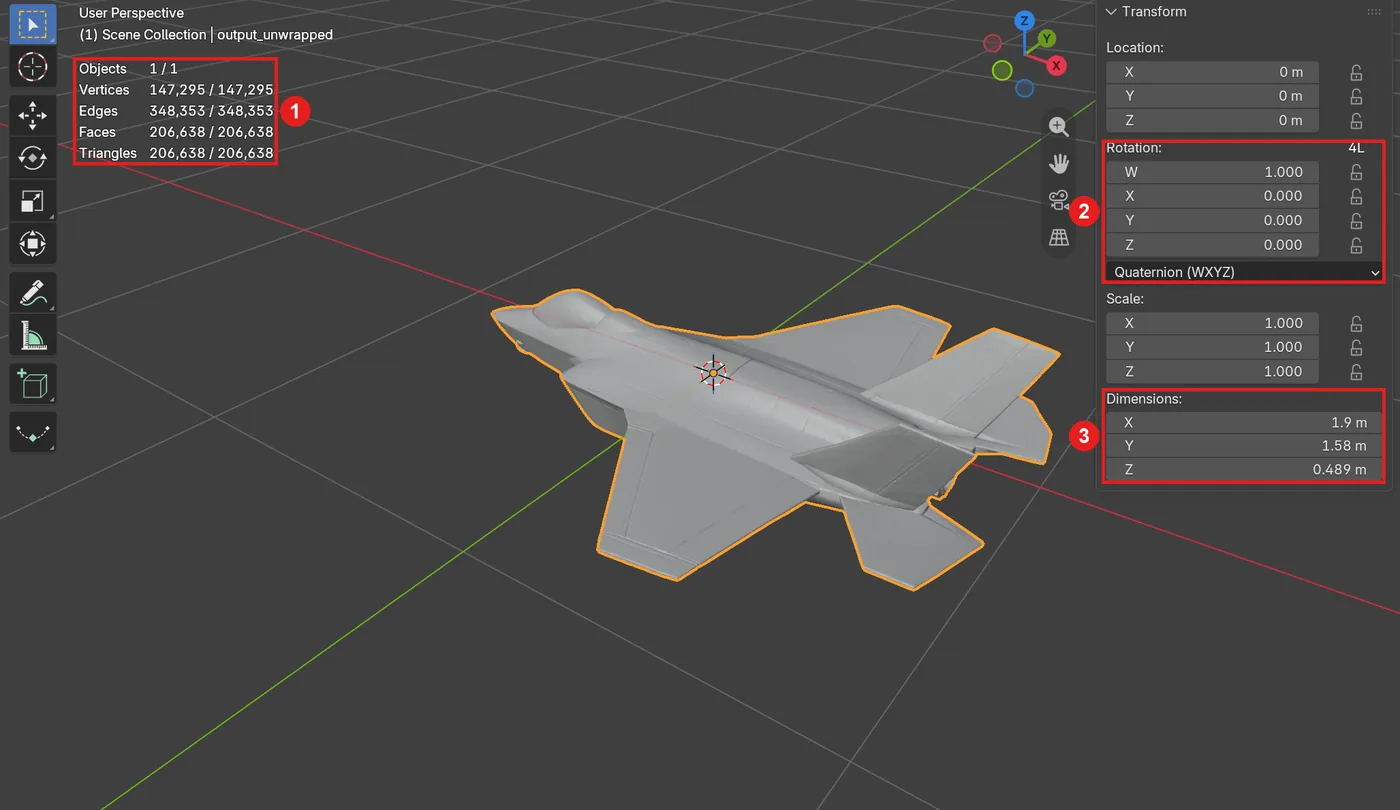 Figure 2. Right after import. ① 147,295 points and 206,638 faces ② Rotation in four fields (Quaternion) ③ Size 1.9 m (Blender screenshot)
Read three things from Figure 2.
- There are more than 200,000 faces. This model was requested with 200,000 triangles. That is fine for 3D printing but heavy for games or scenes with many copies.
- It is 1.9 m long. The AI tool does not know the real size, so it exports a rough size. For a toy model you need to set the size.
- Rotation has four fields, W, X, Y and Z. Importing a glTF file sets the rotation mode to Quaternion. If you need to type rotation values, switch the list below to XYZ Euler to get the familiar three fields.
2. Find split points
Start state: Continue from the model in the previous section.
Steps:
- Press
Tabfor Edit Mode and2for edge select mode. - Press
Alt+Ato deselect, then choose Select > Select All by Trait > Non Manifold.
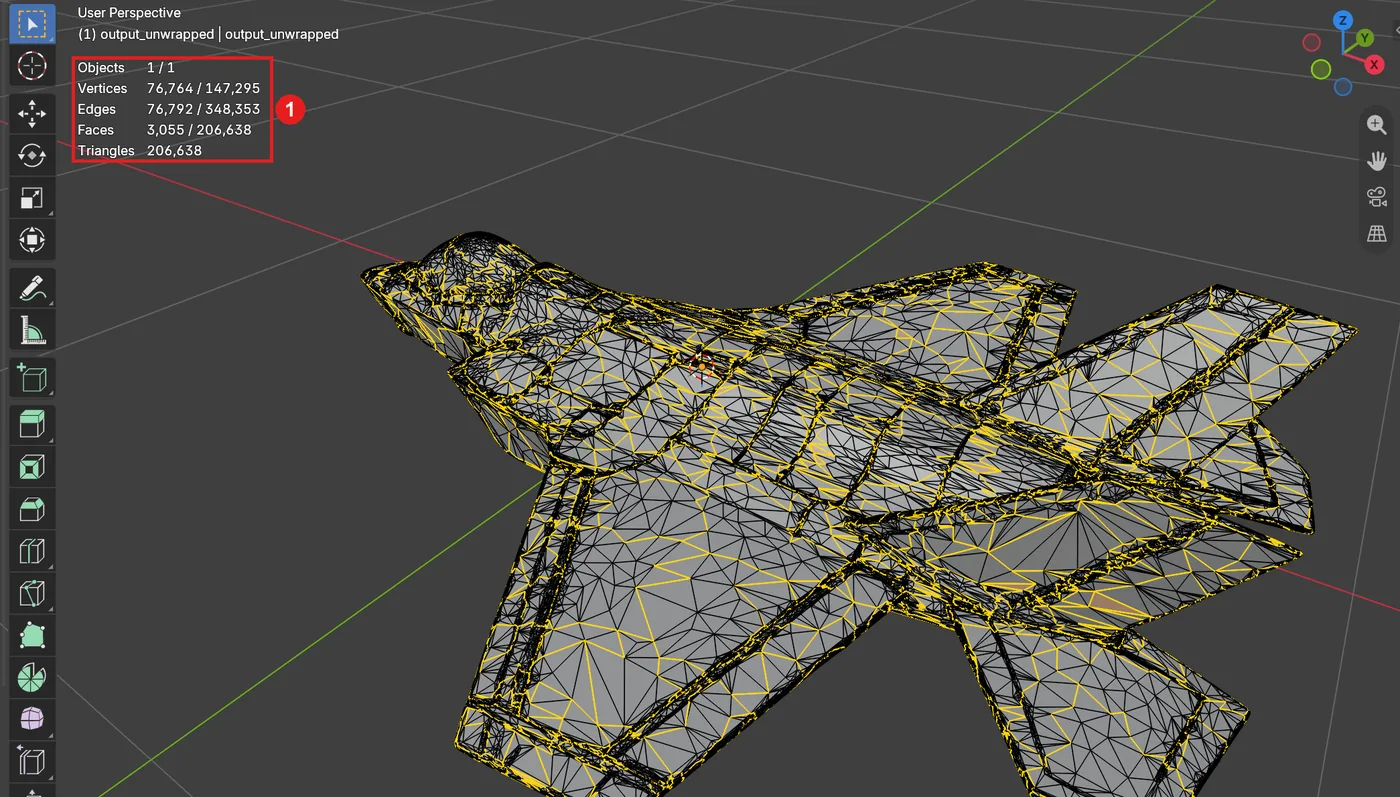 Figure 3. Edges selected by Non Manifold. ① 76,792 edges selected (Blender screenshot)
More than 70,000 edges are selected. It looks like one piece but is actually split into thousands of pieces. On this model there were 5,583 loose pieces. Where pieces meet, there are two copies of points at the same position.
This happens because a GLB stores information such as the texture position (UV) together with each point. Along the edges of texture pieces, the same spot is saved as two separate points. It is like taking a puzzle apart and storing each piece in its own box. It looks fine, but as Figure 3 shows, a 3D printing check catches every piece edge as an open gap. Merging first, before reducing faces later, lets you treat the model as one piece.
3. Merge with Merge by Distance
Start state: Continue in Edit Mode from the previous section.
Steps:
- Press
Ato select everything. - Press
M> By Distance. In the menus it is Mesh > Clean Up > Merge by Distance. - In the panel at the bottom left, check that Merge Distance is the default
0.0001 m. Points closer than this are merged into one. - Press
Alt+Aand select Non Manifold again.
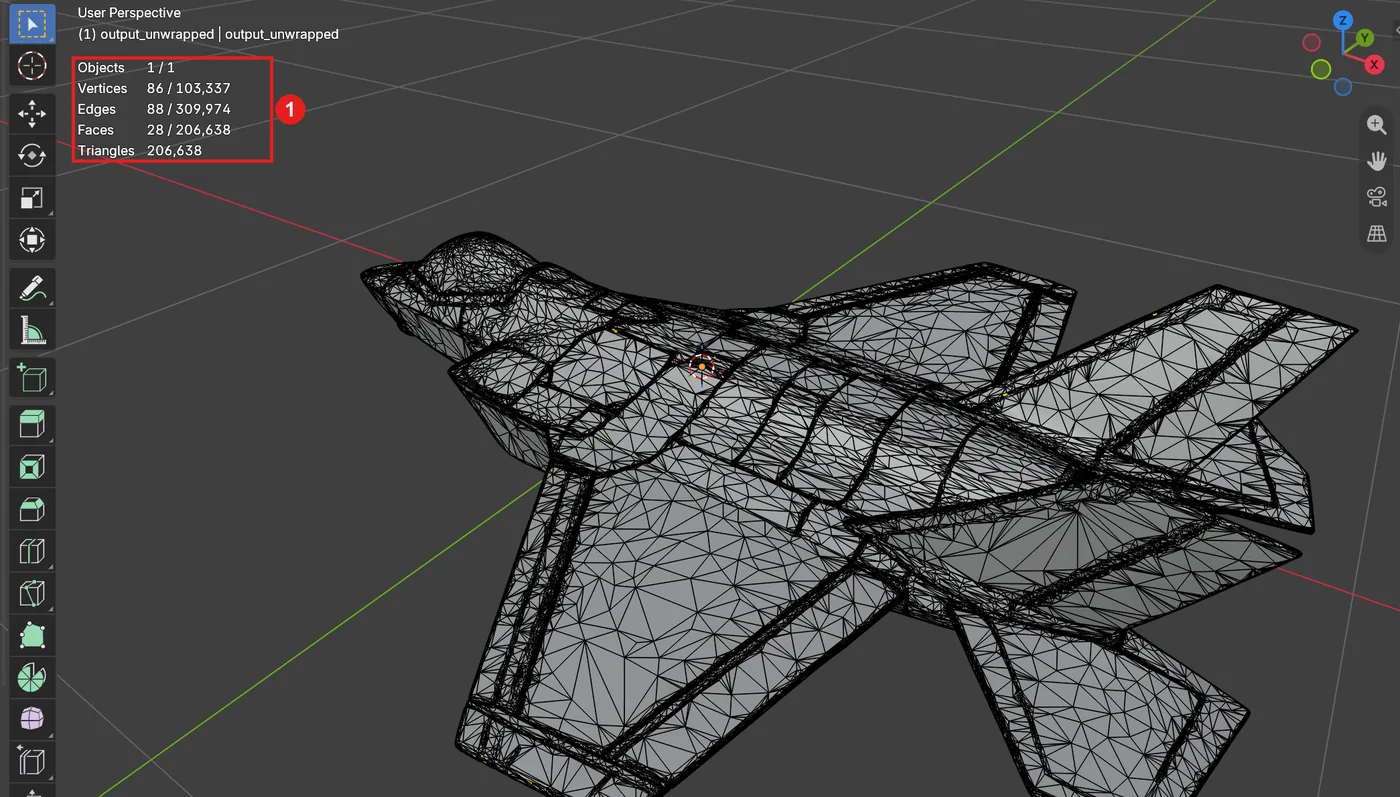 Figure 4. After merging. ① Points drop to 103,337 and 88 edges are selected (Blender screenshot)
The point count went from 147,295 to 103,337. The 43,958 doubled points were merged. The face count stays the same, so the shape does not change. The edges selected by Non Manifold dropped from 76,792 to 88.
The remaining 88 are real gaps or tangled edges. For rendering or games you can usually leave them. If you will 3D print the model, finish the job with the steps in Checking a model before 3D printing.
Note that the glTF import window has a Merge Vertices option on the right (off by default). It is an option that merges points at the same position. In this guide the merge was done after import so you can see the difference.
4. Tidy normals and shading
A GLB often contains custom normals, which store in advance the direction each face catches light. Think of it as a pre-made shading map. After merging points this data may no longer match the new shape, so clear it and let Blender work it out again.
Start state: Continue from the model in the previous section.
Steps:
- Press
Tabto return to Object Mode. - Open the Data tab (green triangle icon) in the Properties editor. In the Geometry Data panel, click Clear Custom Normals Data.
- In the 3D Viewport menu, choose Object > Shade Auto Smooth. A Smooth by Angle modifier appears in the Modifier tab with Angle
30°.
Shade Auto Smooth shades bends gentler than 30° smoothly and keeps sharp bends, such as wing tips, crisp. That suits machine models that mix curves and edges.
5. Set the size and put it on the floor
Start state: Continue from the model in the previous section.
Make this model about 19 cm long, the size of a desk toy. That is one tenth of 1.9 m, so the scale is 0.1.
Steps:
- Hover the mouse over the 3D Viewport and press
S→0.1→Enter. - Choose
Ctrl+A> Scale. Scale in the sidebar goes back to1.000and the smaller size is baked into the shape. Without this step, the size can go wrong in modifiers and export later. - Check that Dimensions X is about
190.3 mmin the sidebar. If the display unit is meters, it shows0.19 m. - This model has its center at the origin, so half of it is below the floor. Put half of the height (Dimensions Z) into Location Z to lift it onto the floor. The example uses
0.0245 m.
You could also type 0.19 straight into Dimensions X. But that shrinks only the X direction and the model gets thin. To shrink all three directions together, the S scale is safer.
6. Reduce faces with Decimate
Decimate is a modifier that reduces the face count without changing the shape much. It merges many small faces into larger ones, a bit like lowering a photo's resolution.
Start state: Continue from the model in the previous section.
Steps:
- In the Modifier tab, add Add Modifier > Generate > Decimate.
- Check that the mode is Collapse and set Ratio to
0.1(② in Figure 5). This keeps 10% of the faces. - Read Face Count at the bottom of the panel (③ in Figure 5). The example shows
20,663.
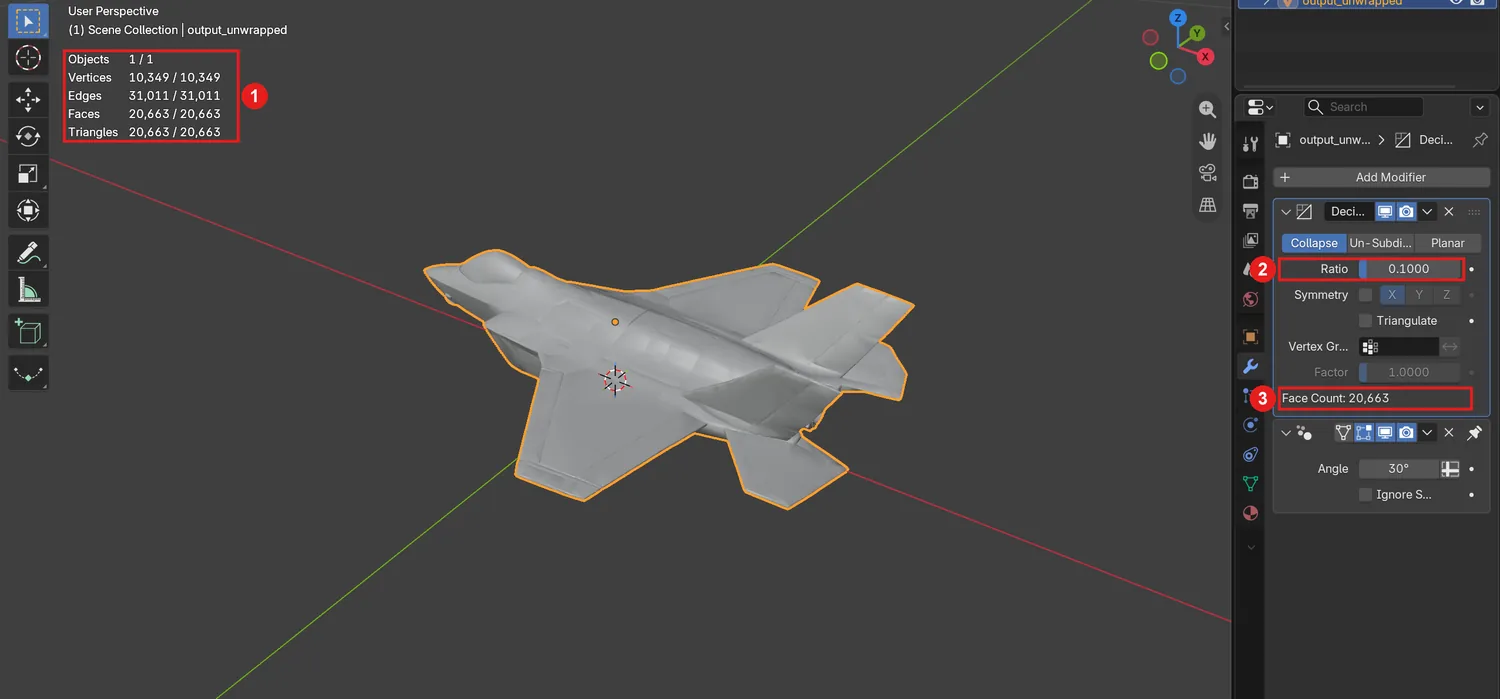 Figure 5. Decimate settings. ① 10,349 points and 20,663 faces ② Ratio 0.1 ③ Face Count (Blender screenshot)
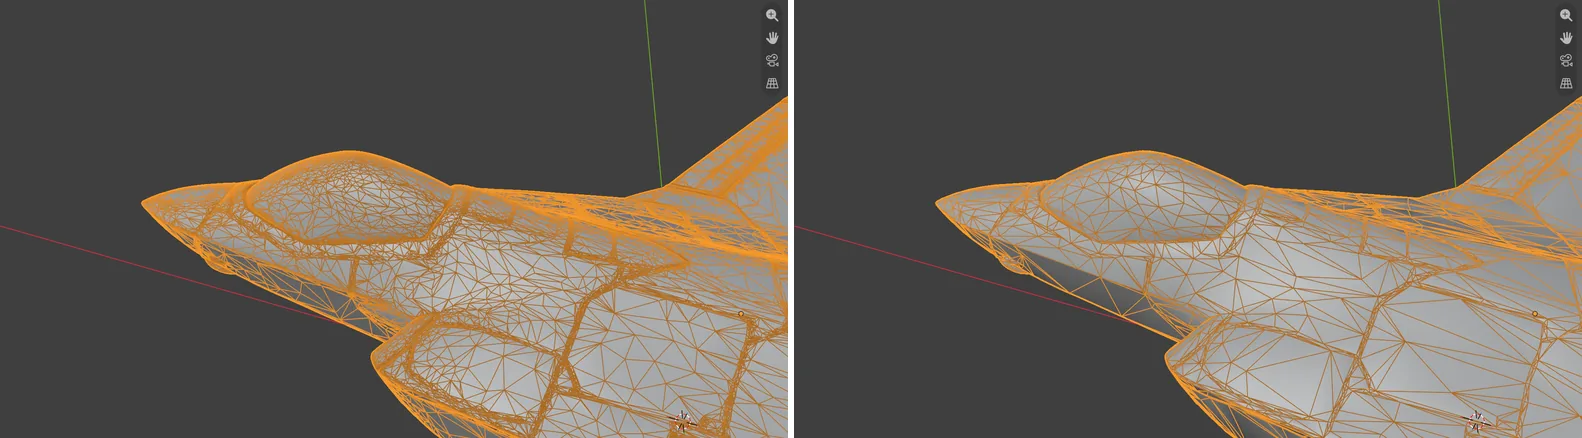 Figure 6. Wireframe comparison. Left, before (206,638 faces). Right, Ratio 0.1 (20,663 faces) (Blender screenshot)
As Figure 6 shows, the lines are far sparser but the nose, cockpit and wings keep their shape. Turn on Wireframe in Viewport Overlays to see the lines. Toggle the monitor icon next to the modifier name to compare before and after.
A modifier only previews the result and keeps the original shape. When exporting, turn on the option that applies modifiers in the export window (Apply Modifiers for glTF), or bake it with the arrow next to Decimate > Apply. How much to reduce depends on the use. Keep more faces on a hero model seen up close for a long time, and fewer on background props placed far away in large numbers.
7. Render the cleaned model
Start state: Continue from the model in the previous section.
Steps:
- Click New in the Material tab and set Base Color to grey. This model was made without a texture, so it had no material from the start.
- Add a floor plane (
Shift+A> Mesh > Plane). You can switch the default light of the new file to Sun in the Light tab. - Rotate and zoom the 3D Viewport so it looks down at the front of the model at an angle, as in Figure 7, then move the camera to that view with View > Align View > Align Active Camera to View (
Ctrl+Alt+numpad0). - Check that Render Engine in the Render tab is EEVEE and press
F12.
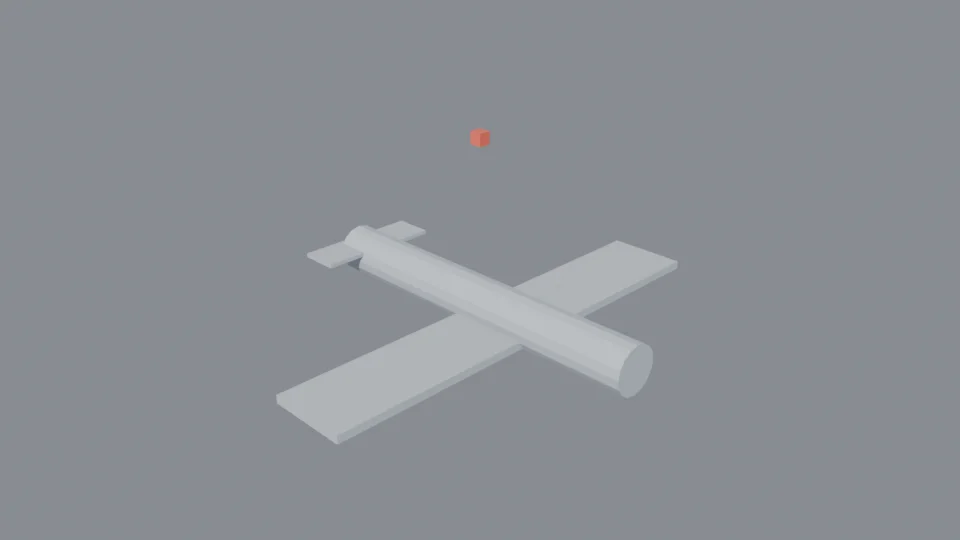
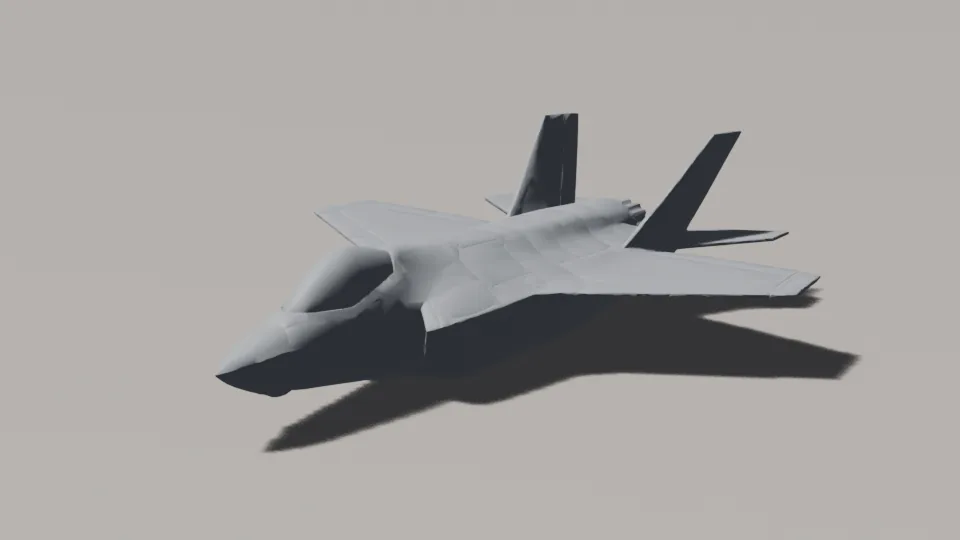 Figure 7. The cleaned model (20,663 faces) rendered with EEVEE (Blender render)
Practice
- Change the Decimate Ratio to
0.05and0.02. Write down at which value the wing tips start to melt. - On a freshly imported model, add Decimate before Merge by Distance and see what changes.
- Raise the Angle of Smooth by Angle to
60°and see which edges become smooth. - Export the cleaned model with File > Export > glTF 2.0. Save it so you can reuse it in other scenes.
Common mistakes and fixes
| Symptom | Cause | Fix |
|---|---|---|
| The model is far too big or small | The AI tool exports a random size | Scale with S, then Ctrl+A > Scale |
| A Smooth by Angle modifier appeared that I did not add | Shade Auto Smooth added it | Normal. Use Angle to set how much is shaded smoothly |
| Typing into Dimensions made the model thin | Only one direction changed | Undo with Ctrl+Z and use the S scale for all three directions |
| Four rotation fields are hard to use | glTF imports as Quaternion | Switch the rotation mode list to XYZ Euler |
| The exported file still has all the faces | The modifier was not applied | Turn on applying modifiers in export, or Apply |
| Non Manifold still selects edges after Merge by Distance | There are real gaps | Leave them for rendering, fix them with the checking guide for printing |
Summary
After import, read Statistics and Dimensions, merge split points with Merge by Distance, clear custom normals and use Shade Auto Smooth, set the size with S and Ctrl+A, and reduce faces with Decimate.
References
- Blender 5.2 manual, glTF 2.0 import and export: https://docs.blender.org/manual/en/5.2/addons/import_export/scene_gltf2.html
- Blender 5.2 manual, Merge (Merge by Distance): https://docs.blender.org/manual/en/5.2/modeling/meshes/editing/mesh/merge.html
- Blender 5.2 manual, Decimate modifier: https://docs.blender.org/manual/en/5.2/modeling/modifiers/generate/decimate.html
- Blender 5.2 manual, object shading (Shade Auto Smooth): https://docs.blender.org/manual/en/5.2/scene_layout/object/editing/shading.html
- Shortcuts: Edit Mode
Tab, edge select2, select allA, deselectAlt+A, merge menuM, scaleS, apply transformsCtrl+A, sidebarN, renderF12 - Pictures: real Blender 5.2.1 screenshots and EEVEE renders. The model was made with Meshy, and the left side of Figure 1 is its input picture (AI-generated image)