Three ways to make a 3D character with AI: an image-to-3D generator (Meshy), a Claude Code script, and modeling by hand
We built the same witch design once with an image-to-3D generator (Meshy) and once with a Blender script written by Claude Code, rendered both under the same conditions, and compared them. Then we sum up the strengths and weaknesses of all three ways, including modeling by hand, and how to choose by goal.
한국어English
ON THIS PAGE
- 011. The three ways at a glance
- 022. Same design, two results
- 033. The image-to-3D generator: fast, but a hardened clay sculpture
- 044. The Claude Code script: easy-to-change LEGO
- 055. Modeling by hand: slowest, but the most freedom
- 066. Choosing by goal
- 07Practice
- 08Common mistakes and fixes
- 09In one line
- 10Read next
- 11References
Based on: an image-to-3D result from Meshy (a model made in October 2026), Claude Code + Blender 5.2, and the official Blender 5.2 manual. Images are Blender renders of two models under the same conditions (front view, orthographic camera), and a sheet comparing concept art with a model. The concept art is AI-generated.
"Making a 3D character with Claude" actually mixes several different ways of working. You can use a generator that turns one picture into a 3D model, you can have Claude Code write a Blender script that assembles the model, or you can model it yourself in Blender. The three differ in time, in the shapes they produce, and in how you fix things later.
We built the same witch design once each with the first two ways. This post renders both results under the same conditions to compare them, then explains the strengths and weaknesses of all three ways, including modeling by hand, and how to choose by goal.
1. The three ways at a glance
| Compare | Image-to-3D generator (Meshy and others) | Claude Code script | Modeling by hand |
|---|---|---|---|
| How | Upload a picture and the AI makes the 3D shape and colour | Claude Code writes a Blender Python script and Blender runs it | A person works with points, edges and faces in Blender |
| Output | One dense lump of mesh | Light meshes, one per part | Whatever the modeler decides |
| Time to the first result | Fastest | Medium (several rounds to match the picture) | Slowest (depends on skill) |
| Fixing later | Hard (generate again) | Change one number and run again | Free |
| Making it move (rig) | Use the generator's auto-rig; adding your own is hard | The script builds bones and motions too | Add bones and paint weights yourself |
| What it costs | Generation credits | AI usage fees, the price of one picture | Time and practice |
A mesh is a 3D shape made of points, edges and faces. A rig is the skeleton and controls inside the model, like the wire frame inside a puppet. You need it to raise an arm or walk.
2. Same design, two results
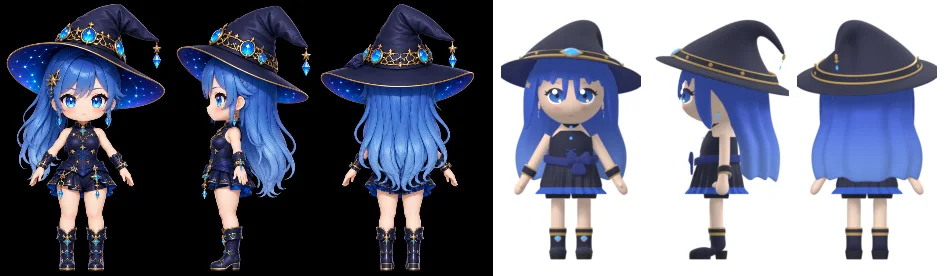
First, the two results side by side. On the left is a model made by putting a full-size witch picture into Meshy's image-to-3D feature. On the right is a chibi witch concept, based on the same witch picture and a chibi character picture, assembled by a script that Claude Code wrote.
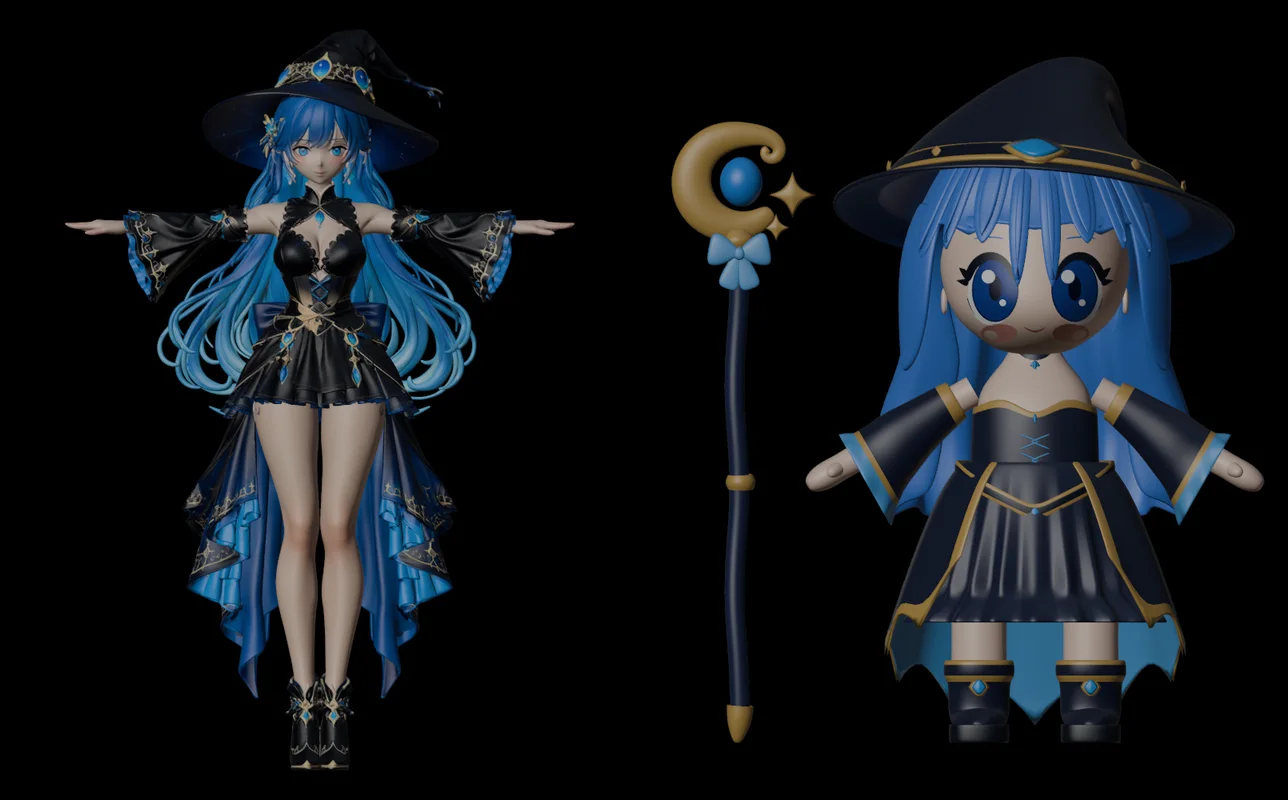 Left, the model made with Meshy (Made with Meshy). Right, the model made with a Claude Code script. Both rendered from the front under the same conditions (Blender render)
On the surface, the left one is far more detailed. Hair strands, skirt folds and ornaments are all there. The difference shows when you look inside. The image below renders the same two models with a different colour for each object. One object gets one colour.
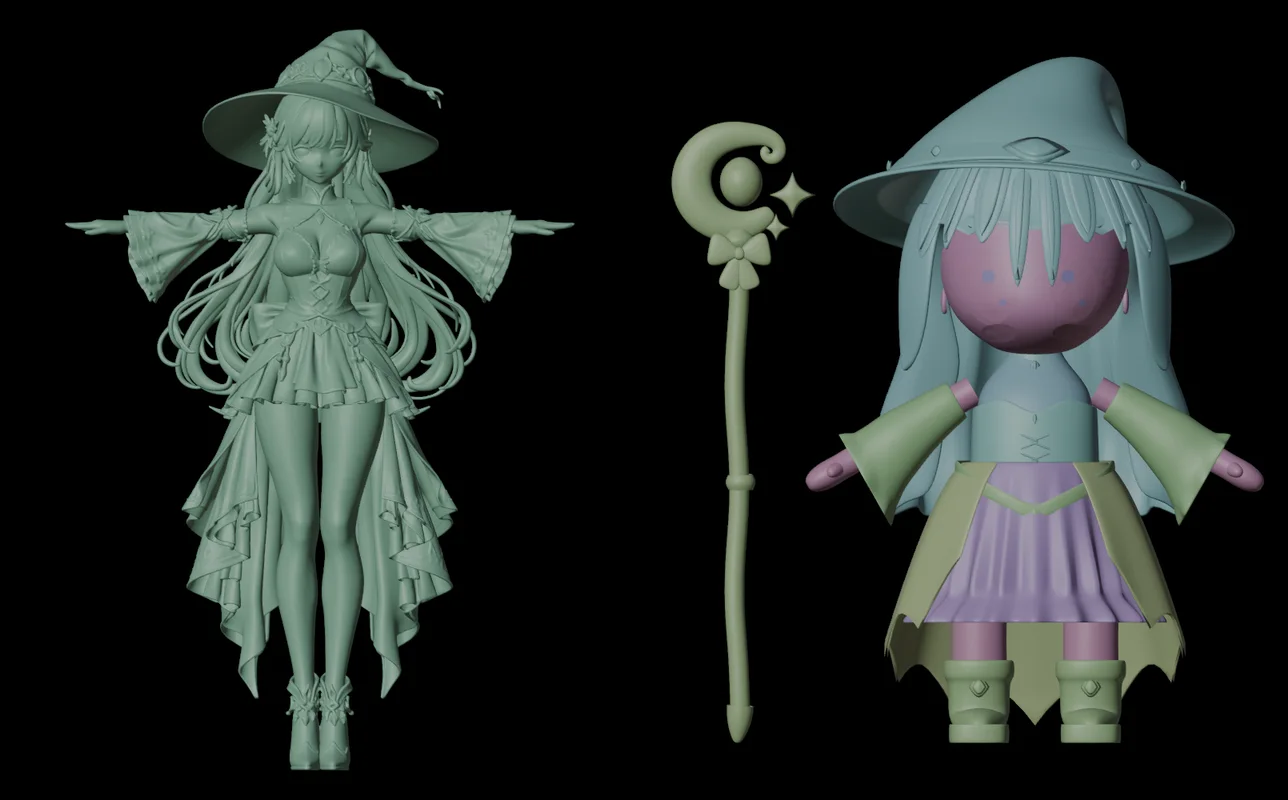 Coloured by object. The left (Made with Meshy) is one lump, so it has one colour. The right has 15 parts, each in its own colour (Blender render)
These values were measured while writing this post, by opening both files with the same script.
| Measured | Meshy model | Script model |
|---|---|---|
| Objects (parts) | 1 | 15 |
| Points | 1,452,461 | 2,694 (before smoothing), 94,009 (after) |
| Faces | 2,906,130 | 92,640 (after smoothing) |
| Materials | 1 | 27 |
The script model has only 2,694 points, light enough to handle by hand, with a Subdivision Surface modifier on top to make it look smooth. A modifier is an effect layered on top without changing the original shape, like a photo filter. So when you fix it, you only touch 2,694 points. In the Meshy model, all 1.45 million points are real points.
3. The image-to-3D generator: fast, but a hardened clay sculpture
An image-to-3D generator takes one picture (or a few, front and side) and returns a coloured 3D model in a few minutes. The result is like a clay sculpture that has already hardened. It looks finished, but if you want to change one arm, there is nothing to pull off.
Strengths
- It gives the fastest and most detailed first result.
- It suits jobs that end with one standing figure. In another project we printed a Meshy model on a 3D printer. That process is in 3D printing from one picture with Meshy AI and Claude Code.
Weaknesses (our records)
- You cannot even change the skirt length on its own. The body, clothes and hair are one lump. The only option is to generate again.
- It is too heavy to add your own bones. We reduced the witch model above with a Decimate modifier and then added bones. When the arms moved, the sleeves flicked out, the hair stretched, the high heels collapsed, and no facial expressions were possible. Fixing it looked like it would take several more days, so we stopped. How to reduce a model is in Cleaning up an AI-generated 3D model in Blender.
- The bones the generator provided were usable. On another Meshy character, copying the bones and weights Meshy made with it (weights decide which bone each point follows) gave a working rig in about 2 seconds. We attached three motions to that rig: a light idle, a jog and a thrust. In contrast, having an auto-rig tool calculate the weights from scratch on the same character took 3 hours 17 minutes (and at the time the joints were also out of line with the mesh, so the result was unusable). For a character that needs to move, take the generator's auto-rig output.
4. The Claude Code script: easy-to-change LEGO
In this way, you tell Claude Code "write a Blender script that builds a character like this picture." Nobody models with the mouse. The script reads numbers such as height, skirt length and sleeve width from one file (character.json) and assembles the parts one by one. The result is like LEGO. You can pull out just the skirt block and swap it.
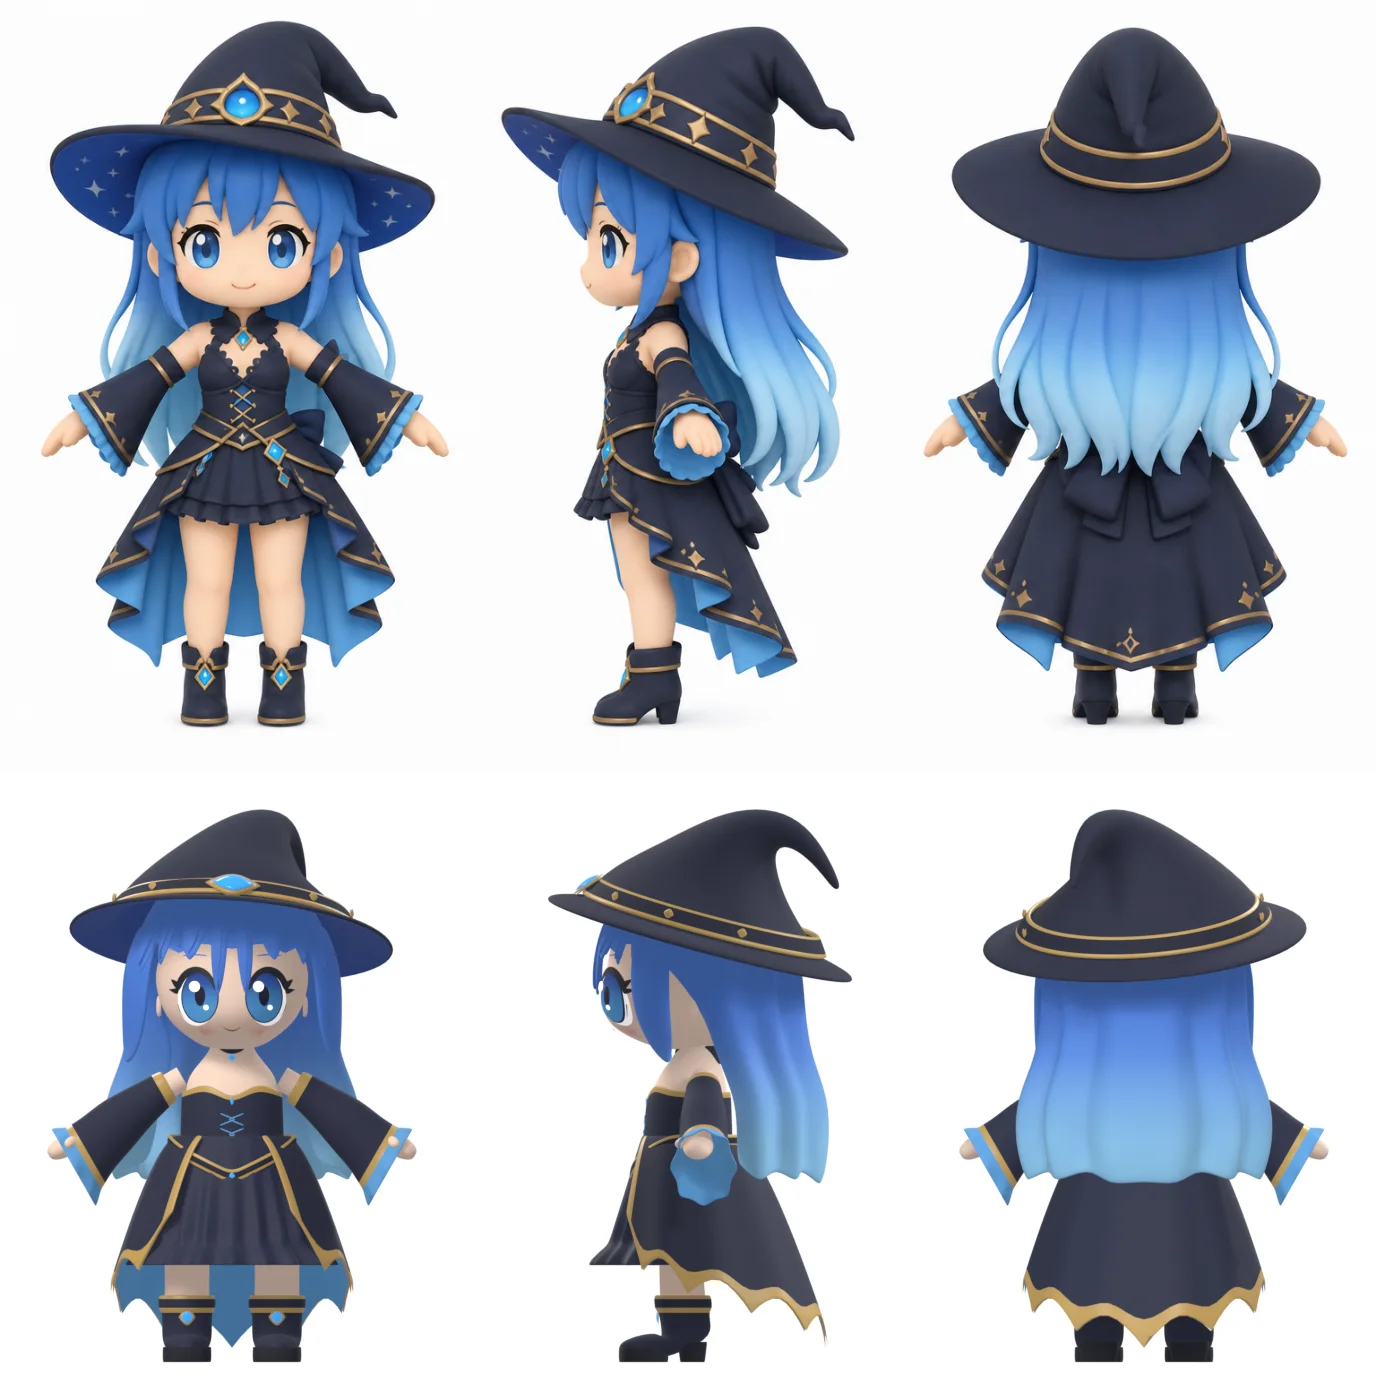 Top row, the concept art (AI-generated illustration). Bottom row, the model made with a Claude Code script (Blender render)
Strengths (our records)
- Change one number and run it again. For an earlier test character, rebuilding the model, rig and motions took about 10 seconds.
- Bones and motions come along. This witch has motions such as waving, bowing, swinging the staff, walking and running, each saved separately and pulled out for each scene. Each motion is saved as one unit called an Action.
- Little of it costs money. Generation credits were spent only on the concept art. This witch's concept art was one image made with Meshy's image feature, for 12 credits. The later steps are script runs, so they cost zero generation credits. Claude Code's own usage fee depends on your plan.
Weaknesses (our records)
- Matching the picture takes many rounds. For the test character, we laid the outlines of the picture and the model over each other and reached a little over 87% on the front, side and back on the 22nd comparison.
- Shapes the script does not know cannot be made with numbers. Shapes missing from the template, such as a tall hat with a bent tip or hair falling to one side, stayed different from the picture however much we changed the values. That story is in Making a 3D character that matches its art.
- Quality has to be judged separately. We had a review agent, separate from the one that built it, score the work. This witch scored 7.2 for the model and 7.3 for the rig, below our target of 8. The shape of the gripping hand and the knee poking through the skirt while running were still unsolved.
The full steps and prompts are in the four-part series starting with Making a 3D character with Claude Code, part 1.
5. Modeling by hand: slowest, but the most freedom
The third way is building it yourself in Blender. We did not make the witch this way for this comparison. So we do not compare times here and only describe the method and its nature.
- In Edit Mode, you move and extend points, edges and faces to build the shape. Start with Blender beginner chapter 6: Edit Mode.
- Characters are usually built as one half, with a Mirror modifier filling in the other half (Mirror modifier). Subdivision Surface on top smooths it (Subdivision Surface modifier). The script model uses the same structure.
- Adding bones and painting weights is also done by hand (Blender rigging basics).
The value of modeling by hand is that you can put every point exactly where you want. A hat shape the script does not know, or fingers the generator smudged, you simply build. The cost is practice time. In practice it gets mixed with the other two ways: fixing one part of a script model in Edit Mode, or keeping a generator result next to you as a reference shape and modeling over it.
6. Choosing by goal
| What you want | Best way | Why |
|---|---|---|
| One standing figure, 3D printing | Image-to-3D generator | Fastest and most detailed. It does not need to move |
| One short dance or motion clip | Generator + the generator's auto-rig | No need to add bones yourself |
| A series character whose clothes and proportions change often | Claude Code script | Fix with numbers and rerun; save motions and reuse them |
| A unique design that must match the art exactly | Modeling by hand (or script + hand fixes) | You can build shapes no template has |
| Learning Blender | Modeling by hand | You learn the principles with your hands |
Practice
- Open any 3D model in Blender and turn on Statistics in the Viewport Overlays menu at the top right of the 3D Viewport. The object count and point count appear at the top left. Write them down like the table above.
- Look at the same model's Outliner and check whether the body, clothes and hair are separate objects. If it is one lump, write down what you would need to do to change the skirt length.
- Pick the row in the section 6 table that fits the character you want to make, and write one line on why.
Common mistakes and fixes
| Symptom | Cause | Fix |
|---|---|---|
| You want to change only the clothes of a generated character, but cannot | The body, clothes and hair are one lump | Generate again, or for characters you will change, use a way that splits parts from the start |
| Blender slows down when you open a generated model | It has over a million points | Reduce it with Decimate (Cleaning up an AI model) |
| Sleeves and hair stretch after adding bones to a generated model | Weights were recalculated on a dense single lump | Use the rig and weights the generator gave you |
| The script model does not look like the picture | The proportion numbers are off, or the shape is not in the template | Overlay the outlines to measure, and have missing shapes built as new parts |
| Fixes you made by hand disappeared after the script ran | The script rebuilt that part | Ask for hand-edited parts to be marked so they are not rebuilt |
In one line
One fast result = generator, a character you will change and animate = Claude Code script, full control to the end = modeling by hand. The next post covers the hardest part of the script way, "making it match the picture", together with the record of where it did not.
Read next
- Making a 3D character with Claude Code, part 1: from one drawing to an easy-to-edit model
- Making a 3D character that matches its art: measuring a turnaround, and the record of where it did not match
- 3D printing from one picture with Meshy AI and Claude Code
- Cleaning up an AI-generated 3D model in Blender
- Retargeting Mixamo animations with Auto-Rig Pro Remap
References
- Blender 5.2 Manual: Decimate Modifier
- Blender 5.2 Manual: Subdivision Surface Modifier
- Blender 5.2 Manual: Mirror Modifier
- Blender 5.2 Manual: Skinning (Armatures)
- Blender 5.2 Manual: Viewport Overlays (Statistics)
- Blender Lab: MCP Server
- Image license: images 1 and 2 are Blender renders of two models made by AZTechnology. The left model was generated with Meshy (Made with Meshy, following the Meshy attribution required under CC BY 4.0). In image 3, the top row is AI-generated concept art and the bottom row is a Blender render.