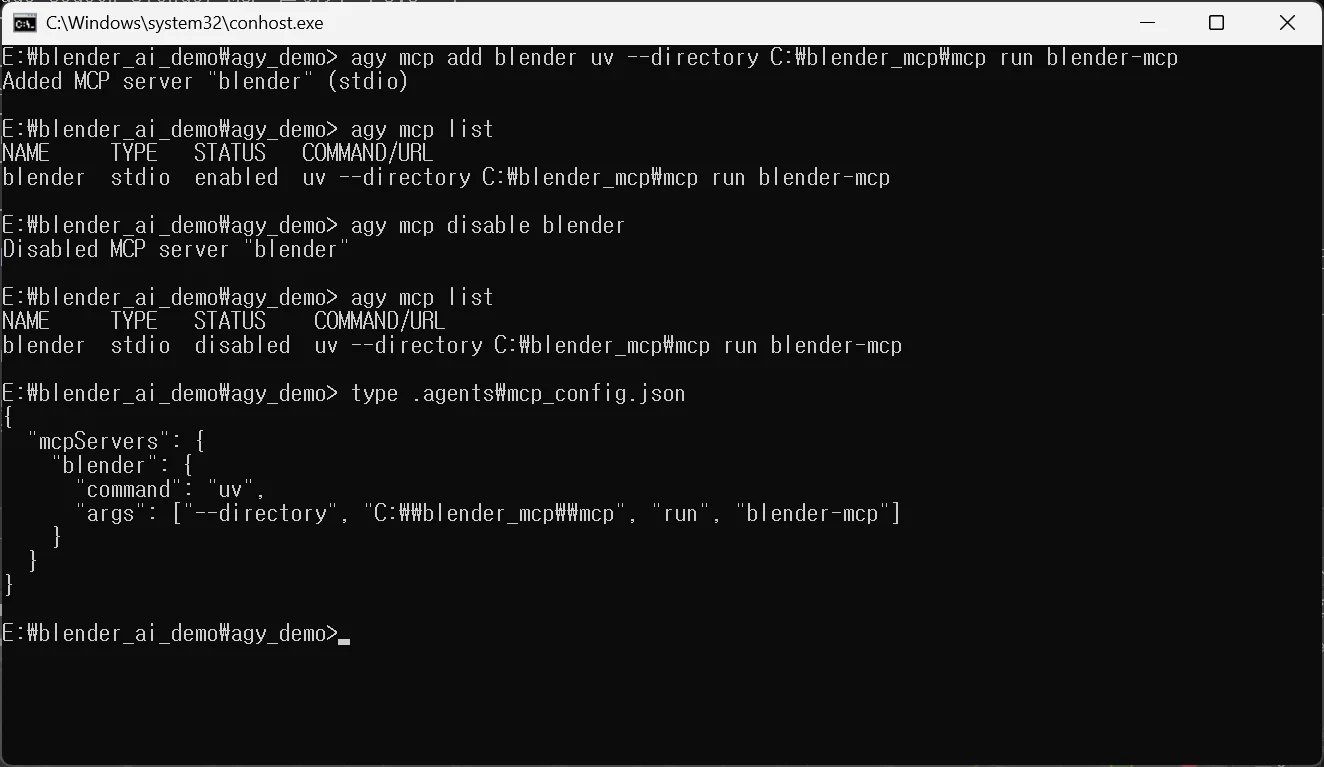
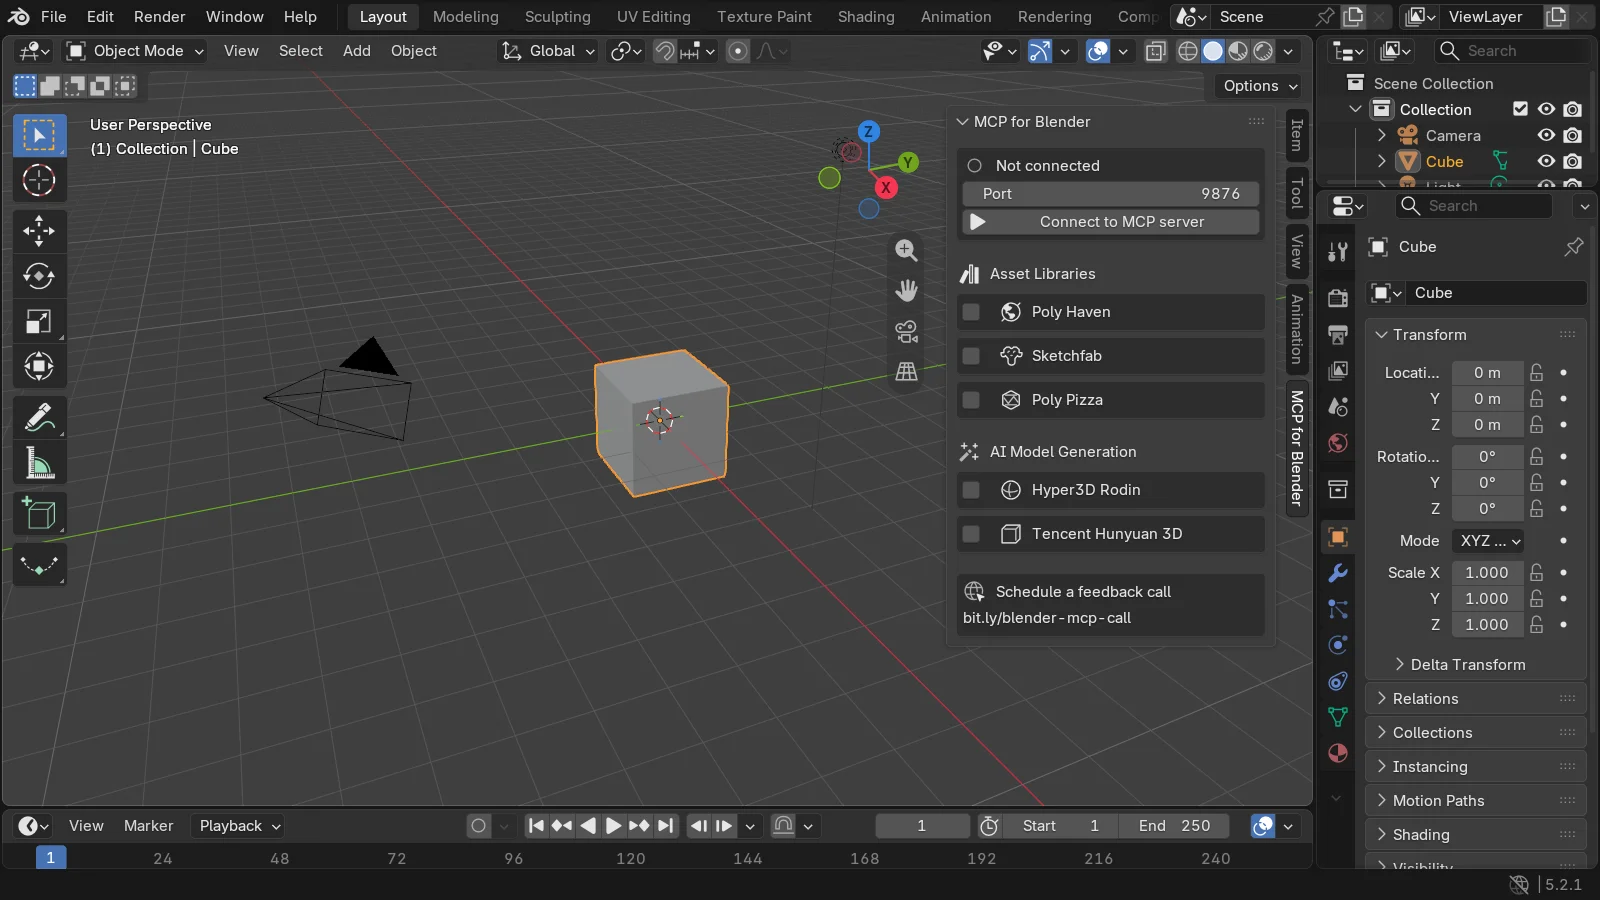
Working in Blender with Codex and GPT-6 Astra: connecting the official MCP step by step
Based on the official documentation, this guide shows how to register the official Blender MCP server in Codex, OpenAI's coding agent, and how to inspect and edit a Blender scene with a model such as GPT-6 Astra.
한국어English
ON THIS PAGE
- 01Three names: Codex, GPT-6 Astra, and MCP
- 02What you need
- 03Step 1: check that the door on the Blender side is open
- 04Step 2: get the MCP server
- 05Step 3: register Blender MCP in Codex
- 06Step 4: choose a model
- 07Step 5: keep the first task small, in three parts
- 08Approvals and safety
- 09How it compares with Claude Code
- 10Common mistakes and fixes
- 11In one line
- 12Read next
- 13References
Based on: the OpenAI Codex official documentation (MCP connections, models), the OpenAI API model documentation (GPT-6 Astra), and Blender Lab's Blender MCP Server page and repository description (add-on 1.0.3, Blender 5.2). Checked in October 2026. This guide was written from the official documentation, without installing and testing Codex. All pictures are real Blender screens, and there are no Codex screenshots. The Blender pictures were taken with a different MCP app (Claude Code) connected to the same official MCP server.
If the Blender side is already set up, the Codex side takes one paragraph of settings. Blender Lab, an experimental group inside the Blender project, made an official MCP server, and Codex has its own command for registering MCP servers. Once registered, you can hand Codex work in plain words such as "Summarize the open Blender scene" or "Tidy up the object names."
GPT-6 Astra is one of the models Codex can use for that work. Astra has no special Blender features. What connects it to Blender is MCP. So this guide centers on "how to register Blender MCP in Codex," and treats choosing a model as an extra choice on top.
By the end of this guide you will be able to:
- Tell apart the roles of Codex, GPT-6 Astra, and MCP.
- Check that the official MCP add-on is on in Blender.
- Register the Blender MCP server with the
codex mcp addcommand or one paragraph inconfig.toml. - Hand over a first task in small pieces (scene summary, renaming, thumbnail) and check the results with your own eyes.
Three names: Codex, GPT-6 Astra, and MCP
Three names can be confusing at first. Compared to a restaurant, they split up easily.
| Name | What it does | Restaurant comparison |
|---|---|---|
| Codex | OpenAI's coding agent. It reads and writes files in the terminal (command window), runs commands, and calls tools | The manager who takes orders and divides the work |
| GPT-6 Astra | One of the OpenAI models Codex can choose. The OpenAI API model documentation introduces it as the most capable model for the most demanding work | The cook the manager calls in |
| MCP | An open standard that connects AI apps to outside programs | The order window between the kitchen and the dining room |
An agent is not an AI that only answers. It is an AI that uses tools to actually get work done. The difference is explained in How do AI and AI agents differ?. If MCP itself is new to you, read What is MCP? first.
In short, the path that drives Blender is "Codex → MCP server → Blender add-on → Blender." Whether you switch the model to Astra or to another model, this path stays the same.
What you need
| Item | Notes |
|---|---|
| Blender 5.1 or later | The minimum version the official MCP add-on requires. The pictures in this guide are from 5.2 |
| The Blender MCP add-on | Installed from the Blender Lab repository. Installation is in Installing the official Blender MCP |
| The MCP server | The blender-mcp program in the Blender Lab repository. The steps below get it from source |
git, uv | Tools to download the server source (git) and run it (uv) |
| Codex CLI | Codex for the terminal. Sign in with a ChatGPT account |
| A ChatGPT plan | How much you can use Codex and Astra depends on the plan. Check the official pricing page |
uv is a tool that runs a Python program together with the parts it needs. In kitchen terms, it is the assistant cook who fetches the ingredients and sets the dish up for you. On Windows, install it by entering the command below in PowerShell (the command from uv's official installation guide).
powershell -ExecutionPolicy ByPass -c "irm https://astral.sh/uv/install.ps1 | iex"
Install Codex CLI in this order.
Follow along:
- Open the Codex CLI official page and choose the Windows tab of the install command.
- Open a new PowerShell window, copy and paste the Windows install command from the page, then press
Enter. - When it finishes, open another new PowerShell window and type
codex --version. If one line with a version number appears, it is installed. - Type
codex. The first time, a screen asks you to choose a sign-in method. Choose Sign in with ChatGPT there.
If Node.js is already installed, you can use npm install -g @openai/codex instead of step 2. This command will not work on a computer without Node.js, so in that case use the install command from step 2.
Step 1: check that the door on the Blender side is open
Starting state: Start with the official MCP add-on installed in Blender 5.1 or later.
The MCP server talks to the add-on inside Blender through a communication method called TCP. A TCP connection is like a phone call. The add-on has to be ready to answer at a set number (port) before the server can call it.
Follow along:
- Start Blender.
- Open Edit ‣ Preferences….
- Click Add-ons on the left, and type
MCPin the search box at the top. - Click the arrow on the left of the MCP row to expand it.
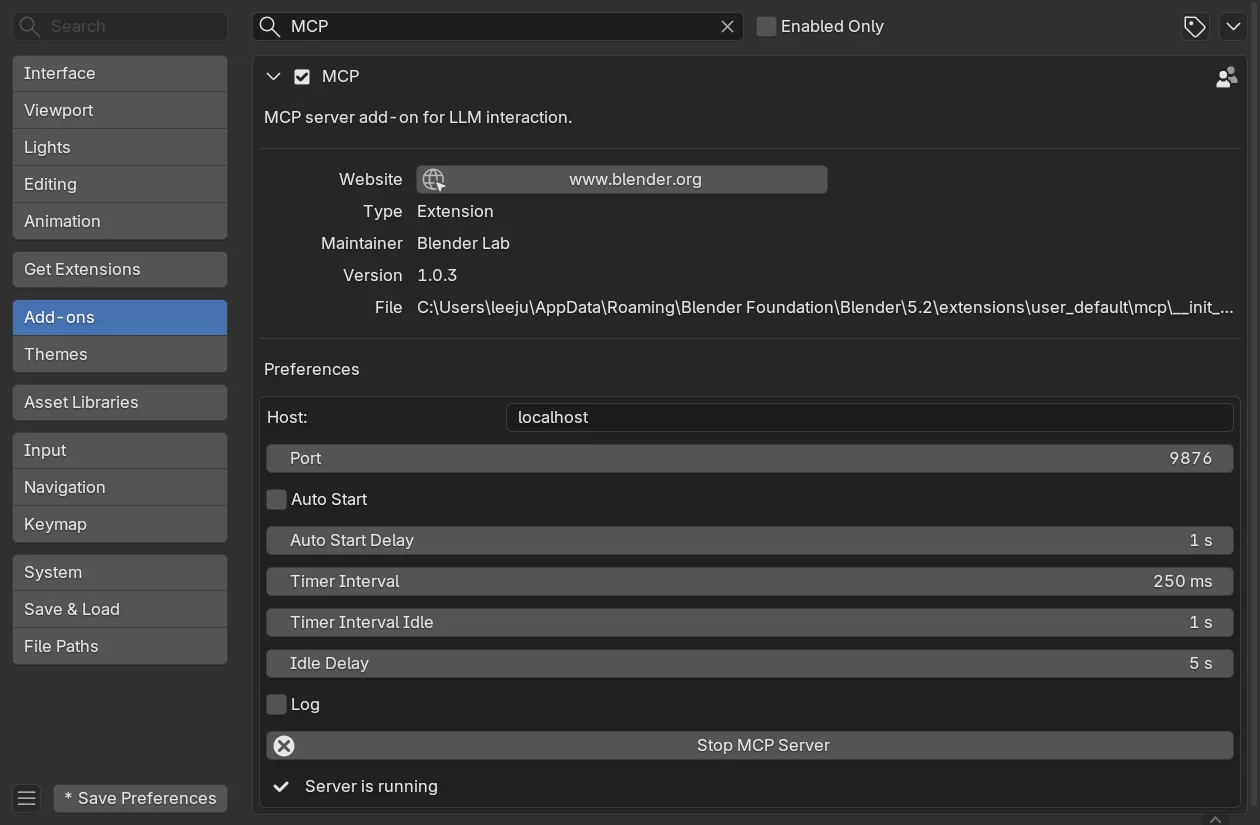
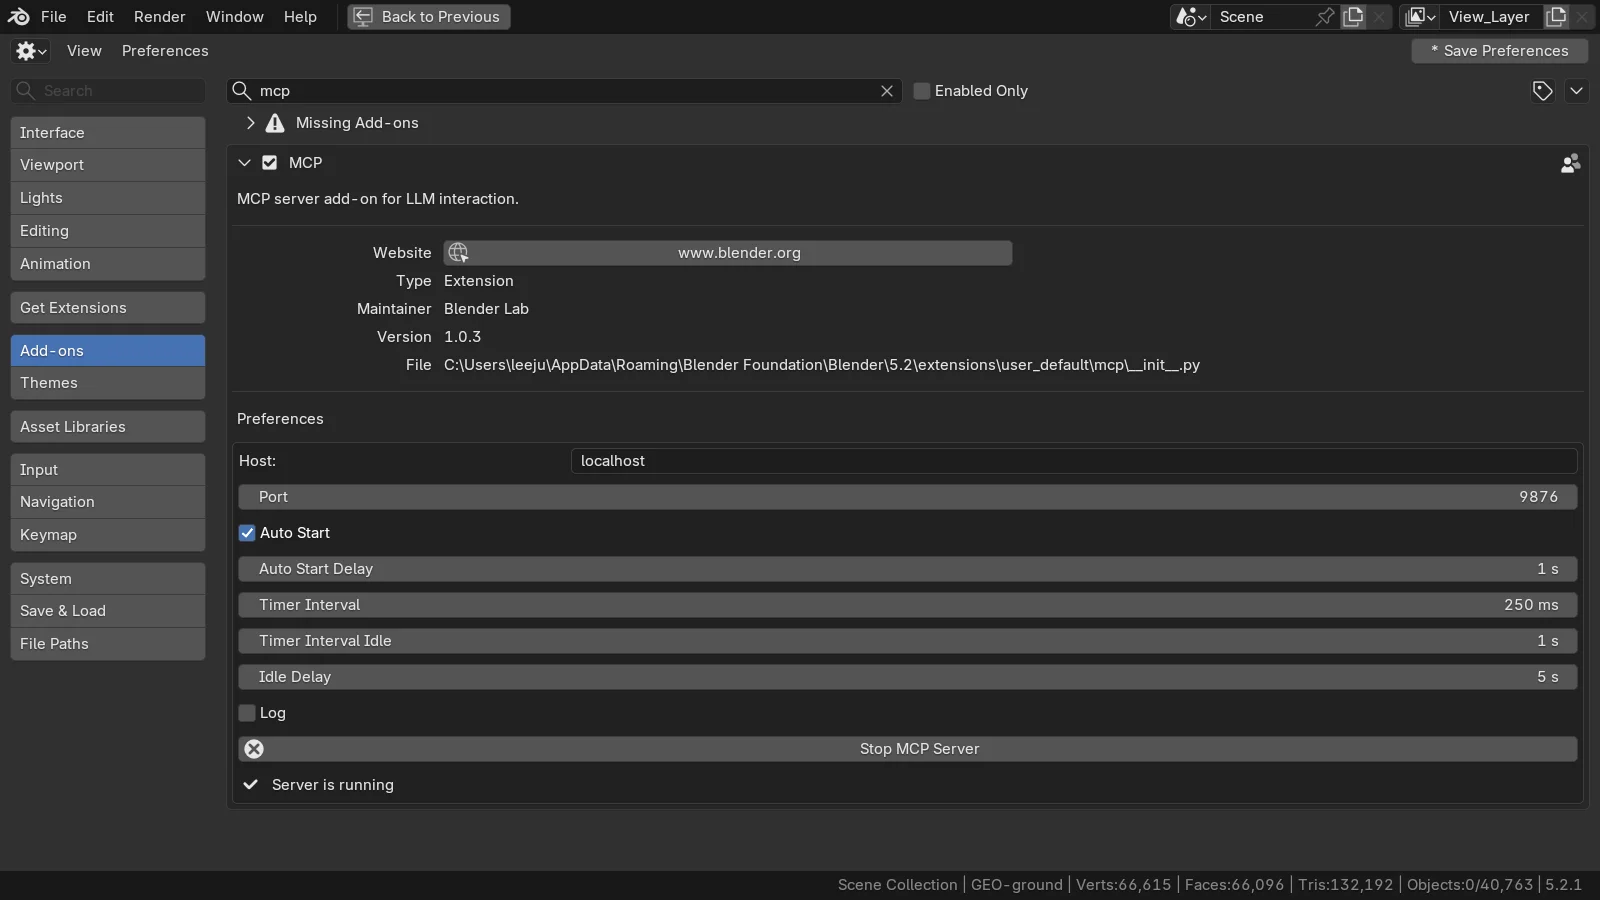
- Check that Server is running appears at the very bottom.
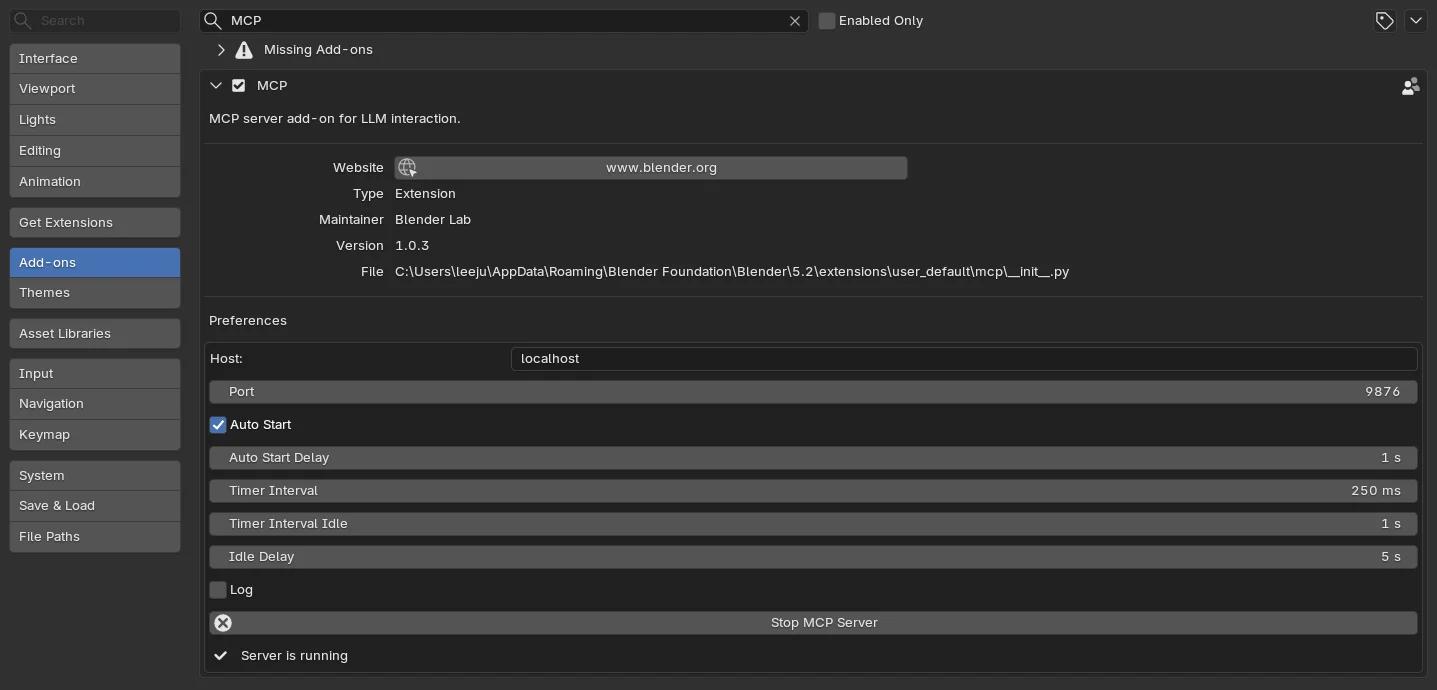 Maintainer Blender Lab, Version 1.0.3, Host localhost and Port 9876, Auto Start on, and Server is running at the very bottom (Blender screenshot)
With Auto Start on, the add-on gets ready to answer on its own when Blender starts. If you do not see Server is running, click the Start MCP Bridge Server button in the same place. Leave Port at its default, 9876. If you turn on another Blender MCP add-on at the same time, they can clash over the same number, so keep only one on.
Step 2: get the MCP server
Starting state: Continue from step 1, with Server is running confirmed.
The MCP server is a small program that runs separately, outside Blender. Codex starts this program, and the program calls the Blender add-on. The official repository describes the flow like this:
MCP Client ⇐ MCP/stdio ⇒ blender-mcp ⇐ TCP socket ⇒ Blender Add-on
Here, the MCP Client is Codex. stdio is a way for programs to pass text through standard input and output, so think of it as a conversation that stays inside one computer.
Follow along:
- Open PowerShell.
- Move to
C:\and download the official repository.
cd C:\
git clone https://projects.blender.org/lab/blender_mcp.git
- Inside the downloaded folder,
C:\blender_mcp\mcpis where the server lives. The commands in the next step use this path.
In apps that support .mcpb bundle files, you can also install from a bundle file without downloading the source. The Codex documentation does not cover .mcpb, so this guide uses the source.
Step 3: register Blender MCP in Codex
Starting state: Continue from step 2, with C:\blender_mcp downloaded.
There are two ways to register it. Use one command, or write one paragraph in the settings file. The result is the same. The ChatGPT desktop app, Codex CLI, and the IDE extension share the same settings.
Way A: one command
The syntax in the official Codex documentation is codex mcp add <server name> -- <command that starts the server>. Codex leaves everything after -- untouched and passes it on to start the server. With the official Blender server, it looks like this:
codex mcp add blender -- uv --directory C:\blender_mcp\mcp run blender-mcp
blenderis a name you choose. It appears under this name in the list later.uv --directory C:\blender_mcp\mcp run blender-mcpmeans "run theblender-mcpprogram in that folder."
Way B: one paragraph in config.toml
By default, Codex's settings file is .codex\config.toml in your user folder. For a project you trust, you can also put it in .codex\config.toml in the project folder so it is used only in that project. Open the file in Notepad and add the paragraph below.
[mcp_servers.blender]
command = "uv"
args = ["--directory", 'C:\blender_mcp\mcp', "run", "blender-mcp"]
startup_timeout_sec = 30
default_tools_approval_mode = "writes"
- The
blenderin[mcp_servers.blender]is the server name. - The path is wrapped in single quotes so that TOML reads the backslashes (
\) as plain characters. To use double quotes, write each backslash twice, as in"C:\\blender_mcp\\mcp". startup_timeout_secis how long to wait (in seconds) for the server to start. The default is 10 seconds. On the first run, uv may take longer than 10 seconds to download the parts it needs, so it is set to a generous 30 seconds here.default_tools_approval_mode = "writes"sets how Codex asks before it calls a tool. What it means is in the "Approvals and safety" section below.
Checking the registration
Follow along:
- In the terminal, run
codex mcp listand check thatblenderis in the list. - Open a chat with
codex, then type/mcpto see the MCP servers that are on right now.
Step 4: choose a model
The official Codex model guide lists Astra (gpt-6-astra), GPT-6.1 Sol, and GPT-6 Luna. You can change the model in three places.
| Where | Example |
|---|---|
| During a chat | Type /model and choose (you can also set how much it thinks) |
| At startup | codex -m gpt-6-astra |
| Settings file | model = "gpt-6-astra" in config.toml |
The official documentation says which models you can use depends on your plan, how you sign in, and which app you use. So if Astra is not in the /model list, check your plan first.
For reference, here are the values for using it through the API. According to the OpenAI API model documentation, GPT-6 Astra has a context (how much it can read at once) of 1,050,000 tokens and a maximum output of 128,000 tokens. The price is 10 dollars per million input tokens and 50 dollars per million output tokens, and requests with more than 272,000 input tokens are charged at a higher rate. What a token is is explained in Tokens and context windows. Prices change often, so check the official pricing page again before you use it.
Choosing a model is like choosing a moving company. Moving a piano needs a skilled team, but a few boxes fit in a small van. Try simple jobs like renaming objects with a lighter model first, and use Astra for complex scene building or work that takes many steps. That order is recommended.
Step 5: keep the first task small, in three parts
Starting state: Start after finishing the registration in step 3, with the scene you want to work on open in Blender. Open a copy, not the original file.
The official MCP server hands the AI several tools for working in Blender. There is a tool that summarizes the scene, a tool that runs Python code, a tool that renders a small thumbnail, a tool that captures the Blender window and sends it, and so on. Codex picks and calls these tools to match the conversation.
Hand over the three tasks below one at a time. If you ask for everything at once, it is hard to find out what went wrong. The wording below is an example.
- Scene summary: "Summarize the list and types of objects in the open Blender scene. Do not change anything."
- Renaming: "Rename the objects in English to match what they look like. Before renaming, show me the list of changes first."
- Thumbnail: "Render a small thumbnail with the current camera and show it to me."
Below are the Blender screens before and after a renaming task, done with the same official MCP server. (This task was given through Claude Code, not Codex. The Blender side is the same whichever app calls it.) It is a small scene with a table, a book, a mug, and a lamp.
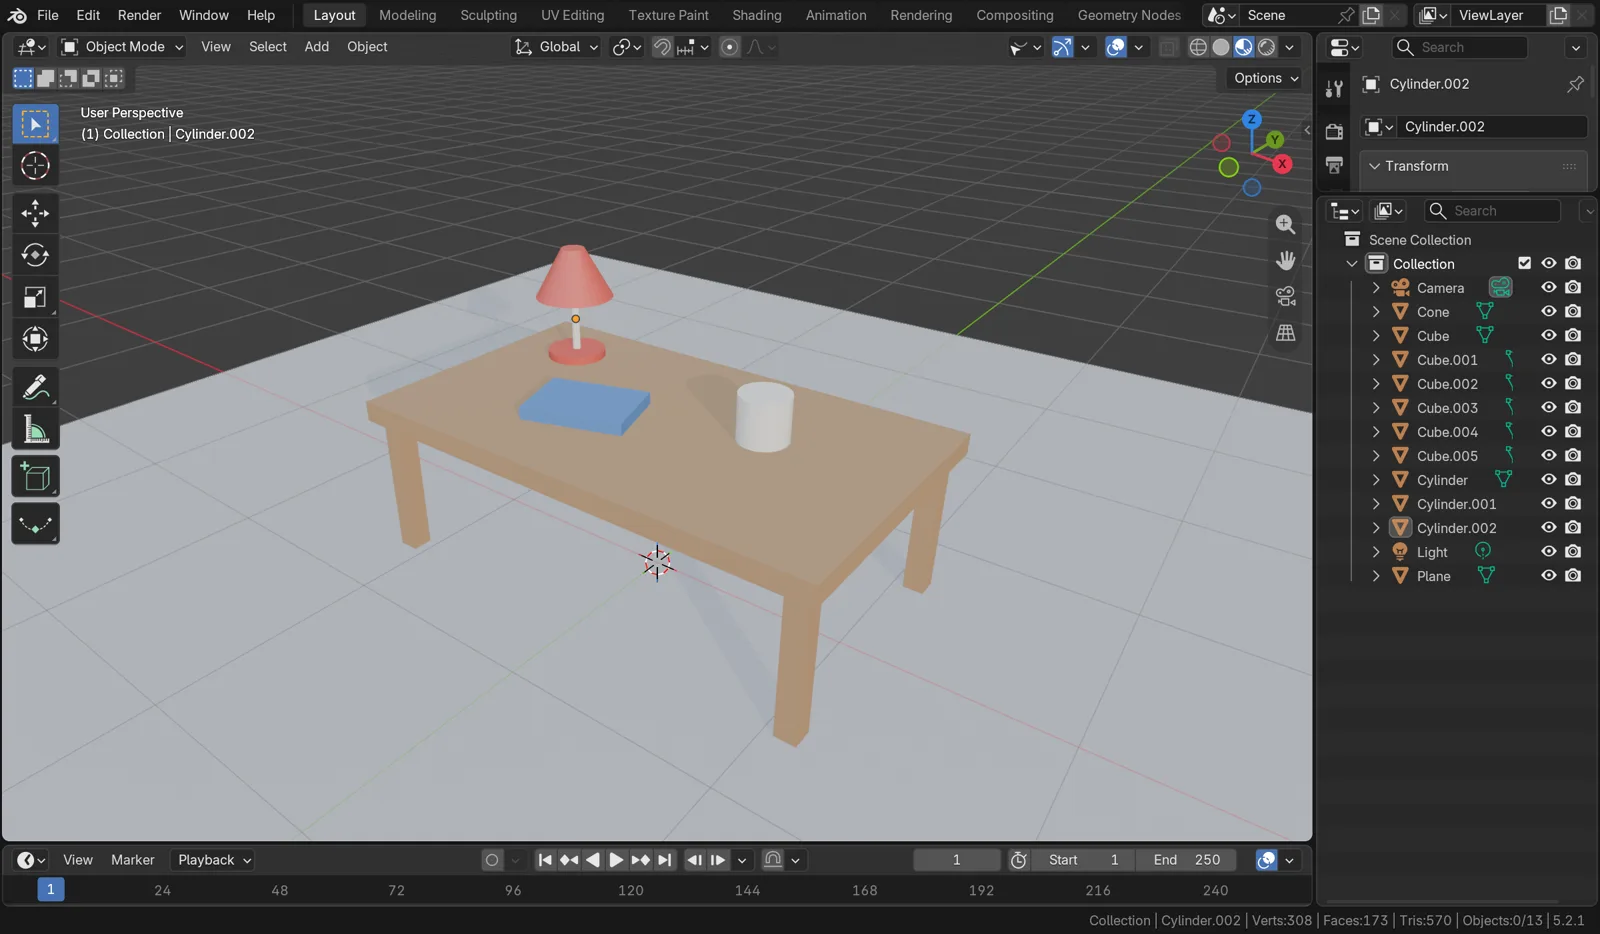 Before renaming. The Outliner (the object list on the right) shows only default names such as Cube.001 and Cylinder.002 (Blender screenshot)
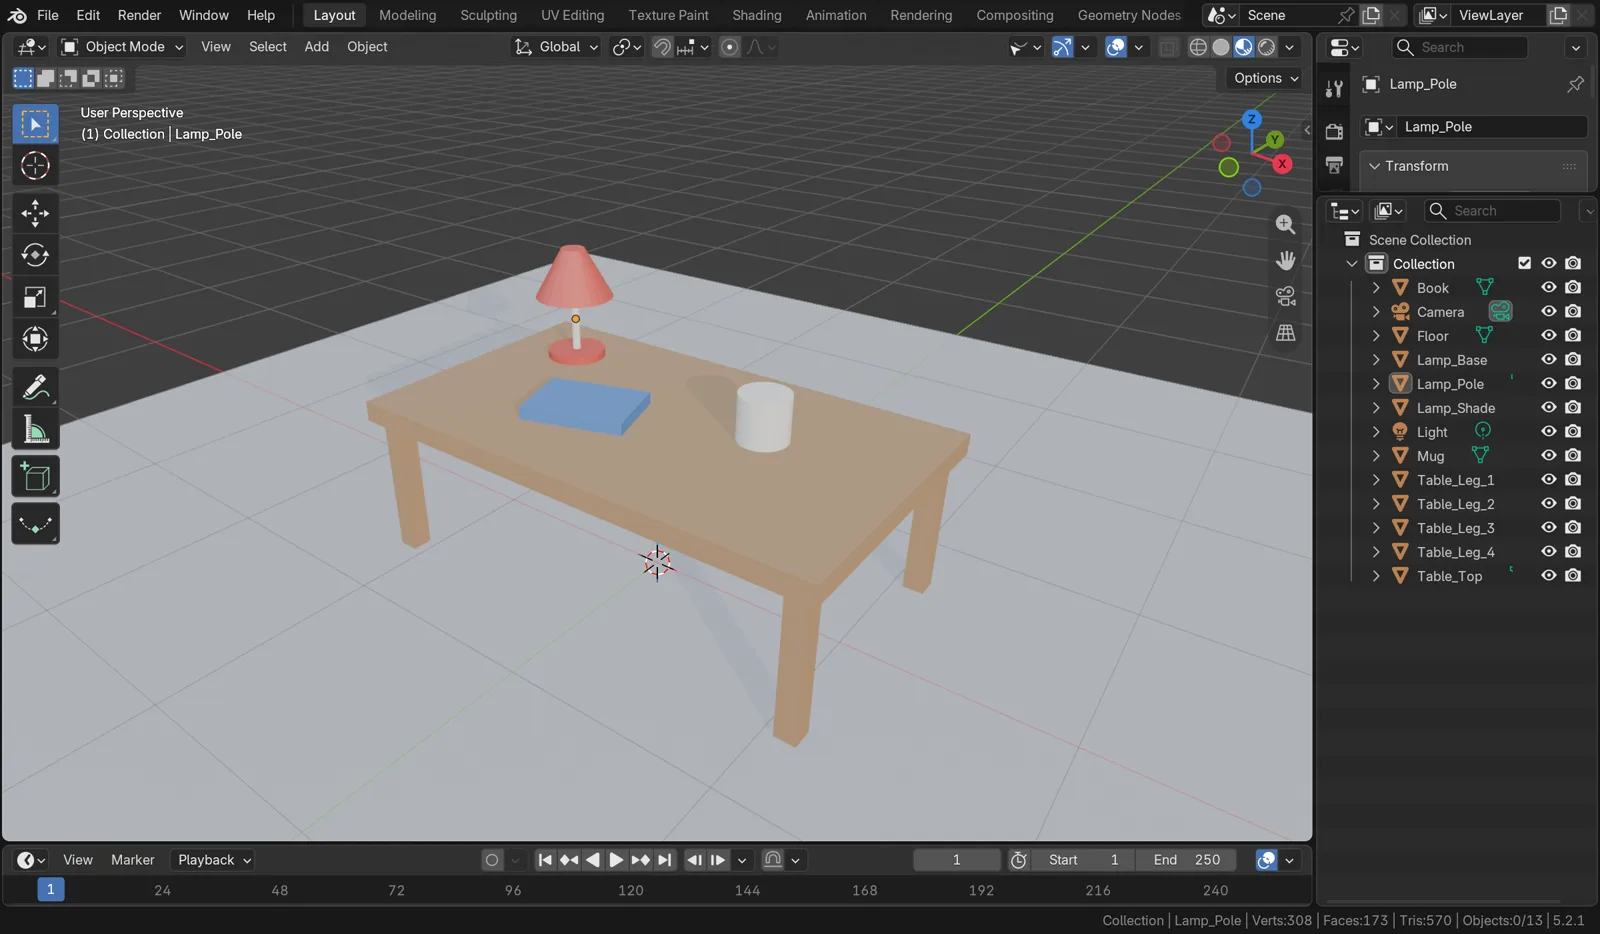 After renaming. The objects are named by the role they play and sorted again in alphabetical order (Blender screenshot)
Follow along: When task 2 is done, click the names in the Outliner one by one. When you click a name, that object is shown with an orange outline in the 3D Viewport. This is how you check that each name matches the real object. Even when the AI says "Done," a person checks whether it is right.
The thumbnail tool used in task 3 (render_thumbnail_to_path) renders with the scene's camera. Like the renaming pictures, the picture below came from calling this tool in Claude Code.
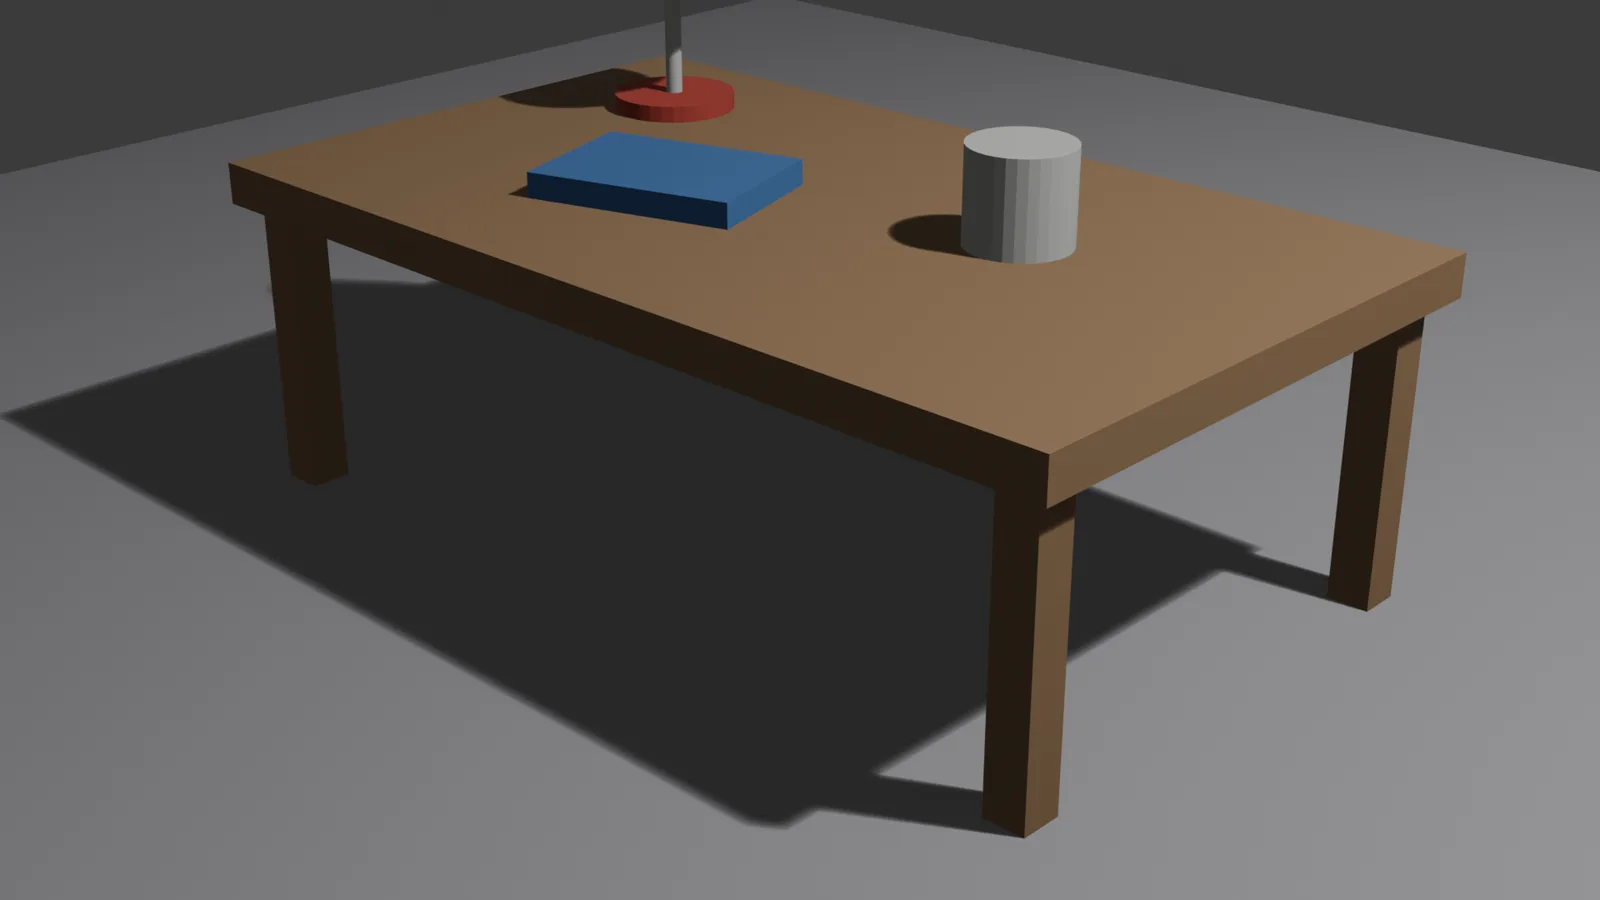 A picture rendered with the thumbnail tool. The camera framing was not adjusted, so the lamp shade is cut off. The picture was reduced to 1600 pixels wide for the web (Blender render)
The tool description calls it a small, low-quality thumbnail, and the server code is also written to shrink the long side to 320 pixels. But when it was called twice in Blender 5.2 with its window open, both times it came out at the scene's output size (1920×1080). The result file was also saved not at the requested path but at the path the tool returned in its response (Blender's temporary folder). So after asking for a thumbnail, look at the file path written in the response and open that file. It may come out larger than you expect.
If the top of the lamp is cut off like in this picture, the tool is not wrong. The camera is simply placed that way. Carry on with the next task, such as "Move the camera back a little so the whole lamp shows."
Approvals and safety
Blender Lab's page clearly warns that this server runs AI-generated code in Blender without any safeguards. So it recommends using it on a computer or virtual machine with no sensitive data. Python code can touch not only things inside Blender but also files on your computer.
Codex has a setting for each server that decides whether to ask before calling an MCP tool. It is default_tools_approval_mode in the server paragraph of config.toml. At first, setting it to "writes" is recommended, as in the step 3 example. The official documentation explains writes as the mode that asks when calling tools not marked read-only. That means tools that only read the scene are called without asking, and tools that can change the scene ask you before they are called. The official Blender server (1.0.3) marks the scene summary, window capture, and documentation search tools as read-only, and does not mark the Python code tool (execute_blender_code) or the thumbnail render tool. So with writes, Codex asks every time before running code. The documentation also lists the values auto, prompt, and approve, but does not explain them. To set just one tool on its own, use tools.<tool name>.approval_mode.
Whatever the settings, these habits stay the same.
- Start from a copy: Leave the original .blend file alone and open a copy.
- Hand over one thing at a time: Split tasks small, and look at the screen each time one is done.
- Get a list before changes: For work that is a hassle to undo, such as renaming or deleting, add "Show me the list first."
- Save under a new name: At each step that looks good, save with a new name using File ‣ Save As….
How it compares with Claude Code
You can also connect the same official MCP server to Claude Code. This guide does not judge which of the two apps is better. It only compares where the settings are.
| Item | Codex | Claude Code |
|---|---|---|
| Register command | codex mcp add <name> -- <command> | claude mcp add <name> -- <command> |
| Settings file | [mcp_servers.<name>] in .codex\config.toml | Settings by user and project scope (.mcp.json and others) |
| See the list | codex mcp list, /mcp during a chat | claude mcp list, /mcp during a chat |
| Blender side | Same add-on, same server, same tools | Same add-on, same server, same tools |
The Blender side is the same whichever app calls it, so you only need to do steps 1 and 2 once. The Claude Code way is in Connecting the official Blender MCP to Claude Code.
Common mistakes and fixes
| Symptom | Cause | Fix |
|---|---|---|
blender is not in /mcp | The chat was opened before registering | Close the chat and run codex again |
| It says the server exceeded its startup time | On the first run, uv is downloading parts | Raise startup_timeout_sec, or run the server command once yourself in the terminal so the parts are downloaded |
| It says it cannot connect to Blender | Blender is closed or the add-on server stopped | Start Blender and check Server is running under MCP in Preferences |
Astra is not in /model | Available models differ by plan and sign-in method | Check the official pricing page, and start with another model in the /model list |
Codex shows an error after editing config.toml | A backslash in the path appears only once inside double quotes | Wrap the path in single quotes or write each backslash twice |
| Names were changed in odd ways | Many changes at once, with checks skipped | Reopen the file you saved under a new name at an earlier step, and ask again with "list first" added |
In one line
Prepare the official add-on and server once on the Blender side, add one codex mcp add command or one config.toml paragraph on the Codex side, and choose the model on top of that. Hand over first tasks in small pieces, such as a summary, renaming, and a thumbnail, and check each on screen.
Read next
- Installing the official Blender MCP
- Connecting the official Blender MCP to Claude Code
- Working in Blender with Kimi Code CLI
- Connecting Blender and AI: 3D work through MCP and scripts
- Connecting MCP servers: how to give AI tools
- Claude, ChatGPT, Gemini, and US and Chinese AI services compared: price, privacy, and how to choose
References
- OpenAI Codex, Model Context Protocol (CLI): https://learn.chatgpt.com/docs/extend/mcp?surface=cli
- OpenAI Codex, Models: https://learn.chatgpt.com/docs/models
- OpenAI Codex, Codex CLI: https://learn.chatgpt.com/docs/codex/cli
- OpenAI API, GPT-6 Astra model documentation: https://developers.openai.com/api/docs/models/gpt-6-astra
- Blender Lab, Blender MCP Server: https://www.blender.org/lab/mcp-server/
- Blender Lab, blender_mcp repository: https://projects.blender.org/lab/blender_mcp
- uv, Installation: https://docs.astral.sh/uv/getting-started/installation/
- Pictures: Blender 5.2 screenshots and render (official MCP add-on 1.0.3)