Driving Blender with AI on your own computer: llama.cpp, Gemma 4, and the official MCP (measured on an 8 GB graphics card)
Connect the official Blender MCP to an AI that runs on your own computer (llama.cpp), with no subscription, and follow along as it reads and edits a scene. It also shows the results of running a small model and the officially recommended model on a laptop with an 8 GB graphics card.
한국어English
ON THIS PAGE
- 011. How the pieces fit
- 022. What you need
- 033. Installing llama.cpp
- 044. Choosing and downloading a model
- 055. Starting the AI server
- 066. Starting the Blender MCP server in web mode
- 077. Registering the MCP server in the web interface
- 088. First question: what is in the scene?
- 099. Second task: placing an object
- 1010. Doing the same task with the officially recommended model
- 1111. The two models compared, as measured
- 1212. Shutting down
- 13Practice
- 14Common mistakes and fixes
- 15In one line
- 16Read next
- 17References
Based on: llama.cpp b11870 (Windows, installed with winget), Blender 5.2 LTS (screenshots from 5.2.1, English interface), the Blender Lab MCP add-on and server 1.0.3, and the Blender Lab Llama.cpp wiki. Checked in October 2026. All pictures are real screenshots. The test PC is a laptop with an 8 GB graphics card (VRAM).
The AI app that Blender's official MCP page uses as its example is not Claude or ChatGPT. It is llama.cpp. llama.cpp is a free program that runs AI models on your own computer. You do not pay a subscription to an online AI service, and your scene information never leaves your computer.
The trade-off is that your own graphics card does the work. So the big question is "Does this really work on an 8 GB graphics card?" This guide walks through installing and connecting everything, then gives the same tasks to a small model and to the officially recommended model and shows the results as they came out. The difference between local AI and online AI is in Local AI vs cloud AI, and graphics card memory is covered in Running AI on your own computer: graphics cards and VRAM.
By the end of this guide you will be able to:
- Install llama.cpp and start an AI server with a model file.
- Start the official Blender MCP server in web mode (HTTP).
- Register the MCP server in the llama.cpp web interface.
- Ask the local AI about the scene, have it place an object, and check the result.
- Pick a model size and settings that fit your graphics card.
1. How the pieces fit
There are four parts. Here they are compared to a restaurant.
| Part | What it does | Restaurant comparison | Address |
|---|---|---|---|
llama.cpp server (llama-server) | Runs the AI model and shows the web interface | The cook and the dining room | http://127.0.0.1:8080 |
| Model file (.gguf) | The AI's "brain" | The cook's recipe notebook | One file |
| Blender MCP server | Passes the AI's tool requests to Blender | The worker between the kitchen and the storeroom | http://127.0.0.1:9191 |
| Blender + MCP add-on | Actually runs the code | The storeroom | Port 9876 |
127.0.0.1 is an address that means "this computer itself." All four parts talk only inside one computer. MCP is a common standard for plugging tools into AI. What it means in detail is in What is MCP?.
2. What you need
| Item | Notes |
|---|---|
| Blender 5.1 or later + the official MCP add-on | Installation is in Installing the official Blender MCP |
| The official MCP server source and uv | Placed in the C:\blender_mcp\mcp folder as the official Setup wiki describes. uv is a tool for running Python programs |
| llama.cpp | Installed in section 3. The official wiki requires build 8218 or later |
| Model file | Section 4. The small model is about 5 GB, the officially recommended model about 17 GB |
| Free disk space | As much as the model file size. If drive C is tight, download to another drive |
There is one thing to watch out for. The official Llama.cpp wiki tells you to download the repository right under drive C (C:\blender_mcp), but the server command on the same wiki says C:\blender\blender_mcp\mcp. The download location and the path in the command do not match, so if you paste the command as it is, it cannot find the folder. Put in the folder you actually downloaded to (this guide uses C:\blender_mcp\mcp). If you downloaded it somewhere else, use that path instead.
3. Installing llama.cpp
Follow along:
- Open Command Prompt or PowerShell.
- Type the command below and press
Enter.
winget install llama.cpp
- When it says the installation succeeded, close the terminal window and open a new one. The installer registered a new command path, so the
llama-servercommand is only found in a new window. - In the new window, check the version.
llama-server --version
On the PC in the pictures, it showed version: 0.7.0-dev (build 11870, ...). Any build number above 8218 is fine. On Mac and Linux, use brew install llama.cpp.
4. Choosing and downloading a model
A model is the large file that acts as the AI's brain. The same model often comes in several versions stored with smaller numbers (quantized versions). Like compressing a photo to JPG, the file gets smaller and accuracy drops a little. Tags in the file name such as Q4_K_M and MXFP4 name the compression method.
A model for Blender MCP must be able to make tool calls. That is the ability to decide on its own, "I should call the scene summary tool," and send the request in a fixed format. The official wiki recommends Gemma 4 26B-A4B and Qwen3.6 35B-A3B, and says it tested both models on a MacBook.
For this guide, the two models below were actually downloaded and run.
| Model | File | Size | On an 8 GB graphics card |
|---|---|---|---|
| Gemma 4 E4B (small model) | gemma-4-E4B-it-Q4_K_M.gguf | About 5.0 GB | Fits entirely on the graphics card |
| Gemma 4 26B-A4B (officially recommended) | gemma-4-26B-A4B-it-MXFP4_MOE.gguf | About 16.6 GB | Does not fit, so part of it moves to system memory (RAM) |
Both models are in the unsloth repositories on Hugging Face, and the license on the model cards is Apache-2.0.
The "A4B" in 26B-A4B means only about 4B (4 billion parameters) of the model actually works at one time. A model like this is called an MoE (mixture of experts). It is like a shop with 26 staff where only 4 are called out for each customer. So even though the whole model does not fit on the graphics card, it runs faster than you might expect.
Follow along:
- In your browser, open the
unsloth/gemma-4-E4B-it-GGUFpage on Hugging Face. - On the Files tab, download
gemma-4-E4B-it-Q4_K_M.gguf. - Move the file to a folder on a drive with free space. This guide uses
E:\local_llm\models\.
5. Starting the AI server
Starting state: Continue in the new terminal window from section 3.
Follow along: Start the small model with the command below.
llama-server -m E:\local_llm\models\gemma-4-E4B-it-Q4_K_M.gguf --port 8080
-m is the model file, and --port 8080 is the number for the web interface. This guide uses 8080, the same as the official wiki. When it is ready, the last line shows this:
srv server_on_li: listening on http://127.0.0.1:8080
On my PC, E4B showed this line after about 25 seconds the first time and about 10 seconds the second time. Higher up in the same log there was also this warning:
security: no API key is set and CORS allows all origins
It means "there is no password (API key), and connections are accepted from any web page." Because the address is 127.0.0.1, nobody outside this computer can get in. Do not change the address with an option such as --host 0.0.0.0. Safe habits are collected in Safety checks before handing Blender to AI.
Leave this window open. If you close it, the AI server shuts down too.
6. Starting the Blender MCP server in web mode
Apps like Claude Code run the MCP server themselves and talk to it through standard input and output (passing text back and forth). The llama.cpp web interface runs inside the browser, so the MCP server has to be open at a web address. The official server has an option for this.
Follow along:
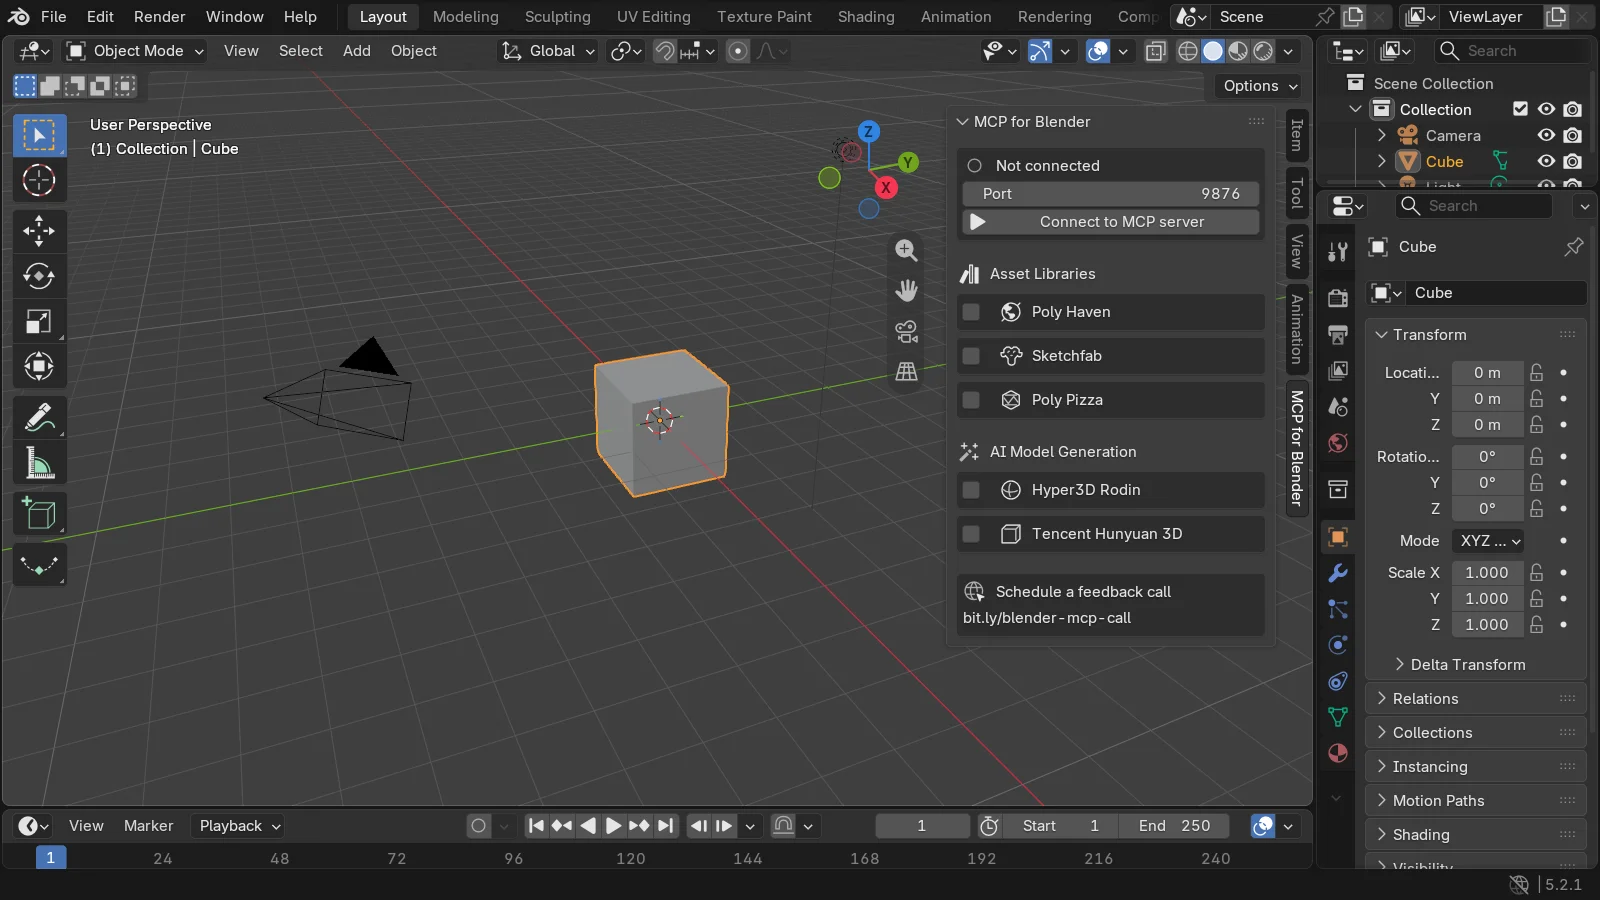
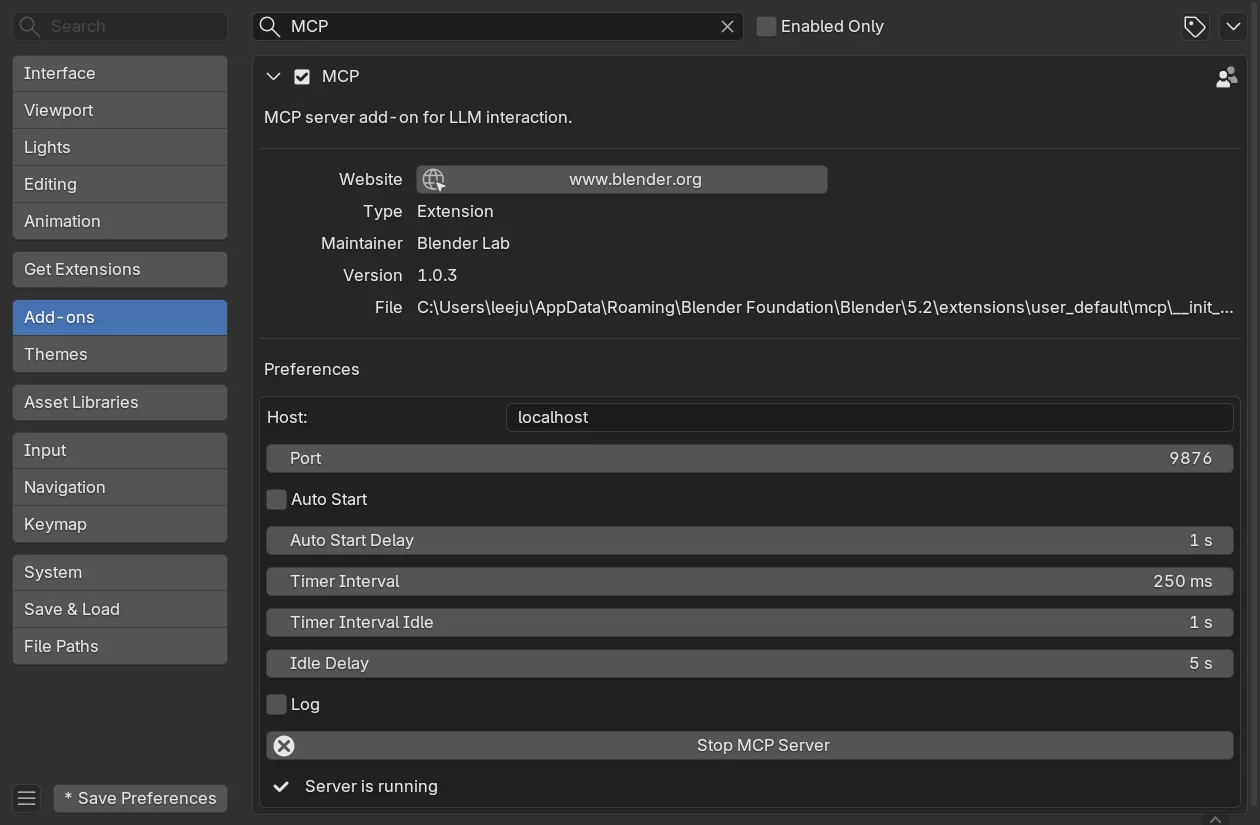
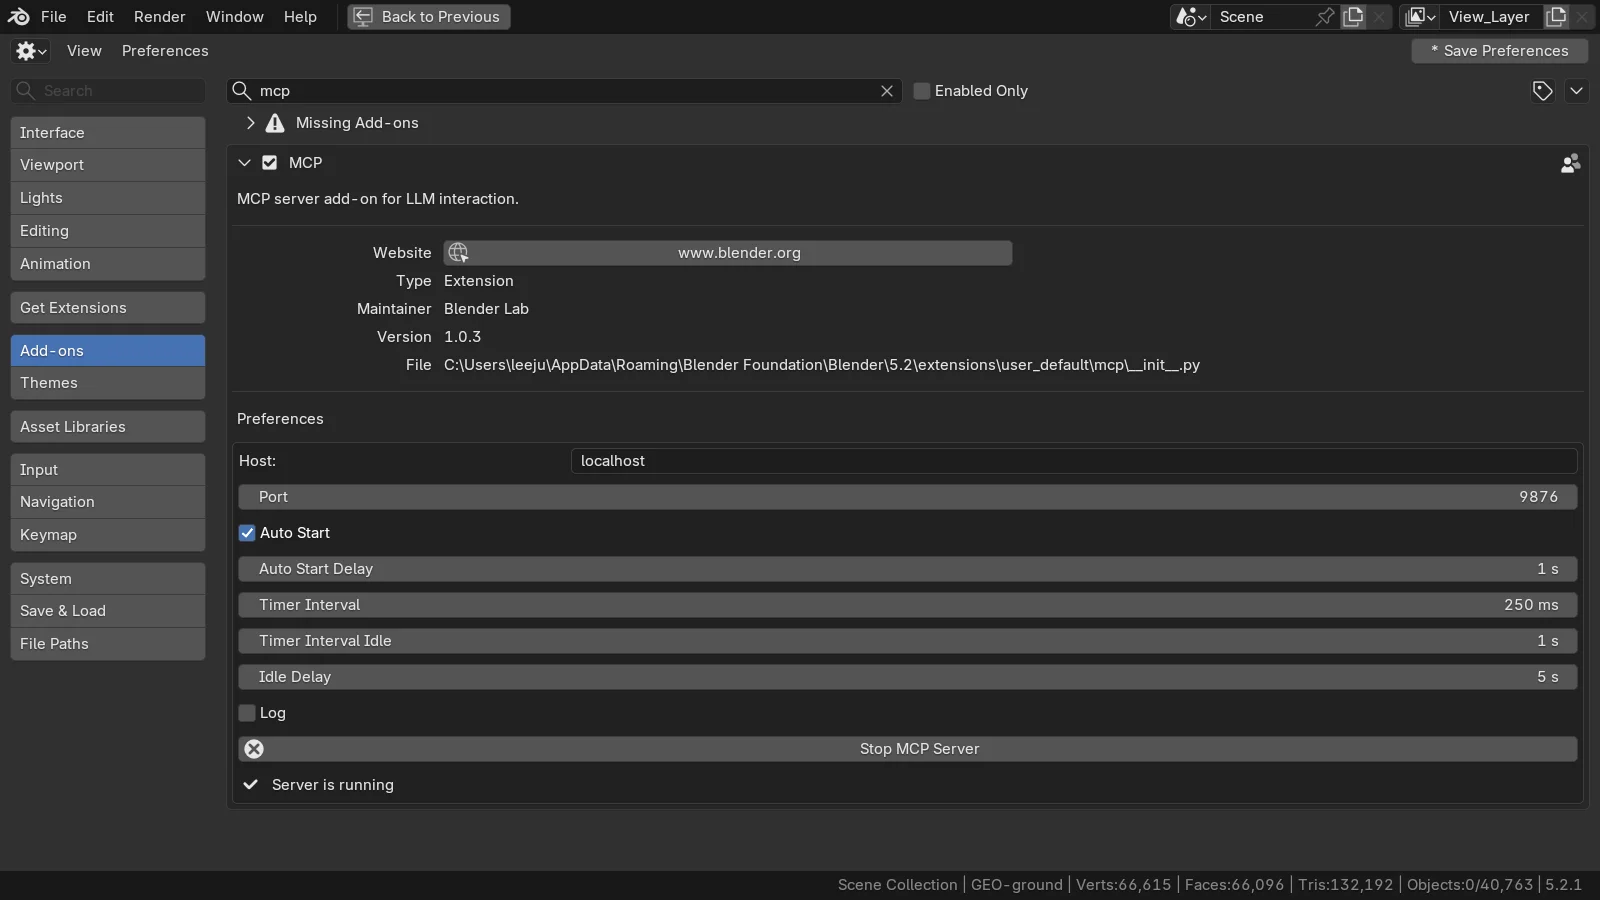
- Start Blender and check that the MCP add-on's server is on ("Server is running" under Edit ‣ Preferences ‣ Add-ons ‣ MCP).
- Open one more new terminal window.
- Enter the command below.
uv --directory C:\blender_mcp\mcp run blender-mcp --transport http --port 9191
It worked if the last line shows this:
INFO: Uvicorn running on http://127.0.0.1:9191 (Press CTRL+C to quit)
Now you have two terminal windows open. One is the AI server (8080), and the other is the Blender MCP server (9191).
Starting state: The table scene below is open in Blender. You can use the default cube scene instead.
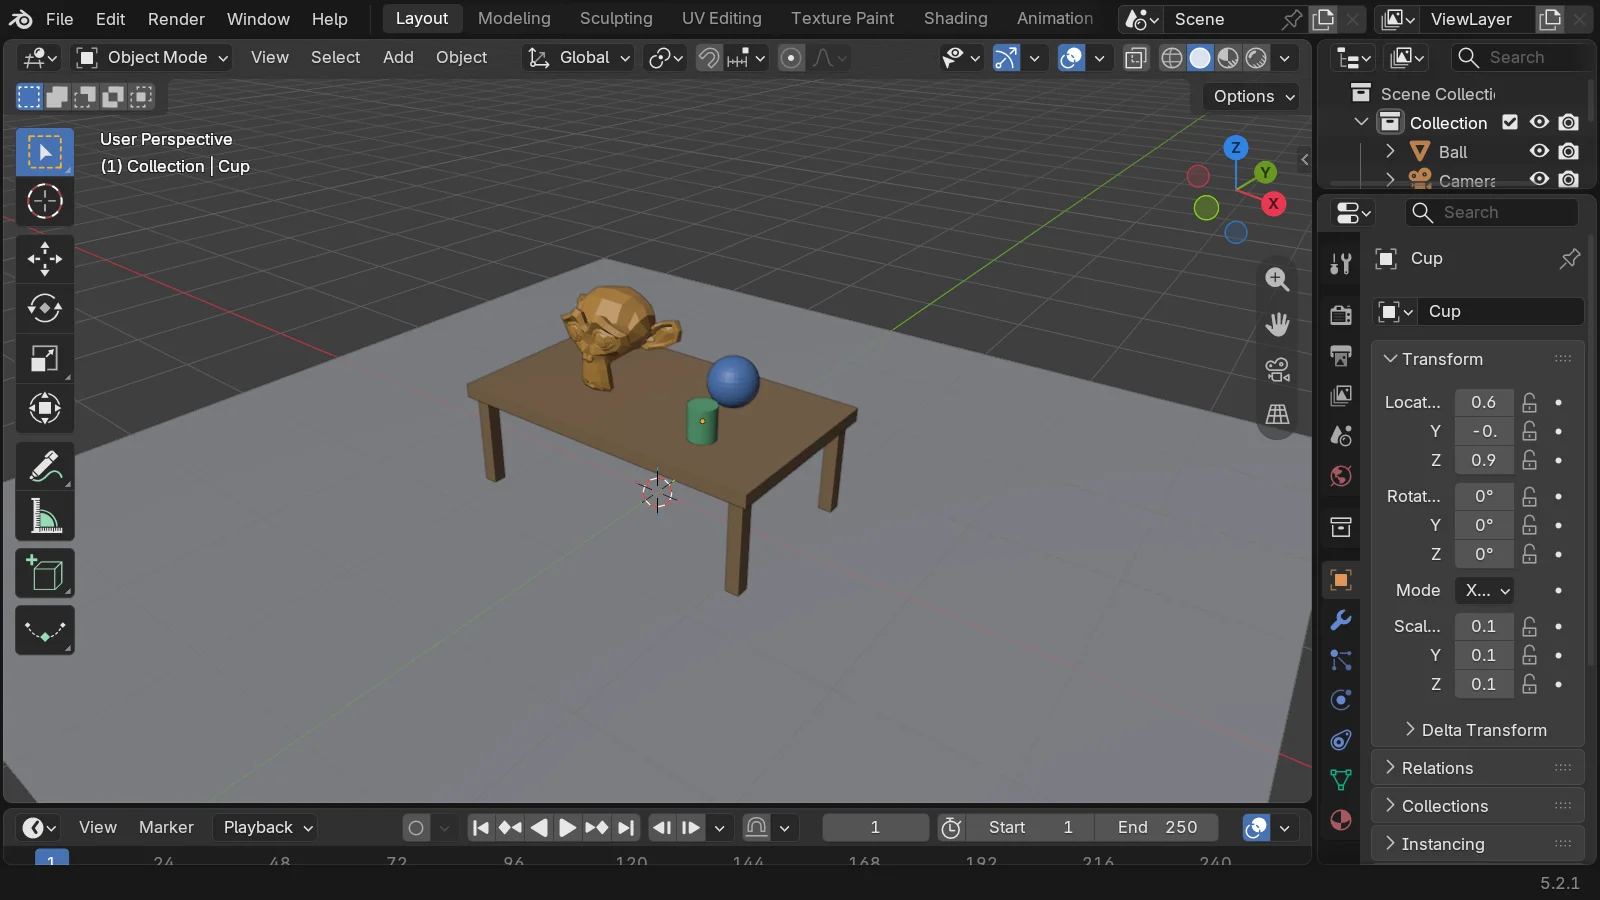 Figure 1. The scene used for the test. Floor, Table with four legs, Suzanne, Ball, and Cup (Blender screenshot)
7. Registering the MCP server in the web interface
Follow along:
- Type
http://127.0.0.1:8080into the browser's address bar. A chat screen with "Hello there" opens.
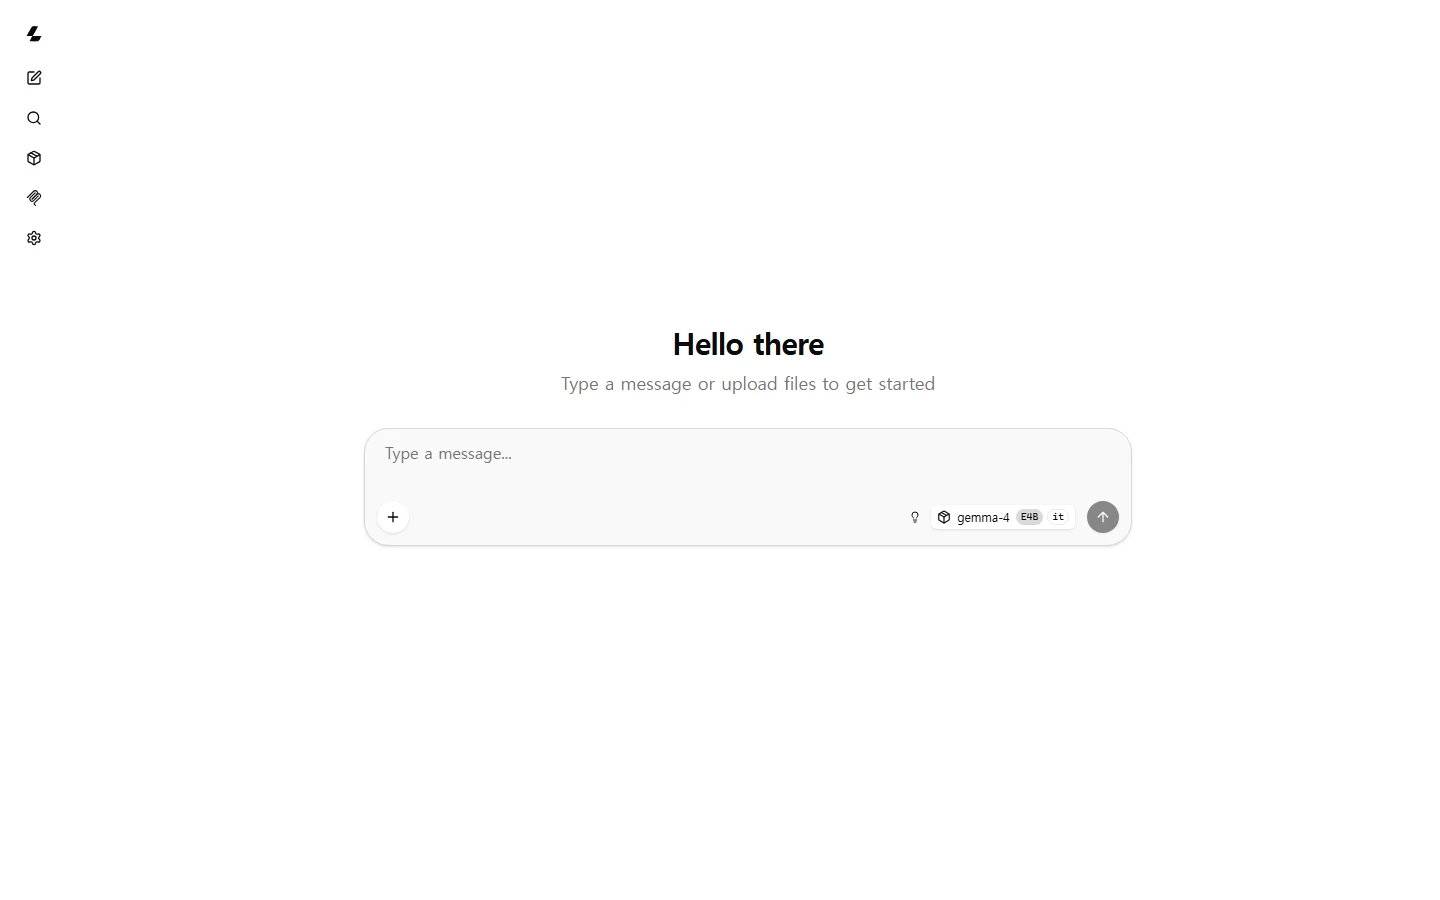 Figure 2. The llama.cpp web interface. The icons on the left, from the top, are new chat, search, models, MCP, and settings (llama.cpp web interface screenshot)
- In the row of icons on the left, click the fifth one from the top (MCP). The "MCP Servers" window opens.
- Click Add New Server.
- In the Server URL box, enter
http://127.0.0.1:9191/. If you leave Display name empty, it is filled with the name the server reports (blender-mcp).
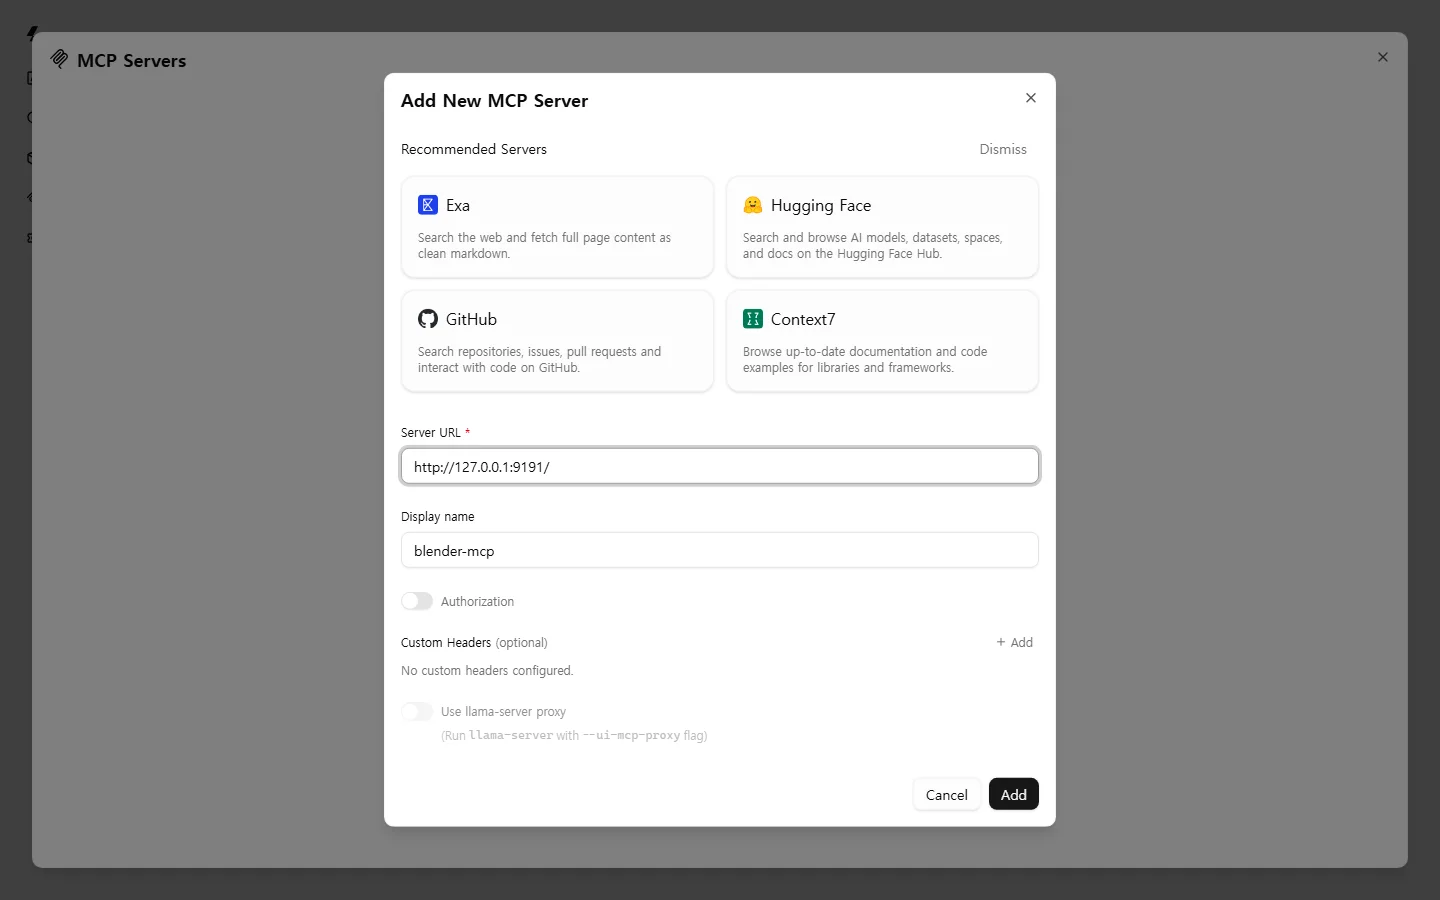 Figure 3. Adding the MCP server. http://127.0.0.1:9191/ in the Server URL box in the middle, Display name blender-mcp below it, and the Add button at the bottom right (llama.cpp web interface screenshot)
- Click Add. When a
blender-mcpcard appears as below and shows "26 tools available," it is connected.
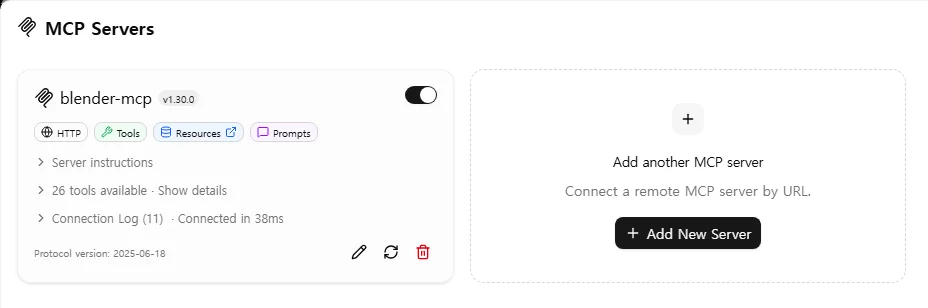 Figure 4. The connected MCP server. The on switch at the top right, 26 tools available in the middle, and Connected in 38ms below it (llama.cpp web interface screenshot)
The v1.30.0 on the card is the version number of the MCP component the official server uses. It is a different number from the add-on version (1.0.3).
- Go back to the chat screen and open
+‣ Tools to the left of the message box. Check thatblender-mcp 26/26is ticked.
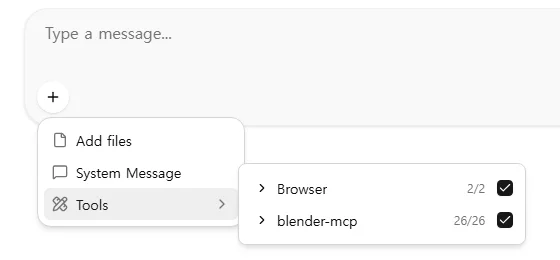 Figure 5. Choosing the tools for the chat. blender-mcp 26/26 is ticked (llama.cpp web interface screenshot)
In the version shown, blender-mcp was turned on by default for new chats once the server was registered. The official repository's instructions say you need to turn on blender-mcp for each new chat. If the box is empty, click it to turn it on.
8. First question: what is in the scene?
Follow along: Type the message below into the box and send it (translated from Korean).
Tell me the names of all the objects in the current Blender scene.
After a moment, the AI asks for permission to use a tool.
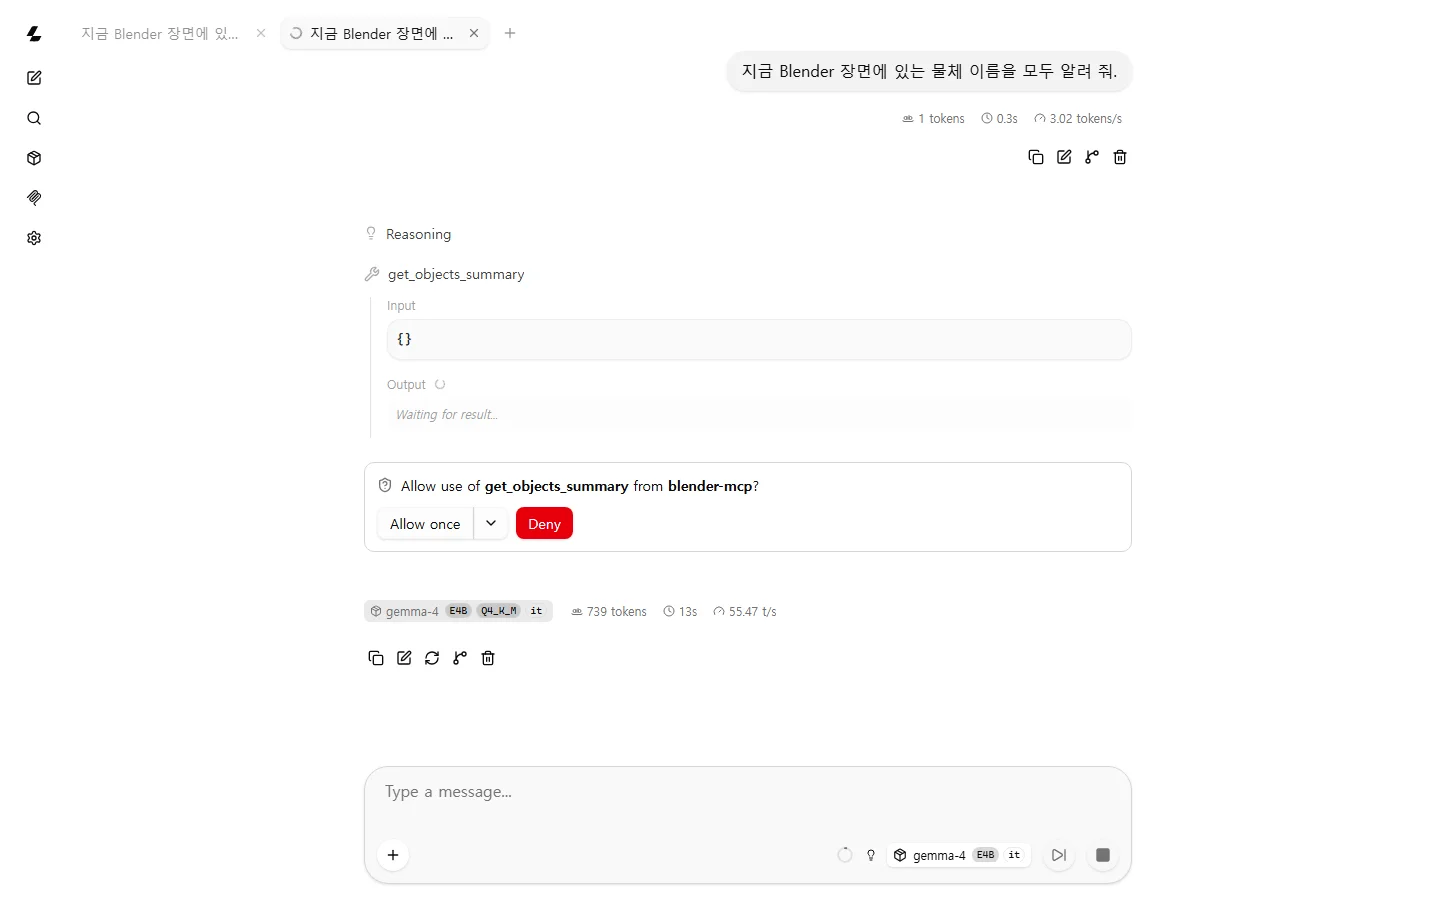 Figure 6. The AI asks for permission to use a tool. The get_objects_summary tool card at the top, and the Allow once and Deny buttons in the permission box below (llama.cpp web interface screenshot, chat in Korean)
get_objects_summary is a tool that reads the list of objects in the scene. It does not change the scene, so click Allow once.
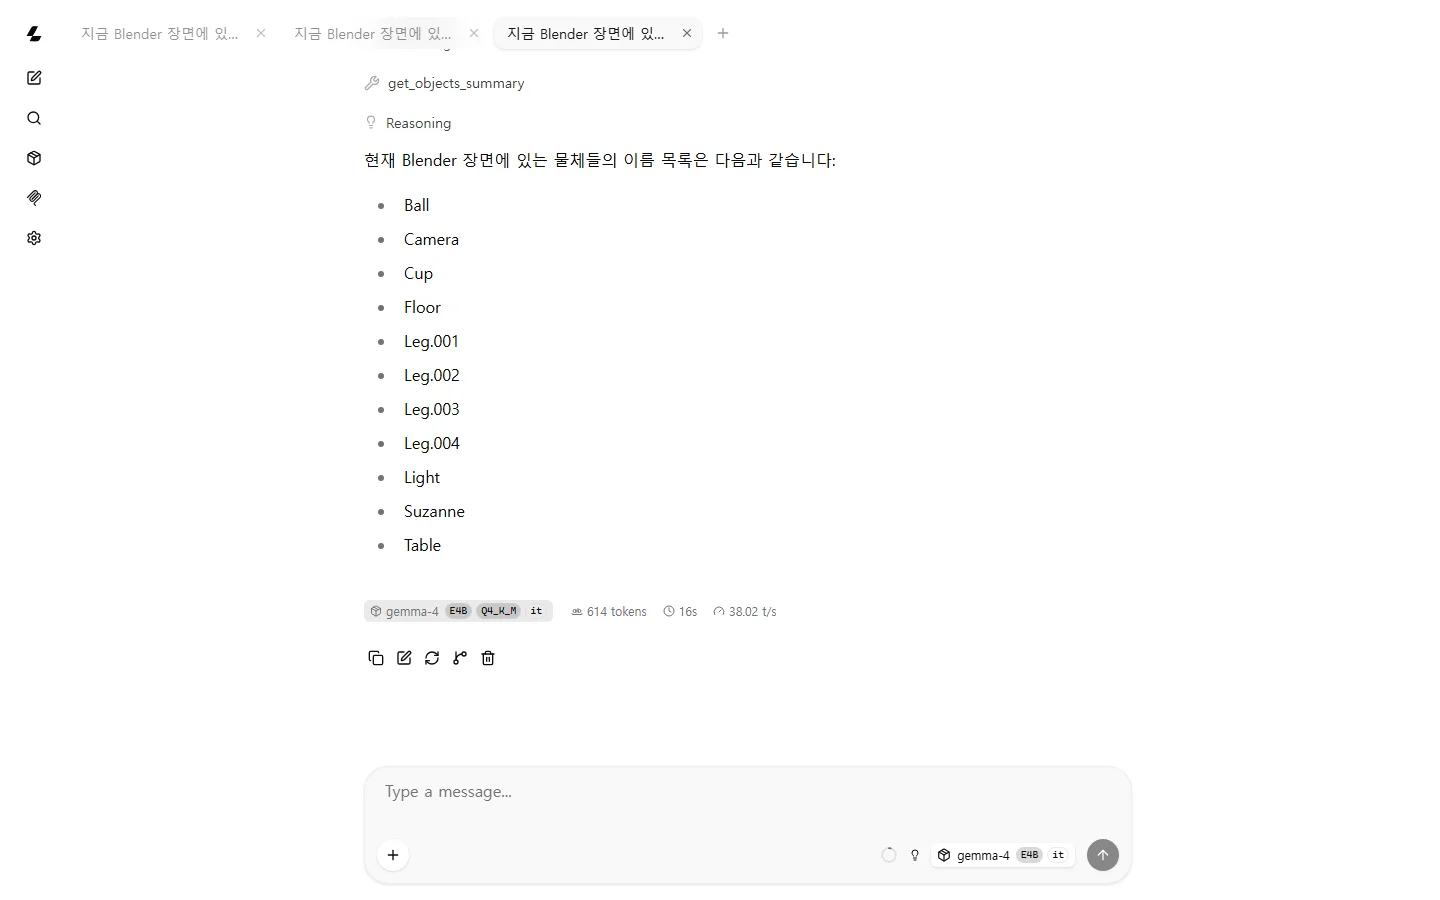 Figure 7. The small model's (E4B) answer. It named all 11 objects correctly (llama.cpp web interface screenshot, answer in Korean)
It named all 11 objects without missing any. The 16s at the bottom of the picture counts only the time spent writing the final answer. From sending the question to the end of the answer took about 20 seconds on my PC, and the permission window appeared about 8 seconds after sending. I clicked the permission button as soon as the window appeared.
9. Second task: placing an object
This time, ask for something that changes the scene.
Follow along: In a new chat, send the message below (translated from Korean).
Put one red cube on top of the Table. Make each side 0.2 m long.
This time it asks for permission to use the execute_blender_code (run Python code) tool. The Input box shows the code it will run. Read the code, then click Allow once.
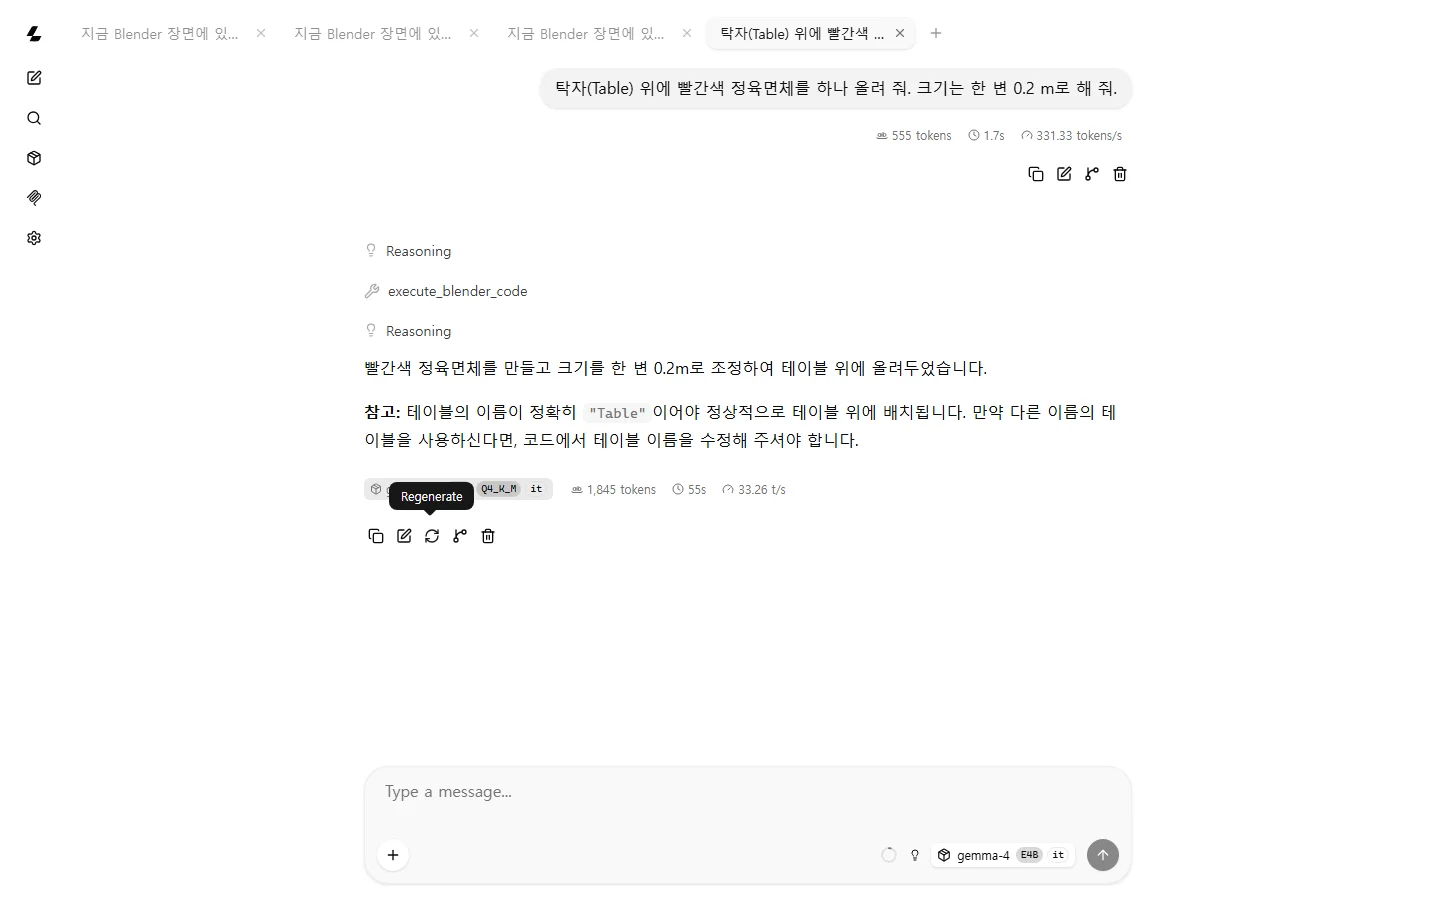 Figure 8. The small model's answer: "I placed it on the table" (llama.cpp web interface screenshot, answer in Korean)
The AI said it placed the cube properly. A closer look in Blender tells a different story.
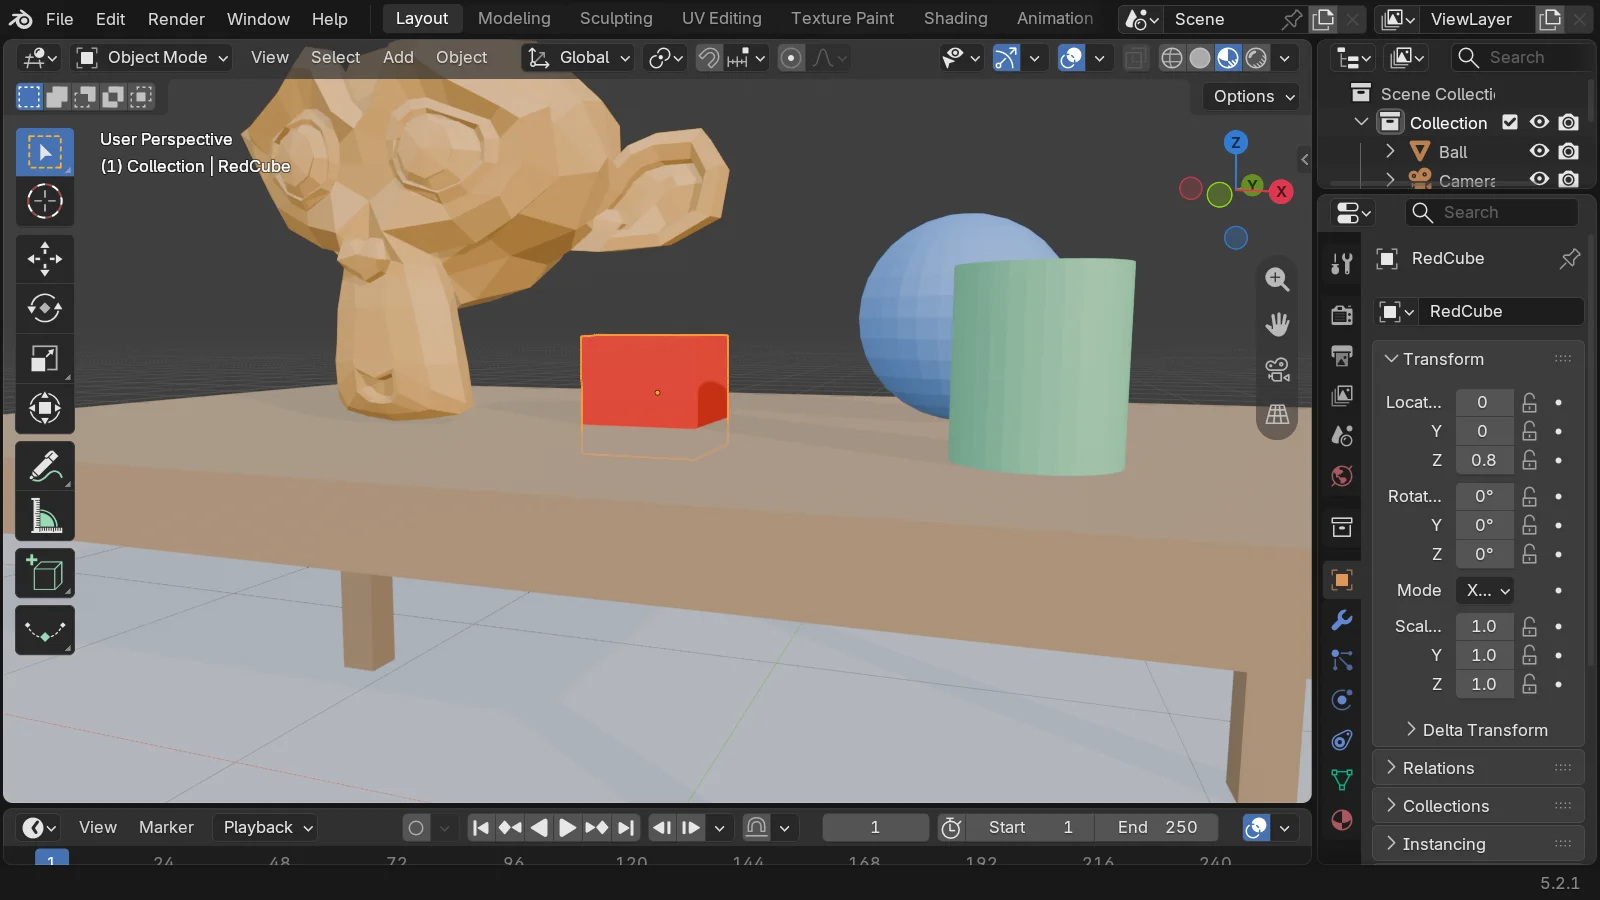 Figure 9. The real result. The lower part of the cube in the middle is buried in the table. Location Z in the Properties Editor on the right (the field is narrow, so it shows 0.8; the real value is 0.85) (Blender screenshot)
The table top is 0.8 m high. The AI put the center of the cube at 0.85 m, so the bottom 0.05 m (5 cm) went into the table. That means a quarter of a 0.2 m tall box is buried. Also, the cube looks red in Material Preview but looked gray in Solid view like Figure 1. That is because only the material's surface color (Base Color) was changed to red, and the color used for Solid view was left as it was.
When the AI says "done," that is not a check. Look at the result yourself, in the Blender viewport and the property values.
Follow along: In the same chat, say clearly what to fix (translated from Korean).
RedCube is a little buried in the table. Calculate the height of the table top yourself, and move RedCube so its bottom face touches the table top exactly.
This time the AI first called a tool twice to read detailed information about the table and the cube, then ran the code. The permission window appeared three times.
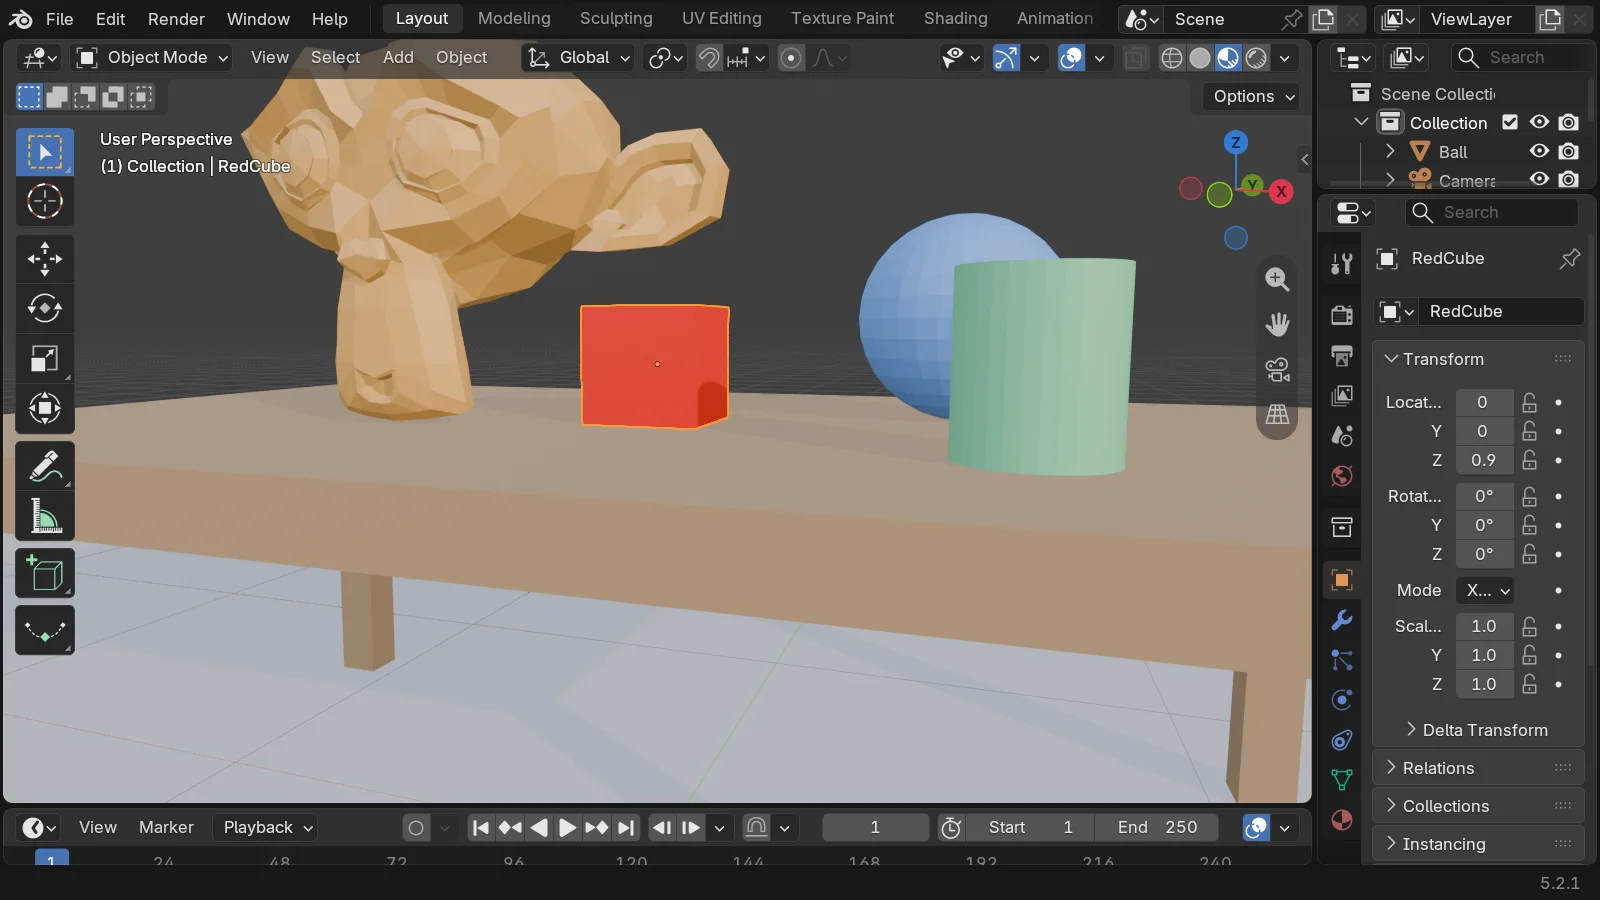 Figure 10. The fixed result. The cube's center is at 0.9 m, and its bottom touches the table top (0.8 m) (Blender screenshot)
The same instruction does not give the same result every time. I sent the same first instruction to the small model twice more, each in a new chat. Once, it made one cube at floor height (center at 0 m) and floated another in the air above the table (bottom at 1.15 m). The other time, it matched the bottom to the table top exactly from the start. So only one try out of three got the first instruction right.
10. Doing the same task with the officially recommended model
Starting state: Start from the scene with the section 9 cube deleted (the same state as Figure 1).
Follow along:
- In the same way as section 4, download
gemma-4-26B-A4B-it-MXFP4_MOE.gguffrom theunsloth/gemma-4-26B-A4B-it-GGUFrepository. It is the file the official wiki tested on a MacBook. - In the AI server window, press
Ctrl+Cto stop the small model. - Start the large model. This time, add the context size options as below.
llama-server -m E:\local_llm\models\gemma-4-26B-A4B-it-MXFP4_MOE.gguf --port 8080 -c 16384 -np 1
First, here is what happens if you leave the options out. On the PC in the pictures, llama.cpp shrank the chat memory space (context) to 4096 tokens to fit the graphics card. Asking a question in that state gave the error below.
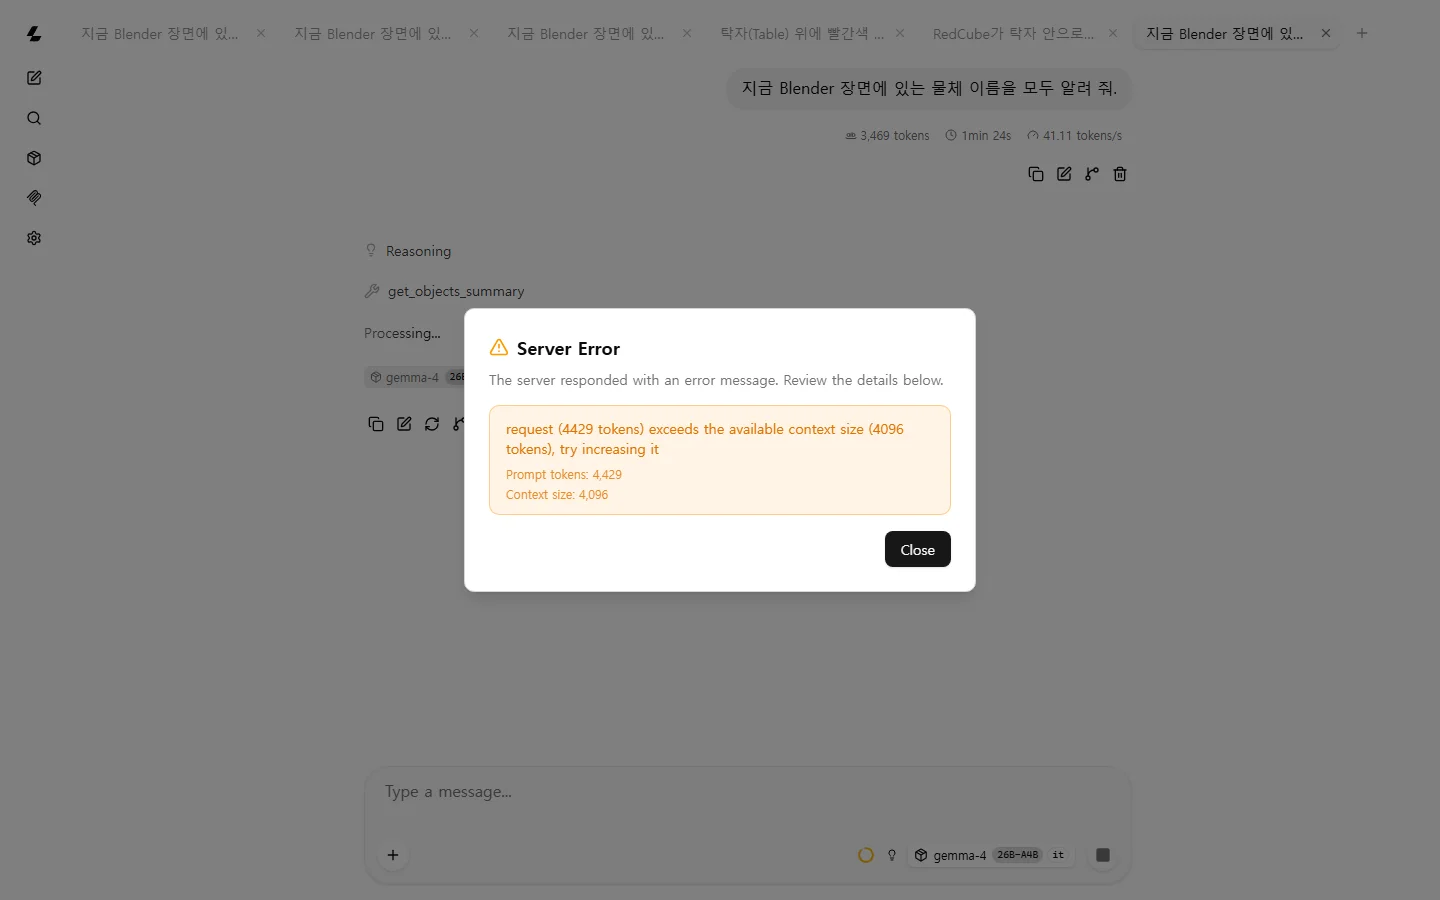 Figure 11. An error from too little context. The request was 4,429 tokens and the context was 4,096 tokens (llama.cpp web interface screenshot)
Context is the amount of text the AI can see at once, and a token is the unit used to count that text. Think of it as the size of a desk. The first question alone takes about 3,500 tokens, counting the descriptions of the 26 MCP tools plus the question. On a 4,096 desk, that leaves almost no room to spread out the question and answer. What these terms mean in detail is in Tokens and context windows.
| Option | Meaning |
|---|---|
-c 16384 | Set the context to 16,384 tokens |
-np 1 | Set the number of simultaneous chat slots to one. With several slots, they share the context |
After starting it with the options, I sent the section 9 instruction as it was.
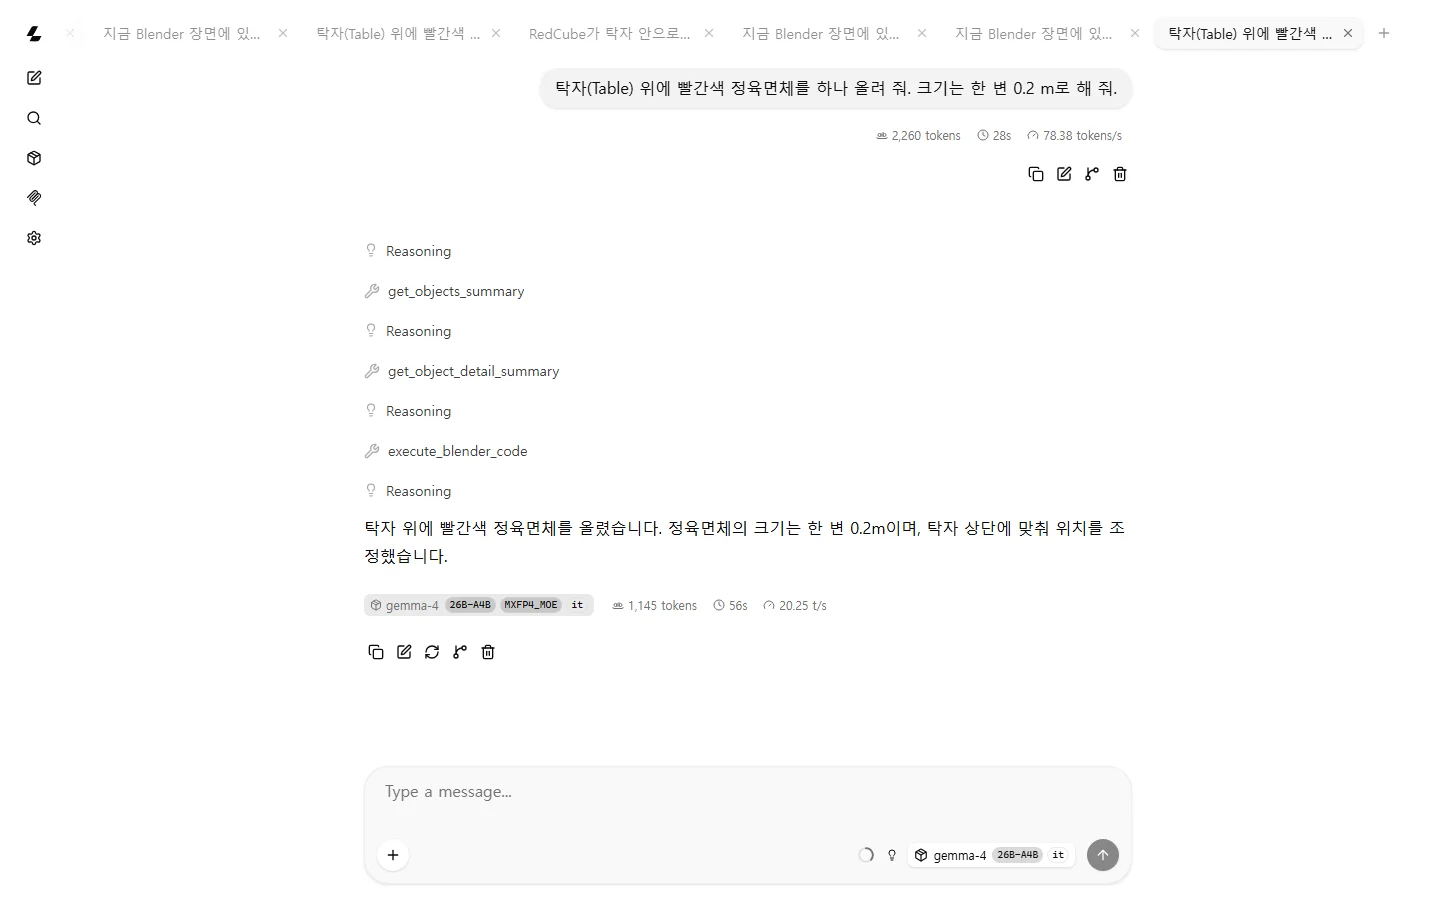 Figure 12. The 26B model's answer. From the top, it used the tools in this order: scene summary, object detail, run code (llama.cpp web interface screenshot, answer in Korean)
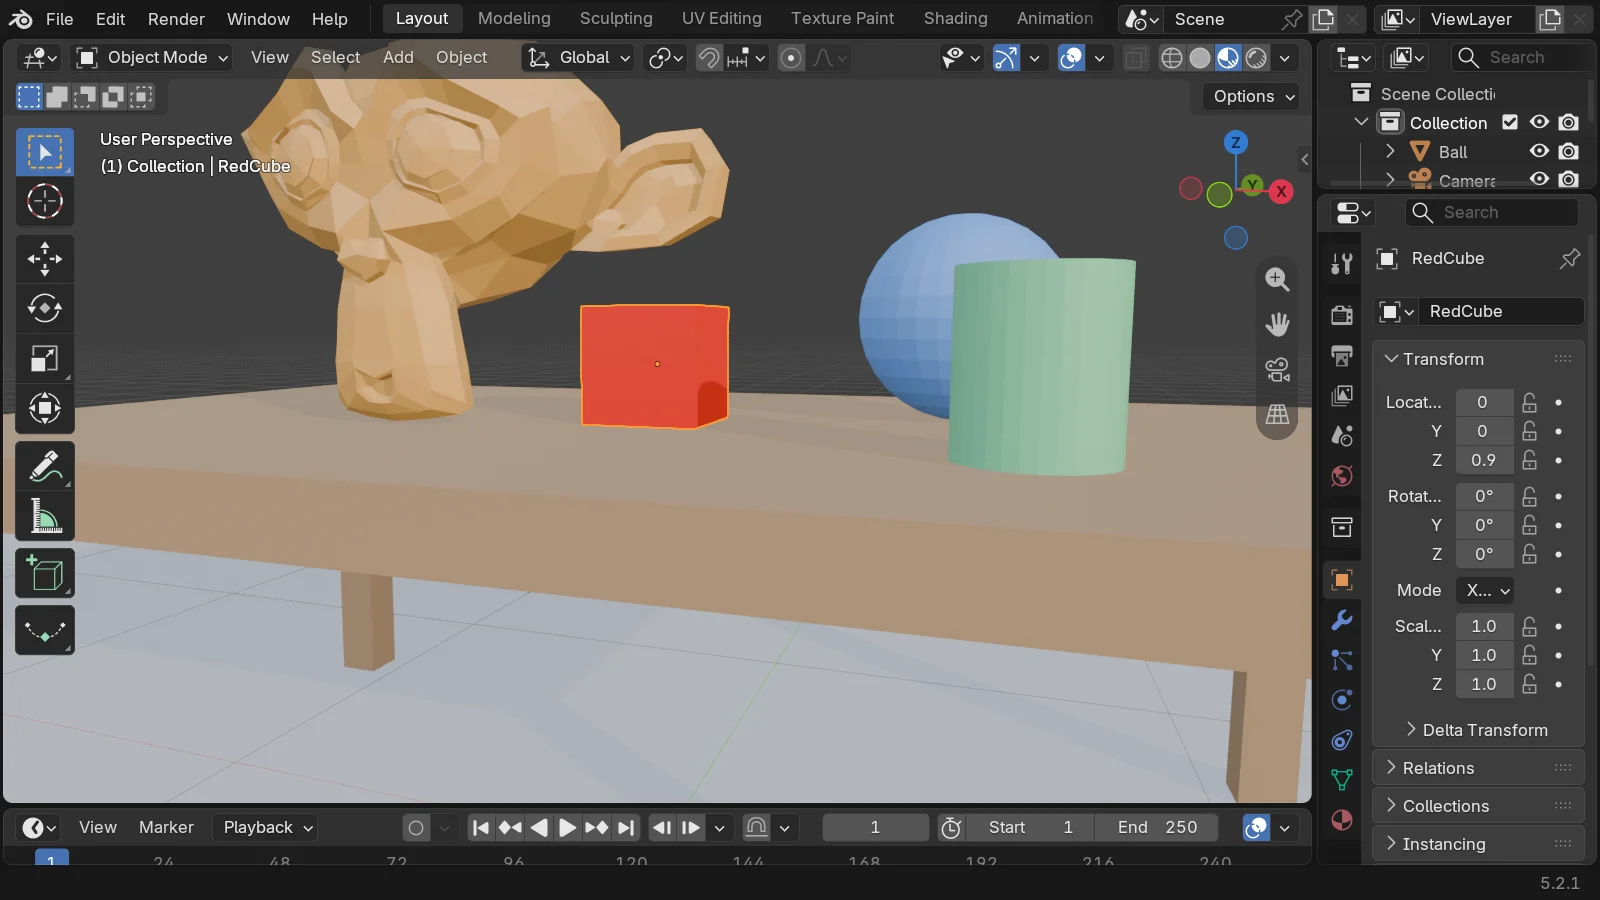 Figure 13. The 26B model's result. On the first instruction, the bottom of the cube touches the table top (Blender screenshot)
The large model read the table's size and position before writing any code. So it placed the cube exactly at a height of 0.9 m on the first instruction. The Base Color was red. When I asked once more in a new chat, it used the tools in the same order and placed the cube at the same height.
11. The two models compared, as measured
All values were measured on my PC (RTX 4070 Laptop 8 GB, RAM 32 GB). I asked the same questions in two separate rounds, and in between, other programs were also using the same graphics card. So the values are given as measured ranges instead of single numbers. Time taken runs from sending the question to the end of the answer, and I clicked the permission button as soon as the window appeared. Writing speed is the value printed in the llama-server log.
| Item | Gemma 4 E4B (Q4_K_M) | Gemma 4 26B-A4B (MXFP4_MOE) |
|---|---|---|
| File size | About 5.0 GB | About 16.6 GB |
| Time to start | About 10 to 25 seconds | About 12 to 32 seconds |
| Graphics card | The whole model on the graphics card | Only part on the graphics card, the rest in RAM. After two questions, llama-server was using about 17 GB of RAM |
| Writing speed | About 29 to 61 tokens per second | About 19 to 24 tokens per second |
| Question 1 (object names) | Correct, about 20 seconds | Correct, about 33 to 60 seconds |
| Question 2 (placing the cube) | Exact in only one of three tries. Once it said "placed it" with the cube buried 5 cm. About 30 to 60 seconds | Exact on the first instruction both times. About 58 to 91 seconds |
| Required options | None | -c 16384 -np 1 |
In short:
- Blender MCP runs even on an 8 GB graphics card. With the small model, tasks like reading a list are quick.
- For tasks that change the scene, the large model is clearly better. The small model's results differed from try to try, and sometimes it said "done" without checking the result itself.
- The large model uses a lot of RAM. On a computer with 16 GB of RAM, 26B-A4B is hard to run. 32 GB or more is recommended.
- Either way, a person checks the result with their own eyes.
Compared with online AI services (such as Claude), local AI costs nothing and keeps your scene on your computer, but it is slower and makes more mistakes. For analyzing large scenes or multi-step work, Connecting the official Blender MCP to Claude Code is the easier route.
12. Shutting down
- Close the web interface tab.
- In the Blender MCP server window, press
Ctrl+C. - In the AI server window, press
Ctrl+C. This frees the graphics card memory. - Check the result in Blender, then decide whether to save. If you do not like it, go back with File ‣ Revert.
Next time, you only need to enter the two commands from sections 5 and 6 again. The MCP server registration in the web interface stays in the browser.
Practice
- Run
llama-server --versionand write down the build number. - Ask the small model "Tell me the location of Suzanne," and check that it matches the value in Blender's Properties Editor.
- When the permission window appears, click Deny. See how the AI responds.
- Try saying "Do not run code that deletes Ball yet; show it to me first." Find the line in the code that deletes it.
- Check how much VRAM and RAM your computer has, and write down which of the two models in the section 4 table fits.
Common mistakes and fixes
| Symptom | Cause | Fix |
|---|---|---|
It says llama-server cannot be found | You ran it in the same window you installed from | Close the terminal, open a new one, and run it again |
| The web interface will not open | The AI server is still loading the model, or it is off | Wait until the "listening on" line appears. If you closed the window, start it again |
| Adding the MCP server does not connect | The section 6 MCP server window is closed, or the address has a typo | Check for the "Uvicorn running" line in the 9191 window, and type the address exactly, including the / at the end |
| Tool calls end with a Blender error | The MCP add-on server in Blender is off | Check "Server is running" in the add-on settings |
| An "exceeds the available context size" error | The context is smaller than the MCP tool descriptions | Restart with -c 16384 -np 1 |
| The AI answers by guessing instead of using tools | blender-mcp is off in the chat | Tick blender-mcp under + ‣ Tools in the message box |
| The computer became very slow | The large model is using a lot of RAM | Close other programs or switch to the small model |
In one line
AI server (8080) + Blender MCP server (9191, web mode) + the address registered in the web interface, and -c 16384 for the large model. It runs even on an 8 GB graphics card, but a person always checks the result. How to give AI more knowledge about working in Blender continues in Blender agent skills.
Read next
- Local AI vs cloud AI
- Running AI on your own computer: graphics cards and VRAM
- What VRAM means: why graphics card memory matters
- Installing the official Blender MCP
- Safety checks before handing Blender to AI
- Trying all 26 tools of the official Blender MCP
References
- Blender Lab, MCP Server: https://www.blender.org/lab/mcp-server/
- Blender Lab, blender_mcp wiki, Llama.cpp and Setup: https://projects.blender.org/lab/blender_mcp/wiki/Llama.cpp , https://projects.blender.org/lab/blender_mcp/wiki/Setup
- llama.cpp official repository: https://github.com/ggml-org/llama.cpp
- Models: Gemma 4 E4B GGUF https://huggingface.co/unsloth/gemma-4-E4B-it-GGUF , Gemma 4 26B-A4B GGUF https://huggingface.co/unsloth/gemma-4-26B-A4B-it-GGUF (model card license Apache-2.0)
- uv installation guide: https://docs.astral.sh/uv/getting-started/installation/
- Shortcut: stop a terminal program with
Ctrl+C - Pictures: all real screenshots (llama.cpp b11870 web interface, Blender 5.2.1). The table scene is an example made for this guide