Rendering Blender for YouTube Shorts: 9:16 resolution, camera Sensor Fit, room for text, and MP4 output
What to change when you re-render a landscape Blender scene as a 1080×1920 vertical video for YouTube Shorts: the resolution, the camera Sensor Fit that crops the sides when you turn the frame upright, a layout that keeps the top and bottom free for text, and the MP4 output settings, with the real record of a 19-second character Short.
한국어English
Based on: the Blender 5.2 LTS manual (English UI, default keymap) and YouTube Help on Shorts. Checked on November 4, 2026. Figures 1 and 5 are stills from a Short we made; the step titles in them are Korean. Figures 3 and 6 are Blender screenshots taken in other scenes, so the numbers in the resolution fields differ from this guide's values.
Sometimes you want a Blender scene as a YouTube Short too. Upload the landscape video as it is and it shows as a thin strip in the middle of a phone screen. A Short needs to be re-rendered vertically to fill the screen.
It looks like changing two resolution fields should do it, but in practice the character's sides get cut off or text covers the face. This guide uses the record of a 19-second character making-of Short (1080×1920, 30 fps) and goes through the four things to change for a vertical render.
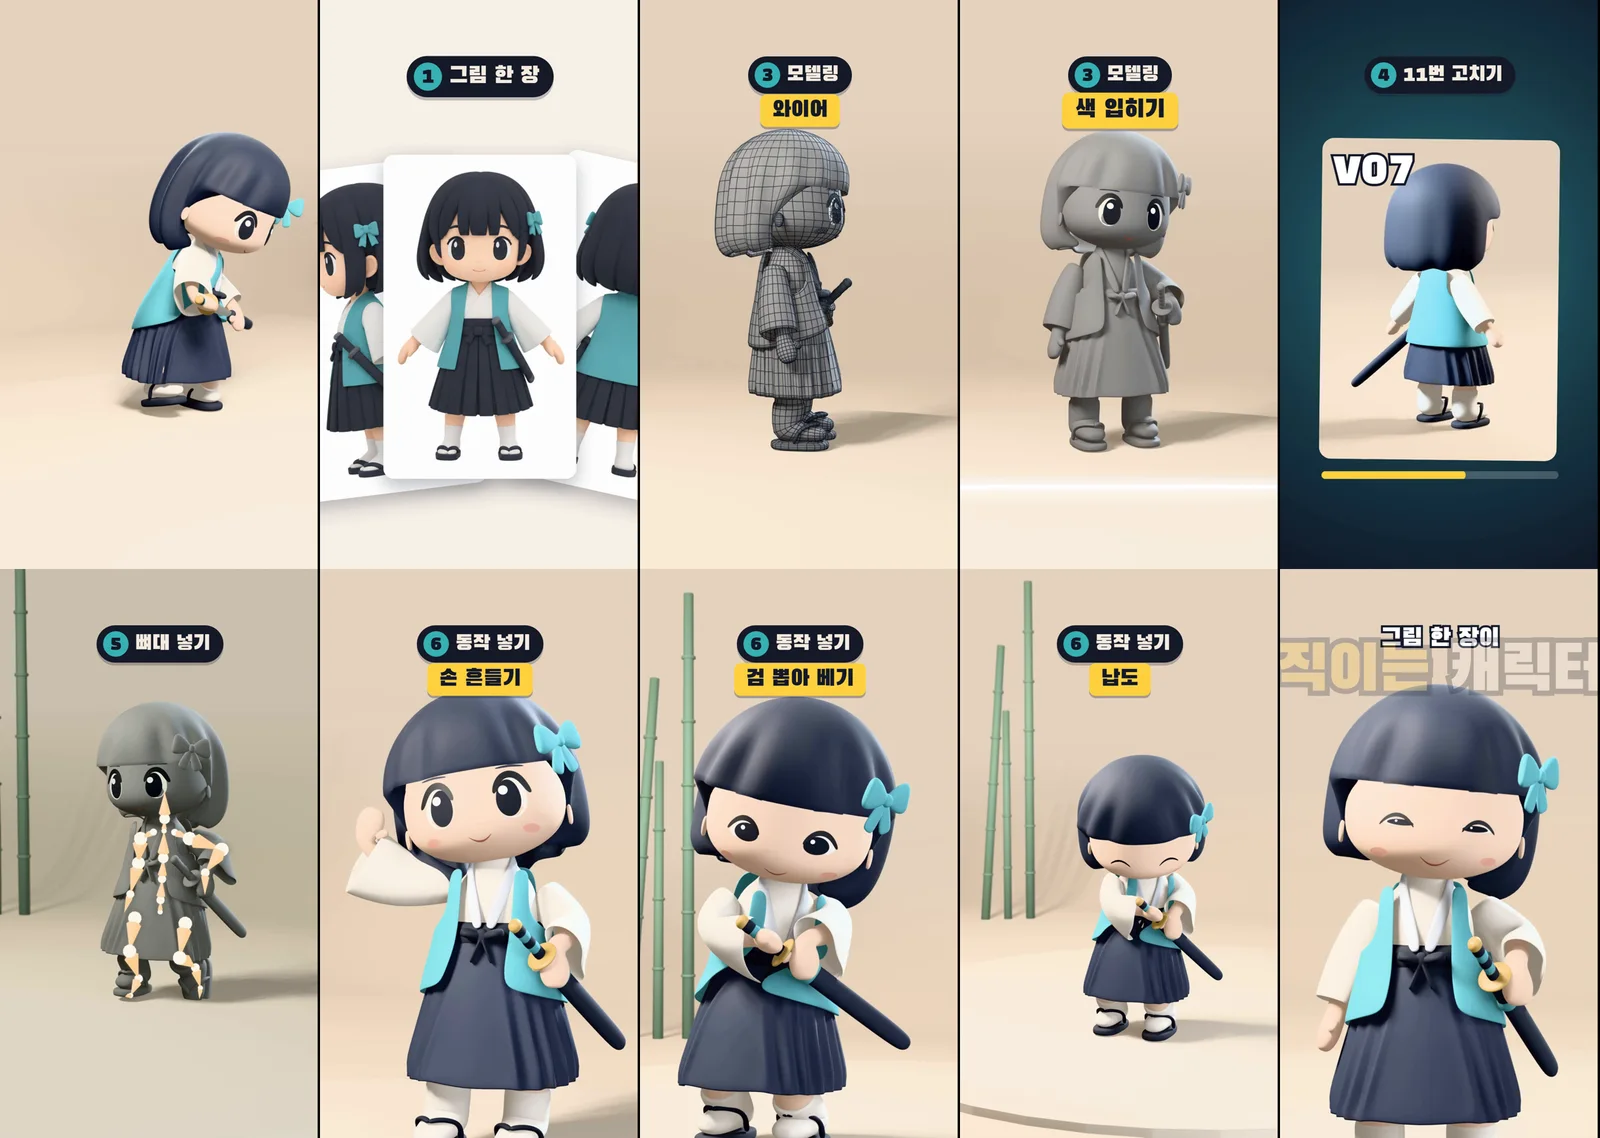 Figure 1. Stills from the 19-second Short re-rendered vertically. The step titles were added in the editing program (Blender render)
By the end of this guide you can:
- Enter the Shorts resolution (1080×1920) and frame count.
- Explain why the view gets narrower when you go vertical (Sensor Fit) and fix it.
- Frame shots that leave the top and bottom free for text.
- Output an MP4 video.
1. What makes a video a Short
YouTube Help says videos with a square or vertical aspect ratio, up to three minutes long, are classified as Shorts (Figure 2). The vertical ratio that fills a phone is 9:16: 9 units wide, 16 tall, usually 1080×1920. It is a 16:9 landscape video (1920×1080) turned on its side. The basics of resolution and aspect ratio are in Resolution and aspect ratio.
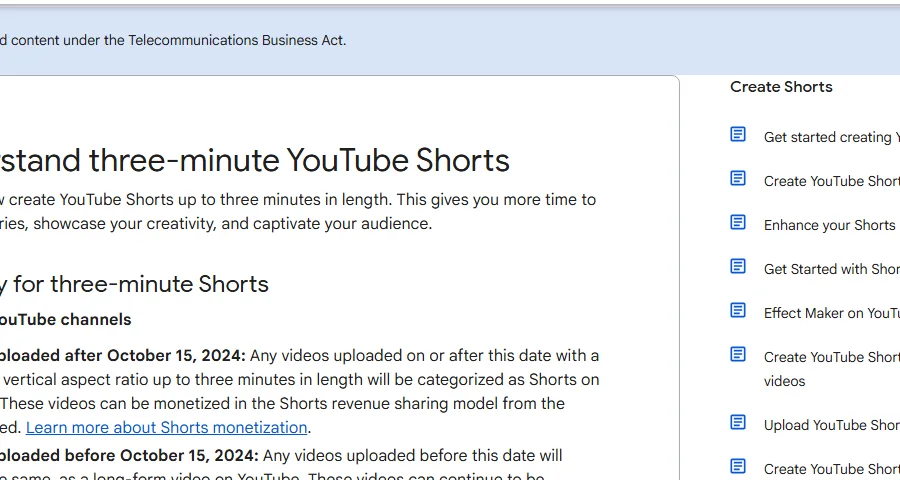 Figure 2. The three-minute Shorts help page (YouTube Help screenshot)
The same page has one more point to note: a Short longer than one minute with an active Content ID claim is blocked worldwide. If you add background music, finish within a minute or use music whose license is clear.
2. Resolution and frame count
Starting point: open a scene you made in landscape (for example 1920×1080). So you don't overwrite the original, first use File > Save As… to save a copy with _shorts in the name.
Follow along (based on the Blender 5.2 manual):
- In the Properties editor, open the Output tab (printer icon) (① in Figure 3).
- In the Format panel, set Resolution X to
1080and Y to1920. As the manual's tip says, right-click a resolution field and choose Swap Dimensions to flip width and height in one go. - Keep Frame Rate the same as the original. This Short uses
30 fps. - Set End in Frame Range to the length of the Short. 19 seconds at 30 fps is 19 × 30 =
570.
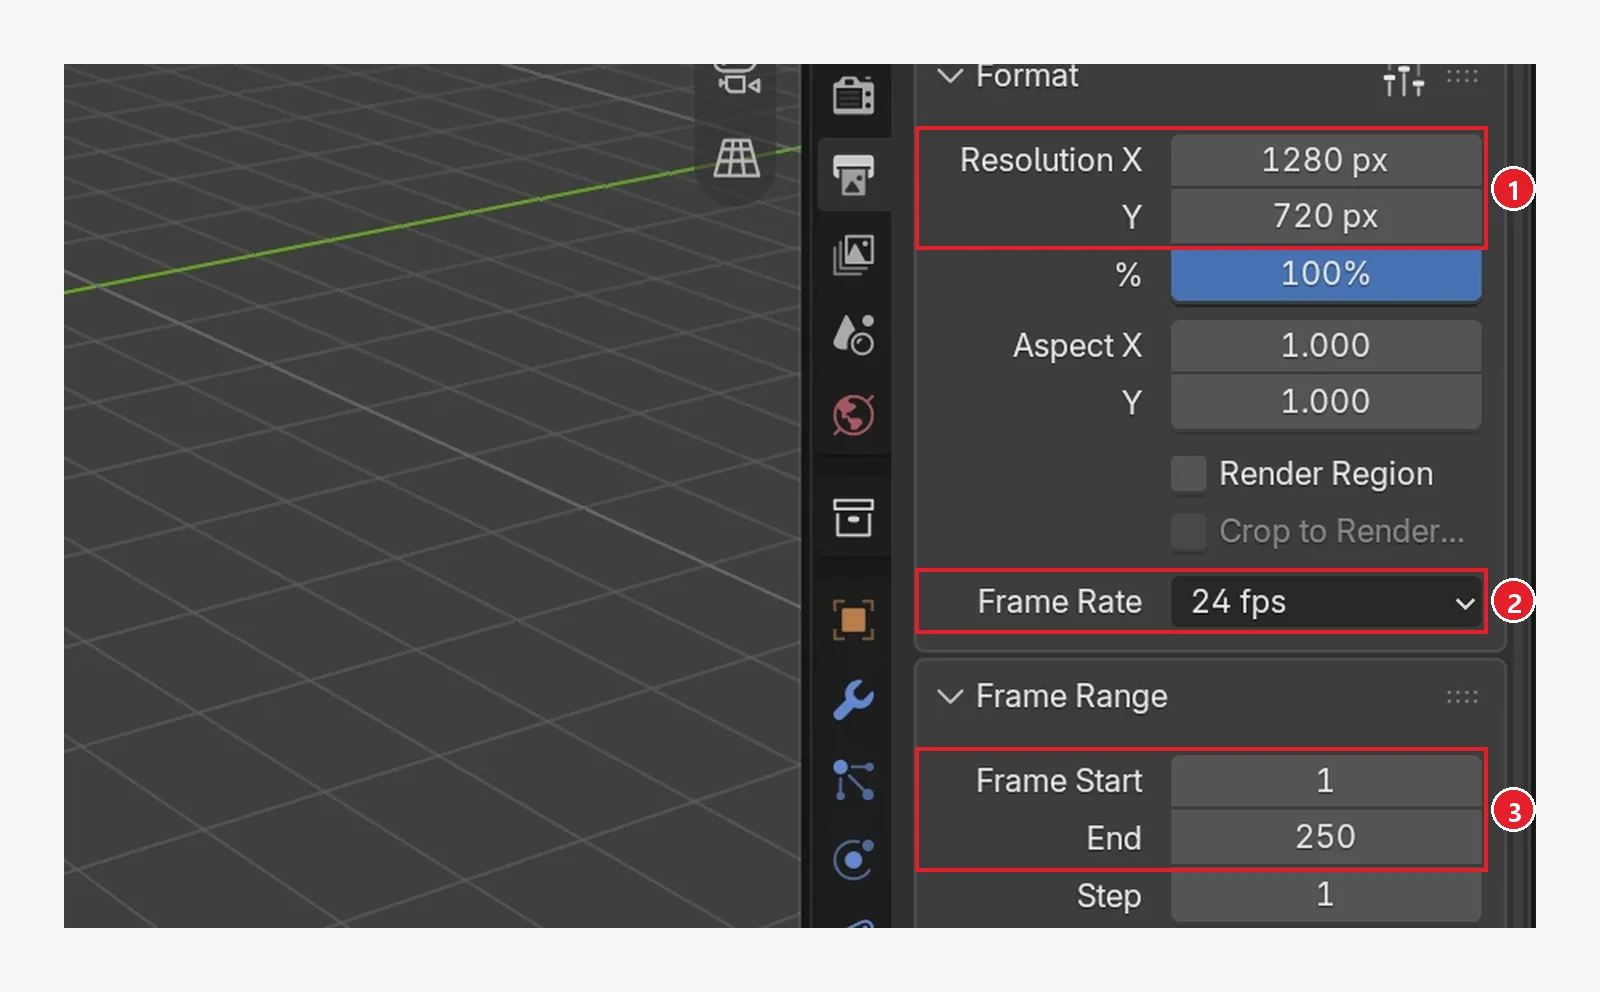 Figure 3. Format panel in the Output tab. ① Resolution X and Y ② Frame Rate ③ Frame Start and End. The screenshot shows 1280×720 at 24 fps; for a Short enter 1080, 1920 and 30 fps (Blender screenshot)
For test renders, lower the % field in the same panel to 50%. The ratio stays the same and only the size halves. Set it back to 100% when you are done checking.
3. Why the sides get cut: Sensor Fit
After switching to vertical, look through the camera (numpad 0) and the character's sides are cut off, as if the view had zoomed in. This happens even though you did not change the lens. The cause is the camera's Sensor Fit setting.
In the Camera properties, Sensor Fit defaults to Auto. The manual says Auto calculates the sensor size "based on the larger of the Resolution dimensions." In landscape the longer side is the width, so the sensor fits the width. In portrait the longer side becomes the height, so the sensor fits the height. As a result, the width of the old landscape view now goes into the height, and the width shrinks by the same amount (Figure 4).
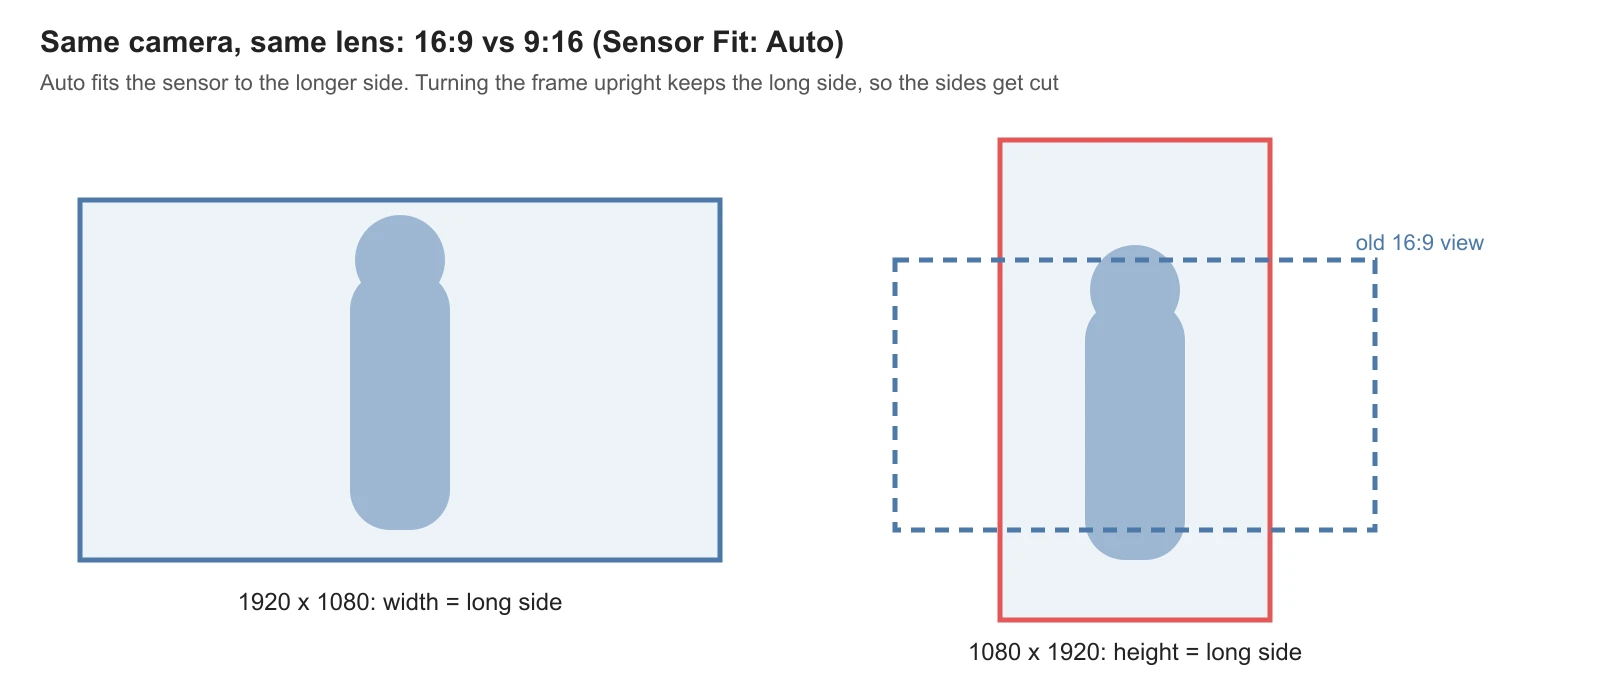 Figure 4. The same camera and lens in landscape and portrait with Sensor Fit set to Auto. The vertical frame (red) only holds the middle of the old view (dashed) (chart)
It is like standing a window upright: the long side of the frame stays the same length. You see more above and below, but less to the sides. There are two ways to fix it:
| Way | What you do | When |
|---|---|---|
| Wider lens | Lower Focal Length to see more | When the character must fill the frame |
| Move the camera back | Move the camera away from the subject | The lens route is better if you don't want to change perspective |
Setting Sensor Fit to Horizontal makes the sensor follow the width, keeping the old view's width. But then the vertical frame gains a lot of space above and below, showing plenty of empty floor and sky. For Shorts it usually looks better to "fill the vertical frame with the character", so, as in section 4, we refitted the lens for each shot.
4. Leaving room for text
The top and bottom of a Short are busy. Big text such as step titles goes at the top, and app elements such as the channel name, description and buttons cover the bottom. So important things belong in the middle band.
In this Short, each shot was fitted so the character stayed inside the red dashed box in Figure 5.
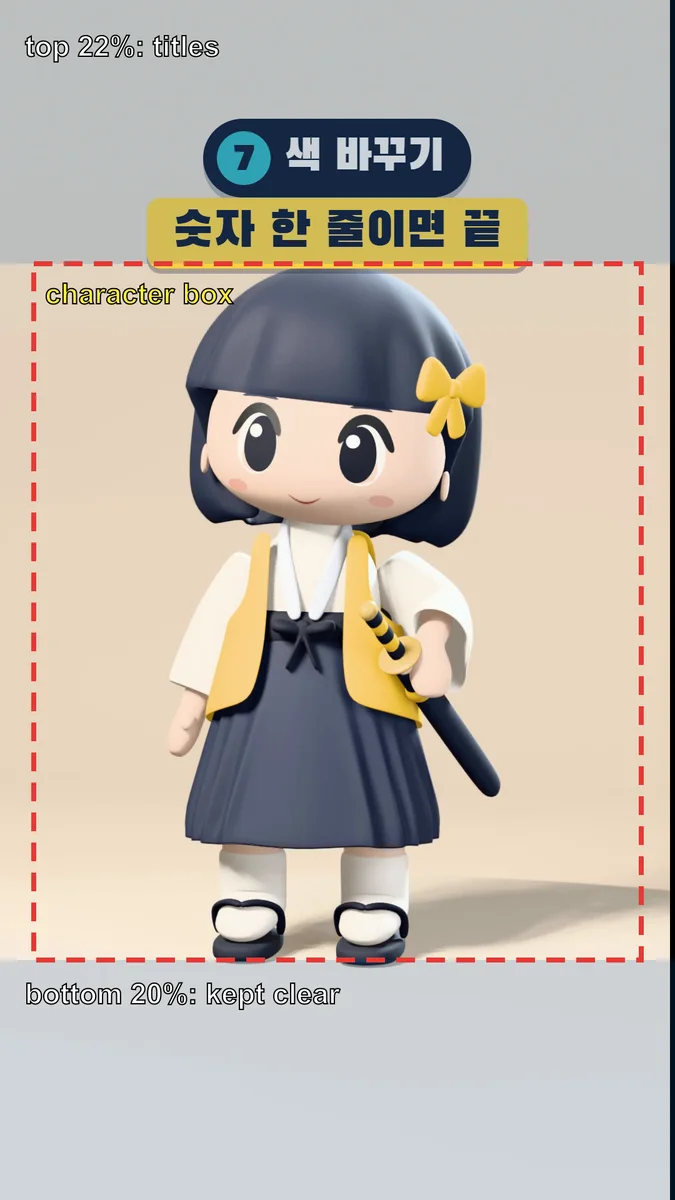 Figure 5. Layout guides drawn over a still. The top 22% is for text, the bottom 20% stays clear, and the character stays inside the red dashed box (drawn over a Blender render)
| Area | Share of screen height | What goes there |
|---|---|---|
| Top band | Top 22% | Step number, short title |
| Middle box | 5–95% of width, from 22% below the top to 20% above the bottom | Character, important action |
| Bottom band | Bottom 20% | Left empty (where app elements cover) |
These numbers are what we chose for this Short, not a YouTube specification. Which parts get covered depends on the phone and app version, so watch the uploaded Short on a phone once and widen the margins next time if something is covered.
You can also see guides in Blender while framing. Turn on Safe Areas in the camera's Viewport Display panel and two inner frames appear in camera view. The manual says to keep important action inside the outer one (Action Safe) and text and graphics inside the inner one (Title Safe). The default margins are for broadcast, so raising the Title Safe Y value to match the Shorts bands makes it handy.
Refitting the lens for each shot. This Short had 10 shots, and the character's size differed from shot to shot. So the camera's position and direction stayed the same, and only the lens scale and Shift changed per shot. Shift slides the frame sideways or up and down without turning the camera, like moving the picture frame after taking a photo, so vertical lines do not lean. The lens scale chosen per shot ranged from 0.80 to 1.24. Below 1 means wider (further), above 1 means tighter (closer).
This fitting was done with a script: for each shot it calculated where the character fell on screen, widened the lens if it went past the box, and tightened it if there was spare room. By hand, change Focal Length and Shift Y on the first frame of a shot and insert a keyframe. So the value does not drift between keys, set those keys' interpolation to Constant in the Graph Editor; then the value jumps only at the cut.
5. MP4 output
Follow along (based on the Blender 5.2 manual):
- In the Output panel lower in the Output tab, set the folder and file name.
- Change Media Type to Video (③ in Figure 6).
- In the Encoding panel, set Container to MPEG-4 and the video codec to H.264. If there is sound, leave Audio Codec at AAC.
- Choose Render > Render Animation (
Ctrl+F12).
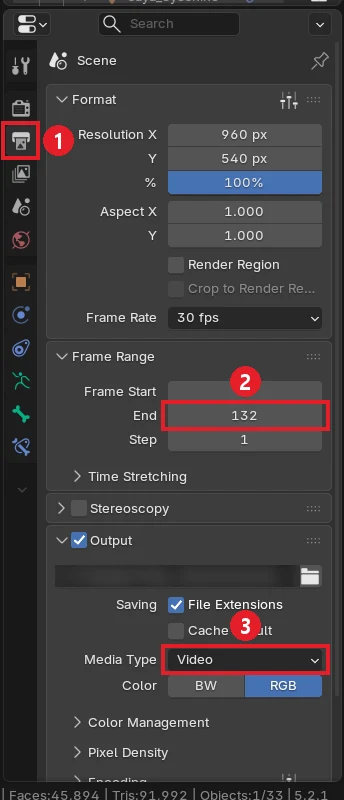 Figure 6. Output tab with Media Type set to Video. ① Output tab ② Frame Range End ③ Media Type. The screenshot shows a 960×540 landscape scene (Blender screenshot)
This Short was rendered from Blender as a sequence of PNG images, then the text and sound effects were added in an editing program and the result was packed into an MP4. Rendering to images means frames already finished are kept if the render stops partway, and the video is compressed only once, in the edit. If you finish in Blender, use the steps above; if you edit separately, Media Type Image (PNG) is the better choice.
The final file was 1080×1920, 30 fps, 570 frames, 19.0 seconds, with H.264 video and AAC sound. Rendering took about 1.2 seconds per frame in EEVEE with 16 samples. A 1080×1920 frame has the same number of pixels as 1920×1080, so you can expect render time similar to the landscape version.
6. Problems we hit
| Problem | Cause | Fix |
|---|---|---|
| In a turnaround shot the character spun out of frame | The pivot (the rig object's origin) was 1 m away from where the character stood | Rotated around the bone where the character stands |
| The last shot looked like a still image | The smile shot was only 0.83 s, so the last second repeated one frame | Re-rendered that part at half speed (more frames in between) |
| Text covered the face | The character was only centered | Refitted to the box that leaves the top 22% free (section 4) |
Exercises
- Save a copy of a landscape scene, change only the resolution to 1080×1920, and look in camera view at how much of the sides is cut.
- In the same scene, lower Focal Length until the whole object fits the vertical frame, and write down the value.
- Turn on Safe Areas and change the Title Safe Y value to make top and bottom bands for text.
Common mistakes and fixes
| Symptom | Cause | Fix |
|---|---|---|
| The sides are cut after switching to vertical | Sensor Fit Auto fits the longer side (height) | Lower Focal Length or move the camera back (section 3) |
| Uploaded as a normal video, not a Short | Landscape ratio or longer than 3 minutes | 9:16 vertical, 3 minutes or less |
| Text or app elements cover the face | Important things at the very top or bottom | Keep the top 22% and bottom 20% clear (section 4) |
| The render is many images, not an MP4 | Media Type is Image | Media Type Video, Container MPEG-4 (section 5) |
| The frame slides when a shot changes | Lens and Shift keys ease between values | Set those keys' interpolation to Constant (section 4) |
Summary
Save a copy → 1080×1920 (Swap Dimensions) → widen the lens to make up for Sensor Fit Auto → keep the top 22% and bottom 20% clear → output a PNG sequence or MPEG-4.
Adding text and sound in Blender is covered in Blender Video Sequencer basics, and how the character in this Short was made starts in Claude Code character, part 1. The full guide to building this character, with the reusable kit and pose library, is a book on Gumroad: https://azblender.gumroad.com/l/lowpoly_character
References
- Blender 5.2 manual, Format (resolution, Swap Dimensions, frame rate): https://docs.blender.org/manual/en/5.2/render/output/properties/format.html
- Blender 5.2 manual, Output (Media Type): https://docs.blender.org/manual/en/5.2/render/output/properties/output.html
- Blender 5.2 manual, Cameras (Sensor Fit, Shift, Safe Areas): https://docs.blender.org/manual/en/5.2/render/cameras.html
- YouTube Help, three-minute Shorts: https://support.google.com/youtube/answer/15424877
- Read next: Resolution and aspect ratio, Video codec basics, Planning AI narration length
- Shortcuts: camera view numpad
0, render animationCtrl+F12(default keymap) - Image license: Figures 1 and 5 are stills from our own Short, Figure 4 is a chart, Figures 3 and 6 are Blender screenshots, and Figure 2 is an official page.