Turntable renders with AI: a circling camera over MCP and many images at once
Through the official Blender MCP, have AI build a turntable camera that circles an object, check the real result in the Graph Editor, tell apart two common problems (a spin that slows at the start and end, and a last frame that repeats when looped), and render eight images at once. It also looks at the AI doing more than the question asked.
한국어English
ON THIS PAGE
- 01Before you start
- 021. The question sent to the AI
- 032. Reading the result: what to check in the Graph Editor
- 043. Two common problems: Bézier interpolation and the last key
- 054. The fix: Linear and frame 49
- 065. Rendering several images at once
- 07Practice
- 08Common mistakes and fixes
- 09Summary
- 10Further reading
- 11References
Based on: Blender 5.2 LTS (screenshots from 5.2.1, English interface, default shortcuts), the EEVEE render engine, the Blender Lab official MCP server and add-on 1.0.3, and Claude Code as the AI app. Checked in November 2026. All images are real Blender screens and real renders. Red numbers, boxes, and the frame number labels in Figure 4 were added for explanation.
A turntable is a render that shows an object turning all the way around. It is simple to make, but miss two small settings and the video stutters. In this guide, you ask AI a short question to build a turntable, check those two settings in a graph, and then render several images at once.
A turntable is like the spinning plate in a microwave. In Blender, though, you usually turn the camera instead of the object. Put an invisible handle (an empty) in the middle, hang the camera on it, and turn only the handle; the camera follows in a circle. The lights stay in place, so the lit side changes as it turns and the shape reads well.
When you finish this guide, you will be able to do the following.
- Have AI build a turntable camera and read its structure.
- Check in the Graph Editor that the spin has an even speed and where the last key sits.
- Fix the setup when the interpolation is Bézier or the last key is on the last frame.
- Render several images at a set interval in one go.
Before you start
You need: an AI app connected to the official MCP, Blender 5.1 or later with the server running, and a scene with an object to spin. To pick an AI app, see Choosing an AI tool for Blender MCP.
- The images in this guide use the gold monkey scene from Letting AI set up lights and materials. Open the file you saved at the end of that guide. If you do not have it, any object near the world origin works. The images show that scene before the HDRI was added to its World, with only the World color changed.
- Check that the object is near the world origin. That is the center of the turntable.
- Save the file once. Images the AI renders may appear in a folder next to this file, so knowing where it is saved makes them easy to find.
1. The question sent to the AI
Starting point: the scene after step 3 of Before you start.
Do this: send a short question to your AI app.
Make a 48-frame turntable where the camera goes once around the monkey in the middle.
When this question was sent to Claude Code, the AI did the following in the scene.
| Step | What it did | Values |
|---|---|---|
| 1 | Added an empty, Turntable_Pivot | position (0, 0, 0) m, shown as a circle (size 7.5) |
| 2 | Parented the camera to Turntable_Pivot | camera kept at its original place (0, −7.5, 1.9) m |
| 3 | Two keys on Turntable_Pivot Rotation Z | frame 1 0°, frame 49 360° |
| 4 | Interpolation of both keys | Linear |
| 5 | Scene frame range | 1–250 → 1–48 |
A parent is like hanging something on a string. When the parent moves or turns, the child follows.
The AI made the empty show as a circle with a 7.5 m radius. That is the same as the distance to the camera, so it seems meant to look like the camera's path. But in Figure 1 this orange circle stands upright, perpendicular to the floor. The camera circles parallel to the floor, so the circle is not the camera's path, just the shape the handle is drawn with. The AI's code also left a comment asking whether the circle display lies flat, and set the rotation back to 0.
What to check: look at the image to see whether the AI's description matches the screen. If you turn the handle (Turntable_Pivot) to lay the circle flat, the camera hanging on it tilts too, so keep the handle's Rotation X and Y at 0. The circle display does not appear in renders, so you can leave it as it is.
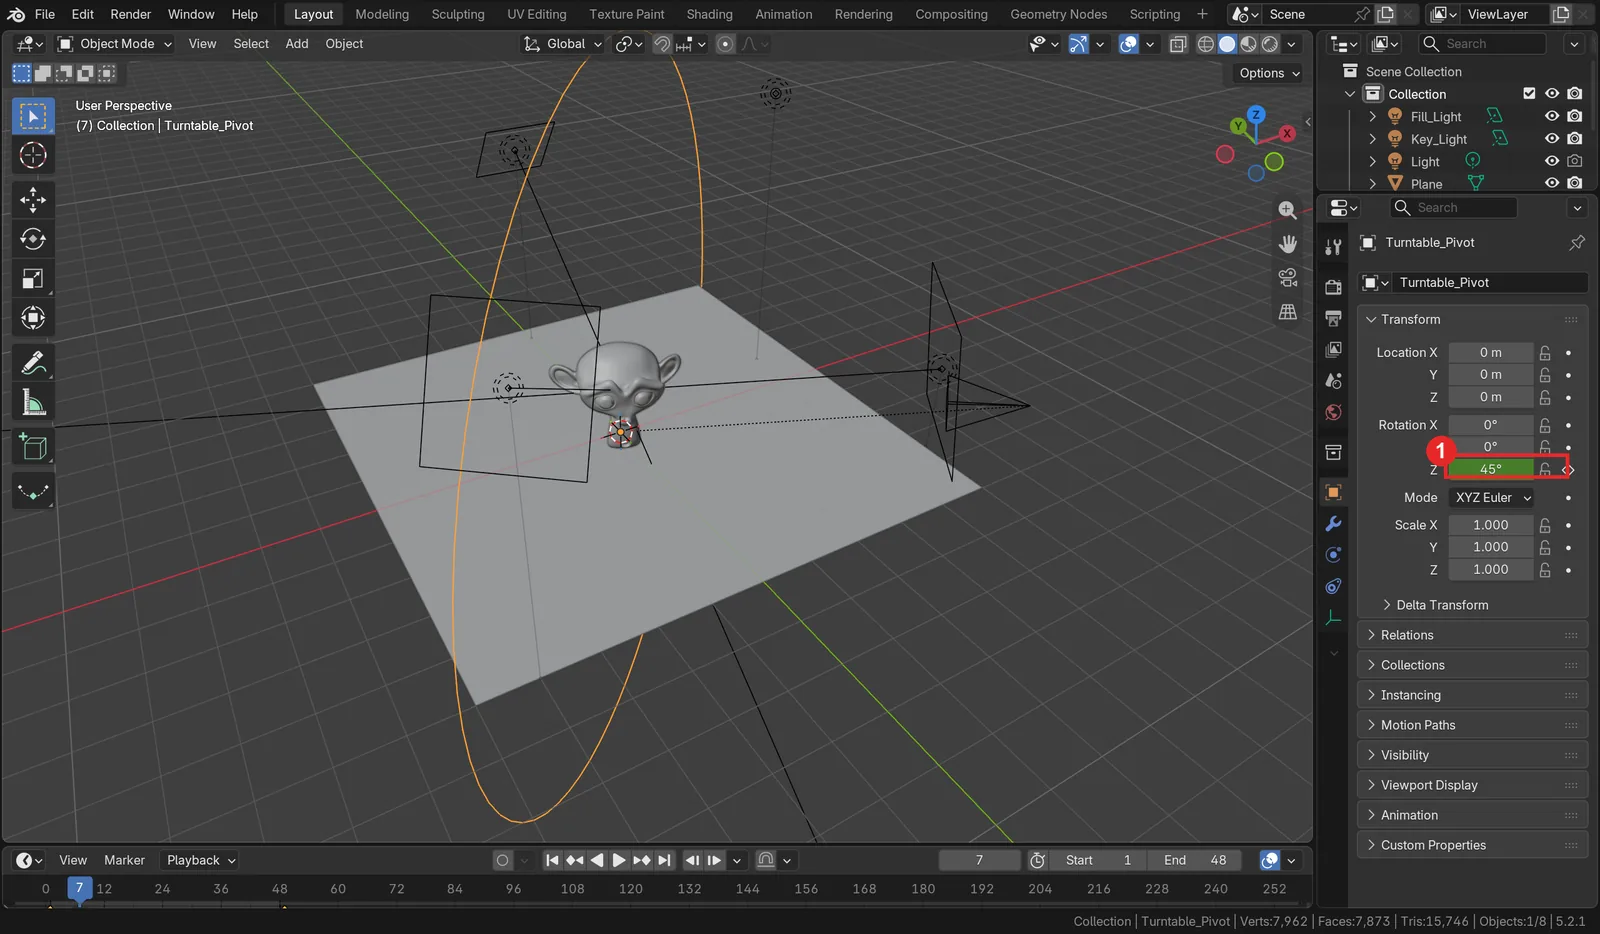 Figure 1. The turntable structure: 1) the keyed Rotation Z. The image is at frame 7, so the handle has turned 45° (Blender screenshot)
Doing more than the question asked: the question only said "make," but after building the scene the AI rendered all 48 frames (about 22 seconds) and saved a copy of the .blend file. The renders appeared as frame_0001.png and so on in a turntable folder next to the open .blend file. Before that, it made one test render with the official render tool, and its answer said that image was saved in a Blender temp folder, not the path it chose. The AI did not look at the images; it only checked the pixel values of a few frames to see that the monkey was in the middle of the frame, and suggested looking at one or two by eye.
If you only want the scene built, add "do not render or save files" to the end of the question. Rendering takes time and fills a folder with images.
Do this: press Space in the Timeline to play. Switch to camera view with numpad 0, and the monkey seems to turn. Press Space again to stop.
2. Reading the result: what to check in the Graph Editor
Starting point: continue from the scene in section 1.
For a turntable to loop smoothly, two things must be right. The speed must stay the same from start to end (interpolation), and the last image must not be the same angle as the first image of the next turn (where the last key sits). A graph shows both at a glance.
Do this:
- Select Turntable_Pivot in the Outliner.
- Click the editor type button at the far left of the 3D Viewport header and switch to Graph Editor.
- With the mouse over the graph, press
Hometo fit the whole curve. - Press
Nto open the sidebar on the right and look at Active Keyframe in the F-Curve tab. Click the 360° key to see its values.
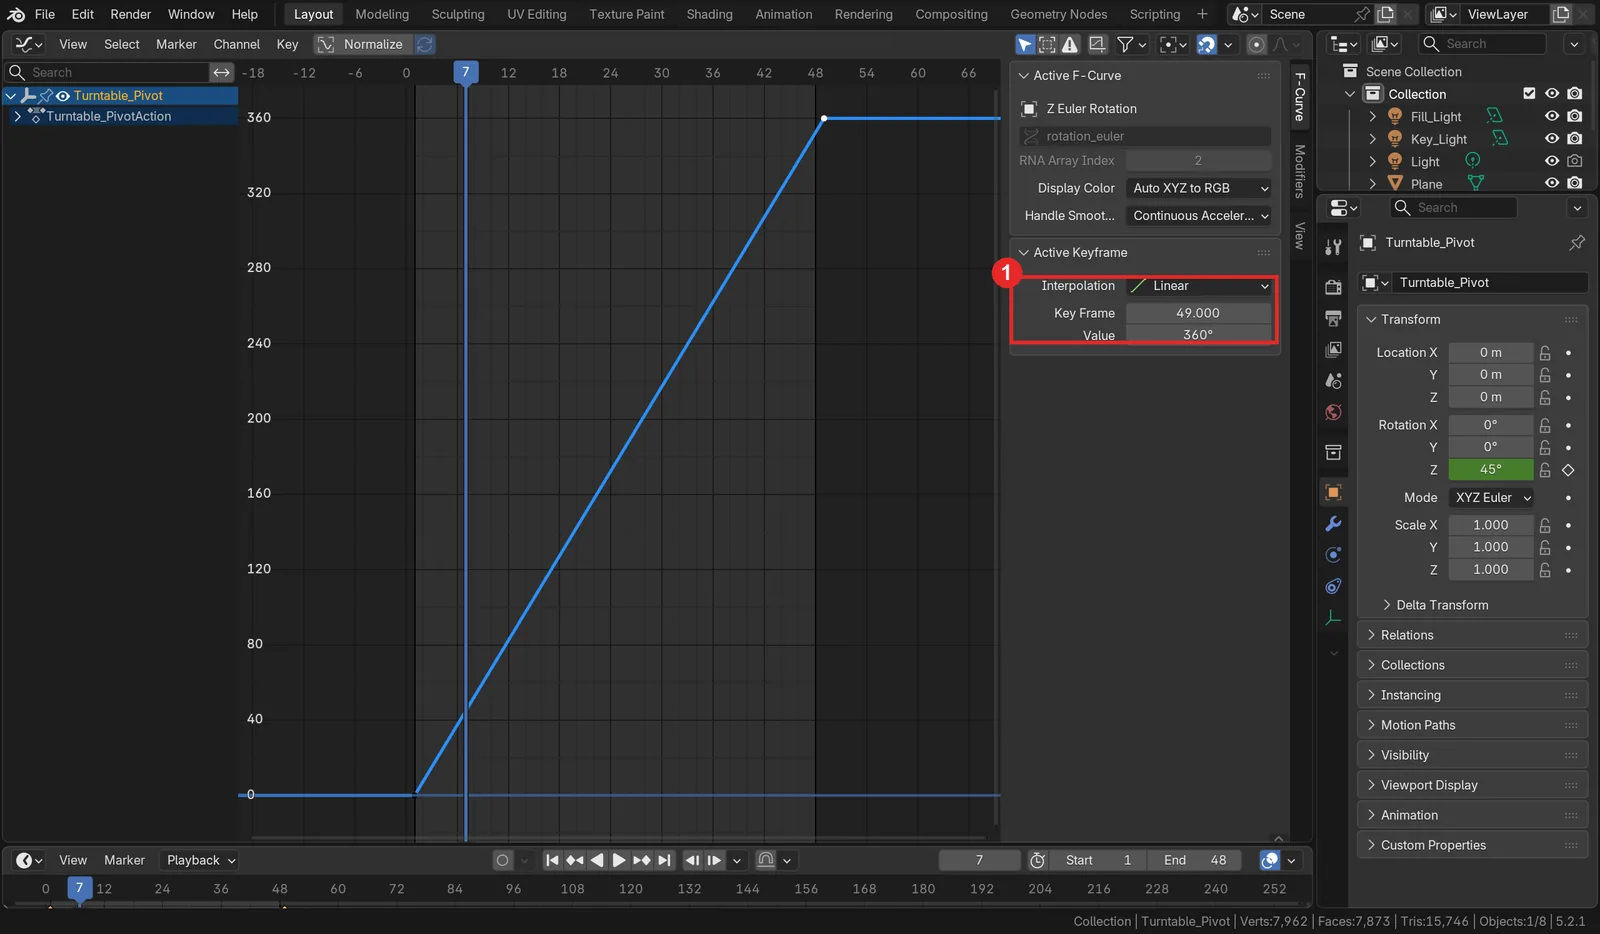 Figure 2. The rotation curve the AI made: 1) Interpolation Linear, Key Frame 49, Value 360° (Blender screenshot)
The curve is a straight line and the last key is at frame 49. Both are right in this result. Reading the angle per frame, it turns 7.5° every frame (360 ÷ 48 = 7.5). Frame 48 is at 352.5°, exactly 7.5° from frame 1 of the next turn (0°).
3. Two common problems: Bézier interpolation and the last key
Starting point: continue from the scene in section 2. In this section you only read and check.
This time the AI got it right from the start, but the two problems below are common with other questions or AI apps. If the code that adds keys does not set the interpolation, Blender's default goes in.
Problem 1: slow at the start and end (Bézier interpolation)
By default, Blender uses Bézier interpolation when you add keys. Interpolation is how the frames between keys are filled in. Bézier starts gently and stops gently, like a car. That is natural for a person walking or a ball coming to rest, but not for a turntable that should always turn at the same speed.
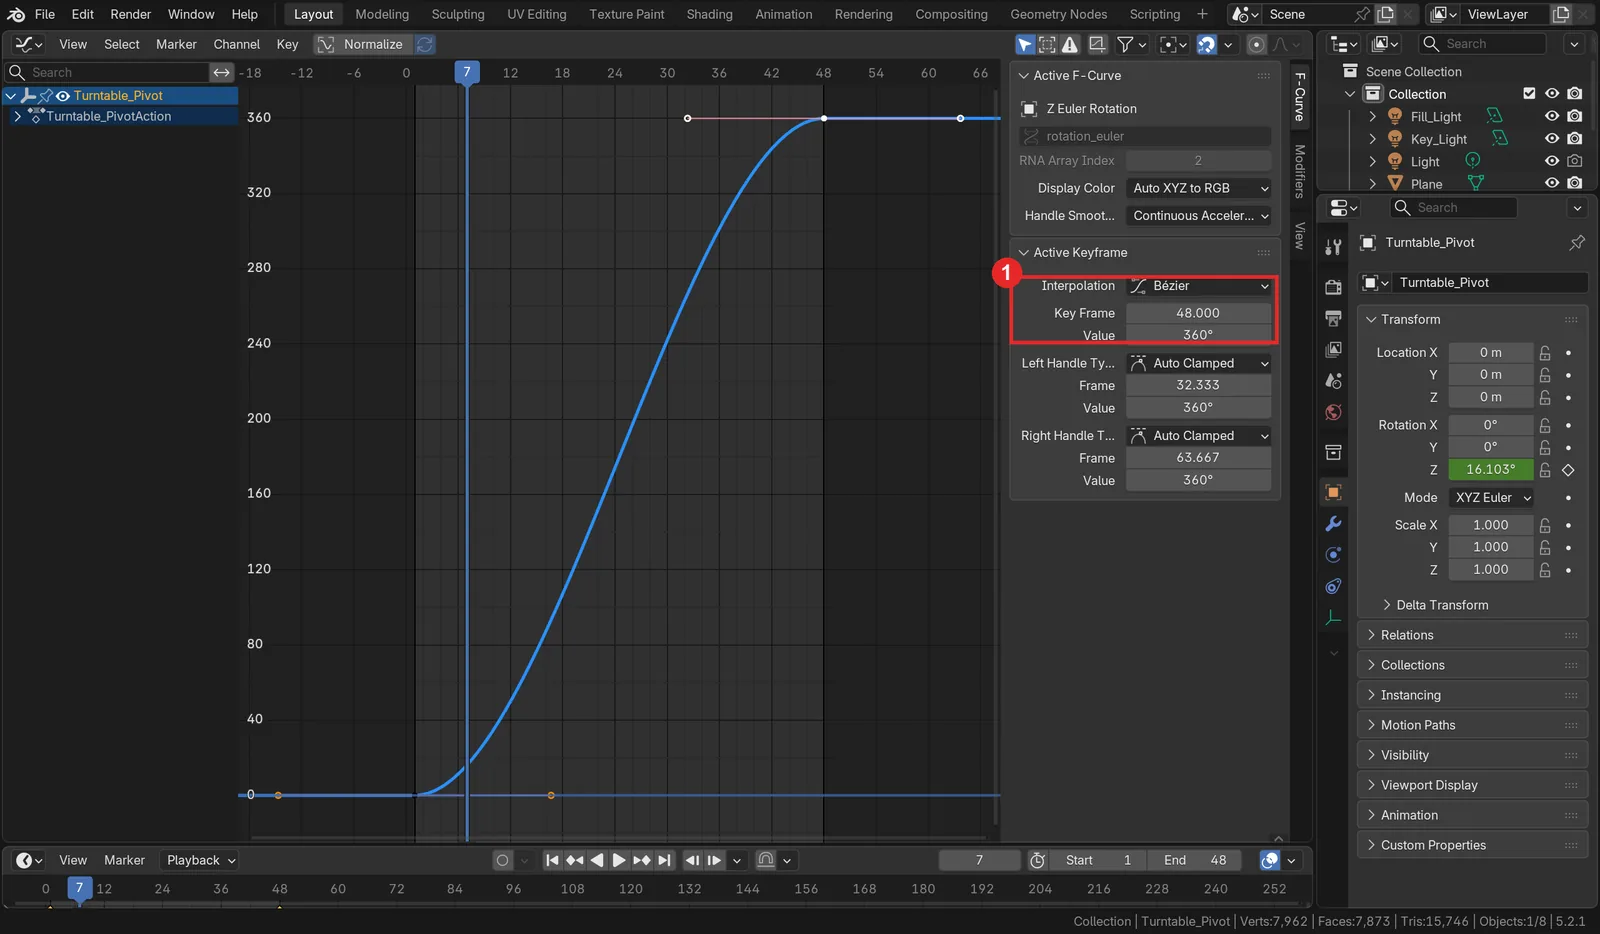 Figure 3. For comparison, the curve in the same scene with interpolation changed to Bézier and the last key moved to frame 48: 1) Interpolation Bézier, Key Frame 48 (Blender screenshot)
The curve is an S shape. Reading the angle per frame in this state shows a big difference.
| Frame | 1 | 2 | 3 | 12 | 24 | 25 | 47 | 48 |
|---|---|---|---|---|---|---|---|---|
| Angle (°) | 0 | 0.48 | 1.9 | 49.93 | 174.26 | 185.74 | 359.52 | 360 |
From frame 1 to 2 it turns only 0.48°, and from frame 24 to 25 it turns 11.48°. That is close to 24 times the difference for the same one-frame step.
Problem 2: one image repeats when looped (where the last key sits)
If frame 1 is 0° and frame 48 is 360°, as in Figure 3, then 0° and 360° are the same view. When the 48-frame video loops, frame 48 and frame 1 of the next turn are the same image, so it seems to pause for a beat there. It is like a second hand lingering once more at twelve. So put the 360° key at the last frame + 1 (frame 49 here) and keep the render range at 1–48.
4. The fix: Linear and frame 49
Starting point: a scene where the graph is an S shape as in Figure 3 or the last key is at frame 48. If it is already right as in Figure 2, skip this section.
Do this: by hand, the steps are as follows.
- With the mouse over the graph, press
Ato select all keys. - Press
Tand choose Linear in the interpolation menu that appears. - Click only the 360° key to select it. In the F-Curve tab of the sidebar (
N), change the Key Frame field under Active Keyframe to49. - Check that the scene frame range (Start and End in the Timeline) is 1–48.
When handing it to AI, say what to change as numbers. Example: "Change the turntable keys to Linear and move the 360-degree key to frame 49. Keep the render range at 1–48."
To avoid the problems from the start, add "turn at a constant speed, and make it loop without a hitch" to the question in section 1.
Play it again: switch the Graph Editor back to 3D Viewport and play with Space. It turns at the same speed from start to end and does not hitch at the loop.
5. Rendering several images at once
Starting point: continue from the scene checked in section 2 (or fixed in section 4). The editor is the 3D Viewport.
Turntables are used as videos, but also to take front, side, and back views for a model sheet. Repeated renders like this are one of the best jobs to hand to AI.
Do this: send this to the AI. Replace the folder path with an empty folder on your PC.
Render 8 images at 480x270, starting at frame 1 every 6 frames, and save them in the E:\mcp_demo\tt folder named like tt_0001.png.
The folder did not exist, so the AI created it, then moved through frames 1, 7, 13, 19, 25, 31, 37, and 43, rendering and saving one image each. Six frames are 45°, so eight images split one turn evenly. The answer also said three more things.
- It opened all eight again to confirm they are 480 × 270.
- The number in each file name is the frame number (tt_0001, tt_0007, and so on). If you want numbers 1 to 8 in order, it offered to rename them.
- It set the render resolution (960 × 540), the save path, and the current frame back to how they were.
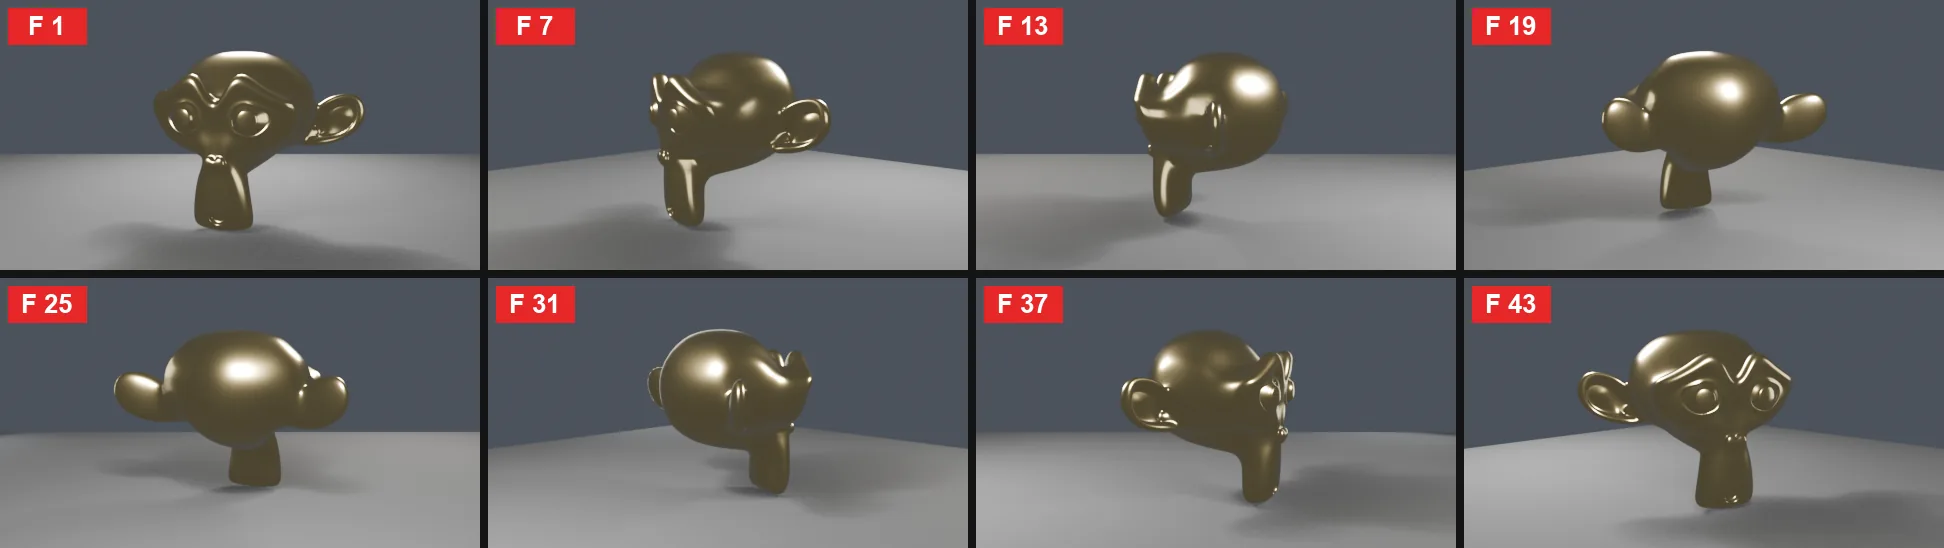 Figure 4. The eight images joined into one sheet. It starts from the front and turns 45° each time (Blender render)
Do this: open the saved images and look through all eight.
What the renders show: in angled cells such as F 7, F 13, F 19, F 31, and F 37, the edge of the floor plane is visible. The edge that was hidden from the front comes into view as the camera turns. Make the floor plane (Plane) bigger, or lower the camera angle a little, and render again. A turntable shows every direction, so gaps in a scene built from one direction show up like this. The AI checked only pixel values, so a person has to look at the images to find things like this.
To render a video: set the output folder and file format in the Output tab, then choose Render > Render Animation (Ctrl+F12). How to choose resolution, frames, and format is in Blender render settings for beginners.
Practice
- If the spin is stretched to 96 frames, write down which frame the 360° key should go on.
- Work out the frame interval for 12 evenly spaced images instead of 8 (for 48 frames).
- Ask AI to "make the camera move up and down a little as it turns. Do not render or save files," and see which new curve appears in the Graph Editor.
- Make the floor plane bigger and render again to see whether the edge in Figure 4 disappears.
Common mistakes and fixes
| Symptom | Cause | Fix |
|---|---|---|
| It slows at the start and end | The default interpolation is Bézier | Select the keys, then T > Linear |
| It hitches for a beat when looped | The first and last frames are the same angle | Put the 360° key on the last frame + 1 |
| A folder of images appeared when you only asked to build | The AI rendered too | Add "do not render or save files" to the question |
| The monkey turns but the camera does not | The key was put on the object, not the camera | Add "leave the object and turn the camera" to the question |
| The camera looks somewhere odd | The camera moved after parenting | Check in camera view (numpad 0) and reset the camera position |
| The floor edge shows in angled cells | The floor plane is small | Make the floor bigger or lower the camera |
| Render files were overwritten | No frame number in the file name | Ask for numbers in the name, such as tt_0001 |
Summary
Hang the camera on an empty handle → check in the graph that it is a straight line and the last key is on the last frame + 1 → check what the AI did beyond the question → render several images at even intervals → look for gaps from every direction. In the next guide, Measuring Blender MCP token use, you measure how much the AI uses for one job like this.
Further reading
- Choosing an AI tool for Blender MCP
- Ten first prompts for Blender MCP
- Blender Python automation
- Blender render settings for beginners
- Blender beginner chapter 10: the camera
- Letting AI set up lights and materials
References
- Blender 5.2 Manual, Keyframe Interpolation (F-Curves): https://docs.blender.org/manual/en/5.2/editors/graph_editor/fcurves/properties.html
- Blender 5.2 Manual, Parent Objects: https://docs.blender.org/manual/en/5.2/scene_layout/object/editing/parent.html
- Blender 5.2 Manual, Output Properties: https://docs.blender.org/manual/en/5.2/render/output/properties/output.html
- Blender Lab, MCP Server: https://www.blender.org/lab/mcp-server/
- Shortcuts: play
Space, camera view numpad0, view allHome, select allA, change interpolationT, sidebarN, render animationCtrl+F12 - Images: real Blender 5.2.1 screens and Blender renders (EEVEE)